How to Use Windows Server Migration Tools?
You may be wondering how to use Windows Server Migration Tools. The detailed steps are shown below. To share files easily, you can use AOMEI Backupper Server.

By AOMEI  / Last Updated August 7, 2020
What is Windows Server Migration Tools and how to use it?
For many companies, transferring workloads from one Server to another is a common occurrence, especially significant files/folders. Many methods and tools can be used to transfer files from Server to Server. The most common one is Windows Server Migration Tools, a set of PowerShell cmdlets.
Windows Server Migration Tools, a Windows Server built-in tool, works with Server 2003 and newer Server OS versions. Generally speaking, you can use this utility to migrate server roles, features, operating system settings, shares and other data from one Server to another.
In fact, many users don’t know how to use Windows Server Migration Tools. Luckily, the operating steps will be presented below. Suppose you have installed Windows Server 2012 on destination Server and Windows Server 2008 on source Server. Let’s have a closer look!
Install Windows Server Migration Tools on the destination and source Server
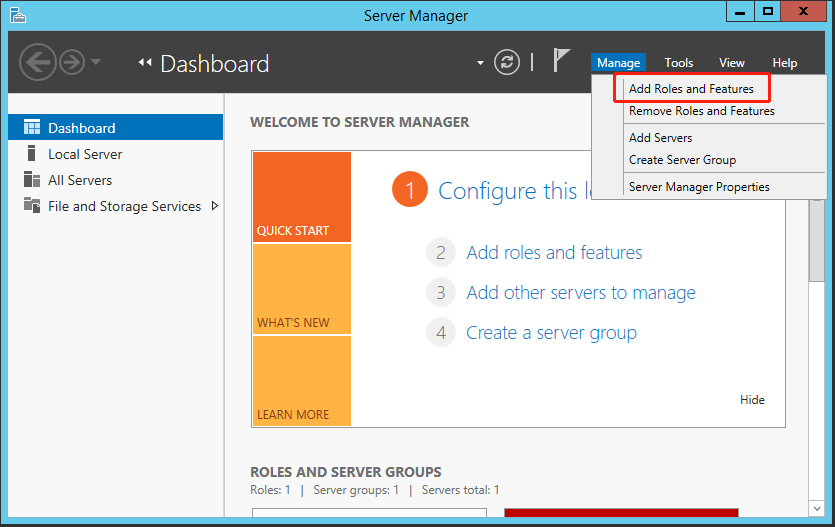
Step 1. Click Start in the lower left corner of the computer. Type Server Manager in the search box and then open it.
Step 2. Click Add Roles and Features under Manage tab. Then press Next.
Step 3. Select the destination server. Then press Next.
Step 4. Click Windows Server Migration Tools under Features tab. Then press Next.
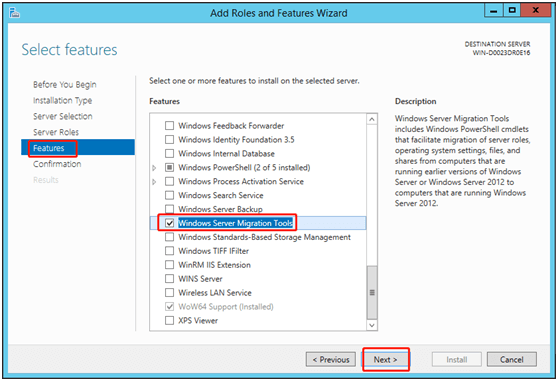
Step 5. Confirm the installation selections. Then click Install to install this tool on the destination computer.
Step 6. Use the method mentioned above to install this utility on the source computer.
Tip: Windows Server migration tools also allow you to move Windows Server 2016 to new hardware machine with ease.
Create a deployment folder on the destination computer
Step 1. Press Windows + X key. Then choose Command Prompt (Admin).
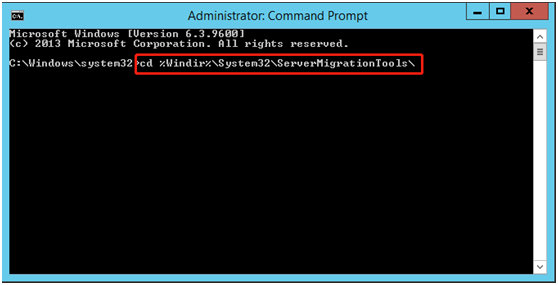
Step 2. At the command prompt, change to the directory in which the smigdeploy.exe tool is stored. Type the following command. Then press Enter.
cd %Windir%\System32\ServerMigrationTools\
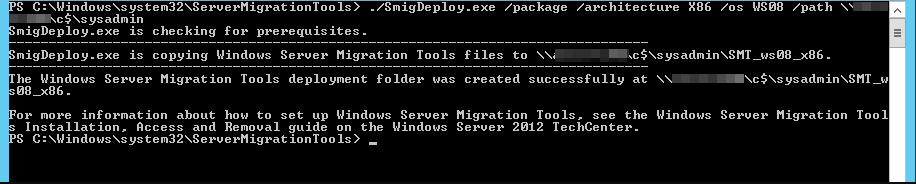
Step 3. Type the following command. Path represents the path of the deployment folder on the source computer. Then press Enter.
SmigDeploy.exe /package /architecture X86 /os WS08 /path
Register Windows Server Migration Tools on the source computer
Step 1. Copy the deployment folder that was created by the destination computer to a local drive of the source computer. Make sure that the operating system architecture of the deployment folder matches that of the source computer.
Step 2. Press Windows logo key + X. Then select Command Prompt (Admin) to open a Command Prompt window on the source computer.
Step 3. At the command prompt, change the directory to which you copied the deployment folder in Step 1.
Step 4. Type the following command to register Windows Server Migration Tools cmdlets. Then press Enter.
.\Smigdeploy.exe

Now you have completed all the preparations. Let’s learn how to use Server migration tools.
Use Windows Server Migration Tools step by step
If you want to export the local users and groups from the source Server, you can follow these steps.
Step 1. Click Server Manager and Tools subsequently on the source Server. Then click Windows Server Migration Tools to open it.
Step 2. Run the following command:
Export-SmigServerSetting -User All -Group –Path C:SysAdminExportMigUsersGroups –Verbose
If you want to import the local users and groups to the target Server, you can refer to these steps.
Step 1. Open Windows Server Migration Tools on the destination Server (Server Manager ﹥ Tools ﹥ Windows Server Migration Tools).
Step 2. Type the following command and then press Enter.
Import-SmigServerSetting –User Enabled –Group -Path C:SysAdminExportMigUsersGroups -Verbose
How to use Windows Server Migration Tools 2012? You can complete this task by using the operating steps mentioned above. Care must be taken to use this utility, because serious problems might occur if you operate incorrectly.
Although Windows Server Migration Tools in 2016/2012/2008 Server can help uses transfer data, the operating steps are complex, especially for some non-technical people. If you think this utility is difficult to operate, you’d better use an alternative.
Best replacement for Windows Server Migration Tool
AOMEI Backupper Server is a reliable alternative for Windows Server Migration Tools. It has a practical feature called file sync that allows you to synchronize files between Windows Servers. With this utility, you can sync files to network, NAS devices, and cloud drives, etc.
To save time, users can use this software to set up an automatic sync based on daily, weekly, monthly, event triggers, USB plug in or real-time sync. Other useful functions like files backup, deleted files restore are also waiting for your use.
This utility supports Windows Server 2003/2008/2012/2016 (including R2)/SBS 2003/2008/2011 as well as Windows PC systems currently. Unlike Windows Server Migration Tools, this software is easy to use.
Just download 30-day free trial! Then follow the quick guide to sync files over a network.
Download Free Trial
 Secure Download
How to share files in Windows Servers step by step?
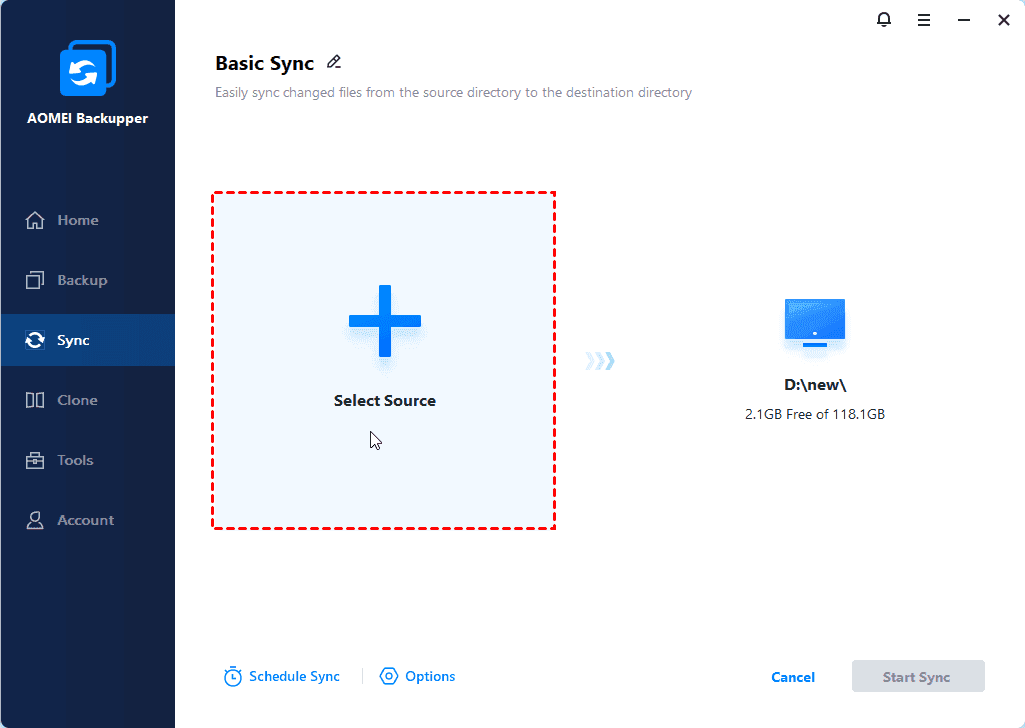
Step 1. Install and launch this utility. Click File Sync under Sync tab.

Step 2. The Task Name can be modified by your needs. Click + Add Folder to select the folder you want to share. Then click OK.
Note: To set up the specific requirement like automatically backup files with a certain file extension, click File Filter at the right side of selected folders.
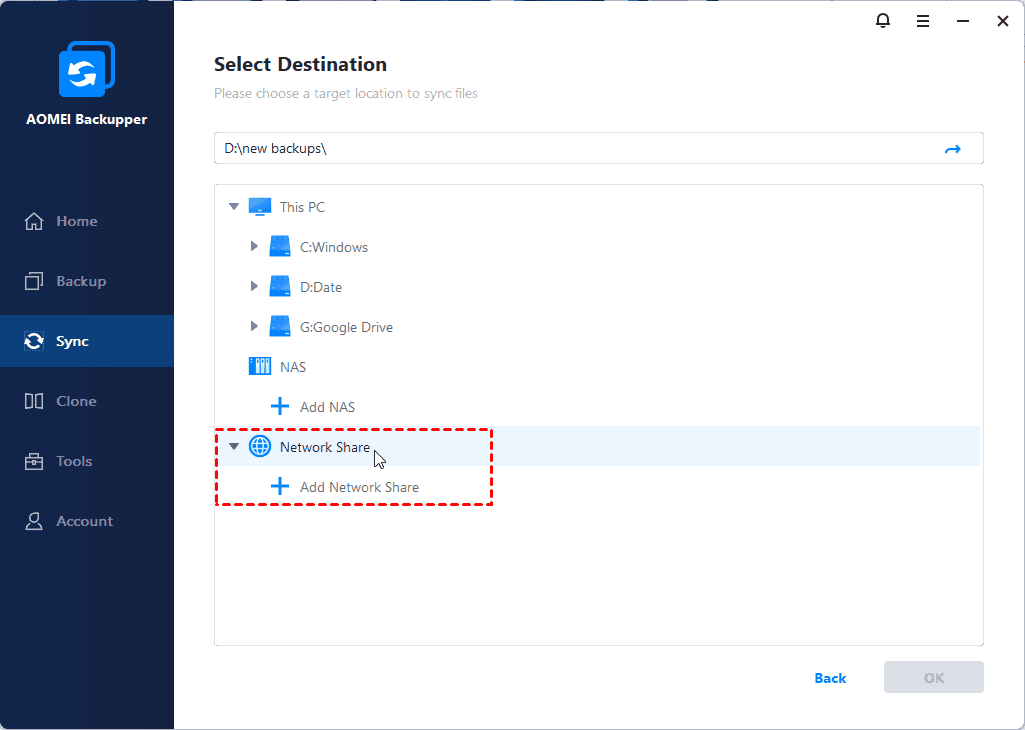
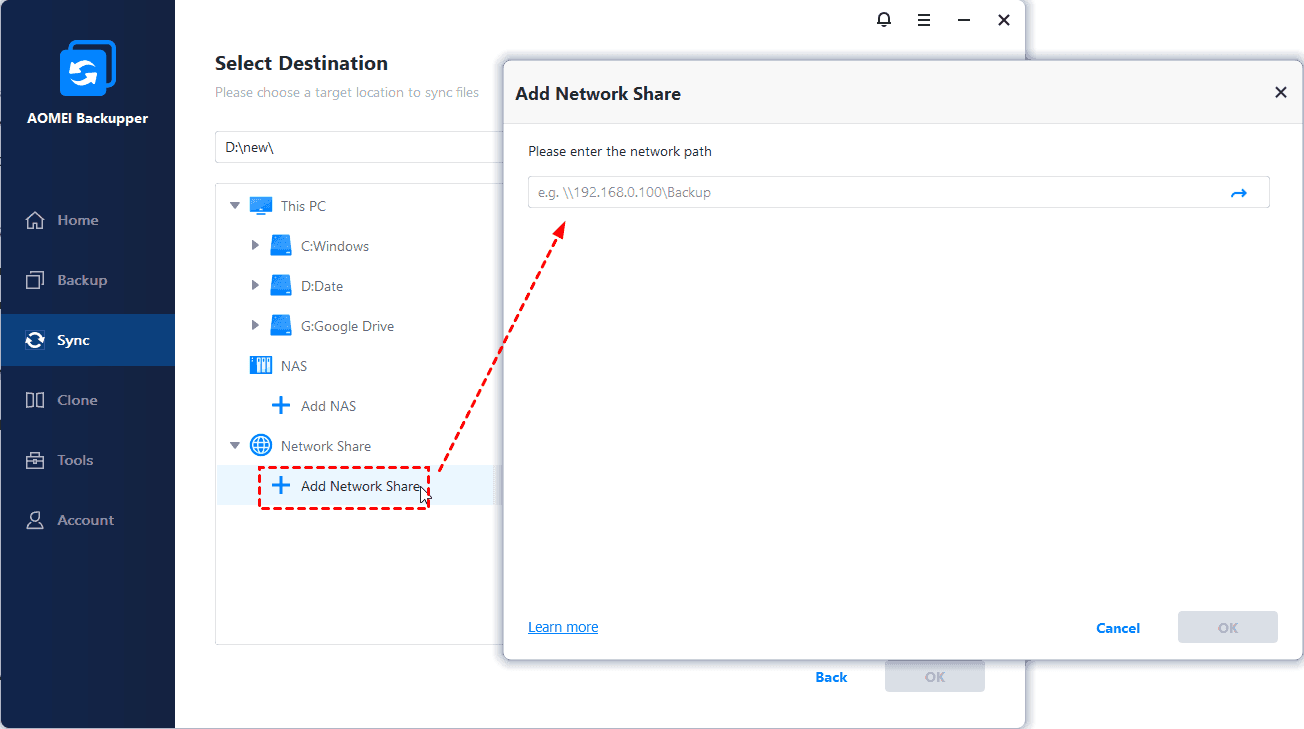
Step 3. Click the inverted triangle and Select a network location, then click Add Network Location and type network path, username, password to add destination path.
Step 5. To continuously sync files, click Schedule and select one or more settings. To delete file backup for disk cleanup, click Scheme and select a specific role. After all finish, click Start Sync.
Daily/weekly/monthly schedule sync: To continuously sync files to network location, you can enable daily sync, weekly sync or monthly sync.
Event triggers: To sync files at a specific event, such as, System Shutdown, can help you avoid interference.
Wake the computer to run scheduled tasks: To sync files during off-peak hours, especially for large files, this feature is very useful. You can create a schedule sync with this feature, and set the backup time to midnight or any other times, then your computer will be wake up 2 minutes before the task start.

To minitor any changes made to synced files and sync them immediately when detected, you could consider using «Real-time Sync».
Do not change the name of the source folder after syncing. Otherwise the program cannot sync it anymore.
AOMEI Backupper currently is only one-way file sync software and ony changes made in source directory can be reflected in destination.
Verdict
How to use Windows Server Migration Tools? This article shows the detailed steps you want. If you find that these steps are difficult for you, you can turn to the best alternative – AOMEI Backupper Server. This professional software enables you to transfer files from one Server to another easily.
Миграция 2003 файловых серверов c помощью cредства миграции Windows Server
В данной статье мы рассмотрим как мигрировать файловый сервер Windows Server 2003 на Windows Server 2012 R2.
Инструмент File Server Migration Toolkit был заменен в Windows Server 2012 на Windows Server Migration Tools, так что если вы планируете перенести Windows Server 2003 файловый сервер на Windows Server 2012 или более поздней версии, все необходимые инструменты, встроенные в целевом сервере.
Windows Server Migration Tools можно использовать для переноса небольших наборов данных, до 100 ГБ. Если необходимо перенести большие объемы данных, Microsoft рекомендует использовать встроенную версию средства командной строки Robocopy. Средство миграции использует протокол HTTPS для безопасной передачи файлов между серверами, что не всегда подходит для очень больших наборов данных. Эта статья в первую очередь предназначен для тех, кто мигрирует с Windows Server 2003, но подходит и для файл-сервера запущенного на Windows Server 2003 SP2 или любую версию до Windows Server 2012.
Подготовка целевого и исходного файлов серверов
Прежде чем начать миграцию, вы должны будете установить Средства миграции Windows Server на целевом сервере (contososrv3). В Windows Server 2012 R2, войдите как локальный администратор, откройте PowerShell и выполните команду ниже, чтобы установить утилиту:
После того, как инструмент для миграции установлен, вам нужно создать пакет миграции, который может быть развернут и зарегистрирован на исходном сервере 2003 Windows Server, (contososrv4). Прежде чем вы сможете использовать инструменты миграции на Windows Server 2003, установите .NET Framework 3.5, а затем Windows Management Framework Core 2.0, который включает в себя PowerShell 2.0. Для получения более подробной информации о том, как это сделать, см. Миграция в Active Directory с Windows Server 2003 до 2012 R2 Миграция DHCP, Remove Server 2003, а также Raise Functional Levels Petri IT Knowledgebase.
Если вы запустили SmigDeploy из командной строки, для регистрации инструментов, PowerShell автоматически откроется, когда оснастка миграции будет зарегистрирована. Если вы хотите,запустить PowerShell в любое другое время, вам необходимо зарегистрироваться оснастку миграции вручную. Это относится как к исходному и так и целевому серверу:
Экспорт локальных пользователей и групп
Первая задача заключается в миграции локальных пользователей и групп с исходного файлового сервера (contososrv4).Параметр -Users также может быть установлен в Enable, чтобы экспортировать всех активных пользователей или Disable для экспорта всех отключенных пользователей.

Вам будет предложено ввести пароль, который используется для защиты экспортированных данных. Теперь вернитесь на целевой сервер (contososrv3) и импортируйте локальных пользователей и групп, заменив contososrv4 в -Path UNC с именем исходного сервера. При появлении запроса введите пароль для файла миграции:
Перенос данных
Теперь мы готовы перенести данные c источника на целевой сервер. Прежде чем мы сможем запустить Receive-SmigServerData и Send-SmigServerData команды, мы должны открыть подключение к консоли PowerShell в Windows Firewall. Запустите New-NetFirewallRule команды на целевом сервере, чтобы временно открыть входящий TCP и UDP порты:
Если исходный сервер имеет PowerShell 3.0 или более позднюю версию, вы можете использовать две New-NetFirewallRule команды выше, чтобы открыть нужные порты. В противном случае и в случае Windows Server 2003 используйте две Netsh команды ниже:

На целевом сервере в строке PowerShell введите Receive-SmigServerData, нажмите ENTER и введите пароль. Так настраивает сервер на прослушивание входящего соединения от вашего исходного сервера, а пароль будет требоваться при запуске Send-SmigServerData на исходном сервере.
На исходном сервере, выполните следующую команду в строке PowerShell, заменив contososrv3 в -computername параметре на имя вашего целевого сервера, а UNCs параметры -sourcepath и -DestinationPath в зависимости от обстоятельств:
Если вы посмотрите на новые папки на целевом сервере, которые были сохранены c источника, вы убедитесь, что разрешения безопасности точно соответствовать тем, что на источнике файловом сервере.

Microsoft рекомендует, что как только начальная миграция данных и пока она не будет завершена, пользователи должны быть принудительно отключены от источника файлового сервера и все изменения данных на источнике заморожены. Чтобы отключить пользователей от подключения, выполните команду ниже на исходном файл сервере:
Теперь запустите Receive-SmigServerData снова на целевом сервере, и команду Send-SmigServerData выше на исходном сервере для переноса любых изменений, которые могли иметь место на исходном сервере.
После того, как миграция завершена, удалите правила брандмауэра для консоли PowerShell, запустив команды ниже. Используйте Remove-NetFirewallRule команду для серверов с PowerShell 3.0 (или более поздней версии), а также используйте Netsh для Windows Server 2003.