User Profile Disks в RDS Windows Server 2012 / 2016
User Profile Disks (UPD, диски профилей пользователей) – новый функционал Remote Desktop Services в Windows Server 2012. User Profile Disks представляют собой альтернативу использованию технологий перемещаемых профилей (roaming profile) и перенаправления папок (folder redirection) в терминальных сценариях RDS. Идея UPD – данные пользователя и его приложений (т.е. его профиль) хранятся в виде отдельного виртуального vhdx диска на неком выделенном общем файловом ресурсе. Этот виртуальный диск монтируется в сессию пользователя при его входе на RDS-сервер, и отключается при выходе (конечно, с сохранением всех изменений в профиле).
В этой статье мы опишем особенности настройки и работы технологии User Profile Disks на сервере с ролью Remote Desktop Services на Windows Server 2012 / 2012 R2 / 2016.
Настройка User Profile Disks в Windows Server RDS
В первую очередь необходимо на любом файловом сервере организации создать общую сетевую папку, в которой будут храниться файлы с профилями пользователей в формате VHDX дисков (если вы хотите обеспечить высокую доступность UPD дисков, можно разместить файлы UPD на кластерном файловом ресурсе). В нашем примере, путь к такому каталогу будет выглядеть так: \\srv01\DemoLabOficeApps. Необходимо предоставить серверам, входящим в коллекцию RDS полные права доступа на данный каталог и файловую систему.
Режим User Profile Disks включается и настраивается в параметрах коллекций Remote Desktop. Этот режим можно включить непосредственно при создании коллекции, или уже после того, как коллекция создана.
 В нашем примере коллекция уже существует, поэтому в консоли Server Manager выбираем имеющуюся коллекцию, и в верхнем левом углу выбираем Tasks-> Edit Properties.
 Затем в разделе User Profile Disks ставим чекбокс на Enable user profile disks, указываем путь к созданной ранее сетевой папке (\\srv01\DemoLabOficeApps) и максимальный размер диска с профилем (пусть это будет 20 Гб). Сохраняем изменения.
 После сохранения изменений, проверьте что NTFS разрешения на каталог с дисками профилей были изменены. В нашем случае коллекция состоит из одного сервера RDSH01, которому предоставлены полные права на папку.
 На уровне сетевой папки (шары) серверу RDSH01$ предоставлены права Full Control.
  При добавлении новых серверов RD Session Host в коллекцию RDS серверов, мастер автоматически изменит разрешения на каталог, предоставив доступ новым серверам. Это очень удобно, т.к. при масштабировании терминальной фермы не нужно каждый раз вспоминать о настройке разрешений на сетевую папку с профилями.
VHDX файл с UPD профилем пользователя
Перейдем в наш общий сетевой каталог с профилями пользователей. Теперь в нем хранится файл вида UVHD-template.vhdx.

Этот файл представляет собой шаблон диска с профилем пользователя. При первом RDP входе пользователя на сервер RDS, этот шаблон копируется и переименовывается в vhdx файл, содержащий в имени SID пользователя.

Get-ADUser -Identity S-1-5-21-305647651-3952524288-2944781117-23711116

Посмотрим, что представляет собой диск с профилем пользователя. Для этого смонтируем его, щелкнув по vhdx файлу ПКМ и выбрав пункт Mount. Диск UPD можно использовать только в одной сессии на одном RDS хосте (монопольный доступ). Вы не сможете смонтировать UPD VHDX диск, если в настоящий момент его использует пользователь на RDS сервере). Как вы видите, содержимое vhdx диска представляет набор каталогов и файлов обычного профиля пользователя. При входе в систему пользователь получает абсолютно прозрачный доступ к данным, хранящимся в его профиле.

На стороне сервера RD Session Host .vhdx файл пользователя монтируется в каталог C:\users\ и выглядит таким образом:

Запись данных в файл vhdx ведется в реальном времени. Т.е. при копировании данных в профиль пользователя на сервере RDS, размер vhdx файла на общем хранилище увеличивается сразу.
В том случае, если в системе уже присутствует каталог с профилем пользователя, каталог со старым профилем переименовывается в формат -BACKUP— .
 VHDX диск монтируется при старте сессии пользователя на VDI или RDS сервере. Список подключенных UPD дисков с профилями можно вывести с помощью утилиты mountvol.
По-умолчанию диск с пользовательским профилем содержит в себе все содержимое профиля пользователя. Однако, в настройках RDS коллекции можно исключить определенные папки из списка синхронизируемых каталогов, либо указать, что должны сохранятся только определённые папки. Таким образом все изменения, которые вносятся в терминальной сессии пользователя в список исключенных папок профиля, не сохраняются на vhdx диске в сетевом каталоге.
 Второй вариант позволяет настроить сохранение в UPD профиле только указанных каталогов.
 В случае необходимости, второй вариант позволяет реализовать сценарии сохранения настроек стартового экрана, хранящихся в файле appsfolder.itemdata-ms. В данном примере мы просто добавили путь к каталогу \AppData\Local\Microsoft\Windows в качестве дополнительного пути, который нужно сохранять в UPD.

Как расширить диск User Profile Disk с помощью PowerShell
Вы можете расширить виртуальный vhdx диск с UPD профилем конкретного пользователя с помощью PowerShell командлета Resize-VirtualDisk из модуля Hyper-V.
Net use U: \\srv01\DemoLabOficeApps
Resize-VHD -Path u:\UVHD- .vhdx -SizeBytes 30GB
Net use U: /delete
Если вы используете командлет Resize-VHD с рабочей станцией под Windows 10, то в системе необходимо установить роль Hyper-V -> ПлатформаHyper-V -> Службы Hyper-V.
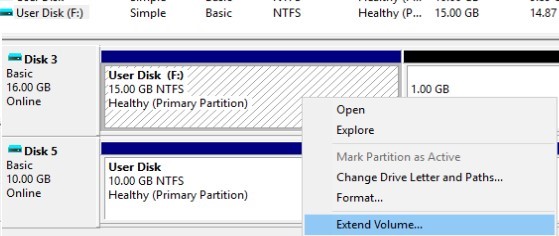
Теперь нужно расширить диск из графического интерфейса консоли Управления дисками (Disk Manager). Действие –> Подключить виртуальный жесткий диск -> Расширить том.

Либо воспользуйтесь таким PoSh скриптом:
Param(
[Parameter(Mandatory=$true,ValueFromPipeline=$true)][alias(«Path»)][string]$vhdxFile,
[Parameter(Mandatory=$true,ValueFromPipeline=$true)][alias(«Size»)][int64]$vhdxNewSize
)
begin<
try <
Mount-VHD -Path $vhdxFile -ErrorAction Stop
>
catch <
Write-Error «File $vhdxFile is busy»
Break
>
$vhdx = Get-VHD -Path $vhdxFile
if ($vhdx.Size -ge $vhdxNewSize)<
Write-Warning «File $vhdxFile already have this size!»
$vhdx | Dismount-VHD
Break
>
>
process<
Dismount-VHD -Path $vhdxFile
Resize-VHD -Path $vhdxFile -SizeBytes $vhdxNewSize
$vhdxxpart = Mount-VHD -Path $vhdxFile -NoDriveLetter -Passthru | Get-Disk | Get-Partition
$partsize = $vhdxxpart | Get-PartitionSupportedSize
$vhdxxpart | Resize-Partition -Size $partsize.SizeMax
>
end<
Dismount-VHD -Path $vhdxFile
>
Обратите внимание, что нельзя расширить UPD диск пользователя с активной RDS сессией.
Чтобы уменьшить размер файла UPD (при условии, что вы удалили данные пользователя внутри vhdx файла и размер файлов на диске меньше выделенного ему размера) можно воспользоваться командами:
resize-VHD \\srv01\DemoLabOficeApps\UVHD- .vhdx –ToMinimumSize
Optimize-vhd -path \\srv01\DemoLabOficeApps\UVHD- .vhdx -mode full
Итак, мы рассмотрели основные особенности работы технологии User Profile Disks в RDS/VDI решениях на базе Windows Serer 2016 и 2012 R2. Настройка UPD намного проще чем процесс настройки перемещаемых профилей и перенаправляемых папок. Диски привязаны к коллекции RDS и не могут повредиться при попытке совместного использования профиля несколькими терминальными серверами (в отличии от обычных профилей). Диски профилей пользователей могут храниться на SMB шарах, CSV, SOFS, в SAN или на локальных дисках. Также Microsoft отмечает, что скорость загрузки рабочей среды пользователя в случае использования UPD уменьшается.
Если вы планируете использовать для хранения UPD профилей DFS сервера, то имейте в виду, что на них должна использоваться Windows Server 2012 R2. При использовании предыдущих версий Windows Server вы получите ошибку:
Unable to enable user disks on rVHDShare. Could not create template VHD. Error Message: The network location «\\winitpro.ru\namespace\UPD1» is not available.
Также на стороне файлового сервера желательно использовать версию SMB 3.02 (Windows Server 2012 R2) или выше.
В любом случае, т.к. технология User Profile Disks относительно свежая, рекомендуется перед крупными внедрениями UPD откатать их работу и возможные проблемы в тестовой среде.
User Profile Disks on Windows Server 2012 R2 / 2016 RDS
User Profile Disks (UPD) is a new feature of Remote Desktop Services in Windows Server 2012. User Profile Disks is an alternative to roaming profiles and folder redirection in the RDS scenarios. The point of UPD is that user and apps data (i. e., a user profile) are stored as a separate VHDX disk on dedicated file on the network shared folder. This virtual disk is mounted to the user session as soon as the user signs in to the RDS server, and unmounted when he logs out (all changes to the user profile are saved to the vhdx disk).
In this article, we’ll describe how to configure and use User Profile Disks on a server with Remote Desktop Services role running on Windows Server 2012 / 2012 R2 / 2016.
Configuring User Profile Disks on Windows Server RDS
First of all, it is necessary to create a shared folder on any corporate file server to store user profiles as VHDX disk (if you want to have high availability for UPD disks, you can place UPD files on a clustered file resource). In our example, the path to this folder looks like this: \\rdvh1\DemoLabOficeApp . Servers being a part of RDS collection have to be given full access permission to access this shared folder.
User Profile Disks mode can be enabled and configured in the collection settings of Remote Desktop Services. This mode can be enabled when creating a new collection, or you can come back to it later.

In our example, the collection already exists, so in the Server Manager console, select this collection and in the upper left corner click Tasks -> Edit Properties.

Then in User Profile Disks section check Enable user profile disks, specify the path to the previously created shared folder (\\rdvh1\DemoLabOficeApps) and a maximum profile disk size (let it be 20 GB). Save the changes.

After you saved the changes, make sure that NTFS permissions for Profile Disks folder have been changed. In our case, the collection consists of one RDSH01 server, which is granted full control permission.

Full Control permissions has been granted to the RDSH01 server on the shared folder level.

When adding new RD Session Host servers to the RDS collection, the wizard automatically changes the folder permissions and gives access to the new servers. It is very convenient, since when scaling a terminal farm you don’t need to remember to set permissions for the profile folder.
UPD: User profile as VHDX file
Go to the network shared folder with user profiles. A UVHD-template.vhdx file is now being stored here.

This file is the user profile disk template. When a user logs on to the RDS server for the first time, this template is copied and renamed as a VHDX file, containing user SID in its name.

Get-ADUser -Identity S-1-5-21-32549751-3956249758-2943215497-23733695

Let’s see what a user profile disk contains. To do it, right-click the VHDX file and select Mount. The UPD disk can only be used in one session on one RDS host (exclusive access). You can’t mount an UPD VHDX disk if the user is currently using it on the RDS server.

As you can see, the VHDX disk contains a set of folders and files of a standard user profile. At logon, a user gets completely transparent access to the data stored in the profile.
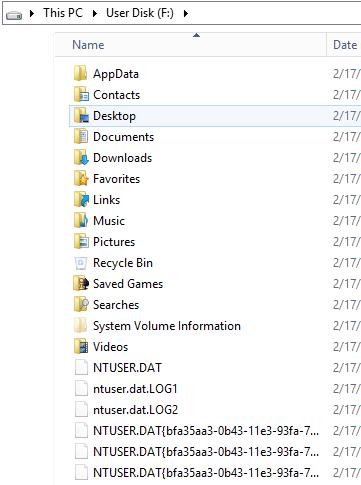
On the side of RD Session Host server, a .vhdx user’s file is mounted to the C:\users\ and looks like this:

Data is written to the vhdx file in real time. It means that when copying data to a user profile on an RDS server, the size of the vhdx file on the shared storage is incremented immediately.
If the user profile folder already exists in the system, the folder with an old profile is renamed to the -BACKUP- .

The VHDX disk is mounted when the user session starts on a VDI or RDS server. A list of connected UPD disks with profiles can be listed using the mountvol utility.
By default, a User Profile Disk contains all the user profile contents. However, you can exclude certain folders from the list of synchronized directories in the RDS collection settings, or specify that only certain folders should be saved. Thus, all the changes made during the user’s terminal session to the folders in the list of excluded directories are not saved into the VHDX disk on the shared folder.

The second option allows you to configure the saving only the specified directories in the UPD profile.

If necessary, the last option allows you to implement the scenarios for saving the settings of the Start Screen, which are stored in appsfolder.itemdata-ms file. In this example, we have only added the path to \AppData\Local\Microsoft\Windows folder as an additional path to be saved in the UPD.

Resizing User Profile Disks Using PowerShell
You can extend the virtual vhdx drive with the user’s UPD profile using the PowerShell cmdlet Resize-VirtualDisk from the Hyper-V module.
Net use U: \\rdvh1\DemoLabOficeApps
Resize-VHD -Path u:\UVHD- .vhdx -SizeBytes 40GB
Net use U: /delete
If you want to run the Resize-VHD cmdlet from a desktop with Windows 10, you must install the feature Hyper-V -> Hyper-V Platform -> Hyper-V Services.

Now you need to extend the volume from the GUI of the Disk Management console (Action -> Attach VHD -> Extend volume).
Or use following PowerShell script to automatically extend the vhdx file to the maximum available size:
Param(
[Parameter(Mandatory=$true,ValueFromPipeline=$true)]
[alias(«Path»)]
[string]$vhdxFile,
[Parameter(Mandatory=$true,ValueFromPipeline=$true)]
[alias(«Size»)]
[int64]$vhdxNewSize
)
begin <
try <
Mount-VHD -Path $vhdxFile -ErrorAction Stop
>
catch <
Write-Error «File $vhdxFile is busy»
Break
>
$vhdx = Get-VHD -Path $vhdxFile
if ($vhdx.Size -ge $vhdxNewSize) <
Write-Warning «File $vhdxFile already have this size!»
$vhdx | Dismount-VHD
Break
>
>
process <
Dismount-VHD -Path $vhdxFile
Resize-VHD -Path $vhdxFile -SizeBytes $vhdxNewSize
$vhdxxpart = Mount-VHD -Path $vhdxFile -NoDriveLetter -Passthru | Get-Disk | Get-Partition
$partsize = $vhdxxpart | Get-PartitionSupportedSize
$vhdxxpart | Resize-Partition -Size $partsize.SizeMax
>
end <
Dismount-VHD -Path $vhdxFile
>
Note that you can’t extend the user’s UPD disk with an active RDS session.
To reduce the size of the UPD file (assuming that you deleted the user’s data inside the vhdx file and the file size on the disk is less than the size assigned to it), you can use the commands:
resize-VHD \\rdvh\DemoLabOficeApps\UVHD- .vhdx –ToMinimumSize
Optimize-vhd -path \\rdvh1\DemoLabOficeApps\UVHD- .vhdx -mode full
So, we have discussed the major peculiarities of User Profile Disks in RDS/VDI solutions running Windows Server 2016 and 2012 R2. UPD configuration is much easier than the configuration of roaming profiles or redirected folders. The disks are connected to the RDS collection and can’t be damaged when using the shared profile by several servers (unlike the standard profiles). The User Profile Disks can be stored in SMB shares, CSV, SOFS, SAN or on the local disks. Also, Microsoft notes that the speed of loading the user’s desktop environment in case of using UPD is reduced.
If you are planning to store UPD profiles on DFS servers, be aware that they must have Windows Server 2012 R2 installed. If you are using previous versions of Windows Server, you will get an error:
Unable to enable user disks on rVHDShare. Could not create template VHD. Error Message: The network location «\\woshub.com\namespace\UserProfileDisk» is not available.
Also it is desirable to use the version SMB 3.02 on the file server side (Windows Server 2012 R2) or higher.
Anyway, since User Profile Disks is a relatively new technology, prior to mass UPD implementations, it is recommended to test their work and possible problems in a test environment.