How To Fix «Windows Resource Protection could not start the repair service» Error
How To Fix «Windows Resource Protection could not start the repair service» Error On Windows 10
System File Checker (SFC) is a utility in Windows that allows users to scan for corruptions in Windows system files and restore corrupted files. This guide describes how to run the System File Checker tool (SFC.exe) to scan your system files and to repair missing or corrupted system files (including .DLL files).
Windows Resource Protection (WRP) prevents the replacement of essential system files, folders, and registry keys that are installed as part of the operating system. It became available starting with Windows Server 2008 and Windows Vista. Permission for full access to modify WRP-protected resources is restricted to TrustedInstaller. WRP-protected resources can only be changed using the Supported Resource Replacement Mechanisms with the Windows Modules Installer service. Protecting these resources prevents application and operating system failures.
TrustedInstaller is a process of Windows Modules Installer service in Windows 10, 8, 7 and Vista. Its main function is to enable installation, removal and modification of Windows Updates and optional system components.
At times you may find that TrustedInstaller.exe has been corrupted, and you may get an error message. In such a case running the System File Checker may help. But sometimes even Windows Resource Protection service, which runs the System File Checker (SFC) is affected. In such a case if you try to run the «sfc /scannow» command, you may get the error message saying: «Windows Resource Protection could not start the repair service». Good news is that it is possible to fix this error. In this article we are going to show you possible solutions for this problem. Read the guide below and see if this helps you to fix the «Windows Resource Protection could not start the repair service» error while trying to run the System File Checker.

Table of Contents:
It is recommended to run a free scan with Malwarebytes — a tool to detect malware and fix computer errors. You will need to purchase the full version to remove infections and eliminate computer errors. Free trial available.
Enable Windows Modules Installer Service
Windows Services (also know as services.msc), are used to modify how Windows services run on your system. These services are responsible for running available programs and managing many system settings and resources. You can modify a service’s settings for security, troubleshooting, and performance-related reasons. You will need to access the Windows Installer service, which enables installation, modification, and removal of Windows updates and optional components. If this service is disabled, install or uninstall of Windows updates might fail for your computer. To access Windows Modules Installer service type «run» in Search and and click the «Run» result.
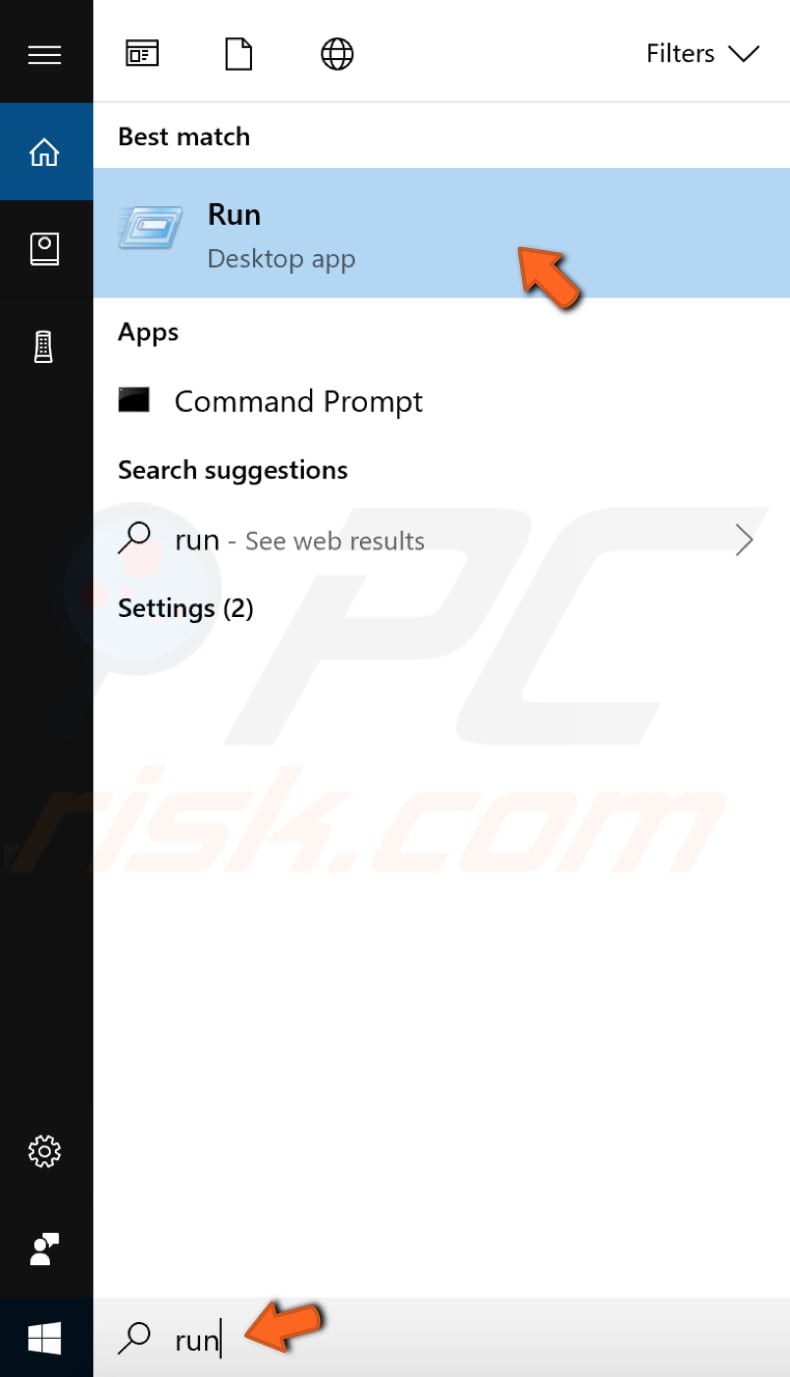
In the Run dialog box, type «services.msc» and click «OK» to open Windows Services.
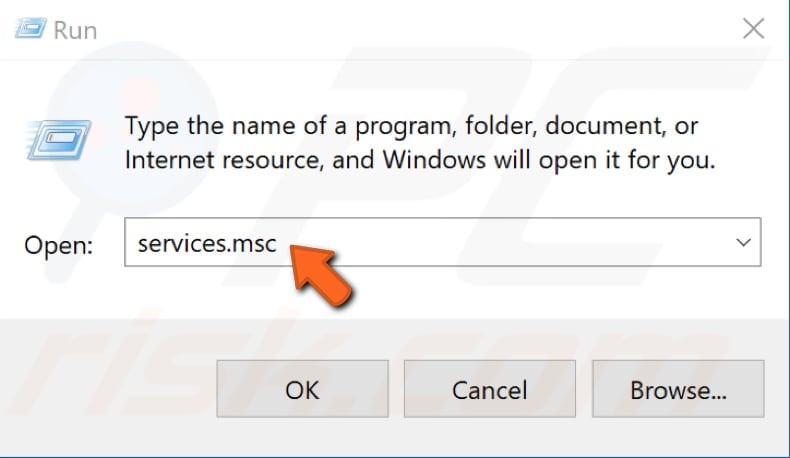
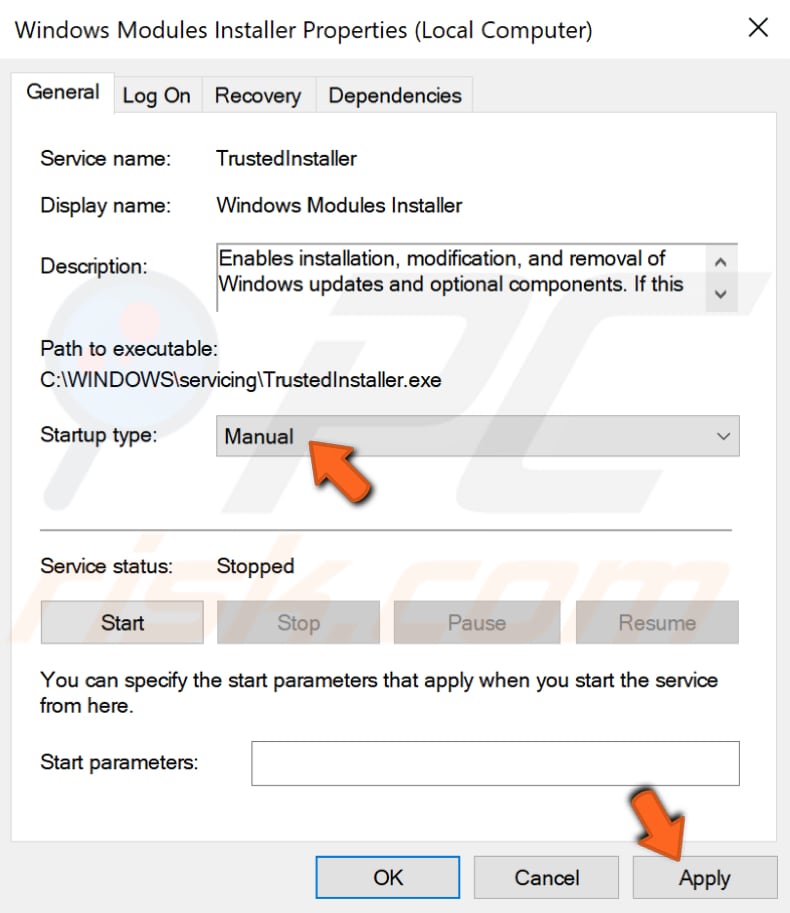
Now scroll down through the services list to find «Windows Modules Installer» service. Right-click it and select «Properties» in the dropdown menu. Or simply double-click the Windows Modules Installer service.

Make sure that «Startup type» is set to «Manual». If it is not set to Manual, then set it this way and click «Apply» to save the changes made.
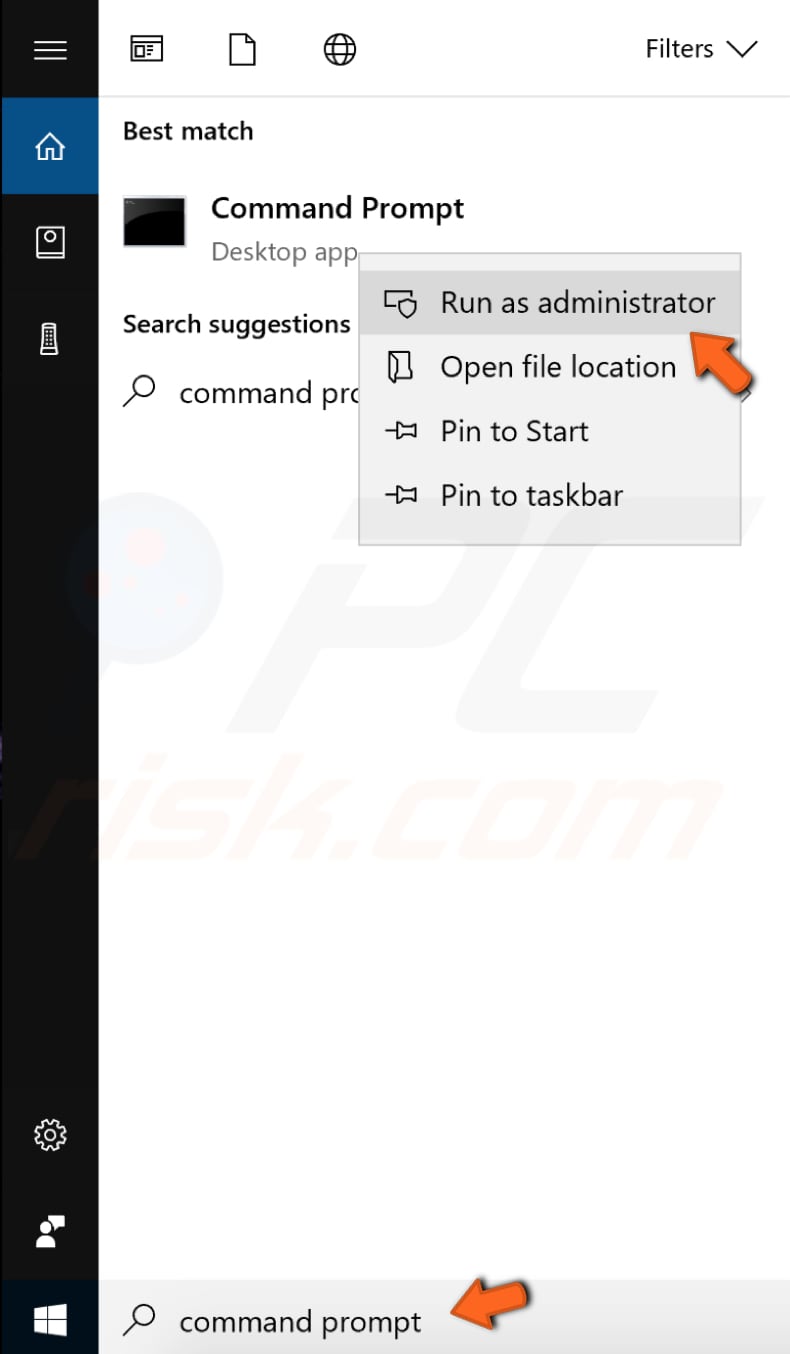
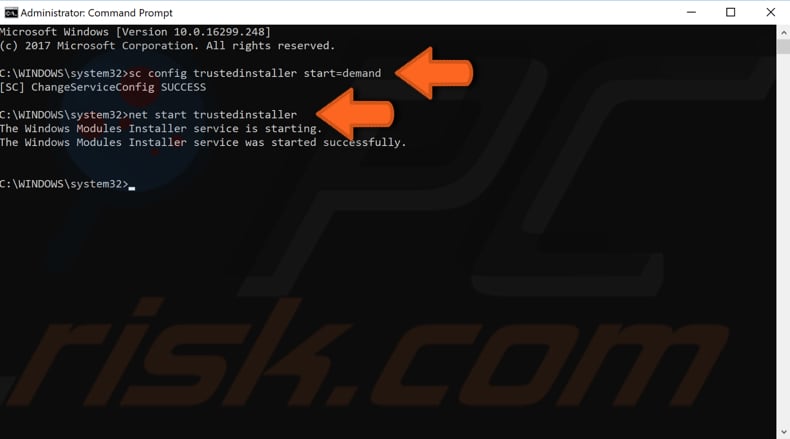
You can also try to enable the TrustedInstaller using Command Prompt and its commands. Command Prompt is the input field in a text-based user interface screen, a command line interpreter application available in most Windows operating systems. It is used to execute entered commands. Most of those commands are used to automate tasks through scripts and batch files, perform advanced administrative functions, troubleshoot and solve certain kinds of Windows issues. To use Command Prompt, you must enter a valid command along with any optional parameters. Then it executes the command as entered and performs whatever task or function it’s designed to perform in Windows. Some commands available in Windows require that you run them from an elevated Command Prompt. This means you have to be running it with administrator level privileges. If you try to execute a command which requires administrative privileges from a normal Command Prompt, you will get the message saying that you must be an administrator running a console, or that access is denied and you do not have sufficient privileges. To open Command Prompt type «command prompt» in Search and then right-click on the «Command Prompt», select «Run as administrator» from the dropdown menu to run Command Prompt with administrator privileges.
Now you will need to execute a couple of commands. Type «sc config trustedinstaller start=demand» and press Enter on your keyboard. Then type «net start trustedinstaller» and press Enter on your keyboard again. Now try to run the System File Checker and see if you are still getting the «Windows Resource Protection could not start the repair service» error.
Run System File Checker In Safe Mode
Another thing you might want to try is to run the System File Checker in Safe Mode. Safe Mode is a diagnostic start-up mode in Windows operating systems used to obtain limited access to Windows when the operating system does not start or function normally. It is the opposite of Normal Mode, which starts Windows in the usual manner. Safe Mode is available on Windows XP, Windows Vista, Windows 7, Windows 8, Windows 10, and most older versions of Windows.
One of the most common steps when troubleshooting a computer is to boot into Safe Mode. Safe Mode starts Windows in a basic state, using a limited set of files and drivers. It can help to troubleshoot problems on your computer. If, for example, the problem does not occur in Safe Mode, then this will confirm that the default settings and basic device drivers are not causing the issue. If you have issues with your computer, or there are reasons you wish to load windows in Safe Mode, there are a number of ways to achieve this. If you are not sure how to start your Windows in Safe Mode, then read this article to find out.
Run DISM Scan
DISM stands for Deployment Image Servicing and Management and it can be used to repair and prepare Windows images, including the Windows Recovery Environment, Windows Setup, and Windows PE. To run DISM scan you need to open Command Prompt as administrator again and to type in this command: «DISM /Online /Cleanup-Image /RestoreHealth». Press Enter on your keyboard to execute it. See if this fixes the «Windows Resource Protection could not start the repair service» error while trying to run the System File Checker.

That’s it, we hope this article was useful trying to fix the «Windows Resource Protection could not start the repair service» error and now you can run the System File Checker without any problems. Do not hesitate to write a comment in the comment section below if you found other workaround for this error!
Video Showing How To Fix «Windows Resource Protection could not start the repair service» Error:
About the author:

I am passionate about computer security and technology. I have an experience of 10 years working in various companies related to computer technical issue solving and Internet security. I have been working as an editor for pcrisk.com since 2010. Follow me on Twitter to stay informed about the latest tech news or online security threats. Contact Tomas Meskauskas.
Our guides are free. However, if you want to support us you can send us a donation.
Global virus and spyware activity level today:

Medium
Increased attack rate of infections detected within the last 24 hours.
SFC PROBLEM WINDOWS RESOURCE PROTECTION COULD NOT START THE REPAIR SERVICE FIXED IN 14291
I was having this problem in 14291 of not being able to run SFC /SCANNOW command for the error of WINDOWS RESOURCE PROTECTION COULD NOT START THE REPAIR SERVICE message. After looking in the Feedback App I found the answer to fix that problem. It works in both 14291 and 14295 you just have to tweak the commands to fit your build. Anyway here’s how I did it:
RUN SFC /SCANNOW in an administrative command prompt window
Get the error stated above.
Open the CBS.LOG file in the C:\Windows\Logs\CBS\ folder
Check what file it fails to load and make note of the folder it is looking in for the file
run the following commands
t akeown /F C:\Windows\WinSxS\amd64_microsoft-windows-servicingstack_31bf3856ad364e35_10.0.14291.1001_none_7c2e5a73f273bd94\*/R /A
icacls C:\Windows\WinSxS\amd64_microsoft-windows-servicingstack_31bf3856ad364e35_10.0.14291.1001_none_7c2e5a73f273bd94\*.* /T /grant administrators:F
xcopy /C /R /O /Y C:\Windows\WinSxS\amd64_microsoft-windows-servicingstack-onecore_31bf3856ad364e35_10.0.14291.1001_none_b11fef854a76db2a\wrpint.dll
and viola! you can run SFC /SCANNOW without any problems after that
Replies (4)
![]()
Darkz2012 discovered the real reason sfc /scannow does not work back in build 14279,
wrpint.dll is missing from the required folders for both x64 & x86(32bit) systems by
checking the CBS.LOG file in the C:\Windows\Logs\CBS folder.
If you copy the file wrpint.dll back to the right locations sfc /scannow works.
Then the code you found in the Hub is actually the same code I wrote to help people with copying
the missing wrpint.dll. However my code even though it works is very large and needs to be updated
for every windows 10 build.
Then Sam-R — found on the web a smaller and better all windows 10 build version of the same code that
does not need to be changed, it works for all versions of windows 10 but needs to be run as a batch file
rather than at command prompt admin.
For all windows 10 builds — including 14295 and any new builds in the future — use the following:
As suggested by SAM-R
Try BKUL ALL WINDOWS 10 BUILD VERSION sfc fix script that works for both 32 bit & 64 bit
Instructions: ( Important these commands need to be run as a batch file — scanfix.cmd )
1. Click file explorer, View, tick [/] file name extensions (then close the file explorer window)
2. right-click the desktop and create a new file — call it scanfix.cmd (not scanfix.cmd.txt)
3. right-click & edit scanfix.cmd then copy and paste the commands in black below and save the file
4. right-click scanfix.cmd — run as administrator
5. Check 1 file was copied
6. Right-click start, command prompt (admin) type sfc /scannow (& press enter)
@echo off
cls
setlocal
set root=%SystemRoot%\WinSxS\%PROCESSOR_ARCHITECTURE%_microsoft-windows-servicingstack
for /f «delims=» %%A in (‘dir /ad /b %root%-onecore*’) do set «from=%SystemRoot%\WinSxS\%%A»
for /f «delims=» %%A in (‘dir /ad /b %root%_*’) do set «to=%SystemRoot%\WinSxS\%%A»
takeown /F %to%\* /R /A 1>nul
icacls %to%\*.* /T /grant administrators:F 1>nul
echo on
echo F|xcopy /C /R /O /Y %from%\wrpint.dll %to%\wrpint.dll
pause
it didn’t work for me.
this is what I did. closed all web browsers, all running apps.. restarted my laptop and on elevated command, (run as administrator), type sfc /scannow. and voila. it worked..