4 способа открыть Панель управления в Windows 10
Сколь бы простой ни казалась опытным пользователям данная тема, «Блог системного администратора» ее рассмотрит. На фоне тех немногих, которые знают как работать с новой ОС, немало и тех пользователей, которые не решаются перейти на новую систему в том числе и потому, что полагают, что привычная Панель управления в ней отсутствует.
Рассмотрел методы, которые помогут открыть Панель управления в Windows 10 .
Через поиск
Справа от кнопки « Пуск » располагается значок-лупа. Применяется для запуска окна поиска по системе. Щелкните по нему. В строку поиска, которая располагается в нижней части окна введите: панель управления .
В левой части появится перечень результатов поиска. В данном случае он содержит один (необходимый вам) пункт. Щелкните по нему для входа в Панель управления.
Метод универсален и может применяться для поиска различных элементов системы, которые вы не можете найти в меню.
Через Выполнить
Второй подход состоит во вводе команды в строке « Выполнить ». Примените клавиатурное сочетание Win и R . Напечатайте: control .
Подтвердите запуск Панели управления одним из двух способов:
- экранной кнопкой «OK»;
- клавишей Enter.
Напрямую
Войдите в папку C:\Windows\System32\ и запустите файл control.exe . Расширение «.exe» означает, что файл является исполняемым. Никогда не открывайте такие файлы, назначения которых вы не знаете. Они могут содержать вредоносный код, нанести вред компьютеру, программному обеспечению и важным данным.
Быстрый доступ
Используйте первый из рассмотренных методов для поиска элемента системы. Откройте контекстное меню Панели. Наиболее удобен второй вариант. Значок быстрого доступа появится на Панели задач и в дальнейшем не придется прибегать к рассмотренным выше методам.
С другой стороны — если вы пользуетесь Панелью управления редко, делать этого не стоит. Значок станет занимать место на экране и усложнять восприятие интерфейса.
Различия между методами
По сути отсутствуют. Результатом применения любого из рассмотренных выше способов станет отображение на экране Панели управления, которая за десятилетия истории операционных систем Windows стала привычным инструментом доступа к важнейшим настройкам ОС.
How to Enable Master Control Panel or Enable God Mode in Windows 7, 8 & 8.1
Written by Administrator. Posted in Windows 8 & Windows 8.1

Around 2007, an undocumented feature of Windows, called the God Mode, was published outside of documentation provided by Microsoft. This is the Windows Master Control Panel shortcut. Bloggers named it the All Tasks or the God Mode and it gained popularity as it provided a method of creating a shortcut to various control settings in Windows Vista at the time. Later Windows Operating Systems such as Windows 7, Windows 8 and Windows 8.1 also carry this feature, except the 64-bit version of Windows Vista. It is known that this functionality crashes the Explorer in the 64-bit version of Windows Vista.
Although not intended for use by general users, God Mode or Master Control Panel functionality in Windows is implemented by creating a base folder with a special extension. The format used is:
Here, GUID represents a valid Class ID or CLSID that has a System.ApplicationName entry in the Windows Registry. Microsoft documents this technique as “Using File System Folders as Junction Points.” FolderDisplayName can be anything — when this technique was discovered, the name GodMode coined by bloggers stuck. Among the many GUID shortcuts revealed in Windows, the CLSID is of special interest as the related widget points to and permits access to several Windows settings or Control Panel applets.
Users can now create a control panel called GodMode that allows them easy access to almost all the administrative tasks in Windows. In fact, GodMode is so named as users have complete access to all aspects of the management of Windows at their fingertips and in one location. That makes it very convenient to configure the hardware or windows settings quickly from a single screen. You access GodMode by creating a special folder on the desktop.
Arrive at the Windows desktop by closing all the open windows. Right-click on an empty part of the desktop or hold your finger there. In the menu that comes up, tap/click on New and then on the Folder option:
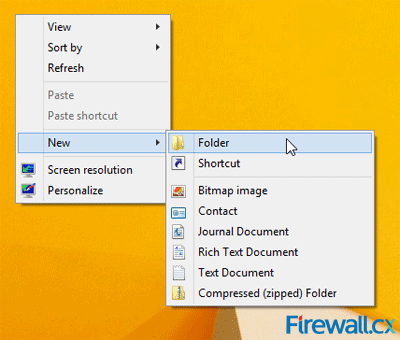 Figure 1. Creating a New Folder
You will see a new folder appear on the desktop and the title of the folder will be in edit mode. Modify the title of the new folder, or rename it to:
Once renames, the icon will change as shown below:
 Figure 2. Create a new folder & rename it to reveal GodMode
You must double-click/tap on the icon to open the GodMode Screen:
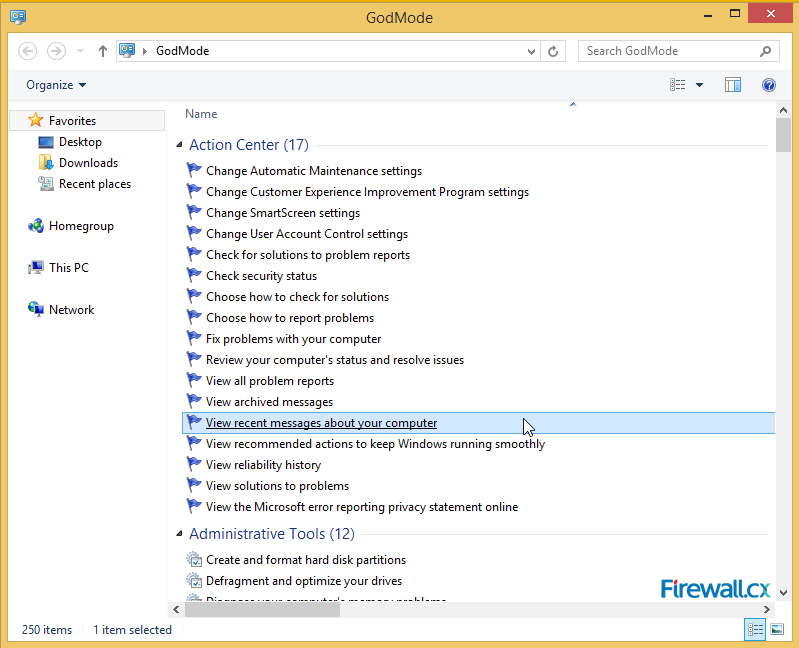 Figure 3. The GodMode Screen
You can now proceed to tweak Windows using the list of available configuration options presented simply by scrolling through and tapping/clicking the option you want.
If you no longer need to have GodMode in your system, you can safely delete the GodMode folder on your desktop.
This article showed how to enable GodMode on Windows Vista (32Bit only), and both 32/64 Bit versions of Windows 7, Windows 8 and Windows 8.1.
Windows master control panel
The “God Mode” or Master Control Panel is a feature that can be found hidden in Windows 10/8/7/Vista. The hidden mode allows you to view and adjust all settings within Windows. In Windows, the same mode offers easy access to all the administrative options.
The administrative options appear scattered in the Control Panel of Windows but when in the secret mode, the same options appear well organized under a single window.
Master Control Panel or God Mode in Windows 10
To be precise, the so-called God Mode brings in all aspects of Windows 10 control in a single place. It collects all of the Control Panel functions, interface customization or other accessibility options under a single window.
The mode is also known as “All Tasks” and you can get more information about it from Windows Registry. Simply type regedit in RUN or Start Menu Searchbox and press Enter. It’ll open Registry Editor. Go to the following key:
Alternatively, you can press “Ctrl+F” in Registry Editor and search for the following string. It’ll open the same key for you.
Here is a simple hack that can enable you to place ALL the Tasks Control Panel and System Settings in ONE place!
Enable Master Control Panel/God Mode in Windows
Create a new folder on your Windows desktop. —>
Name the folder as :

The icon will change!
Now open the folder and see the magic of Windows Registry!
You will see that the folder contains all the shortcuts to the Tasks Control Panel and System Settings.
Move the folder to the C drive, and create its shortcut there. Cut paste this shortcut in folder C:\Users\Owner\Start Menu\Programs. This will display the shortcut in the Start Menu for easy access. —>
This works quite well on my 32bit Windows. But if you find that this hack makes your explorer.exe unstable or makes it crash, I suggest you use the cmd to delete this folder, as follows:
Run cmd and copy-paste this command and hit enter :
or alternatively, if it doesn’t help
PS : This tweak may cause the 64-bit version of Windows to crash.
This registry hack is available in Windows 10/8/7/Vista.
Authored By: Ramesh Kumar, MVP.