How to Dual Boot Windows 10 and Linux Starting with Windows or Linux

Running Windows 10 and Linux on the same computer is easier than ever. Here’s how to do it.
A computer that boots both Windows 10 and Linux can easily be the best of both worlds. Having easy access to either of the operating systems lets you enjoy the benefits of both. You can hone your Linux skills and enjoy the free software only available for Linux platforms. Or, you can switch back to Windows 10 to use apps like Photoshop, AutoCAD or Microsoft Office. The beauty of dual booting is that it lets each operating system take full advantage of the hardware resources of your computer. While virtual machines and the Windows Subsystem for Linux can give you a taste of the Linux experience, dual booting lets you tap its full potential.
The good news is that Windows 10 and Linux live in harmony better than ever these days. Dual booting Windows 10 and Linux used to be a precarious process that could wreck your Windows installation, your Linux installation or both. While the process isn’t quite a smooth as dual booting macOS and Windows with Boot Camp, it comes close. In this article, we’ll show you how to safely install Windows 10 and Linux on the same hard drive. It doesn’t matter if you’re starting with Linux or starting with Windows—dual booting is easy to set up either way.
Dual Boot Linux with Windows 10 – Linux Installed First
Let’s start with the (slightly) harder way first; you already have a copy Linux installed and you want to install Windows on a partition. The first step is to create the partition where Windows 10 will be installed. We have covered how to create partitions in Linux, so, start by reviewing our article on how to do that.
Once you have your partition set up, you will need to purchase Windows 10, download the ISO file then create a bootable copy. Creating a bootable copy of Windows 10 on Linux can be done using the free Unetbootin (USB thumb drive) or Brasero software if you are installing from a DVD.
Create Bootable Windows 10 Install Media Using Unetbootin
Unetbootin can be downloaded from the Software Center in Ubuntu. Once you have it up and running, launch it. Make sure you are using a thumb drive with at least 8 GBs of free space.
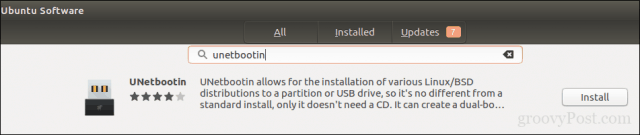
Select the Disk Image radio box, click the browse button (represented by an ellipsis …), browse to the ISO file then click Open. Chose the medium from the Type list box—in this case, your USB drive. Click on the drive list box then select your USB thumb drive.
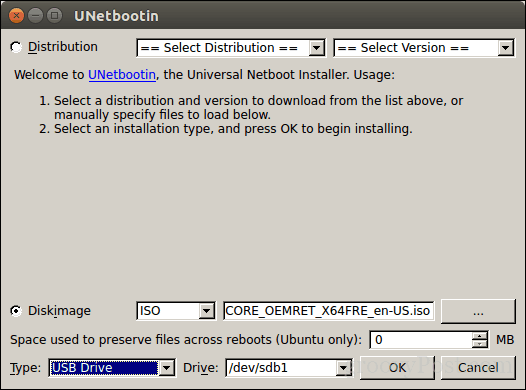
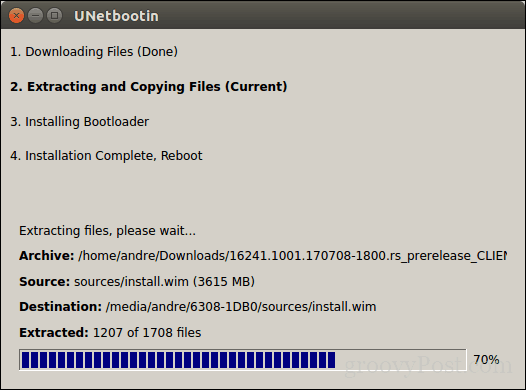
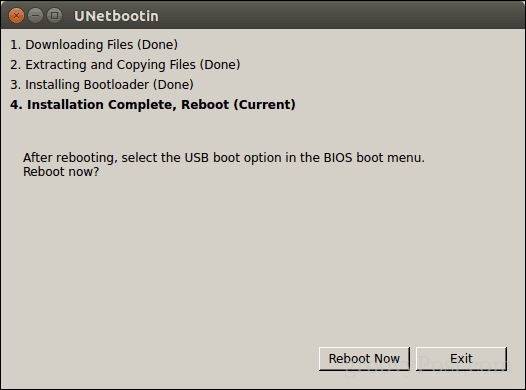
Click OK, then wait while the bootable copy is created.
When complete, click Exit.
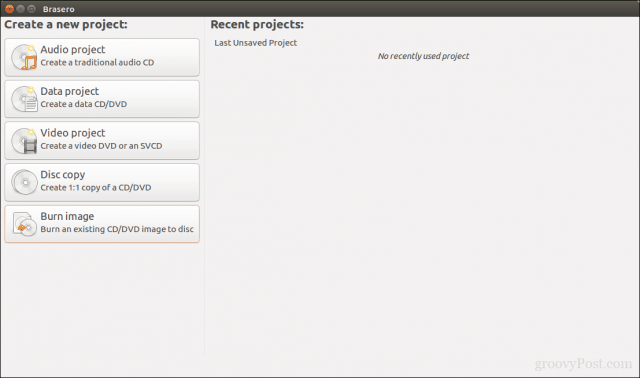
Create Bootable Windows 10 Install Media Using Brasero
If you already made a bootable USB with Unetbootin, you can skip this part. If you are still using an old school system with a DVD drive, you can use the Brasero DVD Burning software, which you can download from the Software Center also. Please keep in mind, Windows 10 ISO files are getting larger beyond the standard 4.7 GB DVDs. So, in some cases, it’s best you use 8.5 GB dual-layer DVDs if supported by your drive. If you can’t, then it’s best you use a USB thumb drive.
In Brasero, click Burn Image.
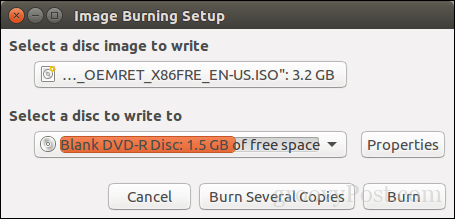
Select your disc image, make sure a blank DVD disc is inserted then click Burn.
After preparing your install media, insert it or connect it. Reboot your computer, then configure your BIOS to boot from the drive. Windows 10 will boot into setup as it normally does. After you arrive at the setup screen, click Custom: Install Windows only (advanced).
Make sure you select the right partition; don’t wipe out your Linux installation. Click Next then wait while Windows 10 Setup copies files to the drive. Your computer will be rebooted several times.
When setup is complete, follow the instructions to complete the out of box experience.
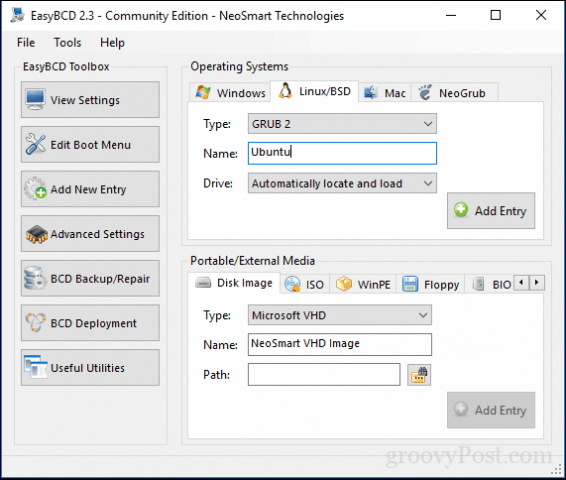
After that’s complete, you might notice the obvious—there is no way to boot into Linux anymore. Here is how you fix that. Download a free utility called EasyBCD from Neosmart Technologies. Proceed to install EasyBCD then launch it. Select the Linux/BSD tab. Click in the type list box, select Ubuntu; enter the name of the Linux distribution, choose automatically locate and load then click Add Entry. Reboot your computer.
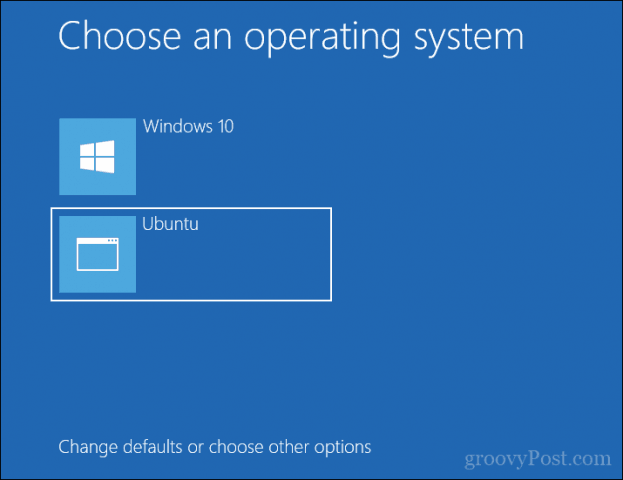
You will now see a boot entry for Linux on the Windows graphical boot manager.
Dual Boot Linux with Windows 10 – Windows Installed First
For many users, Windows 10 installed first will be the likely configuration. In fact, this is the ideal way to dual boot Windows and Linux. Again, I will be using the Ubuntu Linux distribution. You can download the Ubuntu Linux ISO image from Canonical’s web page then create a bootable copy using Unetbootin for Windows or burn to a blank DVD using disc image in Windows 10.
After creating your install media, configure your BIOS to boot from it. Ubuntu’s installation wizard intelligently detects existing Windows installations. It will ask you if you would like to install Ubuntu alongside Windows.
At the Ubuntu install screen, click Install Ubuntu.
Choose whether you want to download and install updates and third-party drivers and codecs then click Continue.

Select the option Install Ubuntu alongside Windows 10 then click Continue.
Ubuntu’s installer will set a default allocation of space for the installation. If you have enough space, you can resize the partition by placing your mouse between the divider then drag it left or right to make adjustments. Once you are satisfied with the allocated amount for your Ubuntu installation, click Install Now.
Click Continue to confirm changes.
Click Continue again.
Enter your time zone then click Continue.

Select your keyboard layout, click Continue.
Create your user account by providing your full name, computer name, login name, and password. Choose whether you want to log in automatically or be prompted for a password. You can also encrypt your home folder for extra security. Click Continue.
Wait while Ubuntu copies files.
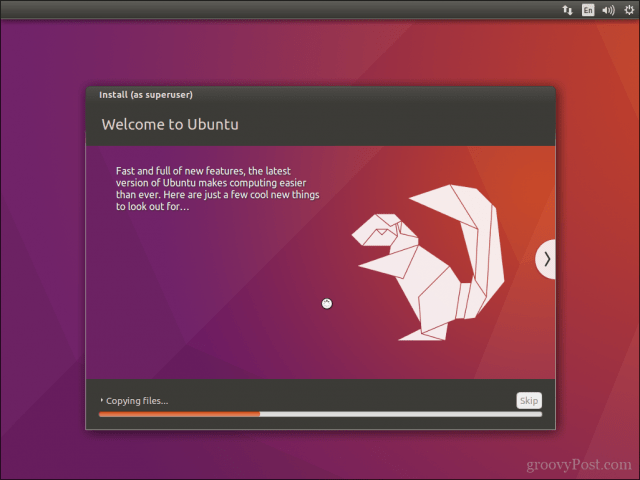
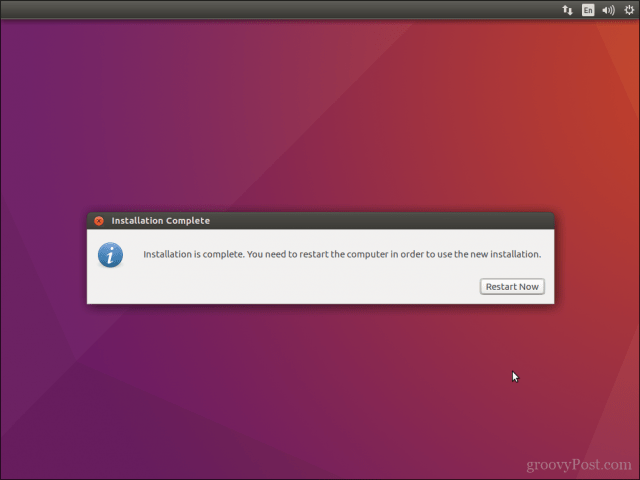
When complete, click Restart Now.
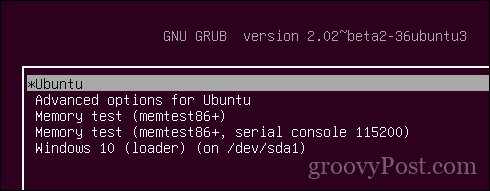
Ubuntu will add a boot entry for Windows 10 to the GRUB boot manager, which you can select using the up or down arrow then hitting Enter.
That’s it, Windows 10 and Ubuntu is now set up on your computer.
Let us know what you think. If you have done this before, share some of your tips with us. By the way, what’s your favorite distro?
How to dual-boot Linux and Windows
Set up your computer to boot into Windows 10 or Ubuntu 18.04 as needed.
Subscribe now
Get the highlights in your inbox every week.
Even though Linux is a great operating system with widespread hardware and software support, the reality is that sometimes you have to use Windows, perhaps due to key apps that won’t run under Linux. Thankfully, dual-booting Windows and Linux is very straightforward—and I’ll show you how to set it up, with Windows 10 and Ubuntu 18.04, in this article.
Before you get started, make sure you’ve backed up your computer. Although the dual-boot setup process is not very involved, accidents can still happen. So take the time to back up your important files in case chaos theory comes into play. In addition to backing up your files, consider taking an image backup of the disk as well, though that’s not required and can be a more advanced process.
Prerequisites
To get started, you will need the following five items:
1. Two USB flash drives (or DVD-Rs)
I recommend installing Windows and Ubuntu via flash drives since they’re faster than DVDs. It probably goes without saying, but creating bootable media erases everything on the flash drive. Therefore, make sure the flash drives are empty or contain data you don’t care about losing.
If your machine doesn’t support booting from USB, you can create DVD media instead. Unfortunately, because no two computers seem to have the same DVD-burning software, I can’t walk you through that process. However, if your DVD-burning application has an option to burn from an ISO image, that’s the option you need.
2. A Windows 10 license
If Windows 10 came with your PC, the license will be built into the computer, so you don’t need to worry about entering it during installation. If you bought the retail edition, you should have a product key, which you will need to enter during the installation process.
3. Windows 10 Media Creation Tool
Download and launch the Windows 10 Media Creation Tool. Once you launch the tool, it will walk you through the steps required to create the Windows media on a USB or DVD-R. Note: Even if you already have Windows 10 installed, it’s a good idea to create bootable media anyway, just in case something goes wrong and you need to reinstall it.
4. Ubuntu 18.04 installation media
Download the Ubuntu 18.04 ISO image.
5. Etcher software (for making a bootable Ubuntu USB drive)
For creating bootable media for any Linux distribution, I recommend Etcher. Etcher works on all three major operating systems (Linux, MacOS, and Windows) and is careful not to let you overwrite your current operating system partition.
Once you have downloaded and launched Etcher, click Select image, and point it to the Ubuntu ISO you downloaded in step 4. Next, click Select drive to choose your flash drive, and click Flash! to start the process of turning a flash drive into an Ubuntu installer. (If you’re using a DVD-R, use your computer’s DVD-burning software instead.)
Install Windows and Ubuntu
You should be ready to begin. At this point, you should have accomplished the following:
- Backed up your important files
- Created Windows installation media
- Created Ubuntu installation media
There are two ways of going about the installation. First, if you already have Windows 10 installed, you can have the Ubuntu installer resize the partition, and the installation will proceed in the empty space. Or, if you haven’t installed Windows 10, install it on a smaller partition you can set up during the installation process. (I’ll describe how to do that below.) The second way is preferred and less error-prone. There’s a good chance you won’t have any issues either way, but installing Windows manually and giving it a smaller partition, then installing Ubuntu, is the easiest way to go.
If you already have Windows 10 on your computer, skip the following Windows installation instructions and proceed to Installing Ubuntu.
Installing Windows
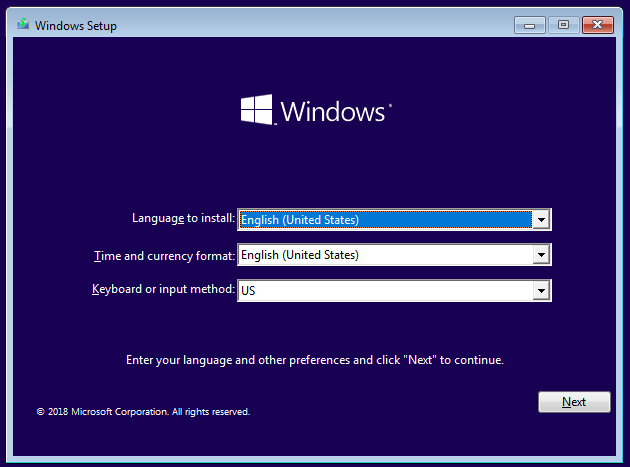
Insert the Windows installation media you created into your computer and boot from it. How you do this depends on your computer, but most have a key you can press to initiate the boot menu. On a Dell PC for example, that key is F12. If the flash drive doesn’t show up as an option, you may need to restart the computer. Sometimes it will show up only if you’ve inserted the media before turning on the computer. If you see a message like, «press any key to boot from the installation media,» press a key. You should see the following screen. Select your language and keyboard style and click Next.
linux-dual-boot_01.png
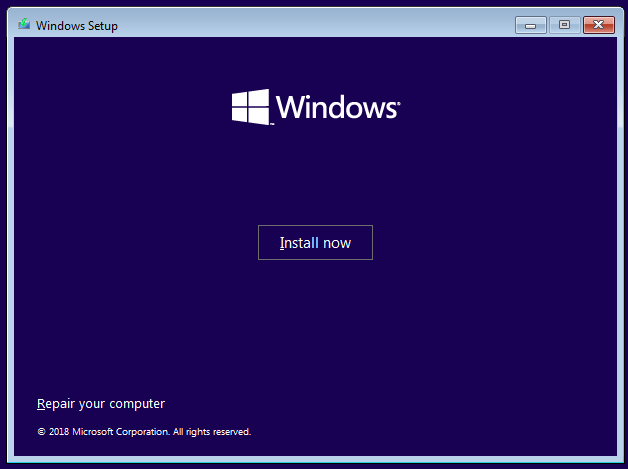
Click on Install now to start the Windows installer.
linux-dual-boot_02a.png
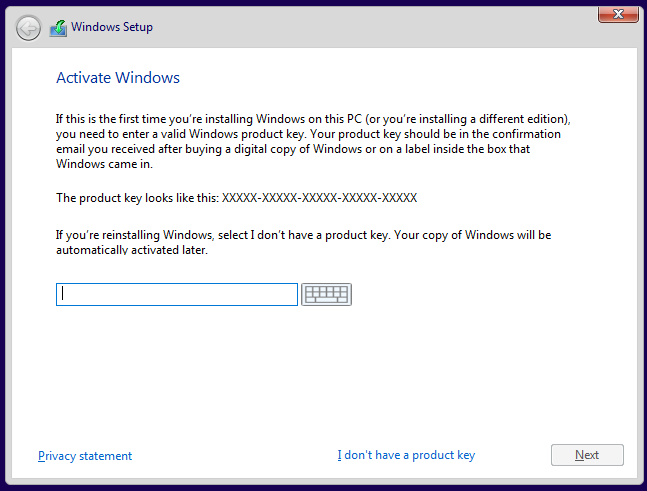
On the next screen, it will ask for your product key. If you don’t have one because Windows 10 came with your PC, select «I don’t have a product key.» It should automatically activate after the installation once it catches up with updates. If you do have a product key, type that in and click Next.
linux-dual-boot_03.png
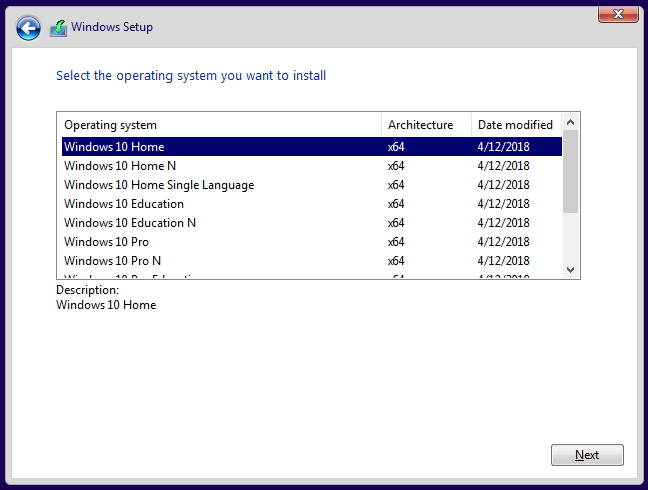
Select which version of Windows you want to install. If you have a retail copy, the label will tell you what version you have. Otherwise, it is typically located with the documentation that came with your computer. In most cases, it’s going to be either Windows 10 Home or Windows 10 Pro. Most PCs that come with the Home edition have a label that simply reads «Windows 10,» while Pro is clearly marked.
linux-dual-boot_04.png
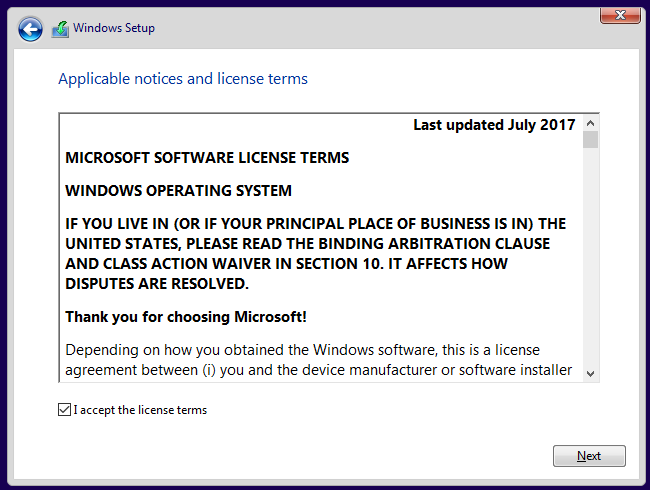
Accept the license agreement by checking the box, then click Next.
linux-dual-boot_05.png
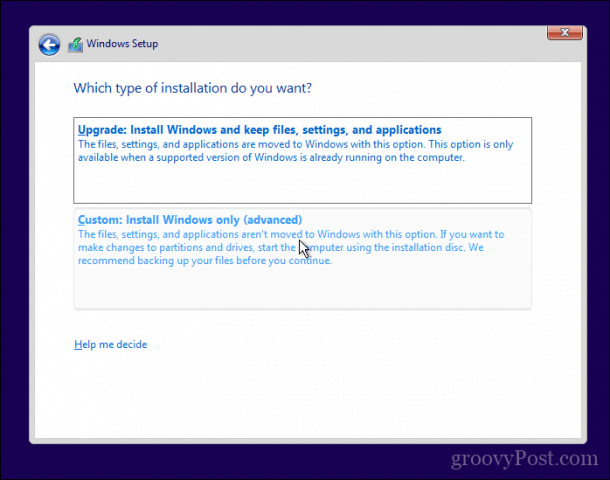
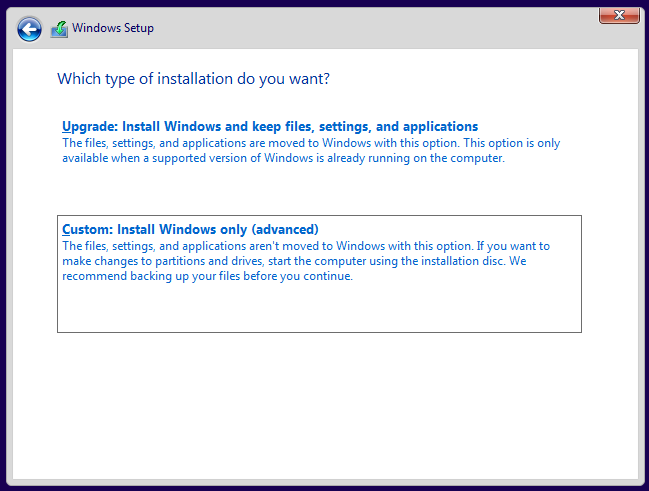
After accepting the agreement, you have two installation options available. Choose the second option, Custom: Install Windows only (advanced).
linux-dual-boot_06.png
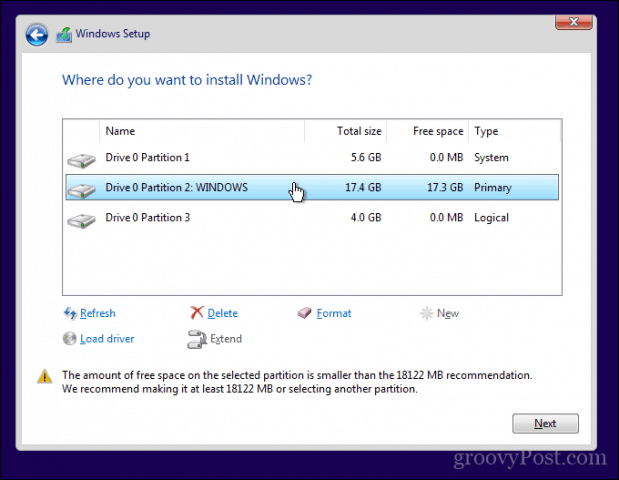
The next screen should show your current hard disk configuration.
linux-dual-boot_07.png

Your results will probably look different than mine. I have never used this hard disk before, so it’s completely unallocated. You will probably see one or more partitions for your current operating system. Highlight each partition and remove it.
At this point, your screen will show your entire disk as unallocated. To continue, create a new partition.
linux-dual-boot_08.png
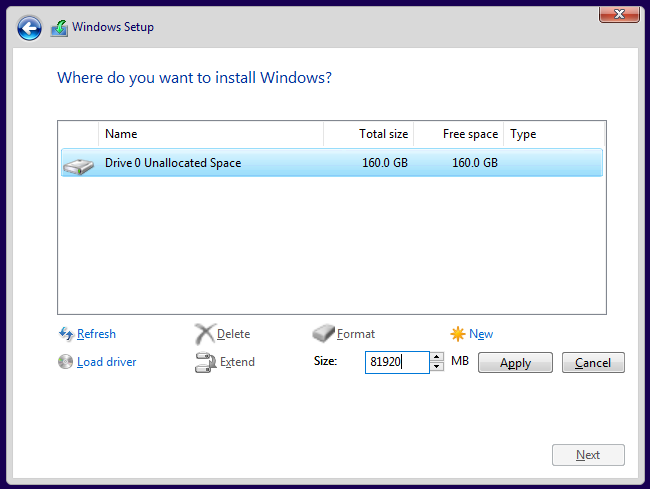
Here you can see that I divided the drive in half (or close enough) by creating a partition of 81,920MB (which is close to half of 160GB). Give Windows at least 40GB, preferably 64GB or more. Leave the rest of the drive unallocated, as that’s where you’ll install Ubuntu later.
Your results will look similar to this:
linux-dual-boot_09.png
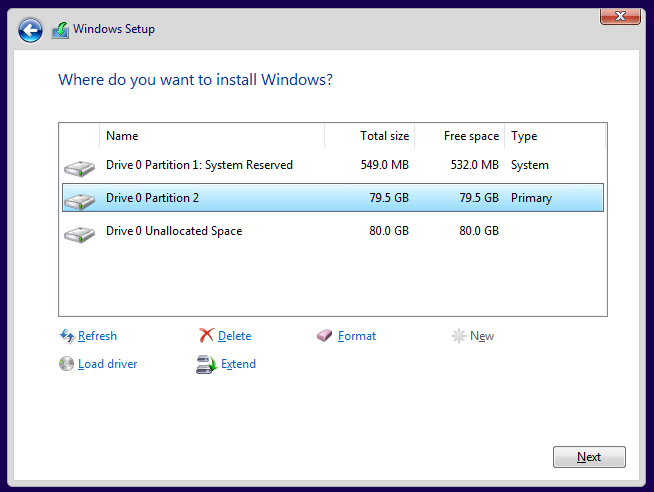
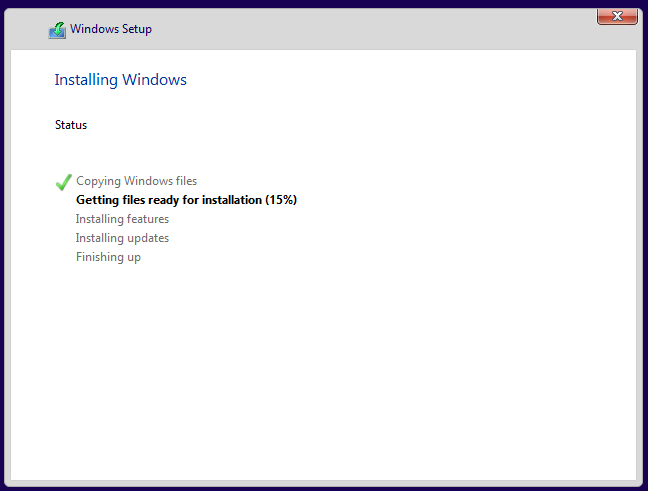
Confirm the partitioning looks good to you and click Next. Windows will begin installing.
linux-dual-boot_10.png
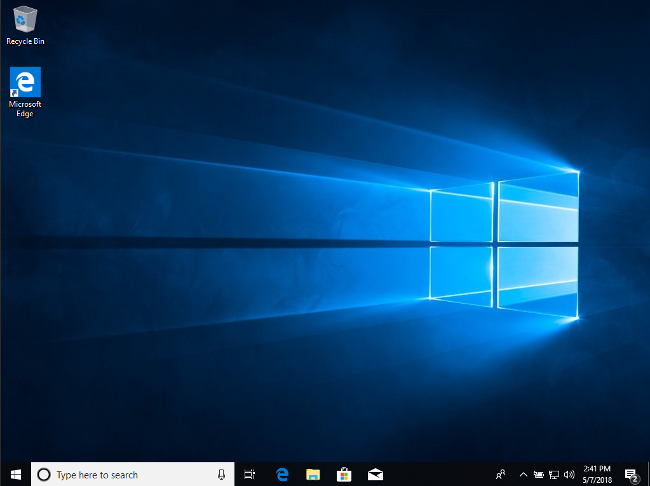
If your computer successfully boots into Windows, you’re all set to move on to the next step.
linux-dual-boot_11.png
Installing Ubuntu
Whether it was already there or you worked through the steps above, at this point you should have Windows installed. Now use the Ubuntu installation media you created earlier to boot into Ubuntu. Go ahead and insert the media and boot your computer from it. Again, the exact sequence of keys to access the boot menu varies from one computer to another, so check your documentation if you’re not sure. If all goes well, you see the following screen once the media finishes loading:
linux-dual-boot_12.png

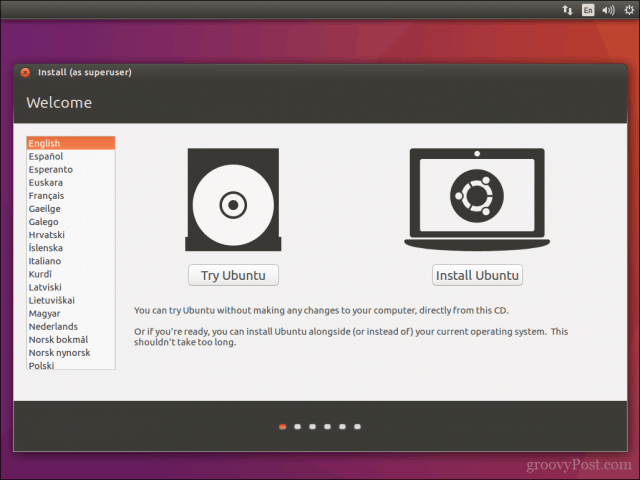
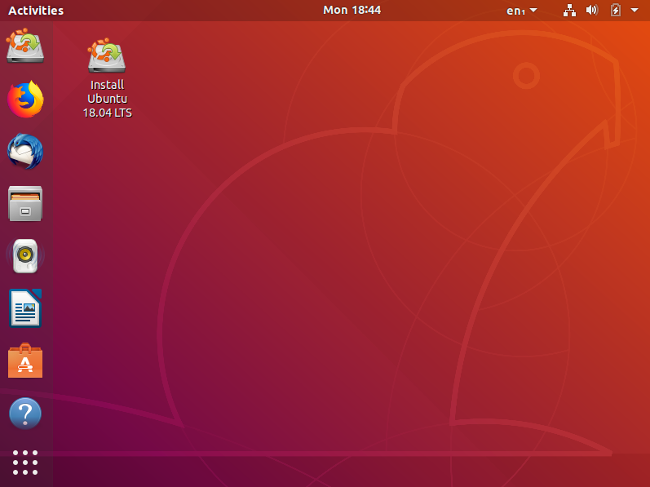
Here, you can select between Try Ubuntu or Install Ubuntu. Don’t install just yet; instead, click Try Ubuntu. After it finishes loading, you should see the Ubuntu desktop.
linux-dual-boot_13.png
By clicking Try Ubuntu, you have opted to try out Ubuntu before you install it. Here, in Live mode, you can play around with Ubuntu and make sure everything works before you commit to the installation. Ubuntu works with most PC hardware, but it’s always better to test it out beforehand. Make sure you can access the internet and get audio and video playback. Going to YouTube and playing a video is a good way of doing all of that at once. If you need to connect to a wireless network, click on the networking icon at the top-right of the screen. There, you can find a list of wireless networks and connect to yours.
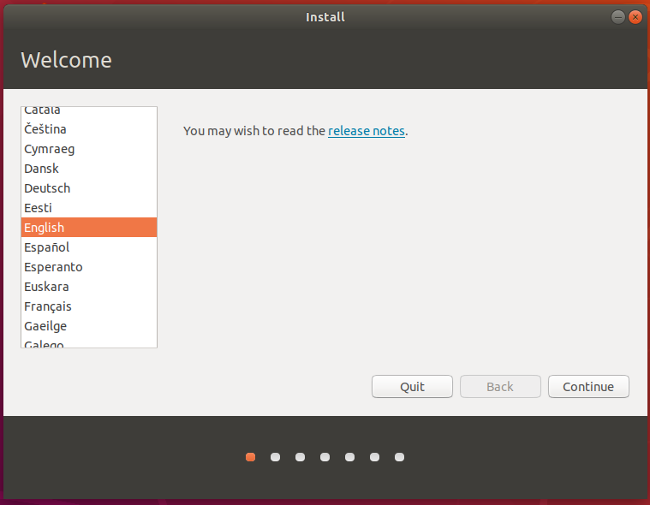
Once you’re ready to go, double-click on the Install Ubuntu 18.04 LTS icon on the desktop to launch the installer.
Choose the language you want to use for the installation process, then click Continue.
linux-dual-boot_15.png
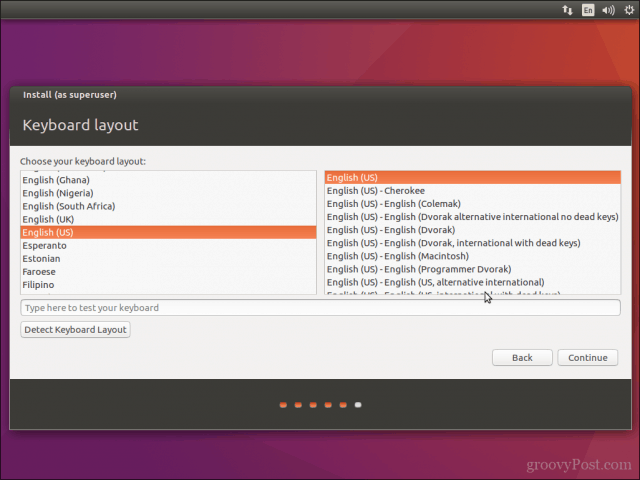
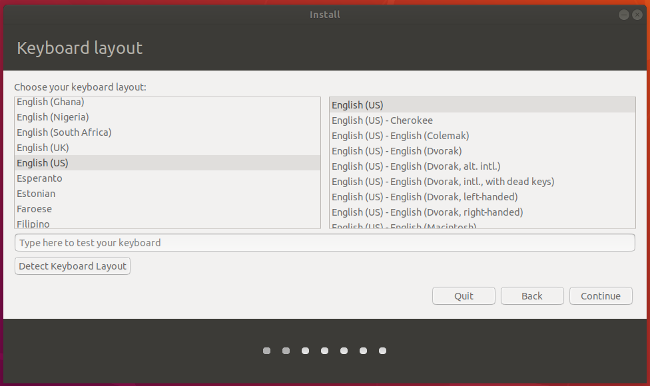
Next, choose the keyboard layout. Once you’ve made your selection, click Continue.
linux-dual-boot_16.png
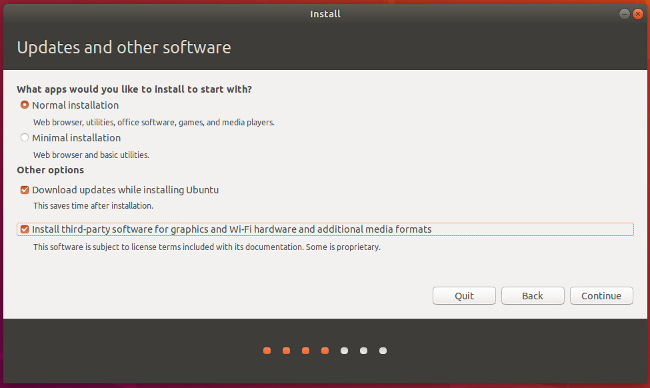
You have a few options on the screen below. One, you can choose a Normal or a Minimal installation. For most people, the Normal installation is ideal. Advanced users may want to do a Minimal install instead, which has fewer software applications installed by default. In addition, you can choose to download updates and whether or not to include third-party software and drivers. I recommend checking both of those boxes. When done, click Continue.
linux-dual-boot_17.png
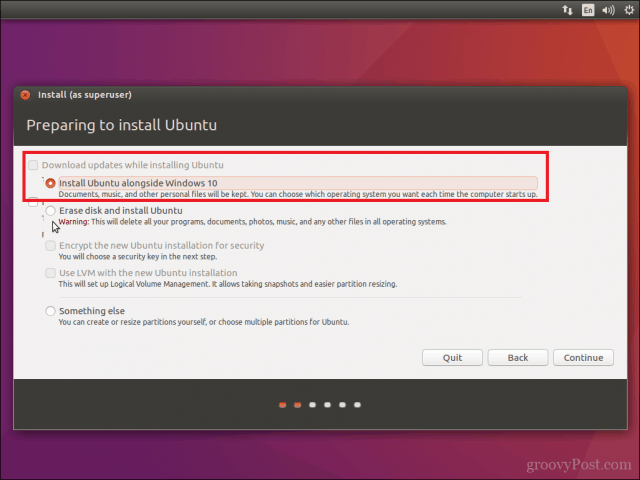
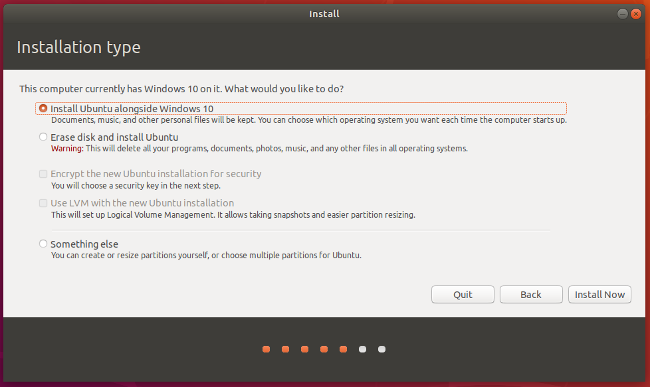
The next screen asks whether you want to erase the disk or set up a dual-boot. Since you’re dual-booting, choose Install Ubuntu alongside Windows 10. Click Install Now.
linux-dual-boot_18.png
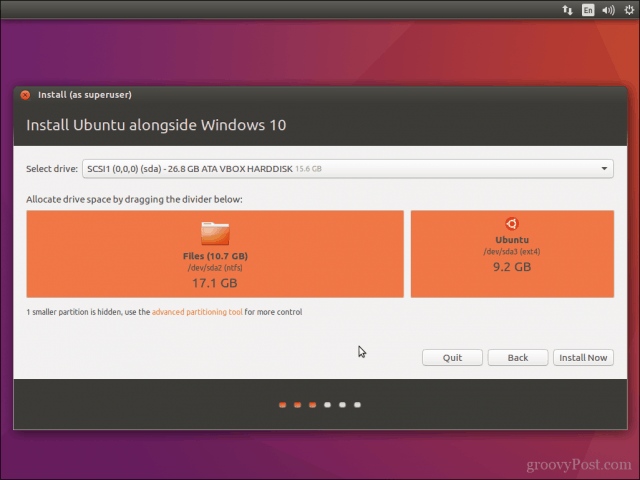
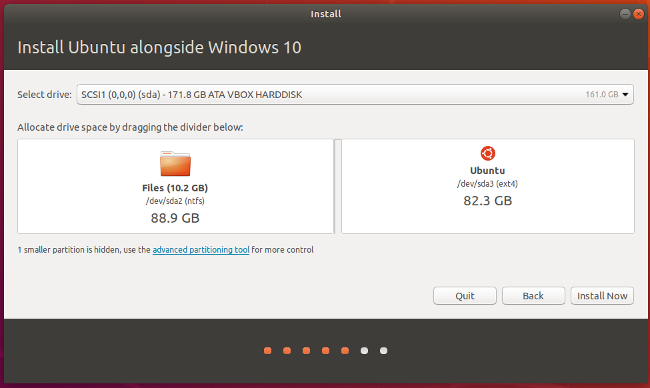
The following screen may appear. If you installed Windows from scratch and left unallocated space on the disk, Ubuntu will automatically set itself up in the empty space, so you won’t see this screen. If you already had Windows 10 installed and it’s taking up the entire drive, this screen will appear and give you an option to select a disk at the top. If you have just one disk, you can choose how much space to steal from Windows and apply to Ubuntu. You can drag the vertical line in the middle left and right with your mouse to take space away from one and gives it to the other. Adjust this exactly the way you want it, then click Install Now.
linux-dual-boot_18b.png
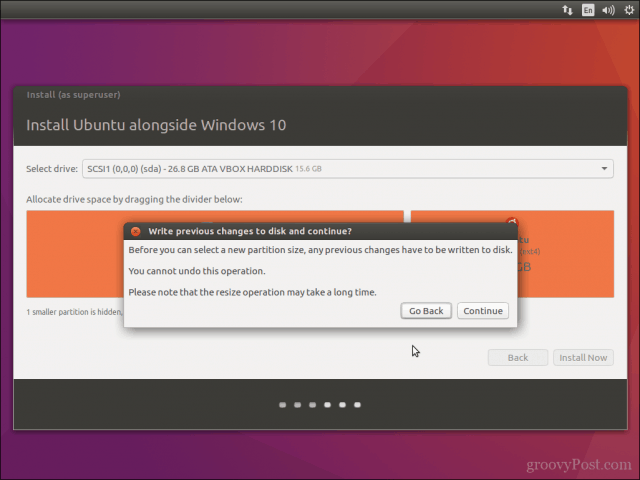
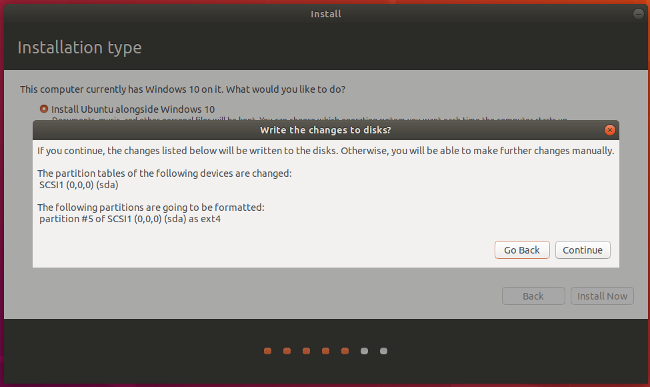
You should see a confirmation screen indicating what Ubuntu plans on doing. If everything looks right, click Continue.
linux-dual-boot_19.png
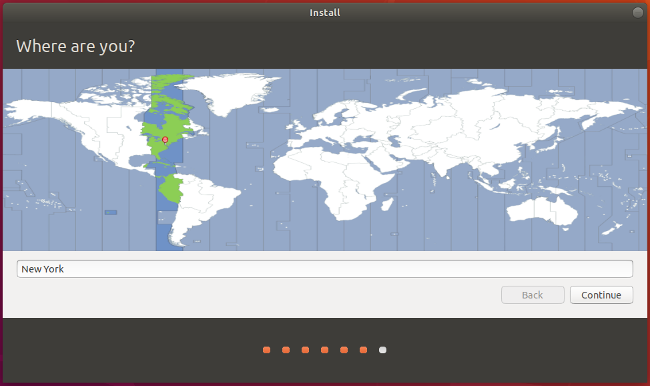
Ubuntu is now installing in the background. You still have some configuration to do, though. While Ubuntu tries its best to figure out your location, you can click on the map to narrow it down to ensure your time zone and other things are set correctly.
linux-dual-boot_20.png
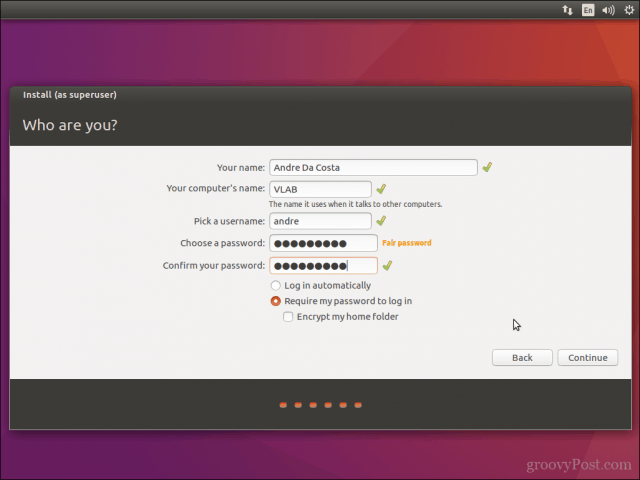
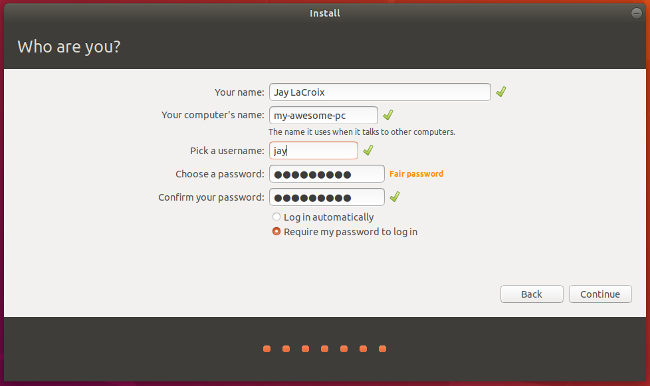
Next, fill in the user account information: your name, computer name, username, and password. Click Continue when you’re done.
linux-dual-boot_21.png
There you have it! The installation is complete. Go ahead and reboot the PC.
linux-dual-boot_22.png

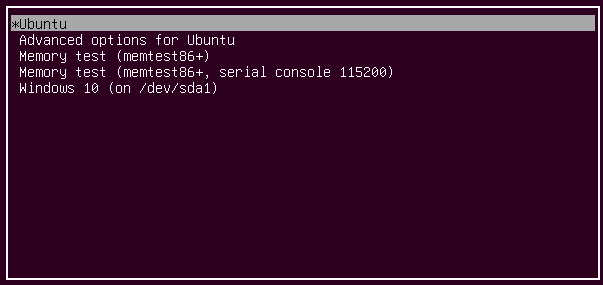
If all went according to plan, you should see a screen similar to this when your computer restarts. Choose Ubuntu or Windows 10; the other options are for troubleshooting, so I won’t go into them.
linux-dual-boot_23.png
Try booting into both Ubuntu and Windows to test them out and make sure everything works as expected. If it does, you now have both Windows and Ubuntu installed on your computer.