Как включить общий доступ к интернету через систему Windows

Как работает общий доступ к интернету (ICS)
Для начала нужен один компьютер, который называется главным, он должен быть подключен к интернету, а также независимо от того, к другим компьютерам в локальной сети.
На главном компьютере необходимо включить общий доступ к интернету (ICS). Тогда другие компьютеры в локальной сети подключаться к интернету через главный компьютер.
Включение общего доступа к интернету (ICS)
Для включения ICS на главном компьютере:
- Откройте окно «Сетевые подключения».
- Щелкните правой кнопкой значок того сетевого подключения, доступ к которому вы хотите получить, а затем выберите пункт Свойства.
- Нажмите кнопку Общий доступ и установите флажок Разрешить другим пользователям сети использовать подключение этого компьютера для доступа к интернету .
- Вкладка «Общий доступ» недоступна, если имеется только одно сетевое подключение.
- Можно также установить флажок Разрешить другим пользователям сети управлять общим доступом к интернету или запрещать его .
Для проверки подключения к локальной сети и к интернету убедитесь, что файлы можно совместно использовать между компьютерами и каждый компьютер имеет доступ к интернету.
Настройка протокола TCP/IP
Для использования общего доступа к интернету убедитесь, что подключение локальной сети (LAN) на каждом компьютере настроено на автоматическое получение IP-адреса.
- Откройте окно «Сетевые подключения».
- Щелкните правой кнопкой мыши значок подключения к локальной сети и выберите команду Свойства.
- Выберите Протокол интернета версии 4 (TCP/IPv4) или Протокол интернета версии 6 (TCP/IPv6) и нажмите кнопку Свойства .
- Выберите Получать IP-адрес автоматически или Получать IPv6-адрес автоматически и нажмите кнопку ОК .
Другие компьютеры в локальной сети необходимо настроить на доступ к интернету (ICS).
Не используйте технологию ICS в сети с контроллерами домена, шлюзами или DHCP- или DNS-серверами. Не используйте ICS на системах, настроенных на статические IP-адреса.
Подключение ICS и VPN
Если создать на главном компьютере корпоративной сети подключения к виртуальной частной сети (VPN) и включить для этого подключения доступ к интернету, весь трафик интернета будет направляться к корпоративной сети, и компьютеры в домашней сети будут иметь доступ к корпоративной сети.
Если не включать общий доступ к интернету (ICS) для подключения к сети VPN, другие компьютеры будут без доступа к интернету или к корпоративной сети, пока подключение к сети VPN оставаться активным на главном компьютере.
ICS и сети без точки доступа
Если подключение к интернету совместно используется в сети без точки доступа, ICS будет отключен, если:
- Пользователь отключается от сети без точки доступа.
- Пользователь создает новую сеть без точек доступа, нельзя отключится от сети без точки доступа, для которой включен ICS.
- Пользователь выходит из системы и снова входит (не отключившись от сети без точки доступа).
How to Share an Internet Connection in Windows 7
The Internet Sharing feature in Windows is easy. Windows 7 makes it easy for you to get connected to the Internet and to share an Internet connection with other computers in your network. You can use the Windows Internet Connection Sharing feature on your Windows 7 computer to let one or more computers share in your Internet connection.
What is internet connection sharing?
Internet Connection Sharing (ICS) is a feature that allows a device with Internet access to act as a host or access point for other devices to connect to the Web.
Microsoft and Windows 7 makes it easy for you to get connected to the Internet and to share an Internet connection with other computers in your network. You can use the The benefit of this approach to Internet sharing is that there is no router requirement – however, the host device (computer) must be turned on for other computers to successfully access the Internet.
Follow these steps to set up the Windows 7 Internet Connection Sharing feature:
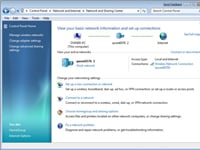
1 Choose Start→Control Panel→Network and Internet. Click the Network and Sharing Center link.
The Network and Sharing Center opens.

2 In the resulting Network and Sharing Center window, click the Manage Wireless Network’s link.
The window that appears lets you “Manage Wireless Networks That Use (Wireless Network Connect).”
3 Click a connection and then click the Adapter Properties link.
The Connection Properties dialog box appears.
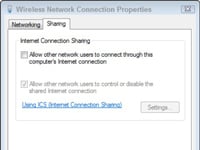
4 Click the Sharing tab.
This tab doesn’t give you a whole lot of options.
5 Select the Allow Other Network Users to Connect through This Computer’s Internet Connection check box.
You might also be able to select the Allow Other Network Users to Control or Disable the Shared Internet Connection check box (Optional). This setting lets other people on your network control the shared Internet connection by enabling or disabling it.
6 Click OK and then close the Manage Wireless Networks window to save the shared connection settings.
Before they can start using your shared connection, users on your network need to configure their TCP/IP settings so that they get an IP connection automatically.
About the Book Author
Nancy Muir (Port Townsend, WA) is the owner of a writing and consulting company that specializes in business and technology topics. Nancy has more than 40 books to her credit. Prior to her writing career, Nancy worked in the publishing industry where she was closely involved in the development of new series and various aspects of technology publishing.
Windows internet share windows 7
As you know we can enable Windows 7 Internet Connection Sharing (ICS) feature on computer (host computer) in order to share Internet connection with other computers, and so I will explain how to do it here.
The benefit of this approach is no router is required to share Internet, but the drawback is this host computer needs to be on for other computers to access Internet.
Let’s start to enable Windows 7 Internet connection sharing feature on computer:
1) Go to Start and click on Control Panel.
2) Proceed to click View network status and tasks in Control Panel window.

3) Network and Sharing Center will appear, click on Change adapter settings.

4) Here it will show the network adapters (wireless or wired) available on computers, and you should right click on the network adapter that has Internet connection and click Properties. In this case, my network adapter is connected to DSL modem, and I’ve another wireless adapter that I will connect to other computers with ad-hoc wireless connection later.

5) That network adapter’s properties window will appear, click on Sharing tab and then tick on Allow other network users to connect through this computer’s internet connection check box to enable Internet sharing.
Note: Please make sure you enable ICS on the network adapter connection that connects to Internet.
Note: If you want other network users to enable or disable the shared Internet connection, tick the Allow other network users to control or disable the shared Internet connection check box. This option is useful if you use modem dial up method to access Internet. For cable/DSL connection user, this option is better disabled and centrally managed by system administrator of this computer.
Note: Tick Establish a dial-up whenever a computer on my network attempts to access the Internet if you use modem dial up method to access Internet. However this check box is only available on the dial-up connection’s properties.
Note: If you have web, mail or other servers in your home network, you can actually click Settings… to select and allow the server to be accessed by Internet user, however I don’t quite recommend using this feature as this Windows 7 is not primary built to be a router. The proper way is to get a hardware router for doing this.

6) Proceed to click on Networking tab, you should un-tick Client for Microsoft Networks and File and Printer Sharing for Microsoft Networks check boxes. This approach would better secure the network and won’t accidentally expose your home network resources to Internet. Firewall is also highly encouraged to be enabled on ICS host computer. Click OK at last.

7) You will see there is a Shared wording on that network adapter after the sharing.

8) After enabling Windows 7 Internet connection sharing feature, the network card connected to the home network (wired or wireless) would be assigned a static IP address 192.168.137.1 with netmask 255.255.255.0 (It would be that wireless adapter in this case). This ICS host will act as a DHCP server and assign other IP addresses in the 192.168.137.x/24 range to other client computers.
9) In order to access Internet, other client computers (Windows Vista, XP, 2000, etc) should configure TCP/IP on their local area connection to obtain an IP address automatically. Then those computers will be assigned IP address in the 192.168.137.x range and able to access Internet through this ICS host computer. Good luck!