How to Search Through File Contents on Windows 10

There’s a hidden feature in Windows 10 that lets you quickly and easily search the contents of files, instead of just searching for filenames.
Windows comes with a robust search engine that allows you to find apps, search the Windows Store and the web, and find files on your PC. The search engine in Windows 7 used to find content not just in file names, but also in the contents of files. You could even search the contents of .zip files in Windows 7.
Most people are unaware that this functionality still exists in Windows 10. It’s just not obvious how to enable it. Today we’ll show you how to enable searching through file contents in Windows 10.
Turn on Option To Search Through File Contents
Click the Cortana or Search button or box on the Taskbar and type “indexing options.” Then, click on Indexing Options under Best match.

On the Indexing Options dialog box, click Advanced.
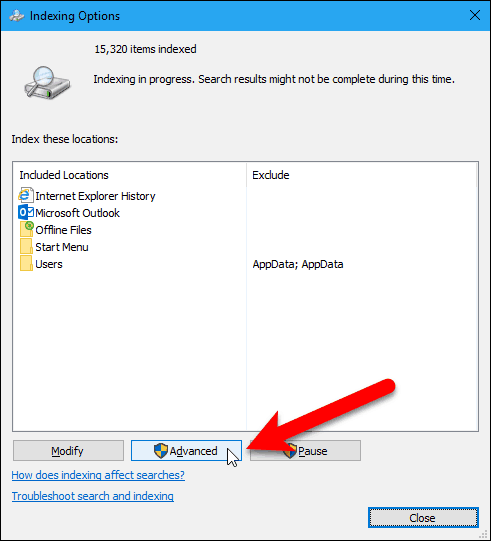
Click the File Types tab on the Advanced Options dialog box. By default, all the extensions are selected, and that’s what we want. This will allow Windows to search through all the types of files on your hard drive.
Select the Index Properties and File Contents option in the How should this file be indexed section. Then, click OK.

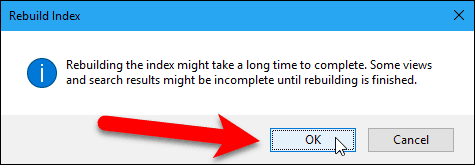
A Rebuild Index dialog box displays, warning you that rebuilding the index might take a long time. That means that all the contents of your hard drive might not be searched until the indexing process is finished. Click OK.
Click Close on the Indexing Options dialog box.

Search Through File Contents in File Explorer
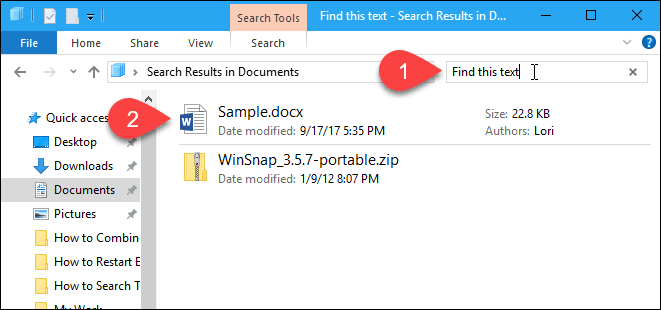
Now, when you search for text in File Explorer, Windows will search the contents of files for the text in addition to searching the file names.
Remember, if you don’t get results for your search right away, you may have to wait for the folders and files to be indexed.
What methods do you use to search the contents of files in Windows? Do you use any third-party apps to search the contents of files? Let us know your thoughts and experiences in the comments.
How To Find File Content in Windows Search
When you are a PC user, using Windows Search is second nature after a while. You can set up your indexing options to find exactly what you need—any document, picture, or music file you want, Windows Search will (usually) find it.
Looking for a more robust file search tool? See what Lookeen has to offer..
What many wonder is if it’s possible for Windows Search to find a document by its content. If you need Windows Search to find file content, for example searching for text within .php, .html, and plenty of other text based files, you will need to add file extensions to your Windows Search Options.
Searching for File Content
The following steps will work on Windows Vista, 7, 8, and 10 in a similar way. The screens and windows may look slightly different from version to version but the process is going to be the same. Here’s what you need to do to get Windows Search to find file content:

- Open your Indexing Options, fastest way to do this is to search for ‘indexing’
- Click on the Advanced button
- Then click on the File Types tab
- In the list that shows up with all the File types, choose the ones that you would like to search the contents of
- At the bottom of the window where it says “How should this file be indexed?” Select the one that says Index Properties and File Contents
- If there’s a file extension that you do not see on the list that you want to be able to search the contents of then you can add it on the bottom where it says Add new extension to list:
- The index will then rebuild for a bit to fit the new options in
This should now have Windows Search finding file content. You can also change Folder Settings to make sure that when you do a search in File Explorer, your results will also show file content. To do so in Windows 8 & 10, follow these steps:
- In any File Explorer window, click File, then Change folder and search options
- Click on the Search tab, then check the box next to Always search file names and contents
- Click Apply then OK

This requires that the index rebuild itself once again, which can take some time. Once that is all done, you will now be able to find file content using Windows Search. If you find that the search results are not up to par, then you may want to look into a third party search program like Lookeen, to find file content quickly and easily.
www.makeuseof.com
Follow MakeUseOf.com
How to Search File Contents in Windows
Windows 10 search is better than ever. Try these tips and third-party tools if you want to have a better search experience.
It can be hard to keep track of all the data on your computer, which is why the built-in Windows search function can come in so handy. But have you ever found it doesn’t always turn up the result you want?
This might be because you’re trying to search text inside a file. By default, Windows won’t look at the internals of every single file when performing your search. However, there is a way to enable this.
Not only can the Windows search be improved, but there are third-party programs that might offer you better search experiences and we’ll cover these too.
Search File Contents Using Windows Search
Windows 10 is better at searching for files and folders than it’s older versions. It’s usually great at finding the file you need. However, there might be an occasion where the file you seek doesn’t come up.
This is because, by default, Windows search doesn’t look at the contents of every file type, nor does it scan files that haven’t been indexed. Here’s how to change both of those things.
About the Windows File Index
The Windows index catalogs information about your files, like the metadata and the words within them. This allows your computer to find things quicker—it doesn’t have to scan each file individually, but can instead look in the index.
Many apps on your system use the index. File Explorer is the obvious place, but Photos, Groove, Outlook, and Cortana all use the index too.
The index updates automatically as the files on your computer change. It will take up roughly less than 10 percent of the size of the indexed files (so 100 MB of files will have an index of less than 10 MB).
While these methods will make your file search more useful, it’s worth noting that they can slow down the speed at which you’ll get your results. The more file types that have their contents indexed and the more folders searched, the longer it’ll take. If you notice a significant slowdown then it might be worth cutting back on your indexing and only enabling the more obscure searches when necessary.
1. Change General Search Options
There are a couple of general options that you can change to enhance the file index and search.
Indexing Options
First, we’ll look at how to change some system-wide indexing options.
Open the Start menu, search for Indexing Options, and select the result. In the window that opens, click Advanced and remain on the Index Settings tab.
Beneath the File Settings heading, you can enable two options:
- Index encrypted files
- Treat similar words with diacritics as different words
The first will add encrypted files to the index. Encryption can help protect your files, so you may not want these indexed.
VeraCrypt is a free, open source encryption tool that you can use to encrypt and protect your valuable personal data in Windows.
The second refers to diacritics, which are also known as accents. Those are the little symbols or glyphs that appear on some words like café. Once you enable this, «cafe» and «café» would be treated as different words. This option is useful if you have many files in different languages.
Once done, click OK to save your changes.
File Explorer Options
Next, we’ll change how search operates within File Explorer.
Open the Start menu, search for Change search options for files and folders, and select the result.
Here you can enable options for when searching non-indexed locations. These are:
- Include system directories (enabled by default)
- Include compressed files (ZIP, CAB, etc.)
- Always search file names and contents (this might take several minutes)
Choose what you want to enable, but the third is crucial if you want a thorough search of files and their contents.
Once done, click OK to save your changes.
2. Search For and Inside More Locations
Windows indexes locations like your Documents, Music, Pictures, and Videos by default. If you like, you can add more locations to the index.
To do this, open the Start menu, search for Indexing Options, and select the result. This will open a window that shows you all the current indexed locations.
To add something to this list, click Modify > Show all locations. Use the Change selected locations section at the top—click the arrow to expand a drive or folder, then place a tick in the box to index it. Once done, click OK.
3. Search Inside More File Types
By default, Windows only adds the file contents of certain file types to the index.
To change this, we again need to use the Indexing Options section. Click Advanced and switch to the File Types tab. Here you will find a list of most file types on your system, right down to the really obscure ones. If a file type isn’t listed, input it in the Add new extension to list text field and click Add.
If you click a common file extension from the list, like doc, look beneath the How should this file be indexed? section. You’ll notice that the file is indexed with the Index Properties and File Contents option. This means that Windows search will look inside DOC files, and other file types marked like this, when you make a search.
Select a more obscure file type and it’ll likely just be set to Index Properties Only, which refers to metadata like the file name rather than anything inside it.
If you know what the file type is that you’re after, find it on the list and switch it so that it’s set to Index Properties and File Contents. Once done, click OK.
Search File Contents Using Third-Party Programs
We’ve rounded up a list of Windows search alternatives in the past, but these don’t specifically search file contents. If the Windows search isn’t for you then you can use a third-party tool called Agent Ransack. This isn’t the only program available, but it’s potentially the best due to its system compatibility, list of features, and lack of a price tag.
Agent Ransack comes from Mythicsoft and is a free alternative to their FileLocator Pro program. You can search your entire system for content text and you can also specify parameters like file size and date modified. It has an incredibly simple and easy to use interface, which is quite possibly easier to navigate than the actual Windows search.
The tool will tell you exactly which line your search keyword appears within a file (along with how many times it’s contained within) and it’ll give you the file search results super quickly. Of course, if you’re searching your entire system then it might take a while, but you can narrow down to folder searches if you need to cut out some excess.
Shortcuts and Tips for Windows Search
These methods will help you search your system thoroughly, allowing you to dig deep through masses of data and scout out that specific file that you need. Whether you prefer the built-in Windows search or a third-party alternative, both will get the job done well.
If you want to get better at using Windows search and quickly find the file you need, check out our Windows 10 search cheat sheet full of tips and shortcuts.