How do I repair my Windows 7 installation? The product key is still attached to the PC.
I had just lost my datas and I want to repair my OS can I avail a copy of it.. The key of the OS that I purchase was still attached on the PC
New computers that come preinstalled with Windows 7 often have what is called a recovery partition. This is used to reinstall the operating system in the event of a system crash. To access it, you will need to boot into when you start your computer by pressing a function key. This can be either F1, F2, F9, F10, F11, F12 or even DEL or Tab key. Consult the owners manual that came with your PC for instructions about how to reinstall Windows.
If your recovery partition is not available or damaged, you should contact the manufacturer of your computer and request a recovery disc set you can use to reinstall Windows 7. They might charge a small shipping and handling fee.
Download the ISO Image of Windows 7
Windows 7 Professional x64 (64-bit)
Windows 7 Professional x86 (32-bit)
Windows 7 Home Premium x64 (64-bit)
32 bit
http://msft-dnl.digitalrivercontent.net/msvista/pub/X15-65732/X15-65732.iso
ImgBurn — In addtion to supporting the creation of CD’s from .ISO files,
it supports a wide range of other image file formats, and it’s free.
(BIN, CUE, DI, DVD, GI, IMG, MDS, NRG, PDI and ISO)
http://www.imgburn.com/
Download and install Gear ISO burn (Free):
http://www.gearsoftware.com/GEAR-ISO-Burn.php
Note: Always use the slowest burn speed (4x or 2x) if offered a choice.
You will have to obtain the drivers for your computer from the manufacturers website.
9 people were helped by this reply
Did this solve your problem?
Sorry this didn’t help.
Great! Thanks for marking this as the answer.
How satisfied are you with this reply?
Thanks for your feedback, it helps us improve the site.
How satisfied are you with this response?
Thanks for your feedback.
If you just need to repair Windows:
What are the system recovery options in Windows 7?
Try Repairing The Windows 7 Installation
1a. Insert the Windows 7 DVD or repair disk and restart your computer. Boot from the DVD, press a key if prompted.
1b. Or if the computer can boot you can press F8 instead repeatedly at boot and chose «Repair your computer» then go to step 4.
2. Choose your language and click Next.
3. Click Repair Your Computer and then select the operating system you want to repair.
4. Click on the Startup Repair link from list of recovery tools in System Recovery Options.
To reinstall Windows:
Reinstall Windows Preinstalled On Computer
OEM computer manufacturers are required to provide at least one way for you to reinstall Windows if you buy a computer with Windows preinstalled — your computer should have included either a restore partition on your hard drive, or Windows install/restore disks. Most computer manufacturers also have a feature to make your own install disks.
If the restore partition is still there and was not removed, it will reinstall Windows 7. There is usually a prompt when you first start the computer telling you what key to press to start the restore — check your manual if you’re not sure how to. Or if you have install disks — insert them, restart and boot from them to start the reinstall process.
If you restore it to factory condition, it will be like it was when you first bought it — all preinstalled programs will be installed. Anything you installed after buying it must be reinstalled. This will remove any personal files on the computer, back them up first.
If you don’t have the restore partition or install disks:
Contact the OEM computer manufacturer and ask them to send you an install disk for your computer — they may or may not do it. If they agree to send you one they may charge a small fee. Contact information for the manufacturer of your computer can be found here:
Reinstall if you bought retail Windows 7:
If you have install disks — insert them, restart and boot from them to start the reinstall process. Reinstalling will remove any personal files on the computer, back them up first.
восстановление запуска windows 7 или startup repair — подробная инструкция.
Существует множество разных проблем, от которых обычные пользователи компьютеров страдают. Может быть из-за того, что ваш компьютер показывает вам ошибку « BOOTMGR is missing » при запуске, или, виндовс выдает синий экран. Или компьютер автоматически перезагружается при запуске (обычно при появлении логотипа Windows).
Это такие проблемы, которые мы обычно исправляем с помощью средства под названием startup repair .
Итак, теперь вопросы, которых мы обычно задаем:
- Что это за «Восстановление при запуске»?
Эта функция очень полезна и эффективна. Основная работа, которую эта функция делает, это восстановление Windows, когда что-то препятствует запуску OC. На техническом языке, можно сказать, что он восстанавливает файлы загрузочного тома, когда ваша операционная система имеет некоторые проблемы с загрузкой.
- Что именно делает «Восстановление при загрузке» нашей Windows?
Startup или Automatic Repair — это единственный инструмент, который Windows использует для восстановления. Этот эффективный инструмент предназначен для восстановления только некоторых глюков. Например, отсутствующие или поврежденные системные файлы, которые в основном использовались для загрузки операционной системы Windows.
- «Восстановление при загрузке» может исправить любые ошибки?
load on startup не может показать вам, что создает проблему для запуска Windows. Он не поможет вам восстановить личные файлы и документы. Он также не может обнаруживать или устранять аппаратные сбои, а также не помогает в борьбе с вирусными атаками и их повреждениями.
Таким образом, startup repair только собирается исправить некоторые определенные вещи. Иначе он скажет вам, что запуск диагностики не может восстановить этот компьютер автоматически.
ПРИМЕЧАНИЕ: Эта статья предназначена только для пользователей Windows Vista и Windows 7. Если вы используете Windows 10/8 , вам нужно будет щелкнуть ссылку, указанную ниже, потому что в Windows 10 или 8 , Startup Repair немного отличается.Просто перейдите по ссылке ниже:
Как использовать Восстановление при загрузке repair win 7?
Во-первых, эта функция не похожа на другие, потому что вы не можете быстро ее открыть, просто щелкнув на чем-то. Но открыть ее не так уж и сложно.
Итак, сначала я собираюсь проинструктировать вас о том, как открыть эту программу. Затем я научу вас, как ее использовать, потому что существуют три разных метода, которые мы используем в соответствии с нашими условиями:
- Вы можете открыть его, когда ваш компьютер автоматически покажет вам экран восстановления Windows Error.
- Вы можете открыть его с помощью параметров предварительной загрузки.
- Вы можете открыть его с помощью установочного диска Windows или загрузочного диска WindowsPen . Причина, по которой я написал все эти разные методы в этой статье, в том, что обычно вы будете использовать данный инструмент, когда ОС не может загрузиться сама. Первый способ очень частоне будетработать, поэтому Вам придется использовать второй. Почему я написал еще один дополнительный метод? Ответ: иногда первый и второй методы не будут работать из-за некоторых поврежденных файлов Windows. И вот тут-то и появился третий метод. Мы применим его с помощью дискаWindowsилиWindows USB Pendrive.
Итак, теперь запустите startup repair , тем способом, который более удобен для Вас. Подробное описание ниже ↓↓↓
# Метод 1 — открыть окно восстановления при загрузке с помощью экрана восстановления ошибок Windows.
В Windows 7 и Windows Vista startup repair есть отличная функция, показывающая вам экран восстановления Windows, когда ваша операционная система имеет некоторые проблемы для нормального запуска.
В этом диалоговом окне вы найдете два варианта, и выбрав первый вариант « start startup repair (recommended) », вы можете легко открыть эту функцию запуска.
Этот параметр будет отображаться автоматически:
Если вы не видите какой-либо опции, как на рисунке, вы можете вручную открыть его с помощью второго метода .
Нажатие на » Launch startup repair (recommended)» напрямую приведет вас к процессу восстановления при запуске.
Иногда в этом окне Вам предложат сделать сделать восстановление системы , и вам просто нужно нажать « ОК ». Так бывает тогда, когда нормальное исправление не будет работать на вашем компьютере.
# Метод 2 — Открытие функции восстановления при запуске с помощью параметров предварительной загрузки.
Экран «Дополнительные параметры загрузки» позволит вам открыть Windows в режиме расширенного поиска неисправностей.
Итак, полностью отключите питание вашего компьютера или ноутбука, после чего вам нужно будет снова включить его. Теперь, когда вы запускаете компьютер, продолжайте нажимать клавишу F8 снова и снова. Вы увидите экран дополнительных параметров загрузки, как на скриншоте ниже.
Если вы не можете найти такой вариант, то единственное и последнее, что вы можете попробовать, это открыть его установкой Windows, поэтому переходите к следующему, третьему методу .
Если вы успешно открыли дополнительные параметры загрузки компьютера, то теперь вам нужно выбрать первый вариант с названием « Восстановить компьютер » или « Repair Your Computer ». Вы увидите следующее:
После этого вас попросят подтвердить свой язык и раскладку клавиатуры, просто выберите свой язык и тип клавиатуры, который вы используете.
Если вы не знаете, какой тип клавиатуры вы используете, вы можете сразу нажать следующую кнопку, чтобы пропустить этот шаг с настройкой по умолчанию.
После выбора языка и клавиатуры, нужно выбрать «Учетную запись пользователя», которую вы хотели исправить.
Итак, выберите своего пользователя и нажмите « Далее ». Этот параметр отображается только если ваша операционная система имеет более одной учетной записи пользователя.
Если у компьютера один пользователь, Вы увидите следующее:
Выбирайте первый пункт: «Начать исправление» или «Startap Repair».
Иногда вам придется сделать восстановление системы. Нужно нажать кнопку « Восстановить », потому что нормальное исправление не поможет проблеме на вашем компьютере, именно поэтому система должна восстановить Windows.
# Метод 3 — Открытие автозагрузки с помощью программы установки Windows Диск или USB.
Если не запускается windows 7 восстановление запуска, вам понадобится использовать ваш установочный диск Windows.
- Во-первых, вам нужно будет загрузиться ваш Windows Disk или USB через меню загрузки . Если вы не знаете, как это сделать, приведенные ниже ссылки помогут вам загрузить ваш диск или флэш-диск.
Теперь вам не нужно ничего делать, просто подождите пока система автоматически покажет ваш установленный Windows. Если этого не произошло, то ваш жесткий диск неактивен, и нужно будет повторно активировать его, используя некоторую команду в cmd (командной строке).
После того, как увидите список с ОС установленными на компьютере, вам просто нужно будет выбрать нужную систему и нажать кнопку « Далее », чтобы продолжить.
После этого нажмите на первый вариант «startup repair», чтобы использовать этот инструмент. Он автоматически исправит ваш компьютер.
Reinstall Windows 7 without losing programs and files (Repair install)
The method of Windows repair placed in the headline of this article has already been mentioned here a year and a half ago. I did not plan a detailed description, but since then it’s been discovered that many site visitors have very vague idea about it. For example, after the recommendation to make a «reinstall on top of the existing one», the discussion participant supposed that «it is something from the times of Win 98/ME». As for me, I consider this technique extremely effective and have been often using it in my practice to recover normal functionality of Windows from XP to 8.1 inclusive. So after all I decided to describe the process in full details.
Despite the fact that at the time of writing many computer owners are still have been using Windows XP, I see no point in writing manuals on this cool but old-fashioned OS. (Vista is out of context at all and is suitable only as a donor of some useful applications that are disabled in newer versions.) At the moment, I continue to use Windows 7 on most home computers, including the main one. Microsoft managed to make Win7 so well, that the doubtful benefits of later versions in the form of Metro interface, App Store and Microsoft account do not really stimulate to pass to them. I consider Win7 the best OS for PC at the moment, and quite long-playing. Therefore I will start with it. However, similar instructions for 8.1 and/or 10 are also planned.
So what is the described «reinstallation on top»? Let’s keep in mind we are not talking about upgrading earlier version of Windows to the later ones. We are considering installing the same version over already installed one — repair installation. This method keeps everything (well, to be exact — the majority) of installed programs, drivers and settings. System core at that is being restored in its initial shape and all system bugs accumulated since previous installation are being repaired. It is necessary to keep in mind some features which will be described later. So first let’s talk about requirements and conditions needed to start the process.
Requirements
- System is working with bugs but still loading. Unlikely from WinXP, where it was possible to reinstall the system by loading from installation disk, in Seven this option does not exist. In other words if the system can’t be start this method won’t work. In this case you can try to force the OS boot up using System Repair Disc; and if this won’t work ether — to roll up to the restore point or try other methods including full reinstallation.
- Time. The process is long and can take up to a few hours depending on the hardware. If you are limited with time don’t read any further and move on to the quicker methods of solving your problem.
- Distributive availability — I mean installation disk or flash drive. Of course, distributive must be compatible by bit capacity, edition, language and service pack (SP) availability. If you are not sure have a look at the system information section; how to get there? – here is the instruction How to determine whether my PC is running Windows 7 of 32 bit or 64 bit. You can find info regarding capacity only thought and the rest is in the section Windows edition. And if it is clear about edition there is one thing about service pack. Microsoft issued only one update pack for Windows 7 — SP1, and most probably that is what installed in your system. But sometimes reinstallation on top of distributive not including SP1. After reinstallation service pack was always installed in a proper way both via manual work or Windows service centre.
- This is not even a requirement but rather a list of small losses going along with the process. After its implementation you lose all or part of installed updates. If your distributive includes SP1 and/or part of updates for the period of its issue, they will be restored in the updated system. Everything else will need to be reinstalled from scratch. Not a big deal but keep in mind. Also, additional language packs will be lost. And the main thing – activation will be lost so you will have to reactivate the system.
Where to get distributive
Microsoft is continuously changing the policy on supplying users with ISO-image of installation DVD. But creative geeks assemble custom distributives which include all editions, capacities, SP1 and updates. Some assemblies contain all those versions for multiple languages. Also often activation is included. I am not telling you to break the law and Microsoft copyright; just keep in mind that this is the most convenient and universal option. This assembly can be saved on one DVD. You can reinstall the system using this DVD and reactivate it with your licenced product key (which you are sure to have) and remain the owner of licenced OS. I will also not tell you where you can download such an assembly. It is an open secret for everybody. By the way you can also find official RTM-distributives for most editions of Windows 7 there as well.
So, you got installation DVD, or downloaded the image and transferred it to the disk or flash drive. Let’s go!
Installation process
- Insert DVD or connect flash drive. If autorun is off run setup.exe from the root of distributive. The window Install Windows pops up.
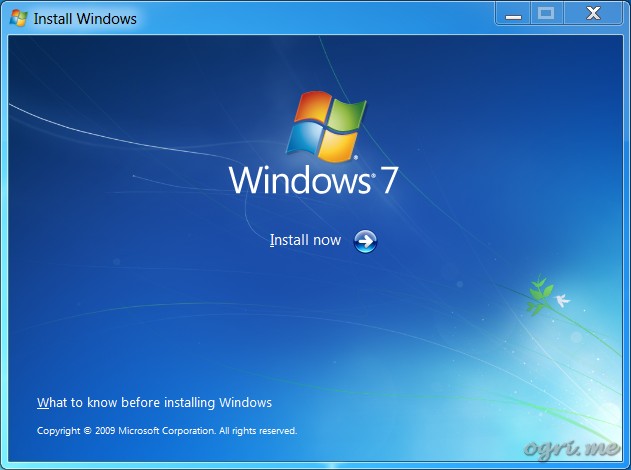
Click Install now. The process is being activated and after copying temporary files we see the next dialogue.
Get important updates for installation.

If Microsoft states that it is important – it is important! From my experience though updates for installation never affected further process. But if you decide to have them next window will be:
Searching for installation updates.

Then after a little wait we get to the next:
Please read the license terms.
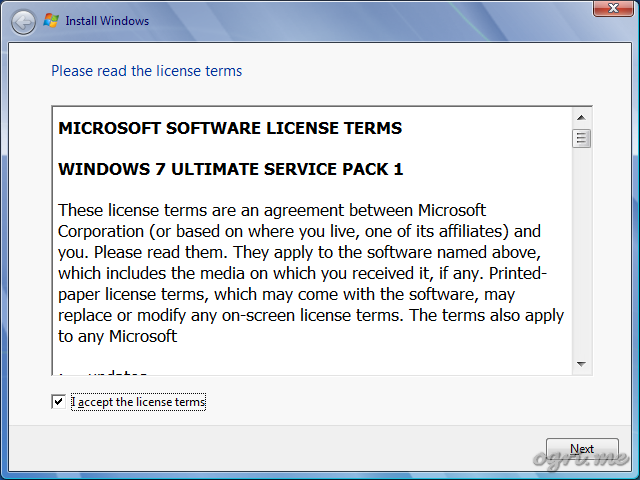
No doubt you’ll carefully read the whole agreement, right? Then mark the check box and click Next.
Which type of installation do you want? Here — attention! Do not accidentally click on full installation or you will get completely clean system!
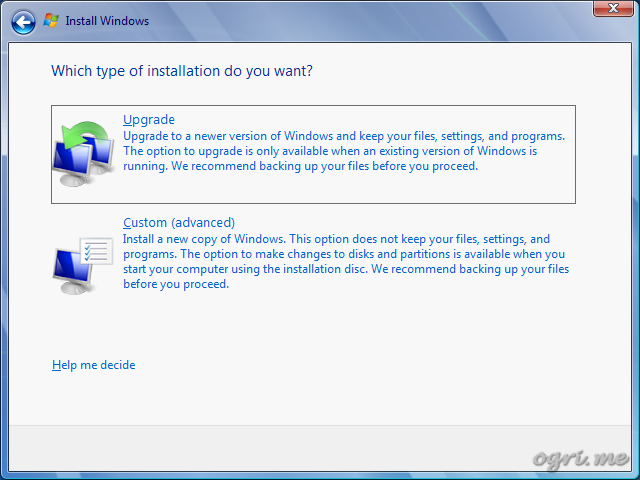
Click on the first item — Upgrade.
Checking compatibility.
Now we will find out if the system allows to be updated.
Compatibility Report. This one is the best:
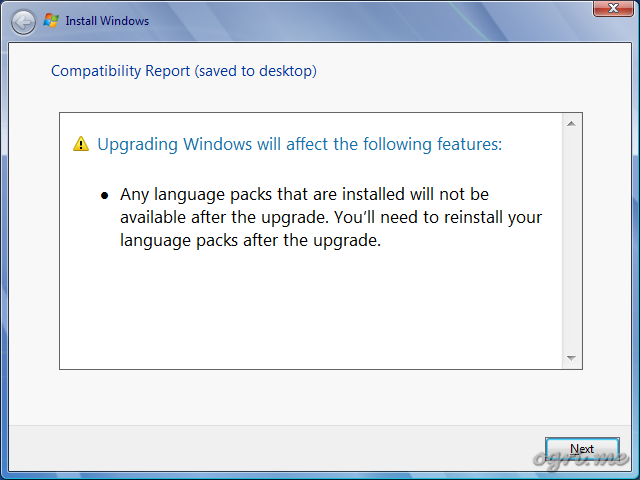
As I mentioned earlier, language packs will be lost after repair installation. Also sometimes you can see info about some devices and applications which might stop working after system upgrading. Probably those are the programs that work in compatibility mode with older versions of Windows. In my practice I ran across such notifications but I never had to reinstall anything – all drivers and applications remained working well after the upgrade. But please keep this in mind. This report will be saved on desktop and after reinstallation can help to figure out what went wrong in case some devices and applications fail.
Click Next — and the process is on!
Upgrading Windows.

Further everything will be as during usual installation with the only difference: the stages of saving and recovering programs and settings will be added to the process. During the process your computer will be rebooting. Also the process might take up to several hours. Based on my experience — one hour or one hour and a half maximum. In any case you can relax before your next step and watch your favourite TV Show.
The screen when you need to do your next action – Set Up Windows.
Type your Windows product key.

As in case of initial installation, entering in the key and activation can be postponed by clicking Skip. Later you can choose different activation methods depending on key label availability — «included with the package that came with your copy of Windows» or «on your computer case». If yes, you can enter the key at this step and click Next.
After finishing the last installation step you will be offered to restart your computer and you will do so. Then your bug-free OS will be ready to use. You will only need to reinstall updates, restore language packs (if they were) and activate the system if you have not done so on Step 9.