Инструкции по установке или удалению подсистемы Windows для Linux в Windows 10 годовщина обновления и создателей Guide to install or uninstall Windows Subsystem for Linux on Windows 10 Anniversary Update and Creators Update
Если вы используете Windows 10 для дизайнеров Update или более поздней версии, следуйте инструкциям по установке Windows 10. If you’re running Windows 10 Creators Update or later, please follow the Windows 10 installation instructions.
Приведенные ниже инструкции предназначены для пользователей, использующих Windows 10 с Годовщинным обновлением или Windows 10 Creators Update. The following instructions are for users running Windows 10 Anniversary Update or Windows 10 Creators Update
До обновления Windows 10 с обновлением (версия 1709) WSL был выпущен в качестве бета-версии и установил один экземпляр Ubuntu при первом запуске «Bash on Ubuntu on Windows» (или bash. exe). Prior to Windows 10 Fall Creators Update (version 1709), WSL was released as a beta feature and installed a single Ubuntu instance when «Bash on Ubuntu on Windows» (or Bash.exe) was first run.
Хотя вы можете использовать WSL в предыдущих выпусках Windows 10, эта бета-версия «Legacy дистрибутив» теперь считается устаревшей. While you CAN use WSL on earlier Windows 10 releases, this beta «legacy distro» is now considered obsolete. Мы настоятельно рекомендуем использовать самую последнюю версию Windows 10. We strongly encourage you to run the most recent version of Windows 10 available. Каждый новый выпуск Windows 10 включает множество сотен исправлений и усовершенствований в WSL, позволяя правильно работать с WSL. Each new Windows 10 release includes many hundreds of fixes and improvements in WSL alone, allowing ever more Linux tools and apps to run correctly on WSL.
Если не удается выполнить обновление до последующего обновления или более поздней версии, выполните следующие действия, чтобы включить и использовать WSL: If you cannot upgrade to Fall Creators Update or later, follow the steps below to enable and use WSL:
Включите режим разработчика, чтобы запустить WSL в юбилейном обновлении или авторских обновлениях Windows 10, необходимо включить режим разработчика: Turn on Developer Mode To run WSL on Windows 10 Anniversary Update or Creators Update, you must enable Developer Mode:
Откройте параметры -> обновления -> и безопасности для разработчиков Open Settings -> Update and Security -> For developers
Выберите переключатель режим разработчика Select the Developer Mode radio button 
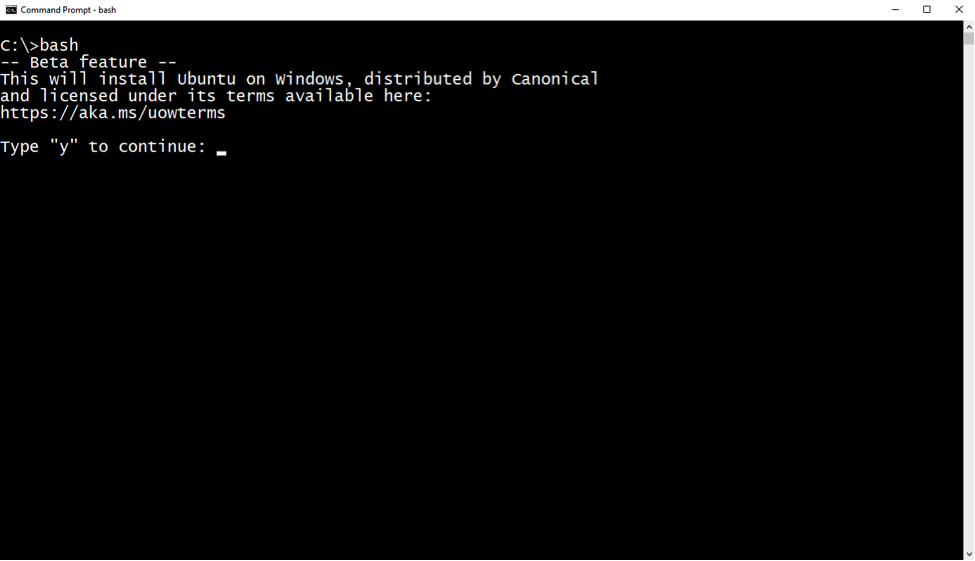
Откройте командную строку. Open a command prompt. Введите bash и нажмите клавишу ВВОД Type bash and hit enter
При первом запуске Bash в системе Ubuntu в Windows вам будет предложено принять каноническую лицензию. The first time you run Bash on Ubuntu on Windows, you’ll be prompted to accept Canonical’s license. После принятия WSL загрузит и установит экземпляр Ubuntu на компьютере, и ярлык «Bash on Ubuntu on Windows» будет добавлен в меню «Пуск». Once accepted, WSL will download and install the Ubuntu instance onto your machine, and a «Bash on Ubuntu on Windows» shortcut will be added to your start menu.

При первом запуске Bash в системе Ubuntu в Windows вам будет предложено создать имя пользователя и пароль UNIX. The first time you run Bash on Ubuntu on Windows, you will be prompted to create a UNIX username and password. Выполните инструкции по новым экземплярам дистрибутив , чтобы завершить установку. Follow the new distro instance instructions to complete your installation
Запустите новую оболочку Ubuntu одним из следующих. Launch a new Ubuntu shell by either:
- Запуск bash из командной строки Running bash from a command-prompt
- Нажатие клавиши «Пуск» Bash в Ubuntu в Windows » Clicking the start menu «Bash on Ubuntu on Windows» shortcut
Удаление устаревших дистрибутив Uninstalling/Removing the legacy distro
Если вы обновляете Windows 10 до версии для дизайнеров, начиная с предыдущего выпуска Windows 10, на котором вы установили WSL, существующие дистрибутив останутся без изменений. If you upgrade to Windows 10 Fall Creators Update from an earlier Windows 10 release upon which you installed WSL, your existing distro will remain intact. Однако мы настоятельно рекомендуем вам установить новое хранилище дистрибутив ASAP и перенести необходимые файлы, данные и т. д. из устаревшей дистрибутив в новую дистрибутив. However, we STRONGLY encourage you to install a new Store-delivered distro ASAP, and migrate any necessary files, data, etc. from your legacy distro to your new distro.
Чтобы удалить устаревшие дистрибутив с компьютера, выполните следующую команду из командной строки или экземпляра PowerShell: To remove the legacy distro from your machine, run the following from a Command Line or PowerShell instance:
Если вы не используете Windows версии 1903 или более поздней, возможно, потребуется запустить wslconfig /u Legacy или lxrun /uninstall /full . If you are not using Windows Version 1903 or higher, you may need to run wslconfig /u Legacy or lxrun /uninstall /full instead.
Удаление устаревшей дистрибутив вручную Manually deleting the legacy distro
При необходимости можно вручную удалить устаревший экземпляр. If you wish, you can manually delete your legacy instance. Это может потребоваться при удалении устаревших дистрибутив с помощью lxrun.exe или при использовании обновления Windows 10 пружины 2018 (или более поздней версии), которые не поставляются с lxrun.exe . This may be required if you encounter issues uninstalling the legacy distro using lxrun.exe , or are running Windows 10 Spring 2018 Update (or later) which do not ship with lxrun.exe .
Чтобы принудительно удалить устаревшую WSL дистрибутив, удалите папку %localappdata%\lxss\ (и все ее вложенное содержимое) с помощью проводника Windows или командной строки: To forcefully delete your legacy WSL distro, delete the %localappdata%\lxss\ folder (and all it’s sub-contents) using Windows’ File Explorer, or the command-line:
Как правильно удалить Linux, установленную рядом с Windows 10

Установка Linux на один жесткий диск рядом с Windows стала настолько простой процедурой, что с ней без труда справится даже начинающий пользователь. Нужно только загрузить компьютер с установочного диска с Linux и выбрать опцию «Установить рядом с Windows», а всё остальное мастер сделает сам, главное, чтобы на системном разделе было достаточно места. Иное дело удалить Linux, не повредив при этом Windows.
Вот тут у новичков могут возникнуть проблемы, так как большой красной кнопки для выполнения этого действия не предусмотрено.
В действительности всё очень просто, за исключением одного момента, когда вам придется восстановить главную загрузочную запись. Итак, прежде всего запишите на DVD или флешку установочный образ с Windows, он вам понадобится для восстановления загрузчика.
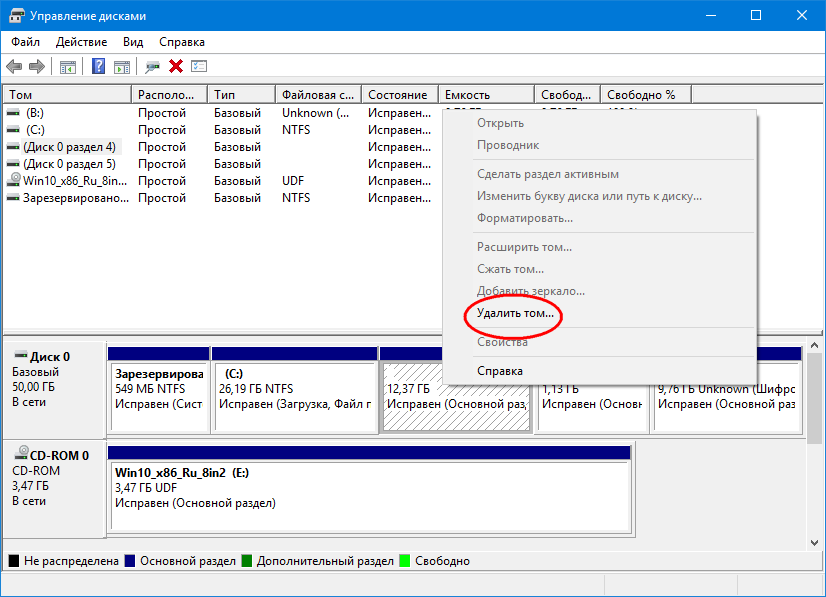
Находясь в работающей Windows, откройте управление дисками и найдите там один или два раздела с установленной Linux. Эти разделы не имеют буквы и располагаются сразу после основного системного тома с Windows или после пользовательского тома, если установка Linux предварялась его разбиением.
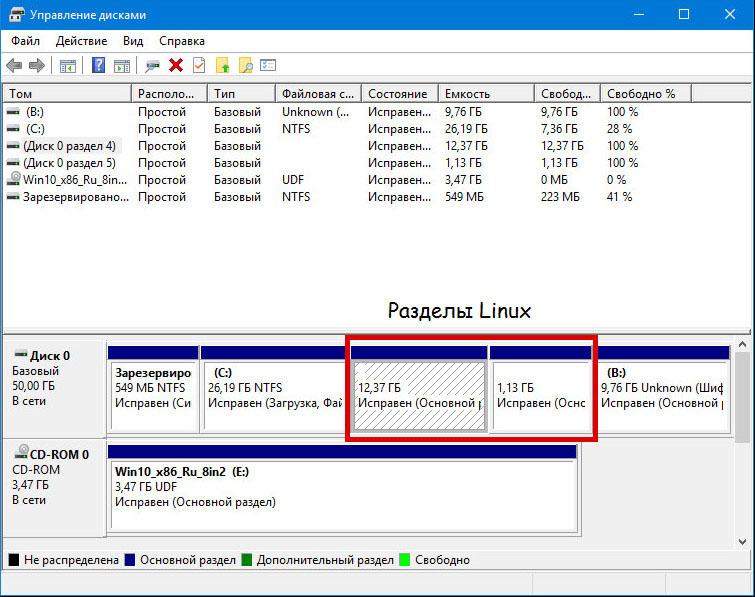
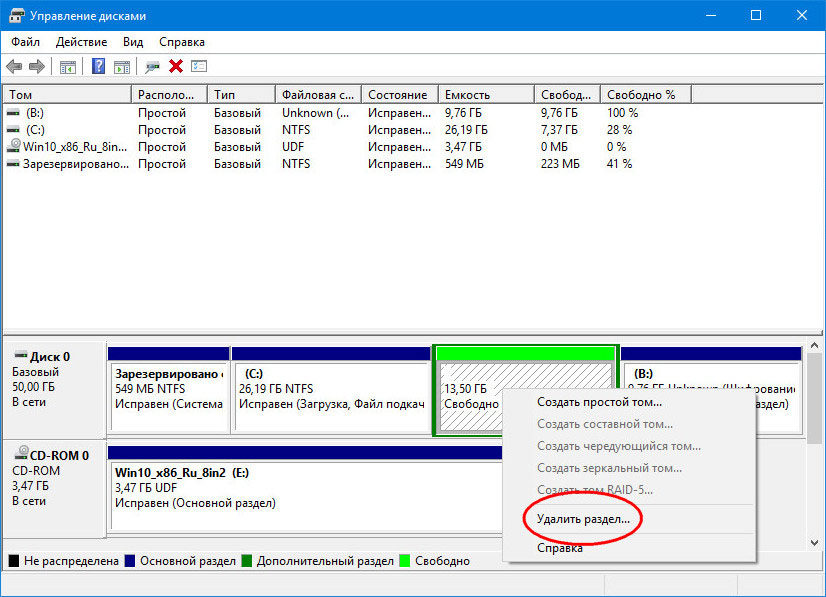
Удаляем эти разделы таким образом, чтобы на их месте образовалось нераспределенное пространство.
Которое затем можно будет присоединить к ближайшему тому.
Вместе с Linux будет удален ее загрузчик, который, как известно, имеет приоритет, поэтому при перезагрузке компьютера вы получите ошибку «no such partition» .

Посему загружаем компьютер с установочного диска и при появлении на экране окна мастера установщика Windows жмем Shift + F10 .
В открывшейся командной строке выполняем две команды:
bootrec /fixmbr
bootrec /fixboot
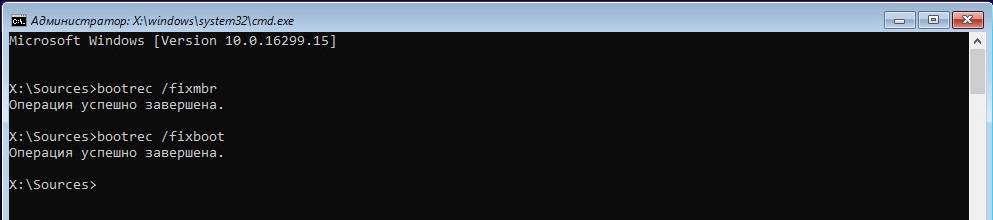
А вообще, должно хватить и одной, первой команды.
После этого перезагружаем компьютер обычным способом.
Действия по удалению разделов можно выполнить сразу из-под загрузочного диска. Для этого в окне мастера-установщика необходимо нажать «Установить».

И проследовать вплоть до этапа разбиения диска.
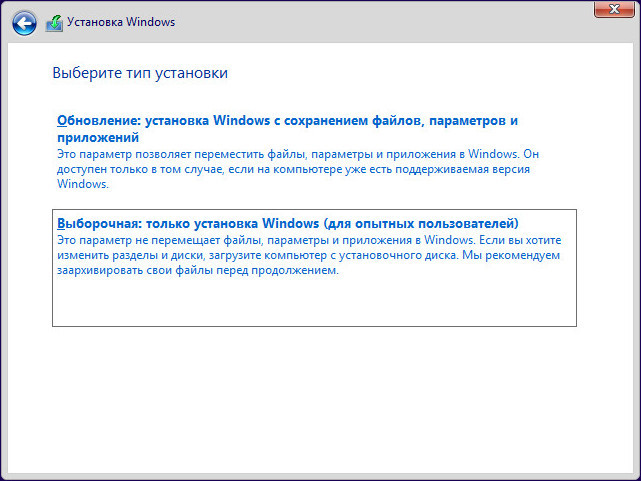
А затем удалить Linux-разделы.
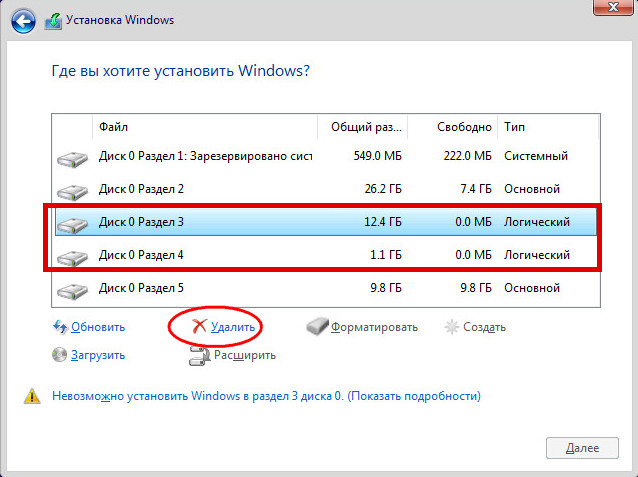
Тут же вызвать нажатием Shift + F10 командную строку и выполнить указанные выше команды.
Сгодится для удаления параллельной Linux и любой LiveCD с менеджером разделов, командной строкой или утилитой EasyBCD на борту, хотя бы тот же by Sergei Strelec .
Guide to install or uninstall Windows Subsystem for Linux on Windows 10 Anniversary Update and Creators Update
If you’re running Windows 10 Creators Update or later, please follow the Windows 10 installation instructions.
The following instructions are for users running Windows 10 Anniversary Update or Windows 10 Creators Update
Prior to Windows 10 Fall Creators Update (version 1709), WSL was released as a beta feature and installed a single Ubuntu instance when «Bash on Ubuntu on Windows» (or Bash.exe) was first run.
While you CAN use WSL on earlier Windows 10 releases, this beta «legacy distro» is now considered obsolete. We strongly encourage you to run the most recent version of Windows 10 available. Each new Windows 10 release includes many hundreds of fixes and improvements in WSL alone, allowing ever more Linux tools and apps to run correctly on WSL.
If you cannot upgrade to Fall Creators Update or later, follow the steps below to enable and use WSL:
Turn on Developer Mode To run WSL on Windows 10 Anniversary Update or Creators Update, you must enable Developer Mode:
Open Settings -> Update and Security -> For developers
Select the Developer Mode radio button 
Open a command prompt. Type bash and hit enter
The first time you run Bash on Ubuntu on Windows, you’ll be prompted to accept Canonical’s license. Once accepted, WSL will download and install the Ubuntu instance onto your machine, and a «Bash on Ubuntu on Windows» shortcut will be added to your start menu.
The first time you run Bash on Ubuntu on Windows, you will be prompted to create a UNIX username and password. Follow the new distro instance instructions to complete your installation
Launch a new Ubuntu shell by either:
- Running bash from a command-prompt
- Clicking the start menu «Bash on Ubuntu on Windows» shortcut
Uninstalling/Removing the legacy distro
If you upgrade to Windows 10 Fall Creators Update from an earlier Windows 10 release upon which you installed WSL, your existing distro will remain intact. However, we STRONGLY encourage you to install a new Store-delivered distro ASAP, and migrate any necessary files, data, etc. from your legacy distro to your new distro.
To remove the legacy distro from your machine, run the following from a Command Line or PowerShell instance:
If you are not using Windows Version 1903 or higher, you may need to run wslconfig /u Legacy or lxrun /uninstall /full instead.
Manually deleting the legacy distro
If you wish, you can manually delete your legacy instance. This may be required if you encounter issues uninstalling the legacy distro using lxrun.exe , or are running Windows 10 Spring 2018 Update (or later) which do not ship with lxrun.exe .
To forcefully delete your legacy WSL distro, delete the %localappdata%\lxss\ folder (and all it’s sub-contents) using Windows’ File Explorer, or the command-line: