How to Restore Missing Power Plan Options on Windows 10
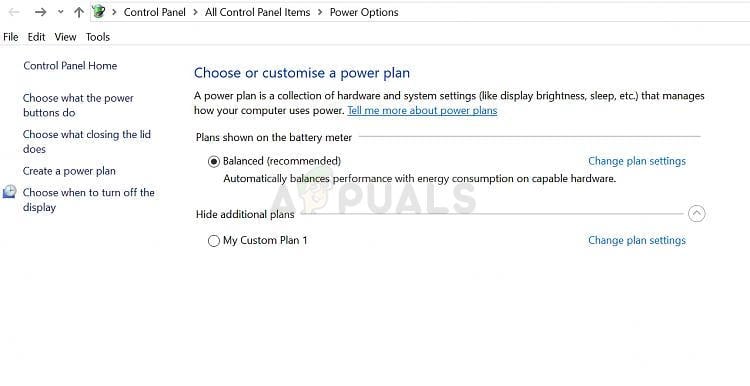
On Windows 10, Power Options allows you to customize your Power Usage – as per requirements. Technically, a power plan is a set of hardware and system settings that defines how power is used and preserved by your computer. There are three built-in power plans: Balanced, Power Saver and High Performance. They can be customised for your system, or you can create new plans based on them.
What Causes Power Options to go Missing?
Many users have reported variations of missing power plans, such as only balance power plan is available and the high performance power plan is missing. This could be due to a system corruption or a Windows Update recently installed which may have modified the registry or tweaked the power options.
We have gathered some working solutions so make sure you try them out. Good luck!
Solution 1: Restore Them Manually
If a Windows Update or something else you did has removed the power plans from your computer, you can get to them by running commands which will recreate them and have them available on your computer the same way as they were before. There are two ways you can do this and it depends on what you prefer.
Command Prompt:
You can restore the missing power plan settings simply by running several commands in Command Prompt.
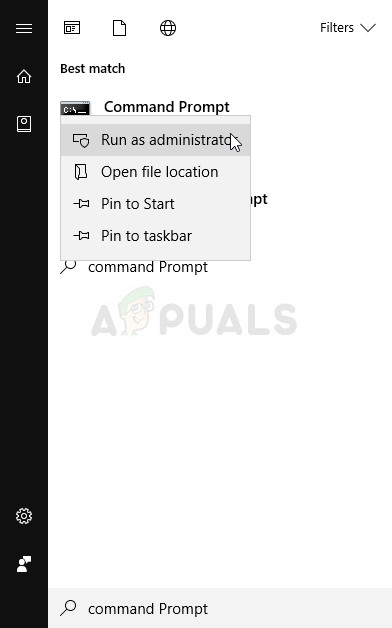
- Search for “Command Prompt” either right in the Start menu or by tapping the search button right next to it. Right-click on the first result which will appear at the top and select the “Run as administrator” option.
- Type in the following set of commands one after another and make sure you click Enter after typing each one and wait for the process to finish and display a “process successful” message:
Note: The last command can only work on Windows 10 versions after the 17101 build as it’s related to restoring the Ultimate Performance Power Plan available for the newest Windows 10 builds for workstations.
- Restart your computer and check to see if the power plans are back where they belong.
Download the Files Yourself:
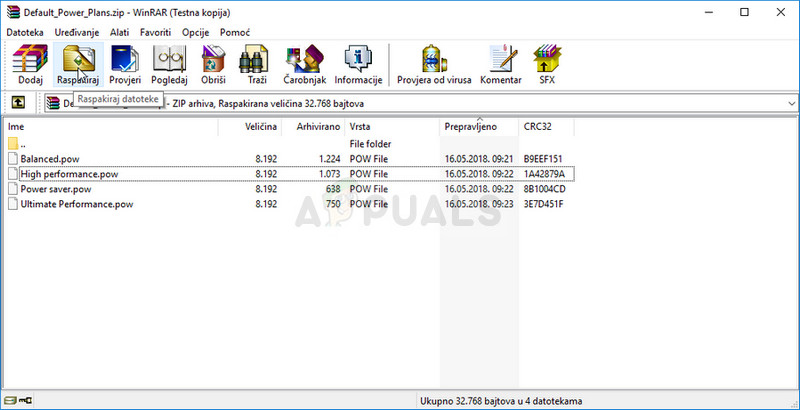
You can download the required files easily from a guide made by TenForums and it contains the “.pow” files which are used to represent a power plan.
- Click on this link in order to download the “.zip” file containing the power plans. Locate the file in your Downloads folder, right-click on it, and choose the Extract to option. Extract the files to any location but it’s best to keep it simple because of the following steps.
- Search for “Command Prompt” either right in the Start menu or by tapping the search button right next to it. Right-click on the first result which will appear at the top and select the “Run as administrator” option.
- Use the following command in order to install the required power plan:
- In this scenario, instead of “Full path of .pow file”, you will have to paste the correct path to the file, in the folder you have extracted the files to. Let’s say you want to install the “Power saver” plan which is also named that way in the folder.
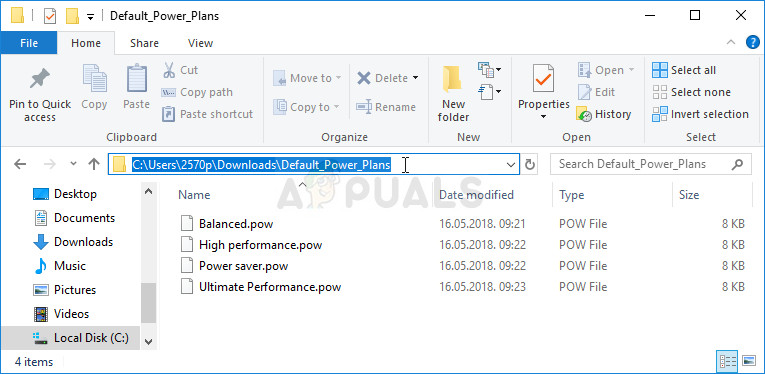
- Navigate to the folder where the files are located, click the address navigation bar at the top and copy the address after it has been selected. Head back to Command Prompt and paste the address. If the files were, let’s say, in the Downloads folder within their own folder called Default_Power_Plans, the command should look like:
- Make sure you repeat the same process for all power plans you want to install and check to see if they have returned in Control Panel.
Solution 2: Use the Following Registry Hack
If a Windows Update has indeed hidden these options, it’s possible that Windows it trying to replace this feature or push it into the history by replacing it with other features. If you still wich to use this exact option, you can turn it on using the following registry hack.
Since you will have to edit a registry key, we recommend you check out this article we have made for you to safely backup your registry to prevent unwanted side effects which shouldn’t occur if you just follow the steps carefully.
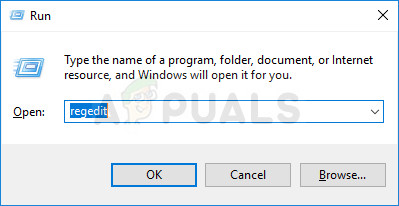
- Open the Registry Editor window by typing “regedit” in either the search bar, the Start menu, or the Run dialog box which can be accessed with the Windows Key + R key combination. Navigate to the following key in your registry by navigating at the left pane:
- Click on this key and try to locate an entry called CsEnabled at the right side of the window. If such option exists, right-click on it, and choose the Modify option from the context menu.
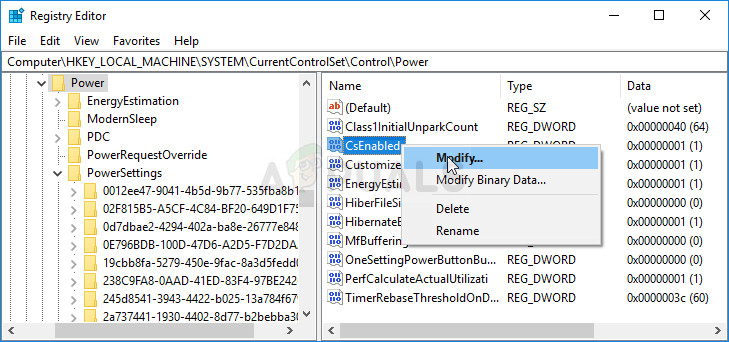
- In the Edit window, under the Value data section change the value from 1 to 0, and apply the changes you have made. Confirm any security dialogs which may appear during this process.
- You can now manually restart your computer by clicking Start menu >> Power button >> Restart and check to see if the problem is gone.
Note: If this didn’t work out for you, you can try adding an option to show these power plans individually for every power plan your computer knows about.
- Navigate to the following key in your registry by navigating at the left pane:
- You will be able to see plenty of weirdly named keys inside the PowerSettings key. Navigate to each one of these keys, right-click the right blank side of the, screen, and choose New >> DWORD (32bit) Value.
- Name each one of these values “Attributes” by right-clicking and choosing the Rename option. After that, right-click the newly created attributed value and choose the Modify option.

- Set the value to 2 under value data, keep the base in hexadecimal and click OK. Repeat the same process for each key in PowerSettings.
- Check to see if the problem is gone now.
Solution 3: A Useful Workaround
This workaround can be used quite easily if you want to add the power option which is missing quite easily. Since a new build of Windows usually only leaves the Balanced power plan intact, you can add it (or any other default plan) easily by creating a new plan which is exactly the same as this one.
- Right-click on the battery icon located in the system tray or the lower right part of your screen, next to time and date, and click on Power Options.
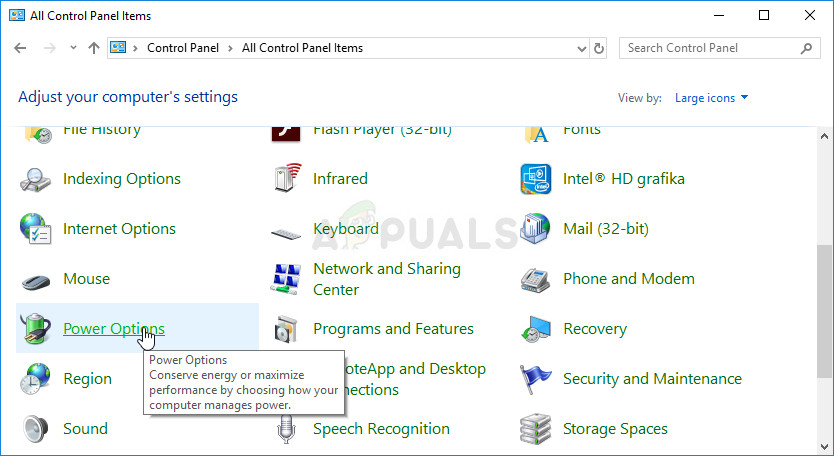
- If you have removed this from the system tray, click on the Start menu and search for Control Panel. Change the View by option to Large icons and click on the Power Options button.
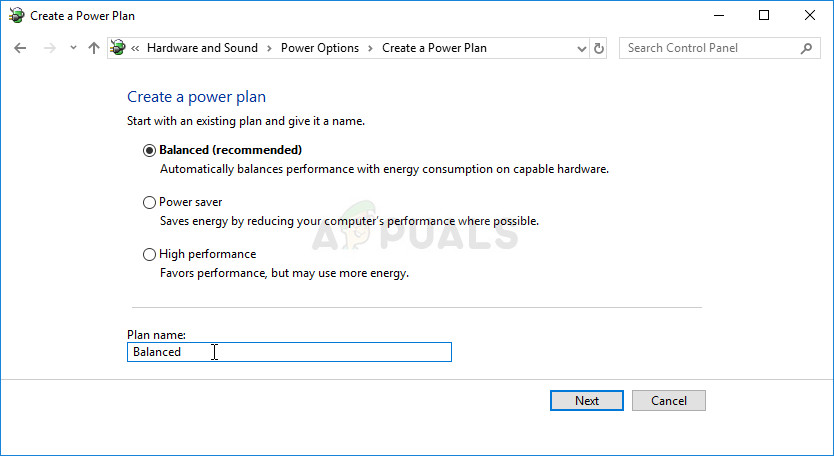
- At the left side of the window you should see several options displayed one under the other so click the Create a power plan option. You should see the Create a power plan window and a list of choices. Set the radio button to the power plan you wish to bring back.
- Under the Plan name, you can even name it the same way as it was originally named before clicking the Next button at the lower right part of the window.
- You will some additional settings, such as Turn off the display, Put the computer to sleep and Adjust plan brightness. You can set them up now or later, before clicking Create.
- You will now have access to this power plan so make sure you select it when necessary.
Solution 4: Check for the New Battery Slider
From the latest build of Windows, it appears that the power options have now started to change for users who didn’t perform the steps above and everyone will get to see the new slider you can use to either set everything to high performance or to save battery life.
Also, these settings will now be managed through the Settings tool and not via Control Panel.
How to Customize Power Options Advanced Settings in Windows 10
Windows 10 allows you to Customize Power Options Advanced Settings by tweaking the system and hardware components. Optimization of Hard Disk, Processor, JavaScript Timer Frequency, Desktop background settings, etc here enables you to save battery keeping PC performance intact. Let’s have a look:
How to Customize Power Options Advanced Settings in Windows 10
How to Open Power Options Advanced Settings in Windows 10
01. Launch Start menu, click the gear icon to access the Settings program. In addition, pressing Windows logo + I keys also do the same.
02. Click System, the first tab.

03. Select Power & sleep section on the left column of the following page. Shift to its right side and click Additional power settings underneath Related settings.

04. Power options window will appear, perform a click on “Change plan settings” next to your selected plan as depicted in the screenshot below.

05. On the succeeding screen, do a click on “Change advanced power settings” (see snapshot).

06. Power options advanced settings dialog box will immediately open up. Now, let us see how to customize Power Options Advanced Settings in Windows 10.

1#. How to Turn off Hard Disk Using Advanced Settings in Power Options
The hard disk of the computer is one of the main elements of your system because it stores all the data in it. It works continuously even when the computer is in hibernate mode or sleep mode. Windows provides you an option to power down HDD after a specified time when its idleness is detected. This will eventually save energy moreover, extend PC’s battery life. So, the advanced options let you “Turn off HDD” all by itself after being inactive for a certain amount of time.
Step 1 – Press the + icon next to hard disk to expand it. Next, again double-click the option “Turn off hard disk after“.

Step 2 – Here, set how many minutes or Never for what you prefer to use. However, it is not suggested to assign a low amount of minutes. As the hard disk often spin up and down, so this usually ends in more wear and tear of the component. If you were customizing this for the first time you will notice the default time is 20 minutes.
2#. How to Customize Internet Explorer in Power Options Advanced Settings
Windows 10 gives you an opportunity to enhance the battery life while you work on Internet Explorer. On this browser, to run JavaScript animations, the JavaScript Timer Frequency is arranged. But you can slow down the animations and its execution in this web browser which in turn will long last the battery life of your device. The “JavaScript Timer Frequency” offers two options – Maximum Power Savings and Maximum Performance. If you choose Maximum Performance, then it will quickly drain the laptop’s battery. Therefore, the Advanced Power Settings lets you optimize this accordingly.
i. Extend Internet Explorer by double-clicking on it. Here, JavaScript Timer Frequency is visible, expand it.
ii. Click on the two situations (On battery and Plugged in) one by one and from the drop-down set the option Maximum Power Savings. Doing so will eventually preserve the battery life of the device.

3#. How to Optimize Desktop background settings in Power Options Advanced Settings
Personalization lovers often customize their computers by applying various themes slideshow and few other options. Users who frequently use slideshows on the desktop always complain about the battery. PC’s that continuously display images one after another slows down the speed of the system moreover sucks battery massively. However, you don’t need to worry as power options advanced settings provides an option to configure the behavior of slideshow when the system in on battery or plugged in.
I. First of all, double-click the option namely Desktop background settings.
II. Again expand Slide show by clicking the + icon that appears next to it. Here, click the drop-down on the conditions On battery and Plugged in. Both of them include two options – Paused and Available.
III. So, if you prefer to enable slideshow, select Available otherwise go with Paused.

IV. It is always suggested to pause the slideshow when the device is operating on battery. This way it conserves the battery for a longer period. Let us walk towards more options to Customize Power Options Advanced Settings.
4#. How to Optimize Wireless adapter settings Power Options
Windows 10 offers you an option to manage the power saving mode of wireless adapters on your system. You can control the strength and the performance of the wireless network to increase the battery life of the device. The “Wireless adapter settings” is the next option which includes 4 power saving modes for you to choose from.
| Power saving mode | Description |
| Maximum performance | Choosing this will result in no power savings. It lets you attain utmost wireless performance. |
| Low power saving | Selecting this will provide least energy savings. |
| Medium power saving | It completely depends on network traffic. Basically, it balances between the power savings and performance. |
| Maximum power saving | This mode will deliver utmost battery savings. |
a. Perform a click on the + icon that appears next to Wireless adapter settings. Expand Power saving mode that comes into view by double-clicking on it.
b. Click the drop-down of both the conditions and choose any of the power saving modes mentioned above depending on your preferences.

5#. Customize Sleep using Power Options Advanced Settings
While you customize power options advanced settings, you come across “Sleep” category, the important one to optimize. It includes options to hibernate as well as wake timers.
Sleep – It lets you enhance battery life or energy by optimizing the device in a low power state after a certain time period. Waking from sleep hardly takes a second. You can start right away from where you left off. An interesting fact is that the amount of power a laptop uses while sleeping depends on various factors, which includes the manufacturer.
Allow hybrid – It is more common for desktop users rather than the laptop. It is designed in a way to protect the ongoing session from sudden power loss. This function works by writing a hibernation file when the system slips into a sleep state. turning this on will not impact the Notebook negatively, however, it will take up hard drive space.
Hibernate – The energy drawn by this functionality is extremely low. Many laptops are able to last for weeks without being plugged in. It saves power by generating a hibernation file on the HDD. You should know that waking the PC from hibernation takes little longer when compared to sleep. For extreme savings set the time after 45-60 minutes while the device is working on battery.
Allow wake timers – When you enable this function, the programs that are designed to run or perform tasks at a particular time will automatically wake the device from sleep. For example, Windows Update. You may disable this function to avoid draining laptop battery.

6#. USB selective suspend settings in Power Options
The USB settings category contains a feature “USB selective suspend setting” which Windows enables by default. This energy saving option generally conserves power by shutting down USB ports that are only used occasionally. But sometimes the USB port fails to return back when it is required or in some cases, it inadvertently turns off.
To make it simple it is quite similar when you put your device or laptop or tablet to sleep. Instead of staying on are completely turning off, this feature lets the operating system to set single USB port into lower power mode. Hence, unlike other devices, it is known as a suspended state rather than sleep. This setting is a big electricity saver and therefore try to always let it enabled.
A. Make a double click on USB settings category.
B. Expand “USB selective suspend setting” and change the activity about the conditions either into Enable or Disable. By default, both On battery and Plugged in conditions are enabled.

7#. How to Customize Intel (R) Graphics Power Plan using Power Options Advanced Settings
If you are a game lover, there are several ways to improve the functionality of your device including the performance to make you more productive. Having a faster GPU moreover, expecting a better battery life is what that matters the most to you.
These days most of the devices have a dedicated “GPU”. This actually gives a high performance when the laptop is plugged in. However, you don’t want it to be on when you don’t need it.
a. Expand Intel(R) Graphics Settings by clicking on the tiny + icon that appears next to it.
b. Double click setting Intel(R) Graphics Power Plan and choose the required parameters. When the device is operating On battery, it is feasible to go with Maximum battery life.
c. In case, you are using a power cord, choose Maximum performance.

8#. Configure Power buttons and lid Advanced Settings Power Options
Windows 10 provides you another interesting way to “Customize Power Options Advanced Settings”. Not many people are aware of the fact that they can configure the power button as well as the lid of the laptop. Many times pressing the power button for a long duration turn off the device but with a faulty hard disk drive. In some cases, the abrupt shutdown of Windows leads to some other problems as well.
So you can always configure the way how the power button or lid of the device will behave. When you hold down the power button of the computer, you can choose to let the OS slip into “Hibernate”, “Shutdown”, “Turn off the display”, “Sleep” or “Do nothing at all”. The same setup choices go when you close the lid (except for “Turn off the display”).
• Double click the category namely Power buttons and lid. Now, two more options “Lid close action” and “Power button action” is visible.
• Click the Lid close action followed by a click on the conditions and choose the settings accordingly.
• Now expand Power button action and configure its behavior as per preference.
9#. How to Customize PCI Express in Power Options Advanced Settings
This is a little complex that you will face while you Customize Power Options Advanced Settings. If you are a newbie then understanding PCI Express is a little complex. This category includes an option “Link State Power Management”. It is a part of the PCI-E-specification and functions simultaneously with the Active State Power Management (in short ASPM).
Generally, the PCI Express contains two levels of power management namely – “Moderate power savings” and “Maximum power savings”. The basic difference between the two options are the power savings versus latency. Latency is usually the time that system takes to recover from the sleep state.
If you pick up Moderate Power Savings, the energy savings will be quite less. Whereas the time to recover from the sleep state (latency) will be too shorter.
Selecting Maximum Power Savings will eventually end up with greater battery life. But the time requires to wake up from the sleep will be much longer.
The Link State Power Management also hold an Off function. It means that the current will run despite what state the laptop is in.
So expand PCI Express followed by an expansion of “Link State Power Management”.
On both the conditions, you will find the different functionalities that we discussed above. Depending upon your need choose the one you prefer to use.
In case you want to store more energy while the device is running on battery, then choose moderate or maximum. Moreover, if the laptop is plugged in keep the option Off.

10#. How to Customize Processor power management Power Options Advanced Settings
Another important hardware component to Customize Power Options Advanced Settings is the processor. When you expand Processor power management, three options come into view.
a. Minimum processor state – This piece of setting lets you pick up the percentage of energy that will be allotted to the processor. The selected percentage will function when the processor is idle or performing minimal tasks. By default, the least amount of percentage is 5% which will actually save power.
b. Maximum processor state – The default percentage of this setting is set to hundred percent. It shows that task at the hand will have all the available processing resources at its disposal.
c. System cooling policy – It lets you choose the amount of power the fan by bye modifying the way that the processor functions. It includes Active state and Passive state. If you pick up “active”, it boosts the fan speed prior reducing the processor. Selecting “passive” will work reverse – it will slow down the processor before it increases the fan speed. However, to achieve the best performance, it is suggested to set it to the active state.
Hence, customize the way you want “Processor power management” to behave.

11#. How to Configure Display Power Options
The “Display” category contains 4 options to Customize Power Options Advanced Settings.
Turn off display after – If you are not using the device for a good amount of minutes, this option will switch off the display. Once you come back just shake the mouse and less than a second the screen will return back. Hence, use the drop-down and choose the minutes accordingly.
Display brightness – The biggest energy hog of the laptop’s LCD is the backlight. So, tune around the brightness percentage to see which one is comfortable. However, when you perform the device’s battery test to learn its longevity, you set the brightness at 40%.
Dimmed display brightness – For a better and longer battery life consider skipping this piece of setting. After Assigning a certain percentage, the screen will eventually dim the brightness when the system detects that you are not using it.
Enable adaptive brightness – Depending on the ambient lighting of your screen, most of the latest laptops come with light sensors that all by itself fine-tune the “screen brightness”. It seems to be annoying for most of the users. As the brightness switches automatically, it drives many users crazy. So, it is recommended to disable the feature for both on battery and plugged in.

12#. How to Customize Multimedia settings in Power Options
Windows 10 also gives you an opportunity to customize power options advanced settings related to “Multimedia”. Expand the Multimedia parameter to optimize video quality.
When sharing media – Generally, Windows consider your laptop as idle when it is sharing contents through a utility such as Windows Media Center. This happens because the operating system does not count the streaming as an activity. When the device is plugged in let the laptop Prevent idling to sleep to continue the stream. To store an extra energy, choose the option “Allow the computer to enter away mode“. Doing so will make the device appear to be in sleep but in reality, it is sharing the media contents.
Video playback quality bias – This setting is useful to the devices that can play HDR videos. Here, if you pick up “Video playback power-saving bias” then the OS will play HDR videos as SDR. Whereas selecting “Video playback performance bias” will retain the image quality but at the same time will consume power.
When playing video – Use this setting to specify the energy optimization that is used by your system’s video playback. To achieve the optimum video quality while playback, then select “Optimize video quality”. Balance option when you prefer the laptop to keep you entertained as well as conserve battery. However, when you desire to watch videos but at the same time preserve the battery life, go ahead with “Optimize power savings”.

13#. How to Optimize Battery using Power Options Advanced Settings
Last but not the least setting is the battery. This will clear your confusion about how to categorize reserve, low, critical battery actions and notifications.
Critical battery notification – Let Windows play an alarm when your device’s battery reaches to the critical stage. Turning this on will prevent the system from shutting down automatically. The OS will notify you once you reach the critical battery level that you have set.
Critical battery action – This allows you choose an activity that Windows will perform during critical battery phase. It offers you options for the “shutdown, sleep, hibernate or do nothing”.
Low battery level – Setting 10 to 15% is the best way to avoid an auto shutdown. It gives you an ample time to save the ongoing work. Keeping the default percentage will give you enough time to reach the power outlet.
Critical battery level – This is another warning stage that Windows notify you.
Low battery notification – It causes the device to show a popup alert when the battery runs. It will warn you when the battery reaches the low level that you have set above. See to Change Percentage Level of Low Battery Warning on Windows 10.
Low battery action – This parameter also serves you the same set of activities that the critical one offers you. If set to Hibernate or sleep the device will do this action after the notification. It is best to assign do nothing as it gives you enough time to find the power cord.
Reserve battery level – It is the percentage battery at which point the laptop will flash an alert. It will work even if the low battery notification is off. Moreover, it is also useful when you ignore the first warning staying at the default 7% will give you a few minutes enhance to save the work you are doing.

In future, if you ever feel like using the default settings, read our tutorial to Restore Power Plan Advanced Settings to Default in Windows 10.
That’s all about How to Customize Power Options Advanced Settings in Windows 10.