How to Find Windows 10’s Spotlight Lock Screen Pictures
By Andrew E. Freedman 08 September 2016
If you have Windows 10’s default, Spotlight feature enabled, your lock screen shows gorgeous images courtesy of Microsoft. Some of these high-quality photos are nature shots while others are pictures of great cities around the world. The pictures rotate several times a day, but what if you see an image you like and want to keep a copy of it on your laptop? Windows keeps these Windows 10 lock screen photos buried deep in a hidden directory, but with a bit of digging, you can find them, save them and even use them as desktop wallpaper.
Here’s how to find Windows 10’s Spotlight lock screen images:
How to find Windows 10’s Lock Screen Images
1. Click View in File Explorer.

2. Click Options. A Folder Options window will appear.
3. Click the View tab.
4. Select «Show hidden files, folders and drives» and click Apply.
5. Go to This PC > Local Disk (C:) > Users > [YOUR USERNAME] > AppData > Local > Packages > Microsoft.Windows.ContentDeliveryManager_cw5n1h2txyewy > LocalState > Assets
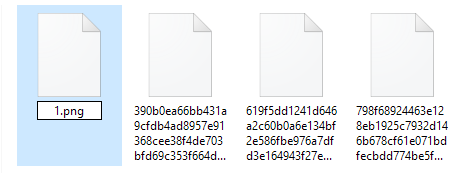
You’ll be presented with a plethora of file names that make absolutely no sense and show no extensions. There’s no great method of telling which ones are beautiful photos and which are icons, but you’re better off clicking on items with larger file sizes.
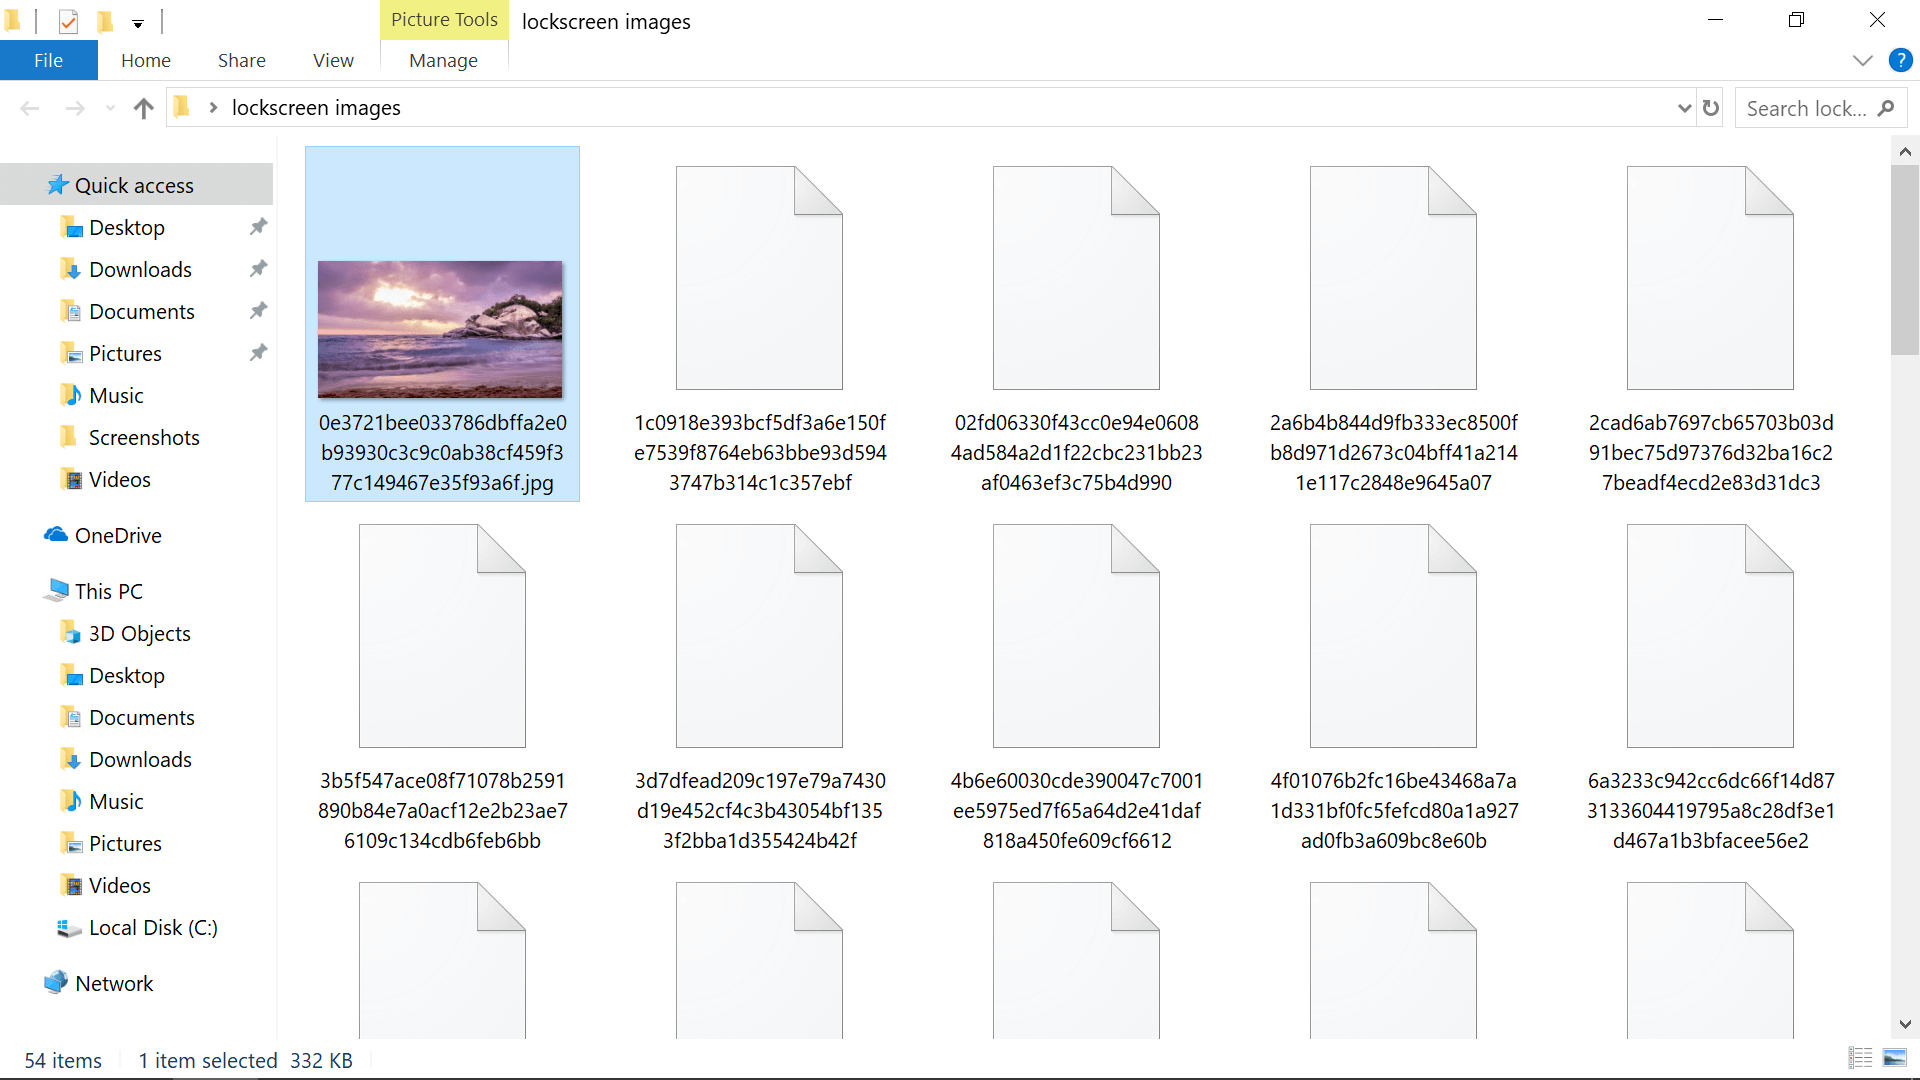
6. Copy the most recent large files to another folded (ex: pictures).
7. Rename the files and add the files suffix .jpg to the end of their names.
You should now be able to view the pictures in any image viewer or editor you want.
One more thing: keep in mind that Microsoft adds and removes these at its whim. If you see one you like, pounce on it and make a copy before it goes away, possibly forever.
Add Windows 10 Lock Screen Pictures to Your Wallpaper Collection
Most Read
Microsoft has made Windows 10’s login screen more visually pleasing than ever by displaying high-resolution images in the background, akin to the company’s Bing search engine. The feature is automatically enabled as part of «Windows Spotlight,» which may also show ads along with «suggestions» but generally just rotates through photos on your login screen.
The pictures are of a good enough quality to be used as the wallpaper on your desktop background and if you’ve seen one recently that’s worth adding to your collection, there’s a chance the image is still stored locally. However, accessing the cached lock screen photos isn’t so simple. Among other hindrances, they are saved to an unfrequented location in Windows 10’s user files.
Shortcut: Use an App
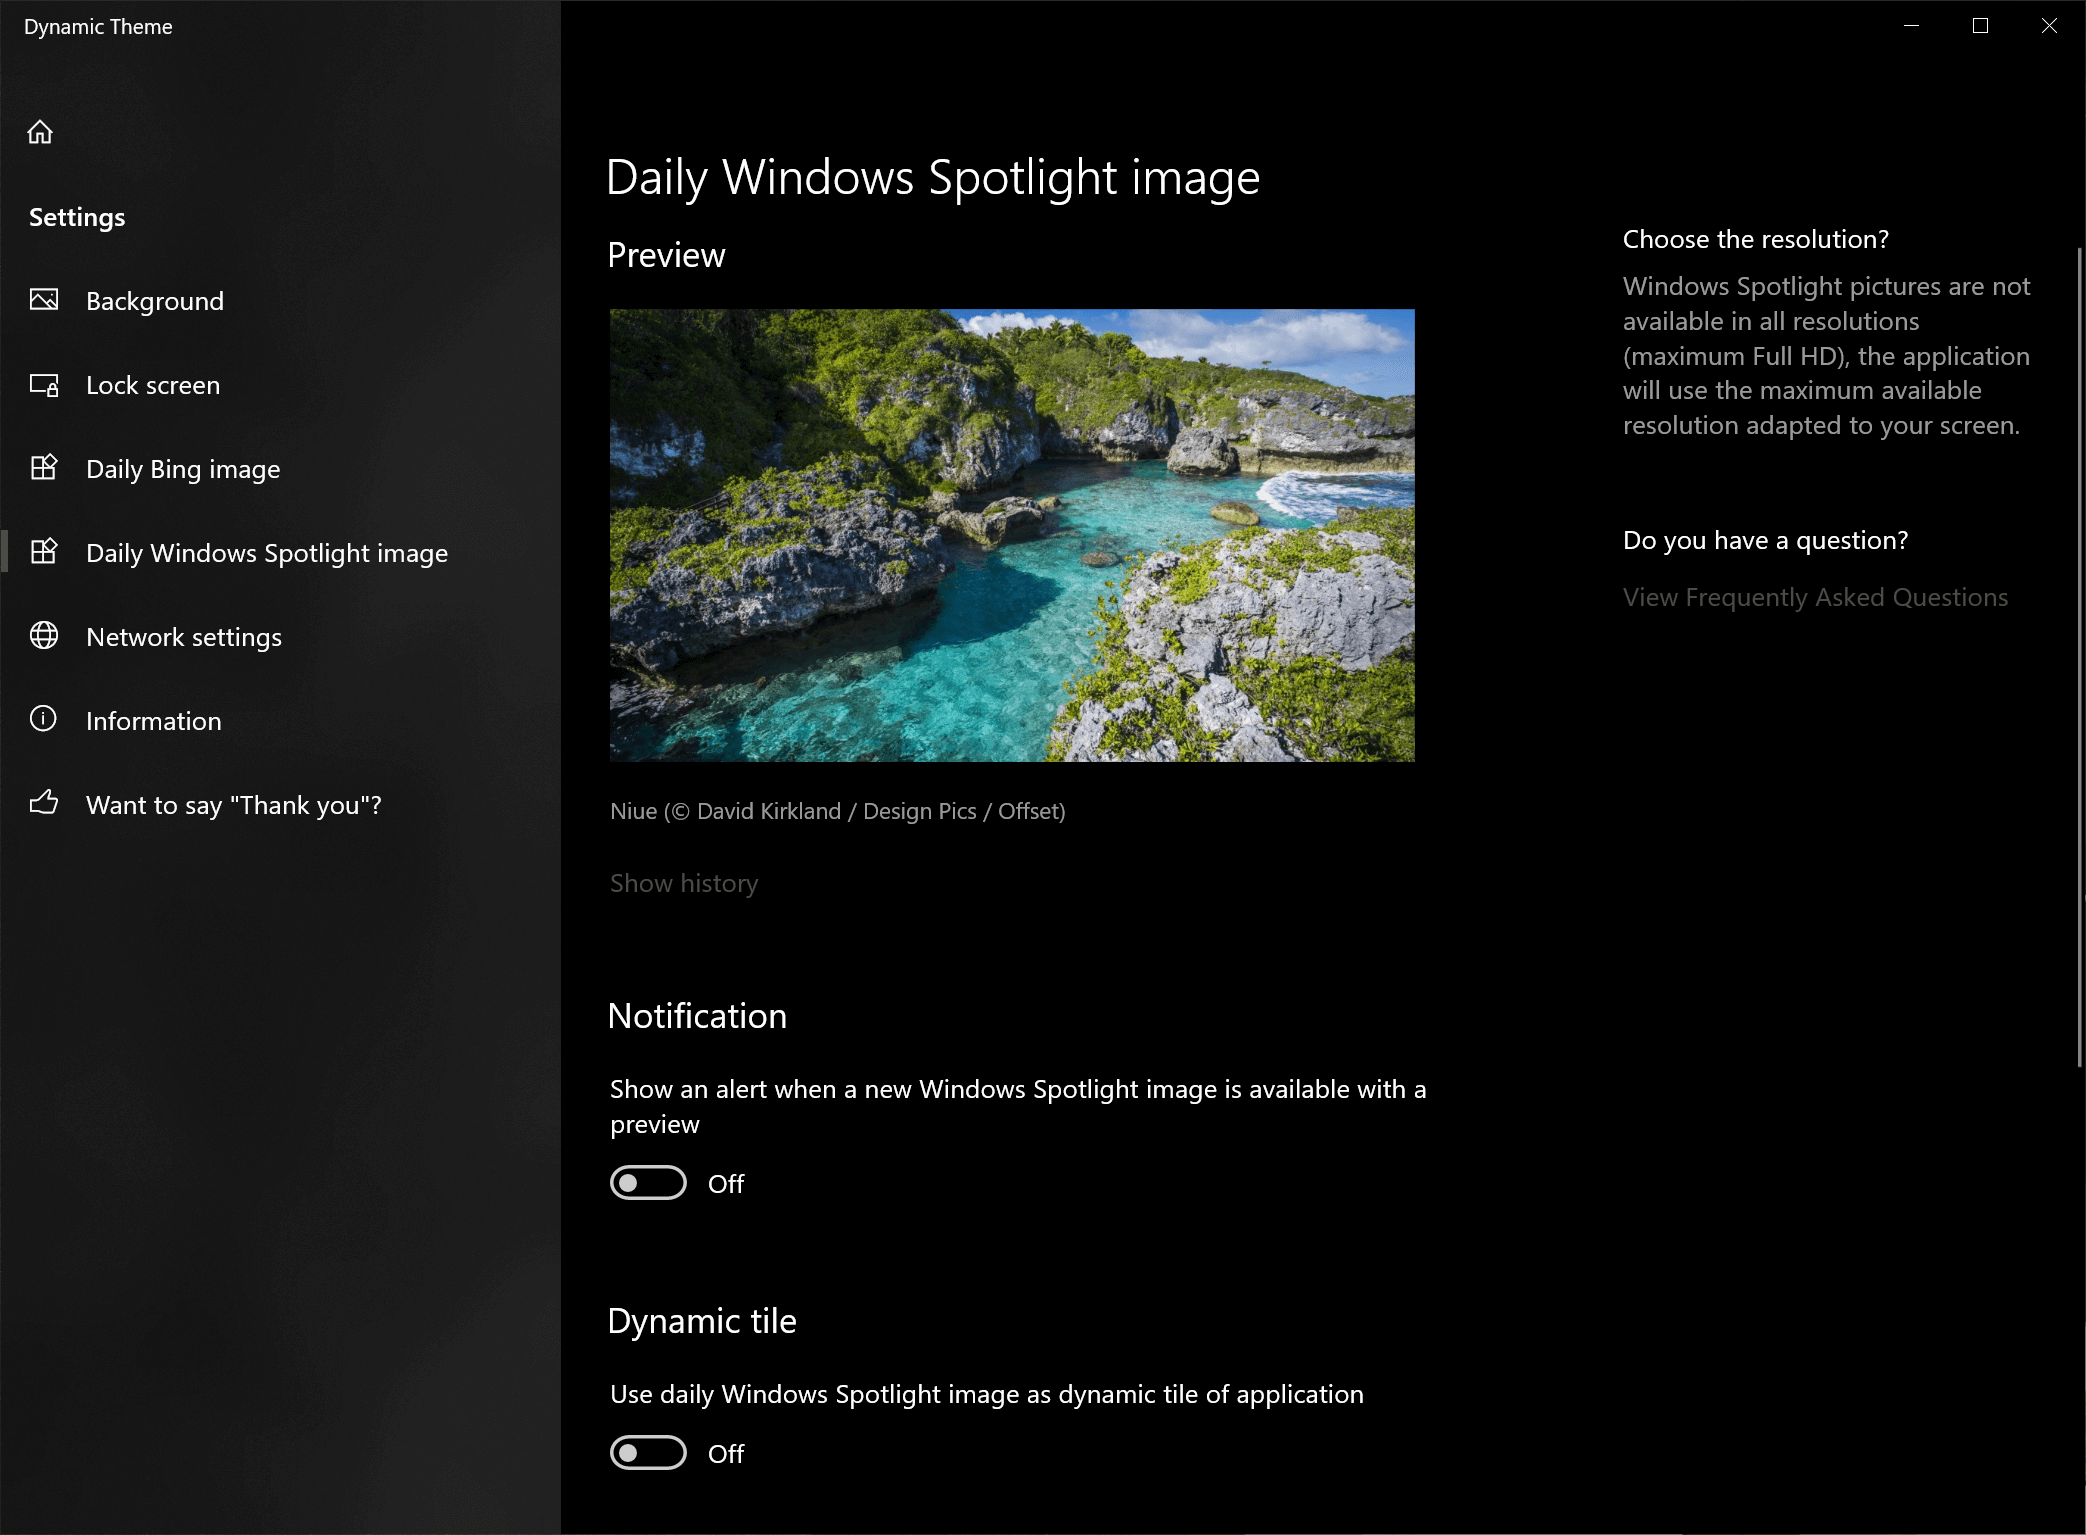
Originally this article detailed where to find Windows Spotlight images, batch rename them, and get them locally. While still a valid method, TechSpot reader Captain Five brought it to our attention that a Windows Store app called Dynamic Theme allows you to browse, save and rotate images from Bing and Windows Spotlight automatically.
We’ve tried it and it works pretty well, plus it offers some advanced options, for example letting you save new images every day to a local folder, choose where to use the images (wallpaper or lock screen, or both), and to sync them across your PCs. Honestly why go through all the trouble when you can use this instead. SpotBright is another Windows Store app (who knew there was actual useful stuff in there) that will let you download Spotlight wallpapers with no fuss.
Where to Find the Lock Screen Pictures
As a prerequisite, make sure that «Show hidden files, folders and drives» is enabled: Open Windows File Explorer, click on «View» and check the box next to «Hidden items.»
After that’s done, copy the following directory path into your File Explorer:
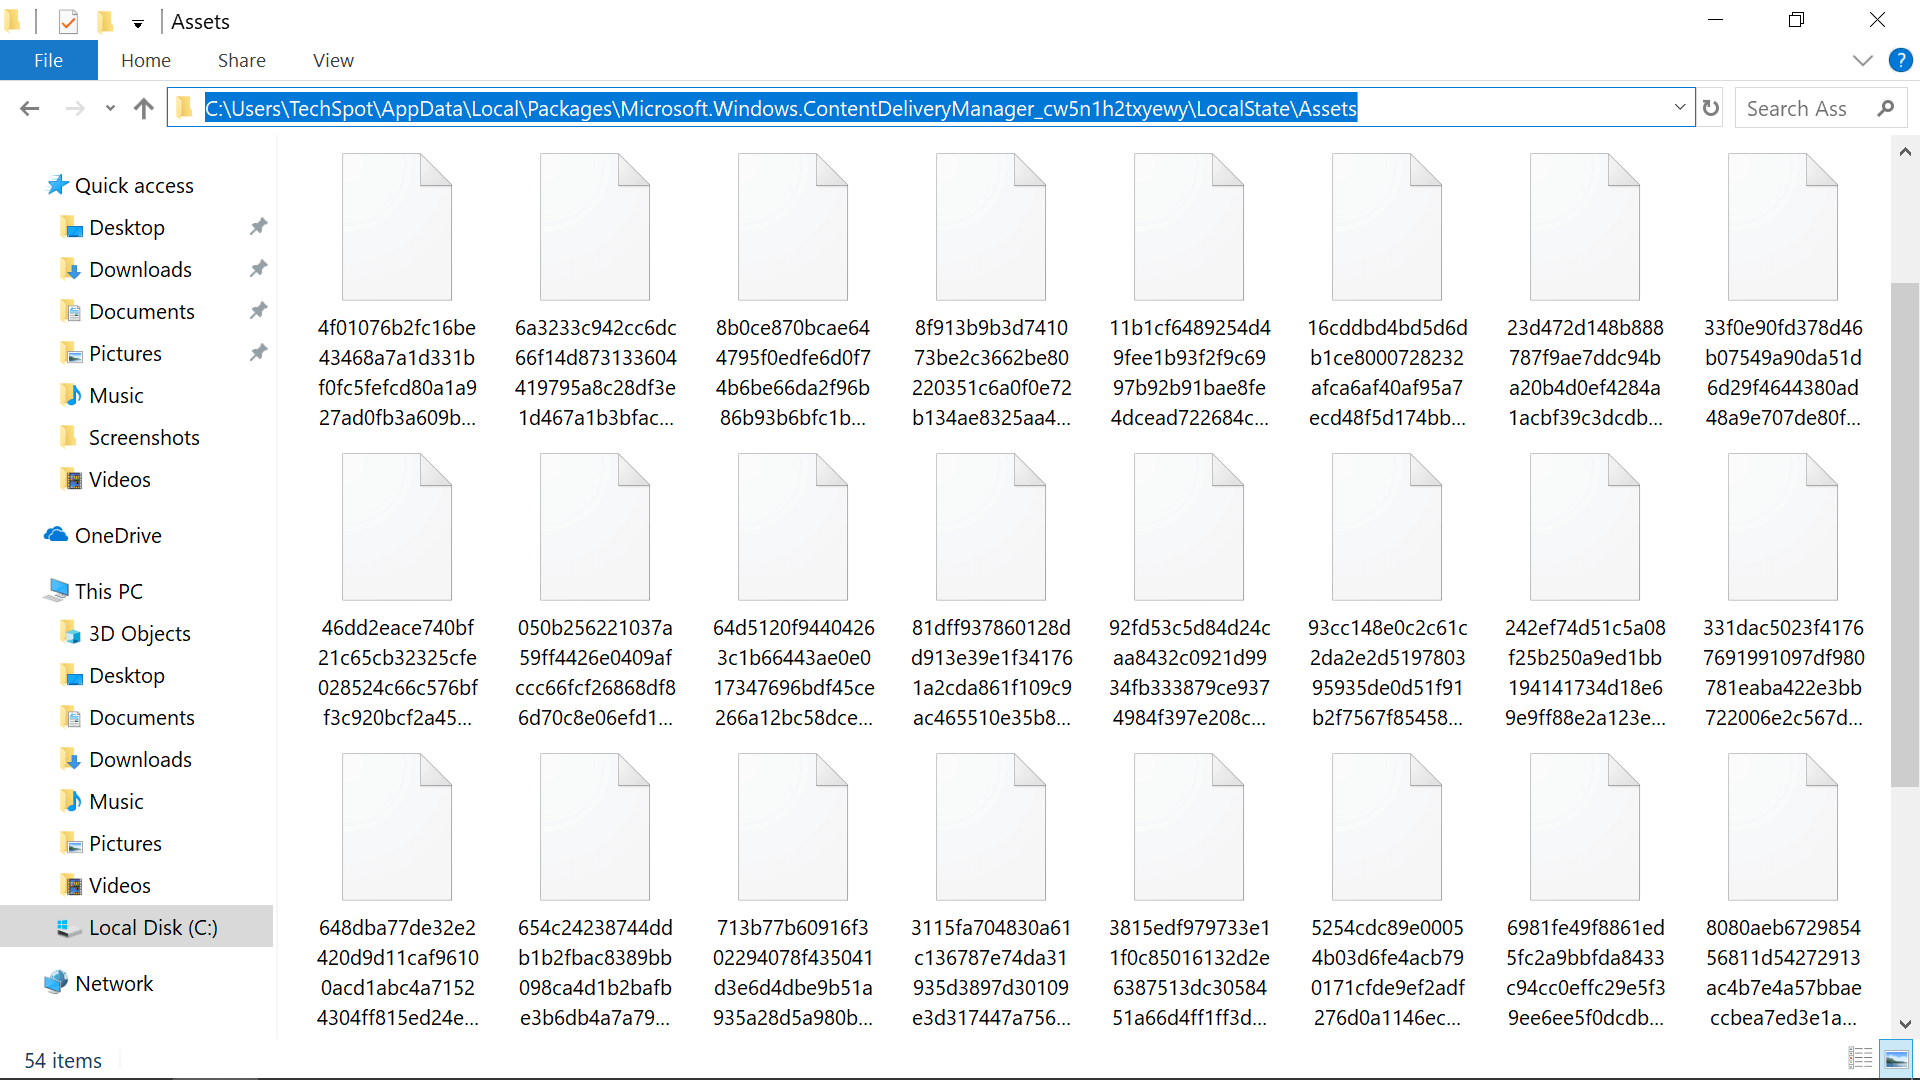
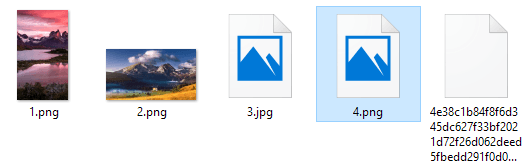
Once you’re there, you should see a series of files without any file extensions or thumbnail previews, so you can’t tell if they’re even image files much less wallpaper-worthy ones, and in fact many of them are lower resolution images that aren’t adequate for any desktop background, such as app icons.
Sorting the files to find larger ones is a simple method for picking out the higher resolution pictures and you can manually rename the files with .jpg at the end to begin using them as you would with any other image.
However, the process of gathering and renaming them is easier if you copy all of the files to a new directory where you can apply an extension to each file at once with the Command Prompt, at which point the wallpapers will be apparent from the thumbnail previews.
To batch rename all the files with .jpg as the suffix:
- Open a Command Prompt window (right click Start > Command Prompt)
- Go to the new folder (example: cd C:\Users\TechSpot\Desktop\lockscreen images)
- Once at the new lock screen images folder, enter the following command: ren * *.jpg
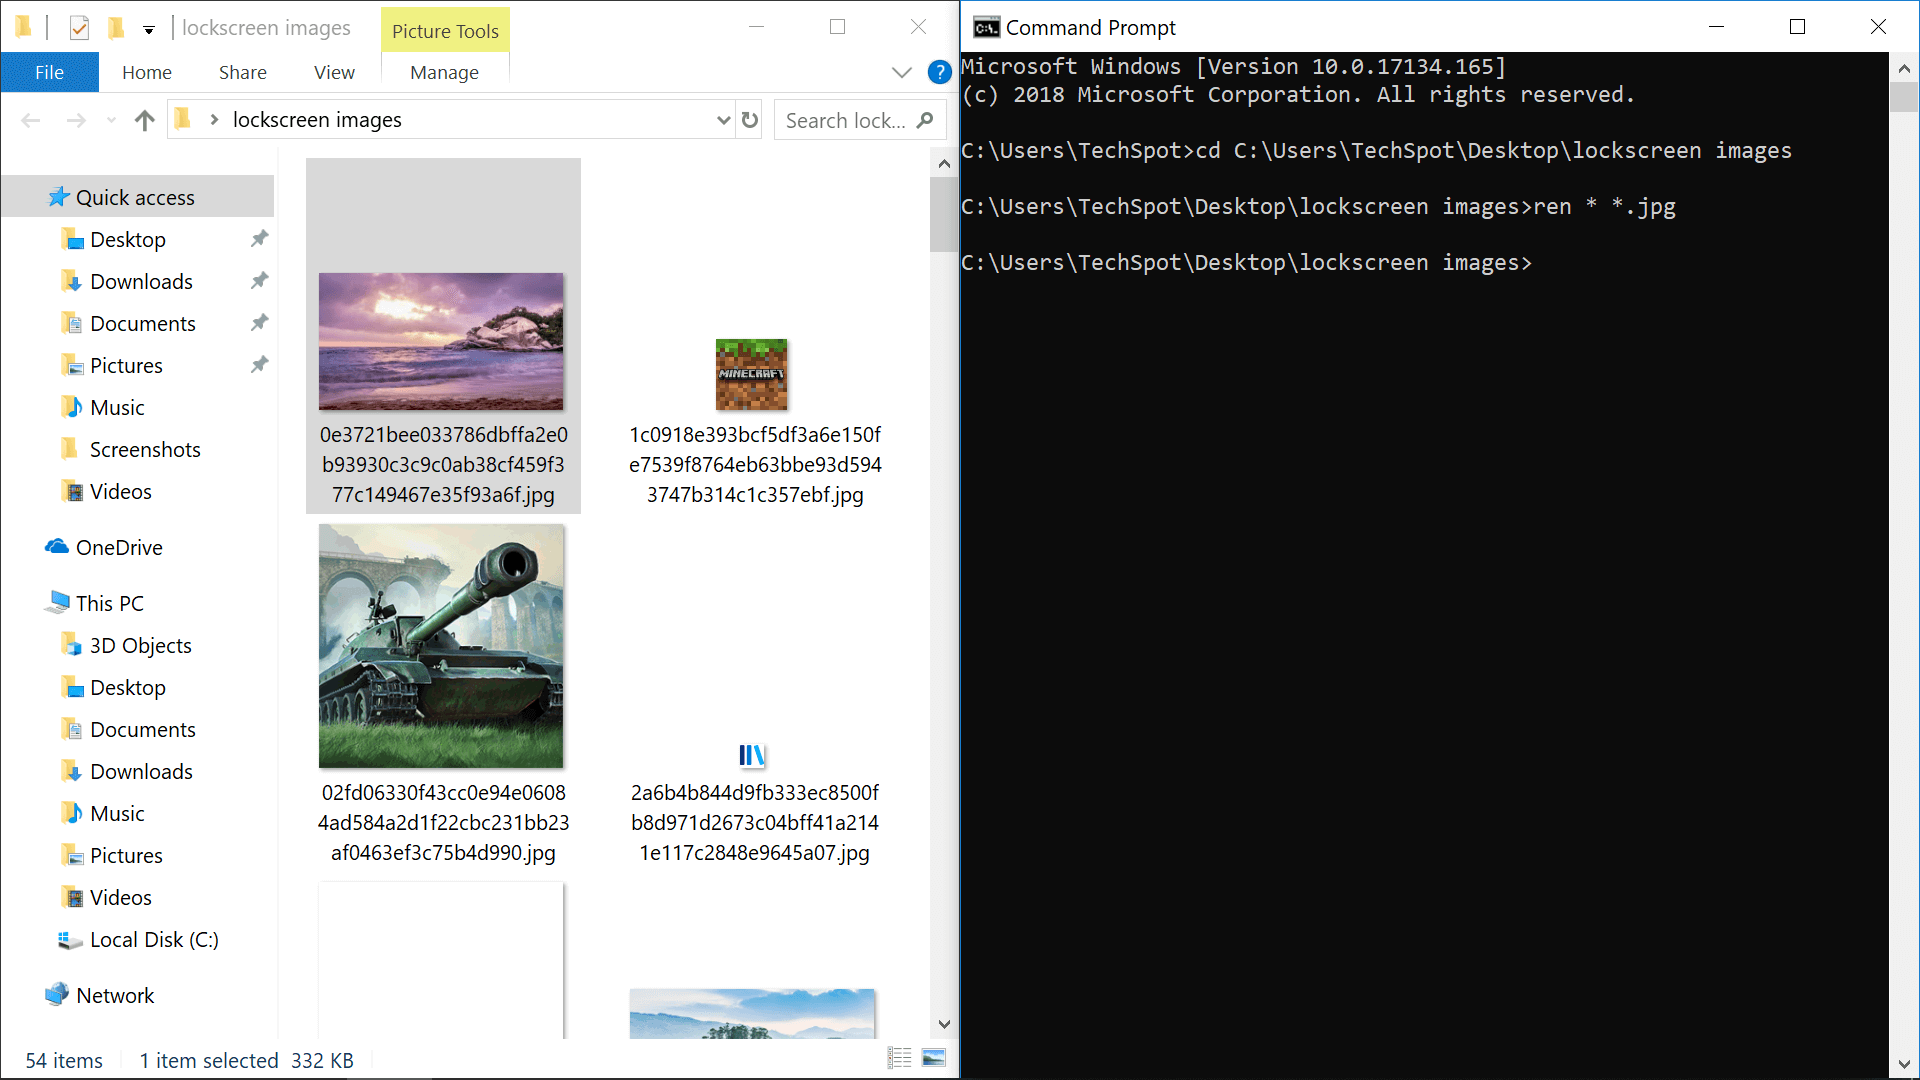
All of the files in the folder should be automatically appended with the .jpg file extension. If some of them still lack thumbnails, try changing the suffix from .jpg to .png.
More Spotlight Photos & Disabling Ads.
Not every Windows Spotlight image is going to be on your local drive, but there are hundreds more available for download in these collections on Imgur and OneDrive. Additionally, there’s an app called «SpotBright» which provides a graphical user interface for downloading Spotlight wallpapers.

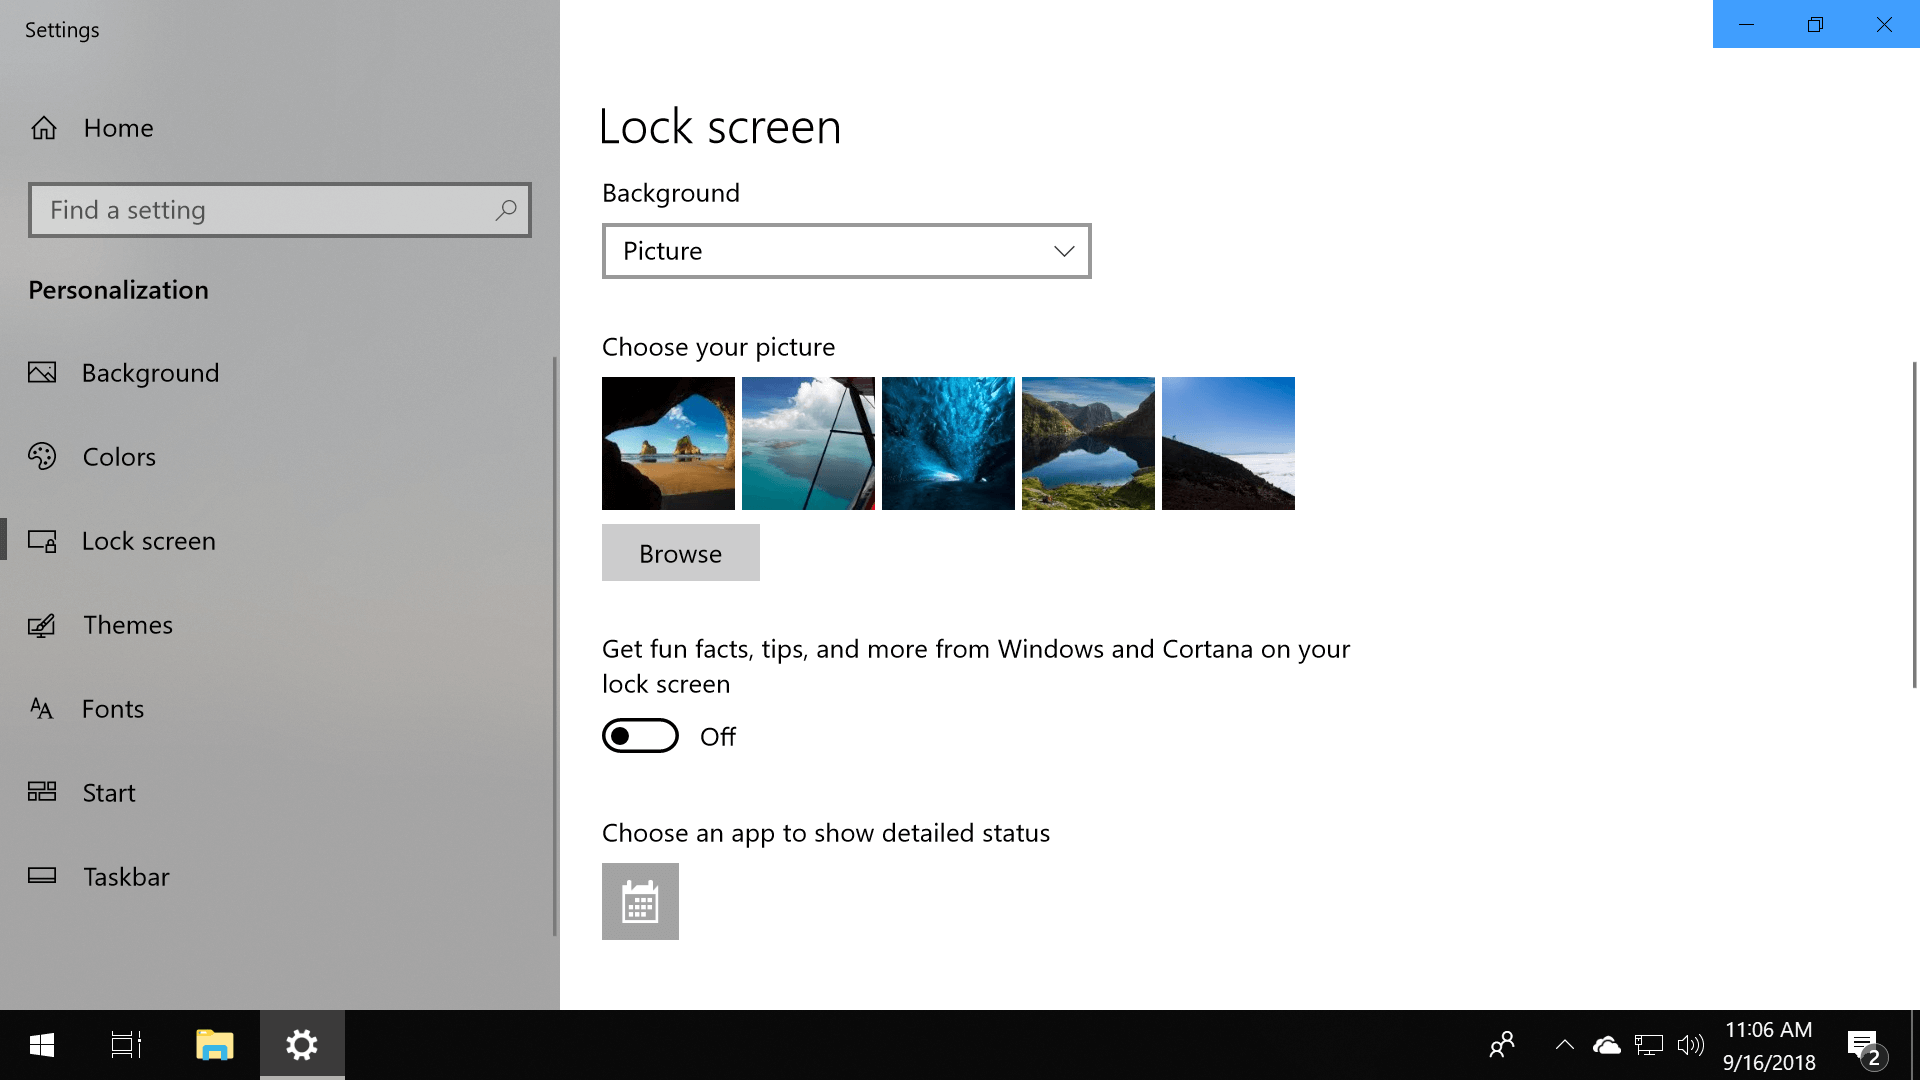
To disable Spotlight ads, etc. so you only get great wallpapers when you log into Windows 10: Open the personalization menu, click the «Lock screen» settings on the left and change «Windows spotlight» to «Picture» or «Slideshow» in the dropdown menu. Then scroll down and turn off «Get fun facts, tips, and more from Windows and Cortana on your lock screen.»
There are also a range of group policy options for enabling only specific Spotlight features, with Computer Configuration\Administrative Templates\Windows Components\Cloud Content\Do not show Windows Tips being the one that disables ads (search for gpedit.msc via Start, Run etc. to launch the Group Policy Editor).
Bonus
Some of the lock screen images have location and other information if you right click the image, go to Properties and then the Details tab. You can also change the format of the time displayed on the lockscreen:
- Search for intl:cpl via Start or Run
- Set your preferred time format on the window that opens
- Go to the Administrative tab and click Copy Settings. so they appear on the welcome screen
How to Download Windows 10 Spotlight/Lock Screen Images
You can then feed to your desktop wallpaper
If you’re using Windows 10, you’ve probably noticed that the lock screen usually displays a really nice background image that is automatically chosen from Bing and automatically sized for your desktop screen. If you have a high-resolution monitor, the feature works especially well.
On a 4K or WQHD (2560×1440) monitor, the high-resolution images look absolutely great. The feature is called Windows Spotlight and it’s an option in the Windows 10 Lock Screen settings dialog.
The only problem is that there is no easy or quick way to download the images to your computer. Nor is there any way to use the Windows Spotlight feature for your desktop wallpaper. You can choose from Slideshow, but it requires you to point to a folder with pictures.
In this article, I’ll show you how to get those pictures from Windows Spotlight onto your computer, which you can then feed to the slideshow option for your desktop wallpaper.
If you’re not sure what Windows Spotlight is or if it’s not enabled on your computer, you can click on start and type in lock screen to bring up this dialog.

As you can see, the lock screen images are really nice and change about every two days. Luckily, all of the images that have been shown on your computer are actually already stored on your system, albeit not in a very user-friendly way.
Find Windows Spotlight Images
The first step is to find all the stored images on your Windows 10 system. To do this, you’ll need to open Windows Explorer and click on the View tab.
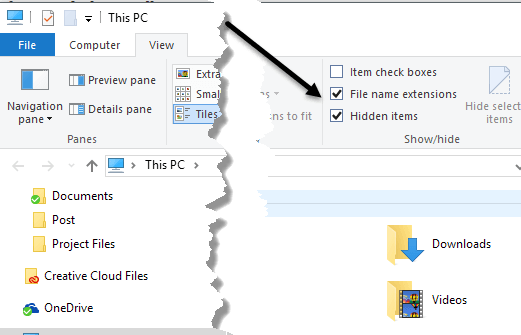
Go ahead and check both the File name extensions and Hidden items boxes. Once you have done this, navigate to the following directory below, using your own user account in place of username.
You should see a bunch of files in this folder if you have been using Windows Spotlight for some time. Go ahead and click on the Size column to order the items by file size.
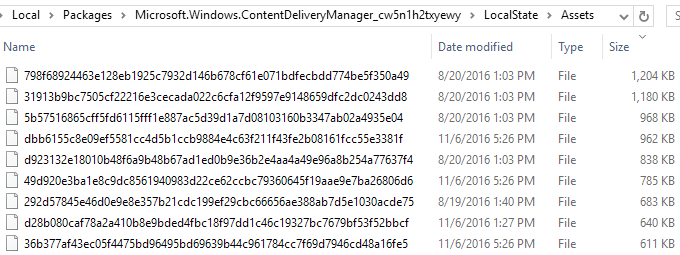
The reason I mention sorting by size is because some of the files in the folder are less than 50 KB and are not the wallpaper images. You can just ignore those files. Now what you want to do is create a new folder somewhere else on your drive that you will use for the wallpaper images.
Select all the files that are larger than 100KB or so and copy them to the new folder. To copy, select the files and then hold right-click and drag the images to the second Explorer window.

You’ll notice that it’ll say “Move to Wallpapers”, which you can ignore since you’re holding down the right-click button your mouse. When you let go, you’ll get another dialog, however, saying the files can harm your computer.
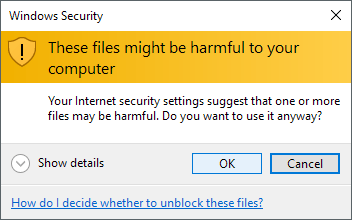
You obviously can ignore this since these are files that are already on your computer. The reason why the message appears is because they are being moved from a system protected hidden folder. Click OK and then you’ll be able to choose Copy here.
To make the images viewable again, you have to right-click on them to rename them. Since you have no idea what the photo will be, just give it a number for the name. You’ll also have to add the file extension. The images are all going to be either .PNG or .JPG, so try them in that order.
Once you rename the file, go ahead and double-click on it to see if it opens in your default photo viewer program. If it does, you’re good to go. If not, try the other file extension. You should start seeing previews of the images in Explorer also as you rename them. Some remain with the default image placeholder icon, but the images load just fine.
That’s about all there is to it. It’s not the simplest procedure by any means, but it’s not risky and it’s fairly straight-forward. I suggest turning on Spotlight for a couple of weeks and then grabbing all the images. The only downside here is that the folder contents change often and it doesn’t keep a record of every single image ever shown. It will delete some and replace them with newer images, so you might have to repeat this procedure every couple of months.
Other Ways to Get Spotlight Images
If you feel that’s way too much work for those images, you do have a couple of other choices. First, you can spend a dollar and get the SpotBright app, which allows you to download the Spotlight images in just two clicks.

The second way is even easier. Someone has been nice enough to find each image used in Spotlight and post it to Imgur. There are at least 200+ images in this album and they are all full HD resolution images. Using the site, you have the advantage of downloading a lot more of the Spotlight images than you’ll find in the hidden folder.

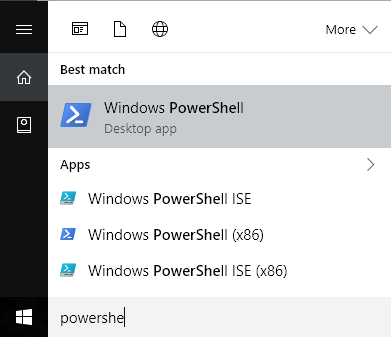
A third way is to use a clever PowerShell command. Even if you are non-technical, it’s very easy to run and it’ll save you a lot of manual work. Just create a folder on your desktop called Pics and then open PowerShell by clicking on Start and typing in powershell.
Now just copy and paste the following command into the PowerShell window and press Enter:

Open the Pics folder on your desktop and voila! All the images from the LocalState/Assets folder should be there. You’ll need to delete out the useless files, but otherwise it saves you a lot of time. Enjoy!
Founder of Online Tech Tips and managing editor. He began blogging in 2007 and quit his job in 2010 to blog full-time. He has over 15 years of industry experience in IT and holds several technical certifications. Read Aseem’s Full Bio