Установка и настройка usb-redirector-linux в CentOS
В статье пойдет речь о настройке сервера для сетевой передачи устройства USB на другой компьютер. Подобная конструкция, как правило, необходима для проброса различных USB-ключей на виртуальные машины. Серверная часть будет настраиваться на базе Linux CentOS 7, клиентская — Windows. В качестве серверного ПО будем использовать usb-redirector-linux. Внимание — данный продукт нельзя использовать бесплатно, если раздача USB устройства идет с сервера Linux. В большей степени, инструкция предназначена для тех, кто планирует купить данных продукт.
Подготовка сервера
Для корректной установки программы, необходимо обновить систему:
После сервер необходимо перезагрузить:
Настройка сервера
usb-redirector-linux собирается из исходников. Для начала ставим пакеты, необходимые для сборки:
yum install wget gcc kernel-devel
Переходим на страницу загрузки программы и копируем ссылку на ее скачивание:

Используя ссылку, скачиваем исходник на сервер:
Распаковываем скачанный архив и переходим в каталог исходников модулей:
tar -zxvf usb-redirector-linux-x86_64.tar.gz
Собираем исходник с указанием исходника ядра:
* каталог 3.10.0-862.3.3.el7.x86_64, скорее всего, будет другим — это зависит от версии ядра.
Возвращаемся в корень каталога, который появился после распаковывания архива:
Устанавливаем usb-redirector следующей командой:
Проброс USB устройства
Переходим в каталог, куда была установлена программа:
Отображаем список подключенных USB устройств:
Получим что-то на подобие:
================= USB SERVER OPERATION SUCCESSFUL ===============
List of local USB devices:
1: USB Keyboard SIGMACHIP Composite USB Device
Vid: 1c4f Pid: 0026 Port: 2-1.4
Status: plugged
2: ET99 Token OEM USB Human Interface Device
Vid: 096e Pid: 0303 Port: 2-1.3
Status: plugged
Чтобы расшарить токен ET99, вводим:
Настройка клиента
Заходим на страницу загрузки USB Redirector и скачиваем клиентскую часть — в нашем случае для Windows:

Скачанный архив распаковываем и запускаем установщик. Отвечаем на все вопросы мастера нажатием Далее.
После окончания установки запускаем программу — нажимаем Add USB Server и прописываем IP-адрес нашего сервера:

Появится список расшаренных устройств — просто нажимаем правой кнопкой мыши на необходимый и кликаем Connect USB Device.
USB Redirector Client
Contents
USB Redirector overview
USB Redirector eliminates the need to swap cables and physically move USB devices to use them on different computers. This software solution enables traffic from USB devices to be sent over a network so remote machines can access them as if they had a direct connection to the peripheral.
USB Network Gate is USB redirector software application that operates by sharing a computer’s USB interfaces rather than individual devices. This allows you to freely plug and unplug devices at will, with each attached device automatically connected to the remote machines. No additional configuration is necessary.

USB Redirector Client and Server sides
USB Network Gate is comprised of two components. The server portion of the software tool needs to be registered in order to share USB ports. There is no requirement to register the client software. With a single server registration, you can install the client on an unlimited number of machines. It is a free USB redirector client.
There are three versions of USB Network Gate that provide USB redirection for the Windows, Linux, and Mac operating systems. Cross-platform environments are fully supported so you can have any combination of server and client computers.

Related Articles
USB Redirector Client for Windows
Let’s take an in-depth look at how USB Redirector works from the Client-side on the Windows operating system.
After sharing a USB port from the server, you need to perform a USB redirector client download on the computer that will remotely access the port and connected device. Here’s how to complete the connection from the client computer.
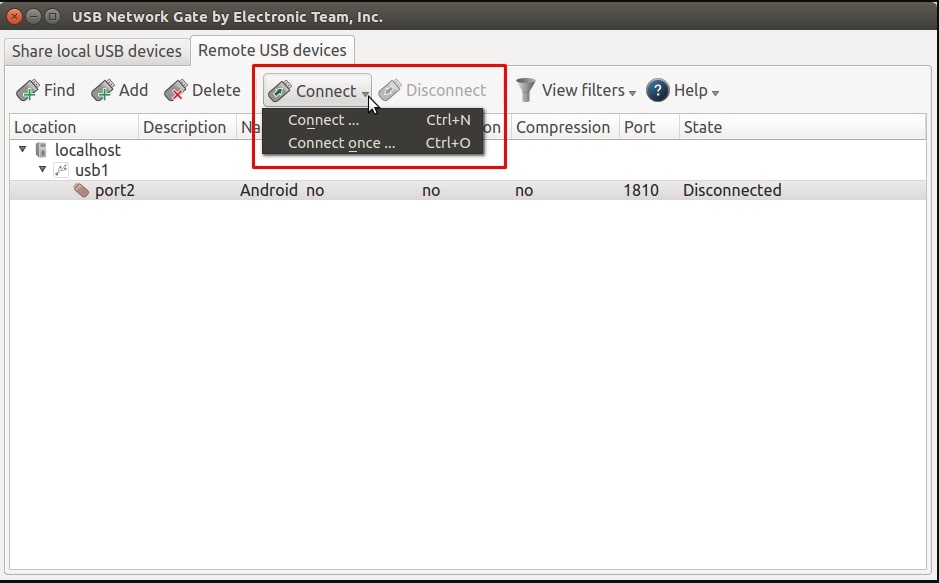
- Select the Remote USB devices tab in the software’s main window. All devices shared from the server will have been recognized by the client and are automatically added to the list of devices which you can select.
- Select the device you wish to use and click Connect.
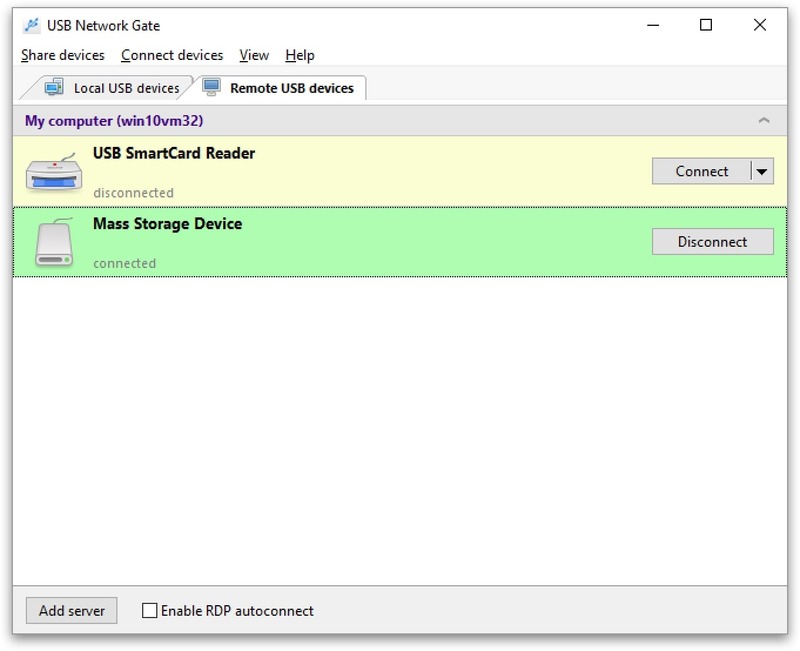
Connect or the Connect once options
You can choose to the Connect or the Connect once option from the drop-down menu. The two options function differently.
If the Connect option is selected, USB Network Gate attempts to reconnect in the event of a broken connection. This function only pertains to connections broken on the client-side. Connections disabled from the server-side or communication that fails due to incorrect passwords are not re-established.
The Connect once option will not try to restore a connection terminated due to a failed connection.
You will be prompted for a password if the device is being protected in that manner (see How to Secure Connection).
The USB Redirector Client for Windows is compatible with these Windows versions:
USB Redirector Client for Linux
Once USB Network’s Gate server has shared a device, use the USB redirector free client to connect to it. Follow these steps to enable the connection on your Linux computer.
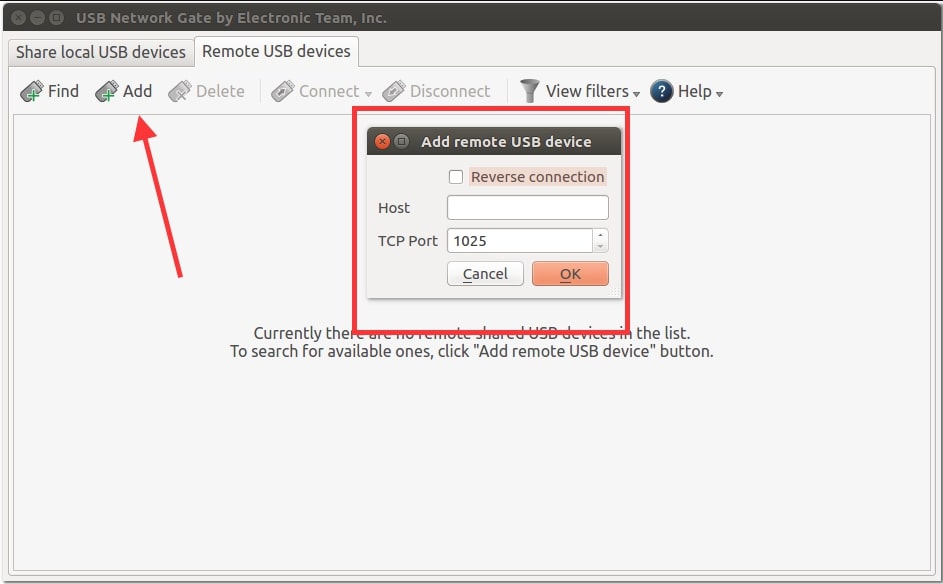
- Switch to the Remote USB devices tab.
- Click Find on the main toolbar:

You will be presented with the Add remote USB device dialog. - The Find all option will display all shared devices available on your local network. You can limit the search to a specific host by selecting Find and typing in its network name or IP address.
- If the search is not successful, it may be that a firewall is blocking access to your server’s network ports. To resolve this issue, select the Add button and enter the designated TCP port that is being used to share the device.
- After adding the device to the list, select it and press Connect or Connect once to establish a connection (see the beginning of this section for the differences between these options).
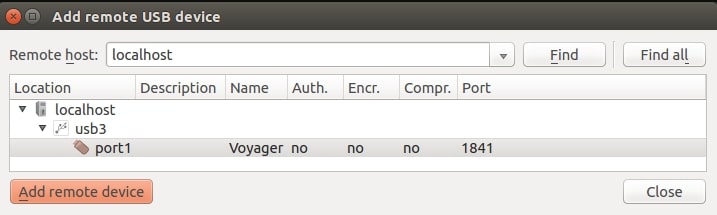
Devices protected with a password will cause prompt to be displayed before access is granted (see How to Secure a Connection).
USB Redirector Client for Linux was tested on these distributions:
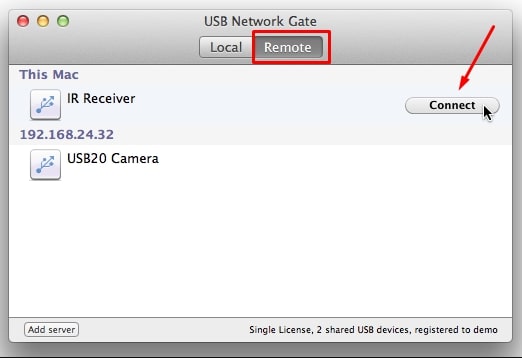
USB Redirector Client for Mac
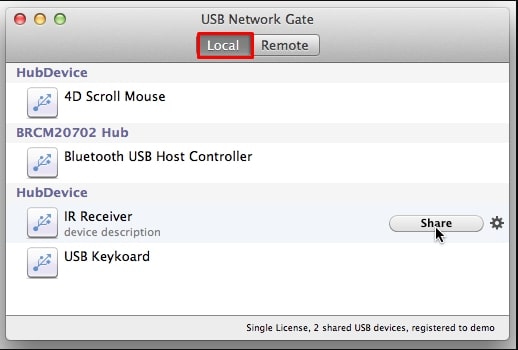
Connecting to USB devices shared by USB Network Gate from a macOS machine involves following these steps:
- Launch the USB Network Gate client.
- The client detects the shared USB devices automatically as they are added by the server. You will see them in the list of available devices. You can also use the Add button to conduct a manual search. Another option is to use the menu –> Manage –> Connect to New Server procedure.
Note: These ports need to be open on your macOS machine for the application to function correctly: TCP 5473, UDP 5474, UDP 5475.
- Click the Connect button to establish communication with the selected device. You may have to provide a password if prompted when the device is protected from unauthorized access (see How to Secure Connection).
Usb redirector client linux
This Free product allows to share and access USB devices remotely on Linux platform. This solution is compatible with all of our other USB redirection products. It allows redirecting USB devices between Linux based computers or between Linux and Windows. And with help of the special patch, it is possible to add USB redirection support to the well-known open source remote desktop clients, rdesktop and FreeRDP, so that you can redirect USB devices into remote session on Windows computer where USB Redirector RDP Edition or USB Redirector TS Edition are installed.
USB Redirector for Linux helps to:
- Redirect USB devices to virtual machine.
- Organize USB server for users in your local or corporate network.
- Use USB devices plugged into your Linux thin-client in a Windows Remote Desktop session.
- Use USB devices plugged into remote Windows-based computer.
- Limit physical access to USB devices, but make them available for users in your network.
How to start:
USB Redirector for Linux can be installed in three modes:
- USB server mode. When installed in this mode, USB Redirector allows to share your USB devices for access on remote computers with Linux or Windows operating systems.
- USB client mode. When installed in this mode, USB Redirecror allows you to connect remote USB devices that were shared on remote computers with Linux or Windows operating systems.
- Combined USB server and USB client mode. You can either share your USB devices for remote access or connect USB devices from remote computers with Linux or Windows operating systems.
 | USB Redirector installation instructions can be found here. |
Redirect USB Device in Five Steps:
- Step 1: Download and install USB Redirector for Linux in USB server mode on a computer where USB device is physically attached. This computer will be the USB server.
 ./installer.sh install-server
- Step 2: Share needed USB device on USB server:
usbsrv -list-devices
usbsrv -share 8
- Step3. Now move to the computer computer where you need to use USB device remotely and install USB Redirector for Linux in USB client mode. This computer will be the USB client.
./installer.sh install-client
- Step4. Create direct connection from USB client to USB server (it is also possible to use callback connection from USB server to USB client).
usbclnt -add-server 192.168.1.105:32032
- Step5. In the list of remote USB devices choose the needed one and connect it:
usbclnt -list-devices
usbclnt -connect 1-8
- Result: Now you can use the USB device on USB client computer just like it was plugged there directly:
Cross-platform features and Remote Desktop support:
USB Redirector for Linux is compatible with USB Redirector, USB Redirector RDP Edition and USB Redirector TS Edition. It means you can freely share USB devices between Linux and Windows systems without any limitations.
It is possible to redirect USB devices over RDP connection from Linux thin-client to Windows Terminal Server (RD Sesssion Host). For this, you need to use one of the compatible RDP clients. We support the most popular open source Linux Remote Desktop clients, rdesktop and FreeRDP. We provide patches for these RDP clients which add USB over RDP redirection support.
After installing USB Redirector for Linux, you need to apply the special patch, that is shipped inside USB Redirector installation package in the rdp/rdesktop directory:
- copy usbrdr.c and usbrdr.patch into rdesktop source code directory
- run patch -p3 -i usbrdr.patch
- re-compile and re-install patched rdesktop
- start rdesktop with ‘-r usbrdr’ option.