10 лучших GUI-клиентов Git для разработчиков
Перевод статьи «Top 10 Best GUI Git Client for Developers».
Git — это система контроля версий для отслеживания изменений в файлах. Обычно используется в командной работе, особенно в среде программистов.
Несмотря на то, что многие пользователи вполне комфортно себя чувствуют, пользуясь Git при помощи командной строки, для этого инструмента есть достаточное количество графических интерфейсов. Эти GUI-клиенты способны существенно ускорить вашу работу с системой контроля версий, особенно, если вы еще не слишком хорошо с ней знакомы.
(Примечание редакции. Любопытно, что на сайтах вопросов и ответов многие отмечают, что использование GUI сильно упрощает рутинную работу, когда вы уже хорошо знакомы с принципом работы и командами Git).
Если вы ищете идеальный графический интерфейс для управления своим репозиторием на Mac, Windows или Linux, вам повезло: сейчас мы вам расскажем о лучших GUI-клиентах Git.
1. GitHub Desktop

GitHub Desktop это совершенно бесплатное приложение с открытым исходным кодом, разработанное GitHub. С его помощью можно взаимодействовать с GitHub (что и не удивительно), а также с другими платформами (включая Bitbucket и GitLab).
Функционал приложения позволяет легко замечать пул-реквесты в ветках, а также просматривать различия в версиях изображений и блоков кода. При этом элементы для дальнейшего управления можно добавлять в приложение даже путем перетаскивания.
Приложение доступно для macOS и Windows.
2. Fork

Fork это весьма продвинутый GUI-клиент для macOS и Windows (с бесплатным пробным периодом). В фокусе этого инструмента скорость, дружественность к пользователю и эффективность. К особенностям Fork можно отнести красивый вид, кнопки быстрого доступа, встроенную систему разрешения конфликтов слияния, менеджер репозитория, уведомления GitHub.
С помощью этого инструмента вам будут доступны интуитивный rebase в красивом UI, GIT LFS, cherry-pick, подмодули и многое другое.
3. Tower

Tower это платный графический интерфейс Git для macOS и Windows. В настоящее время это один из ведущих профессиональных инструментов подобного типа. С его помощью вы сможете лучше познакомиться с системой контроля версий. Вам будут доступны в визуальном представлении все действия, которые можно совершать в Git. Сюда входит и разрешение конфликтов слияния, и совместная работа над проектами.
Есть бесплатный пробный период.
4. Sourcetree

Sourcetree это бесплатный GUI Git для macOS и Windows. Его применение упрощает работу с контролем версий и позволяет сфокусироваться на действительно важных задачах.
Красивый пользовательский интерфейс дает возможность прямого доступа к потокам Git. К вашим услугам локальный поиск по коммитам, интерактивный rebase, менеджер удаленных репозиториев, поддержка больших файлов. Все происходящее вы можете видеть наглядно, а это очень облегчает понимание процессов.
Sourcetree был разработан Atlassian для Bitbucket, но вполне может использоваться в сочетании с другими Git-платформами. Имеет встроенную поддержку Mercurial-репозиториев.
5. SmartGit

SmartGit это Git-клиент для Mac, Linux и Windows. Имеет богатый функционал. Поддерживает пул-реквесты для SVN, GitHub и Bitbucket. В арсенале SmartGit вы найдете CLI для Git, графическое отображение слияний и истории коммитов, SSH-клиент, Git-Flow, программу для разрешения конфликтов слияния.
SmartGit может использоваться бесплатно в некоммерческих проектах.
6. Sublime Merge

Sublime Merge это клиент Git для Mac, Windows и Linux. Это детище тех же разработчиков, которые создали редактор кода Sublime Text.
Sublime Merge отличается высокой производительностью, а также отличным функционалом для слияния, поиска, просмотра различий между версиями. Базовой версией можно пользоваться бесплатно.
7. GitKraken

GitKraken это кроссплатформенный GUI Git для использования с различными платформами контроля версий (включая GitHub, Bitbucket, GitLab). Его цель — повысить вашу продуктивность в использовании Git. Для этого вам предоставляется интуитивный UI, возможность отслеживать задачи, встроенный редактор кода, редактор конфликтов слияния и поддержка интеграции с другими платформами.
Коммерческое использование платное. Также придется купить Pro-версию, если хотите получить расширенный функционал.
Доступен для Mac, Windows и Linux.
8. GitUp

GitUp это бесплатный (open-source) клиент Git для пользователей Mac. В этом инструменте упор сделан на скорость, простоту, эффективность и легкость использования. Он позволяет вам напрямую взаимодействовать с базой данных хранилища, в результате чего работает куда быстрее аналогов.
В GitUp вы найдете графическую альтернативу для всех функций Git и интуитивно понятную реализацию команд ввода.
9. Aurees Git Client

Это бесплатное приложение для использования Git на Mac, Windows и Linux. Создано оно для ускорения работы, связанной с контролем версий.
Здесь вы найдете отличный функционал для просмотра и редактирования разницы в версиях (с подсветкой), предварительный просмотр слияния версий, хорошую систему разрешения конфликтов слияния.
10. GitBlade

GitBlade — это красивый клиент Git для платформ Mac, Windows и Linux. В нем вы найдете все функции, необходимые в ежедневной работе с Git-проектами (инструменты merge, визуальное отображение связанных веток и коммитов, режим просмотра различий между версиями, визуализация истории файла).
Всеми базовыми функциями можно пользоваться бесплатно (а более продвинутыми — 14 дней пробного периода).
Это была десятка лучших клиентов Git с графическим интерфейсом. Все они подходящи для использования в Mac, большинство — в Windows и лишь некоторые — в Linux. Мы (редакция Techrocks) решили исправить эту небольшую несправедливость и добавить парочку клиентов Git для Ubuntu, которые не вошли в общий список. Описания — из статьи «Best 10 Git GUI Clients for Ubuntu».
11. Git Cola

Git Cola это совершенно бесплатный клиент Git для Ubuntu и других дистрибутивов Linux, а также Windows и macOS. Один из самых лучших и быстрых инструментов такого типа. Он прост в работе, но отлично справляется со всеми основными задачами, возникающими при работе с версиями.
12. GitEye

GitEye — простой в использовании клиент Git с графическим интерфейсом, созданный CollabNet. Поставляется в комплекте с несколькими инструментами, помогающими повысить продуктивность разработки ПО. Например, Gerrit Code Review выводит уведомления об изменениях или обновлениях в коде.
GitEye имеет понятный и очень мощный интерфейс, в котором все так хорошо продуманно, что пользователю не придется долго искать нужные функции.
Этот клиент Git хорошо интегрируется с другими популярными инструментами, такими как Bugzilla, Jira, Hudson, Jenkins и пр.
Есть версии для Windows, Linux и Mac.
И напоследок — графический пользовательский интерфейс в виде сайта.
13. UnGit
Этим GUI вы можете пользоваться на любой платформе. После установки UnGit запускает локальный веб-сервер, прослушивающий отдельный порт. Благодаря этому вы получаете интерактивную веб-страницу для вашего репозитория, которую можете открыть в любимом браузере.
UnGit также доступен в виде плагинов для Atom и Sublime Text.
Несмотря на то, что все приложения, о которых мы рассказали, обладают схожим функционалом, каждое из них имеет свои отличительные особенности. Эти особенности позволяют им выделяться среди аналогов в какой-то отдельной области, так что каждый разработчик сможет подобрать подходящий инструмент для своих нужд.
Next up: Learn Sourcetree with Bitbucket

Step 1: Create a Git repository
As our new Bitbucket space station administrator, you need to be organized. When you make files for your space station, you’ll want to keep them in one place and shareable with teammates, no matter where they are in the universe. With Bitbucket, that means adding everything to a repository. Let’s create one!
Step 1: Create the repository
Initially, the repository you create in Bitbucket is going to be empty without any code in it. That’s okay because you will start adding some files to it soon. This Bitbucket repository will be the central repository for your files, which means that others can access that repository if you give them permission. You will also copy a version of that repository to your local system—that way you can update it from one repo, then transfer those changes to the other.

Do the following to create your repository:
- From Bitbucket, click the + icon in the global sidebar and select Repository. Bitbucket displays the Create a new repository page. Take some time to review the dialog’s contents. With the exception of the Repository type, everything you enter on this page you can later change.
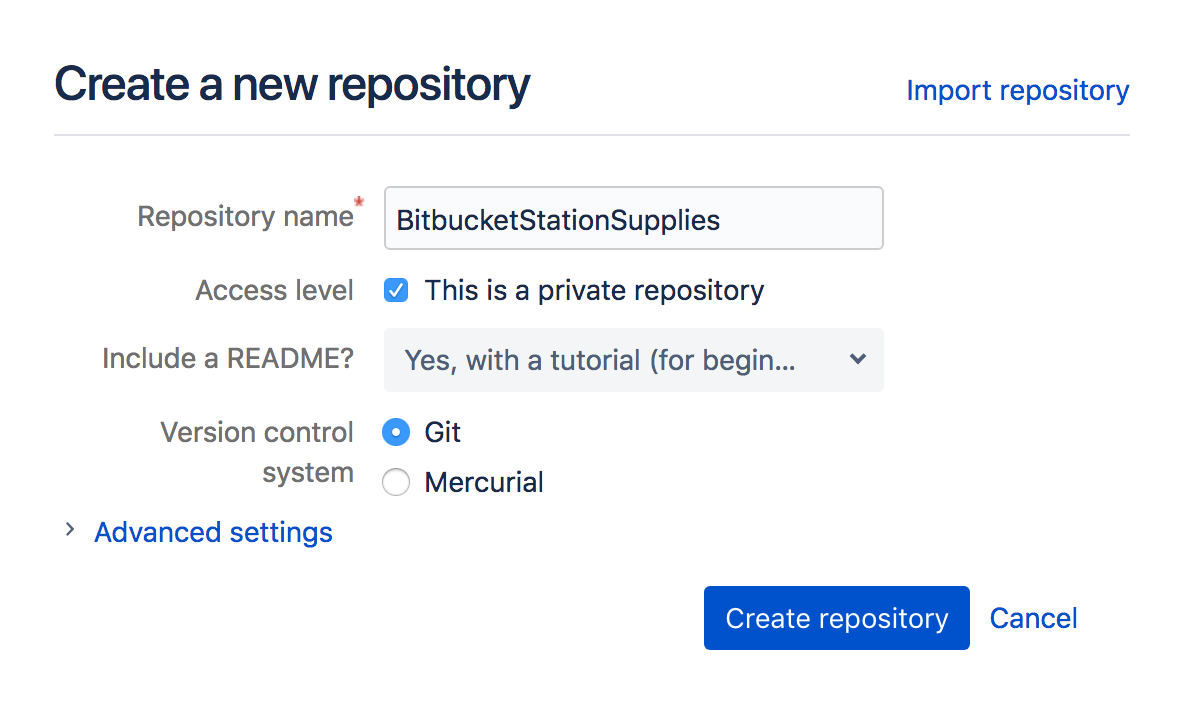
Enter BitbucketStationSupplies for the Name field. Bitbucket uses this Name in the URL of the repository. For example, if the user the_best has a repository called awesome_repo , the URL for that repository would be https://bitbucket.org/the_best/awesome_repo .
Keep the rest of the options as is unless you want to change them:
Access level —Leave the This is a private repository box checked. A private repository is only visible to you and those with access. If this box is unchecked, anyone can see your repository.
Include a README? —If you recently created your account, this defaults to a tutorial README. For the purposes of this tutorial, pick either of the Yes options, that way you’ll start out with a file.
From Version control system, you can choose either Git or Mercurial. If you aren’t sure which one to go with, keep Git as your option.
Click Create repository. Bitbucket creates your repository and displays its Source page.
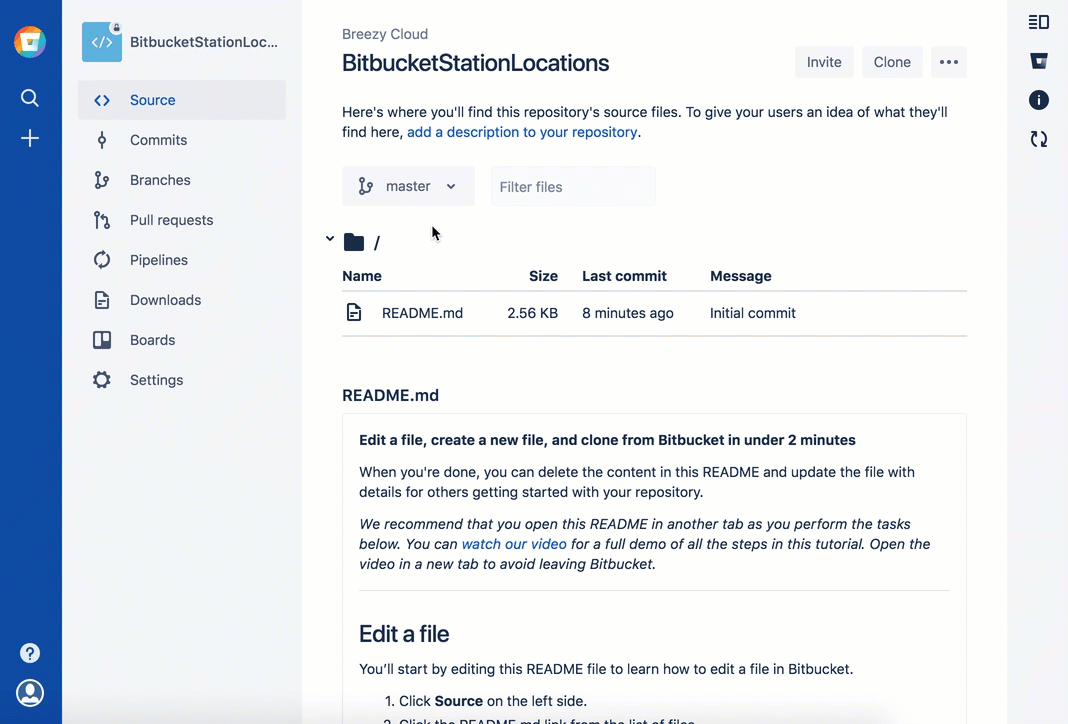
Step 2: Explore your new repository
Take some time to explore the repository you have just created. To view the shortcuts available, press the ? key on your keyboard.
Click + from the global sidebar for common actions for a repository. Scan through the links in the navigation sidebar to see what’s behind each one, including the repository Settings where you’ll update repository details and other settings. Click the Commits in the sidebar. If you included a README, you’ll see one commit on that page.
Your repository is private and you have not invited anyone to the repository, so the only person who can create or edit the repository’s content right now is you, the repository owner.
Step 2: Copy your repository and add files
Now that you have a place to add and share your space station files, you need a way to get to it from your local system. To set that up, you want to copy the Bitbucket repository to your system. Sourcetree refers to copying a repository as «cloning» it. When you clone a repository, you create a connection between the Bitbucket server and your local system.

Step 1: Clone your repository to your local system
Use Sourcetree to clone your repository to your local system without using the command line.
- As you use Bitbucket more, you will probably work in multiple repositories. For that reason, it’s a good idea to create a directory to contain all those repositories. So start by creating a directory on your local system and call it repos.
From Bitbucket, go to your BitbucketStationSupplies repository.
Click the Clone button in the top right corner. Bitbucket displays the Clone this repository dialog. 
From the Clone this repository dialog, click Clone in Sourcetree.
From the Clone New dialog box, update the Destination Path to /repos/bitbucketstationsupplies . This destination path refers to the directory you just created with the folder for the repository. The Name field remains the same with the folder name of the repository. 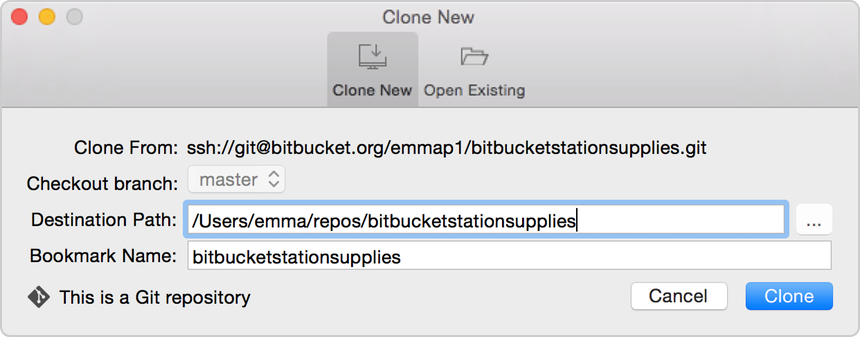
Click the Clone button.
Congratulations! You’ve cloned your repository to your local system.
Step 2: Create a file, add it locally, and push it to Bitbucket
With the repository on your local system, you can start making a list of all the supplies you need for your space station. To do so, let’s create a file for your supplies.
As you work on this section, the images may look slightly different, depending on whether you are working with a Git or Mercurial repository.
Double-click the bitbucketstationsupplies repository in Sourcetree and notice that there is nothing to commit from your local repository to the remote repository. 
Use a text editor to add the following three lines:
space ice
cream nerf
darts telescope light shield
Save the file as supplies.txt to the bitbucketstationsupplies directory on your local system. The supplies.txt file now appears in Sourcetree since you created it in your local repository. 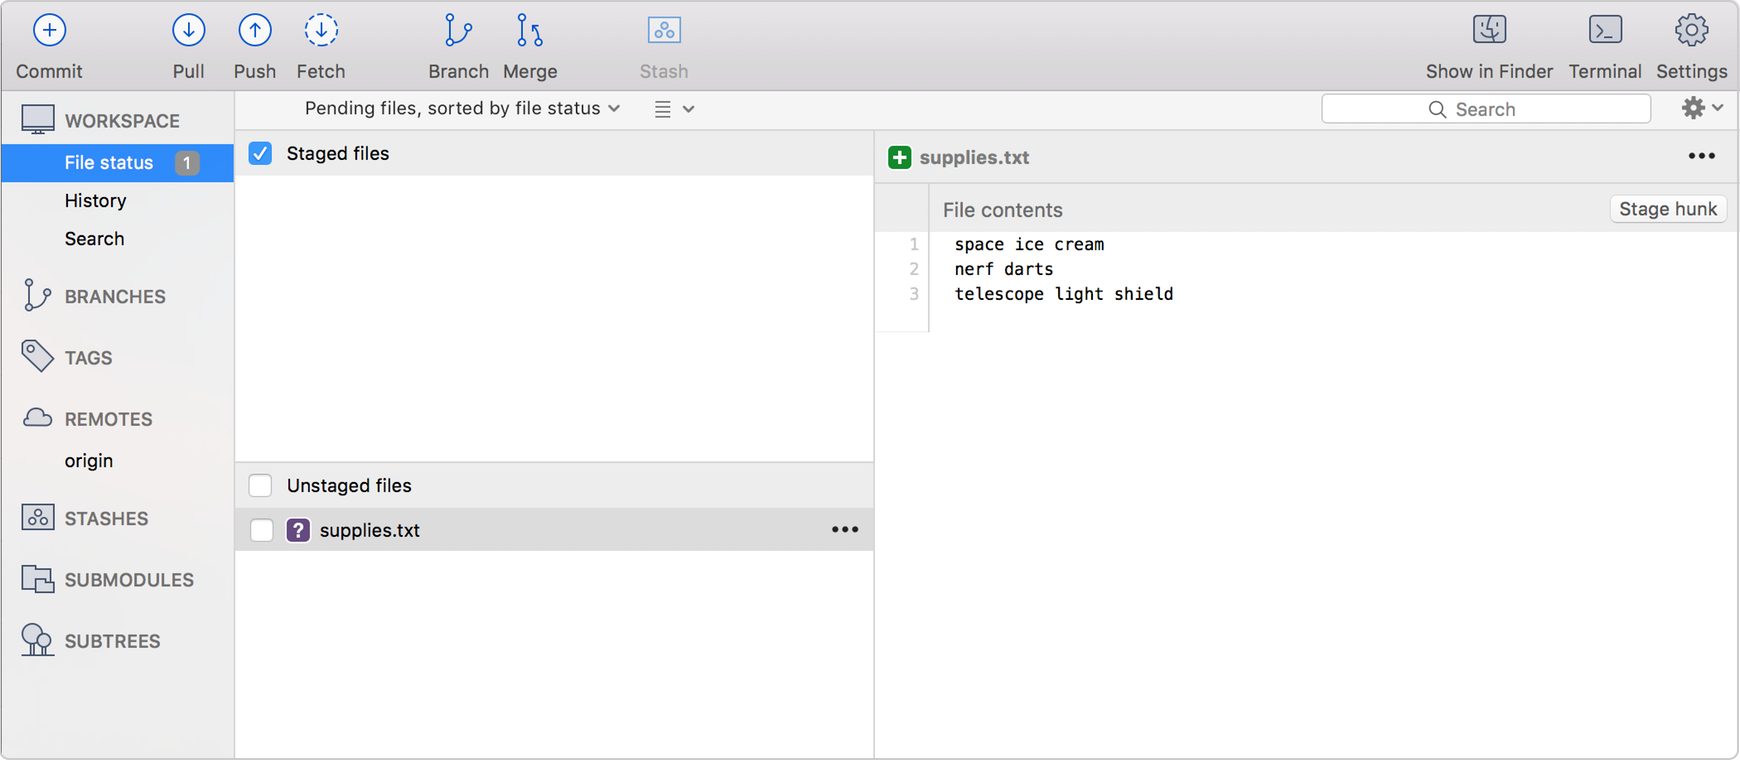
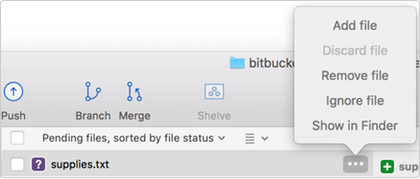
Now is the point where you prepare a snapshot of the changes before committing them to the official history. From the options menu of the supplies.txt file, select Stage file (for a Git repository) or Add file (for a Mercurial repository). 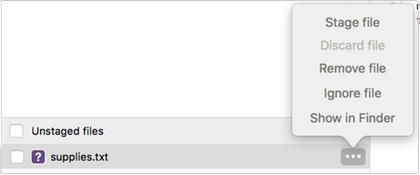
Click the Commit button at the top to commit the file.
In the message box, enter «Initial commit.» 
Click the Commit button under the box. Your new file is now committed to the project history. 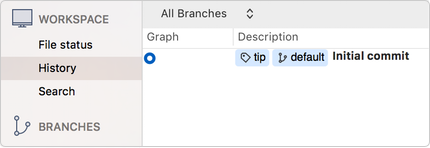
Up until this point, everything you have done is on your local system and is invisible to your Bitbucket repository until you push those changes to your remote Bitbucket repository.
From Sourcetree, click the Push button to push your committed changes. Pushing lets you move one or more commits to another repository, which serves as a convenient way to publish contributions. 
From the dialog box that appears, your next step depends on whether you are using Git or Mercurial:
Git–Under the Push? column, select the master branch to indicate that you are pushing that branch to origin and click OK. 
Mercurial–Everything is automatic, so all you have to do is click OK.
Go to your BitbucketStationSupplies repository in Bitbucket.
If you click Commits in the sidebar, you’ll see your commit in the repository. Bitbucket combines all the things you just did into that commit and shows it to you.
If you click Source in the sidebar, you’ll see your file in the repository, the supplies.txt file you just added. 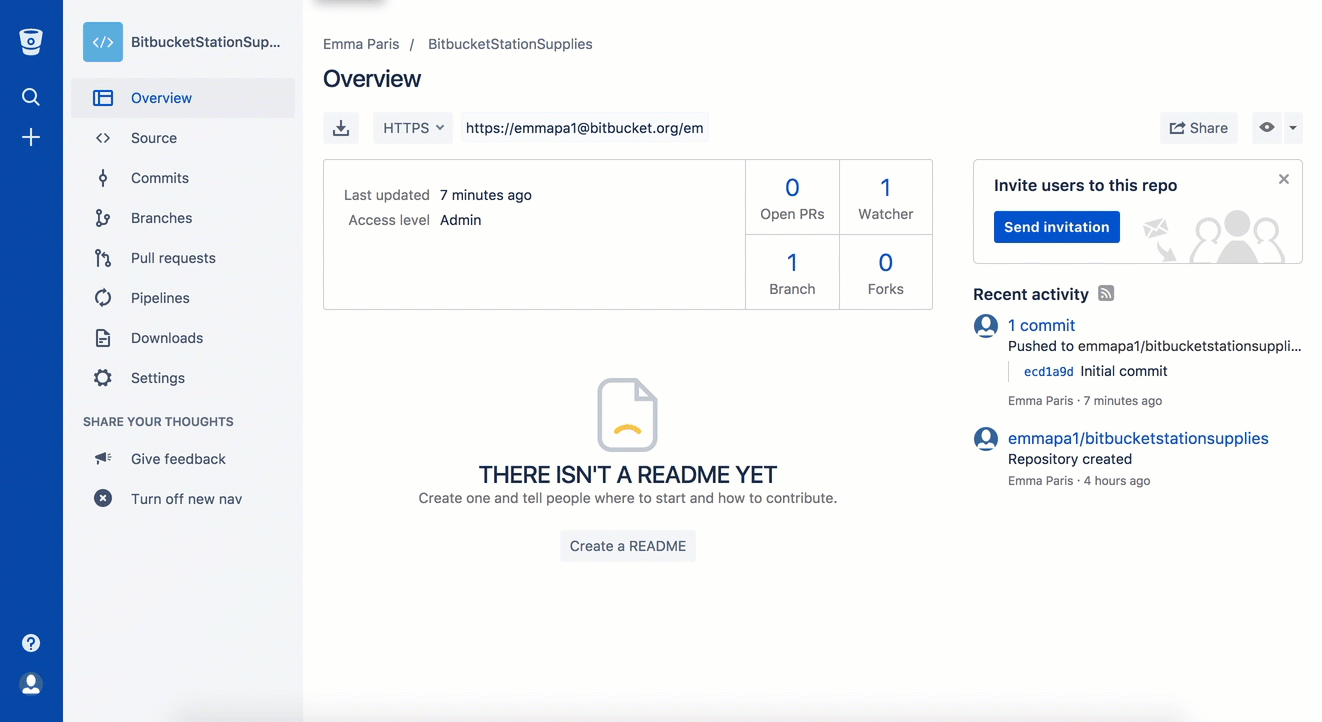
Step 3: Pull changes from your repository
Next on your list of space station administrator activities, you need to file out a request for new supplies. Let’s set up a system for getting supplies to our Bitbucket space station. With just a bit more knowledge of Bitbucket and Sourcetree, we’ll be supporting our space exploration for years to come!
Step 1: Create a file in Bitbucket
To add your supply request file, do the following:
From your BitbucketStationSupplies in Bitbucket, click Source to open the source directory. Notice you only have one file, supplies.txt , in your directory. 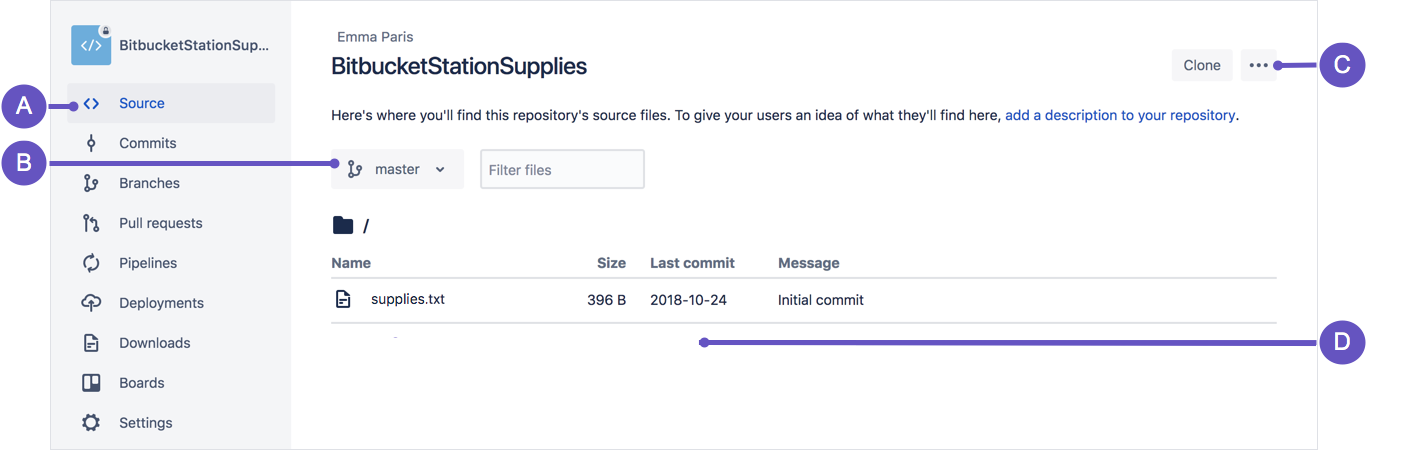
A. Source page: Click the link to open this page.
B. Branch selection: Pick the branch you want to view.
C. More options button: Click to open a menu with more options, such as ‘Add file’.
D. Source file area: View the directory of files in Bitbucket.
From the Source page, click the More options button in the top right corner and select Add file from the menu. The More options button only appears after you have added at least one file to the repository. A page for creating the new file opens, as shown in the following image. 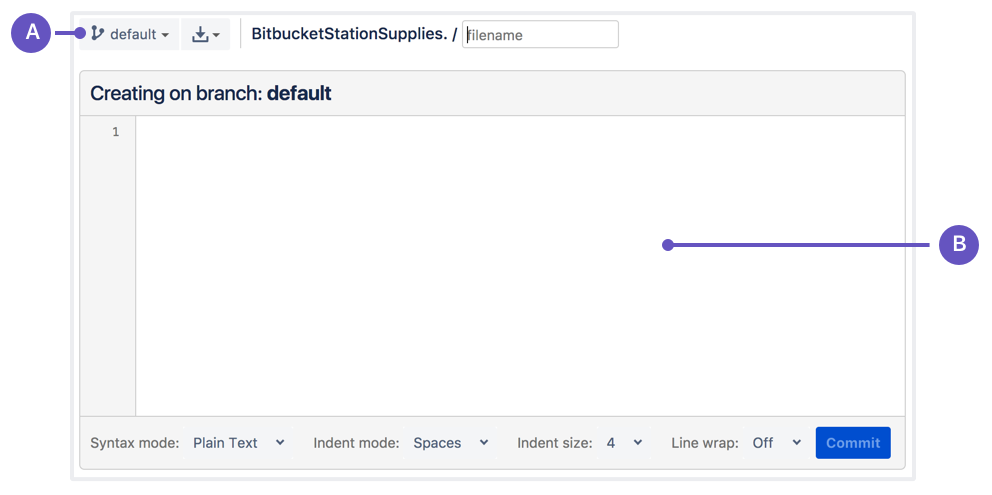
A. Branch with new file: Change if you want to add file to a different branch.
B. New file area: Add content for your new file here.
Enter supplyrequest in the filename field.
Select HTML from the Syntax mode list.
Add the following HTML code to the text area:
We are requesting additional supplies. Please send us the following:
Click Commit. The Commit message field appears with the message: supplyrequest created online with Bitbucket.
Click Commit under the message field.
You now have a new file in Bitbucket! You are taken to a page with details of the commit, where you can see the change you just made:
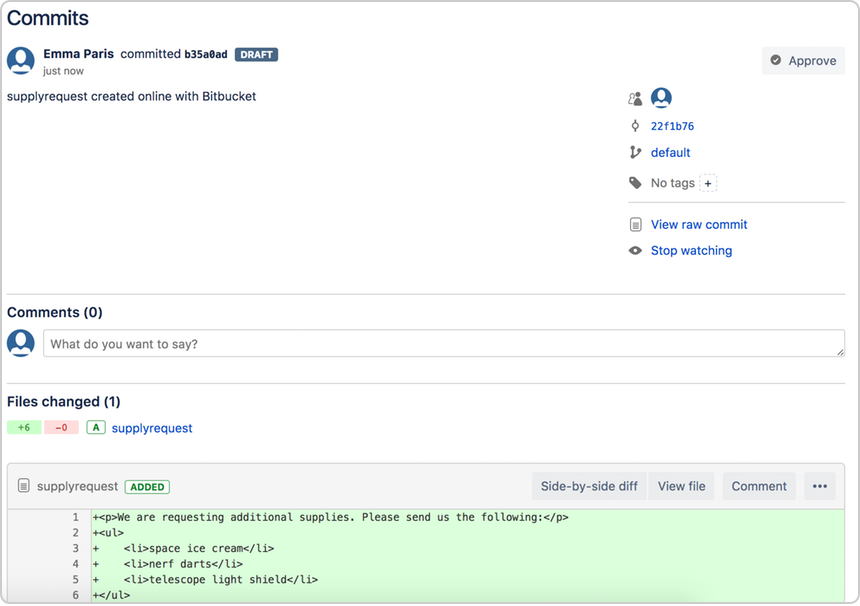
If you want to see a list of the commits you’ve made so far, click Commits in the sidebar.
Step 2: Pull changes from a remote repository
Now we need to get that supply request form onto your local system. The process is pretty straight forward, basically just the reverse of the push you used to get the supplies.txt file into Bitbucket.
To pull the file into your local repository, do the following:
Open your repository in Sourcetree, and click the Pull button. 
A popup appears to indicate that you are merging the file from Bitbucket to your local repository. 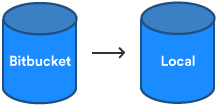
Click OK from this box. Sourcetree updates with a description of the merged file. 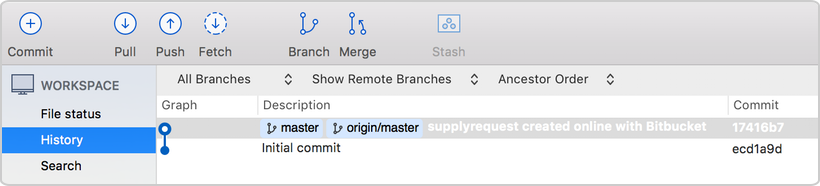
Navigate to your repository folder on your local system and you’ll see the file you just added.
Fantastic! Now, you have finished the basic DVCS workflow (clone, add, commit, push, and pull) between Bitbucket and your local system.
Step 4: Use Sourcetree branches to merge an update
After looking through the Intergalactic Mall Magazine, you see a pair of speakers that you really want for the space station. They are big enough to produce a good amount of sound and soft enough that the lack of gravity won’t cause them to crash. The only problem is that they pretty pricey, and you need approval before you can officially add them to your list of supplies.
In the meantime, create a feature branch so that you can update the supply to your request list while you wait. Then when you have approval, you just merge the requests file from the feature branch into the main branch.
Branches are most powerful when you’re working on a team. You can work on your own part of a project from your own branch, pull updates from Bitbucket, and then merge all your work into the main branch when it’s ready. Our documentation includes more explanation of why you would want to use branches.
Step 1: Create a branch and make a change
Let’s create a branch so that you can list the speakers in your supply requests file. Even though branches work differently between Git and Mercurial, you create them in a similar way from Sourcetree.
- From Sourcetree, click the Branch button.

- Depending on whether you have a Git or Mercurial repository, you see a different popup for creating a new branch. From the New Branch or Create a new branch field, enter wish-list for the name of your branch.

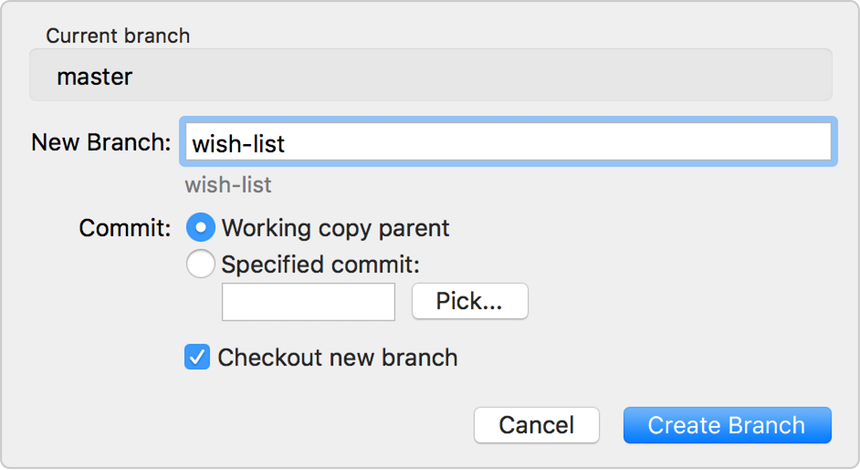
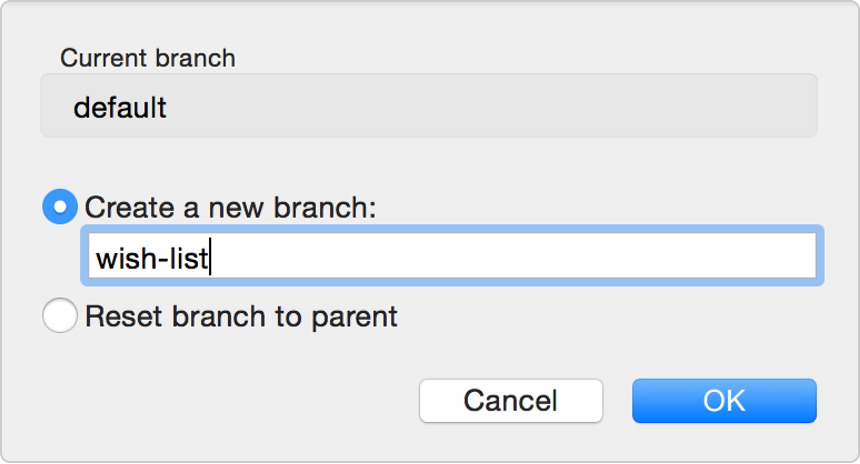
Click Create Branch or OK.
From Sourcetree, click the Show in Finder button. The directory on your system opens.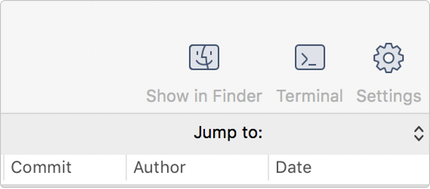
From the directory folder, open the supplyrequest file with a text editor.
Making a change to the file by adding the following item to the list of supplies:
anti-gravity speakers
Open the view in Sourcetree and notice that your repository now has uncommitted changes. 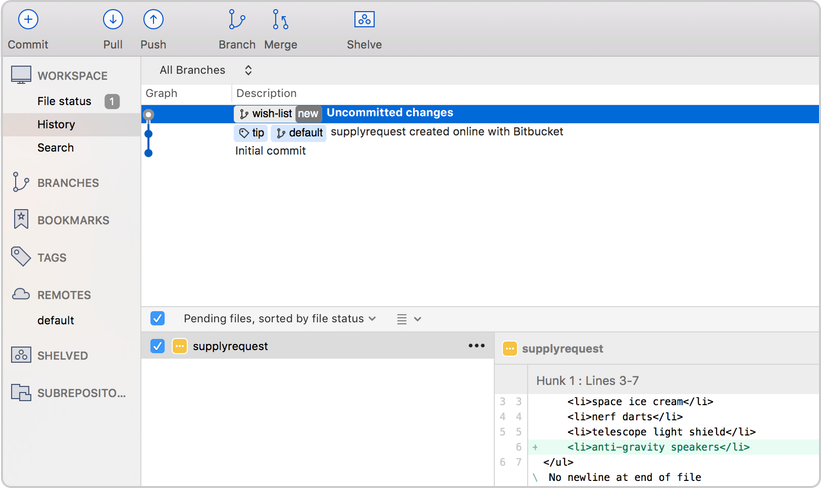
From here, everything you do is the same as you did when you added the supplyrequest file and initially committed it.
If you have a Git repository, make supplyrequest.txt ready to commit by selecting Stage file from the options menu. 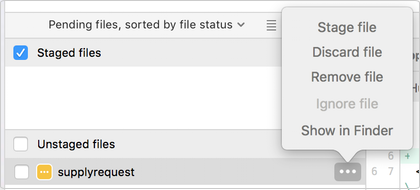
Click the Commit button at the top to commit the file.
In the message box, enter «Adding an item for my wish list.»
Click the Commit button under the box. From Sourcetree, you see that the file has been updated on the wish-list branch. 
Step 2: Merge file changes from a branch
Your speakers were approved! Now it’s time to update the main supply list with your wish-list item.
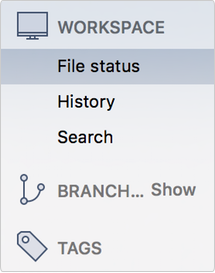
- First, you want to switch back to the main branch. From the left-side menu items in Sourcetree, hover your mouse over the right side of the Branches label so that the word Show appears.
- When Show appears, click it. Under the Branches heading, you will see the two branches for this repository, the main branch, and the wish-list branch. The main branch for a Git repository is called master . The main branch for a Mercurial repository is called default .

Double-click the feature branch (in this case wish-list ) to switch to that branch.
Click the Merge button. 
From the popup that appears, make sure the commit on your wish-list branch is highlighted. You are indicating that you want to add the commit from this branch to the main branch. 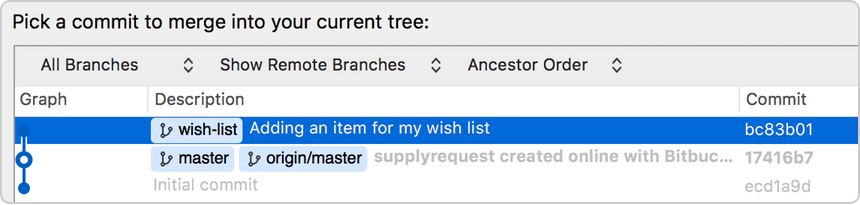
If you have a Git repository, check this option at the bottom: Create a commit even if merge resolved via fast-forward. 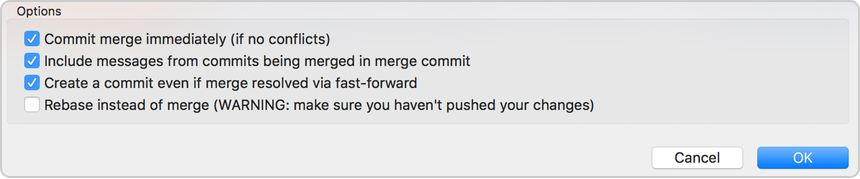
Click OK. You have updated the supplyrequest file in your main branch with your wish-list item. Sourcetree will look slightly different based on whether you have a Git or Mercurial repository. 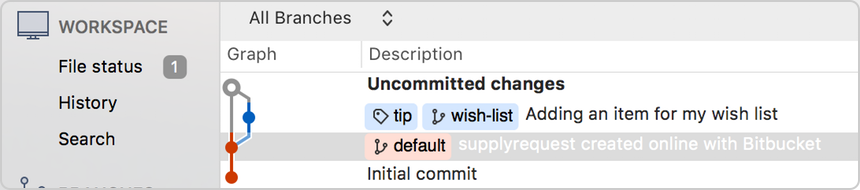
If you have a Git repository, you are done. If you have a Mercurial repository, you will notice that you need to commit your changes. Click the Commit button at the top. The commit message defaults to a description with «Merge.» Keep this message and go ahead and click Commit.
Step 3: Push your change to Bitbucket
From Sourcetree, click the Push button to push your committed changes.
From the dialog box that appears, click the OK button to push changes to your local repository.
Click the Overview page of your Bitbucket repository, and notice you can see your push in the Recent Activity stream.
Click Commits and you can see the commit you made on your local system. Notice that the change keeps the same commit code that it had on your local system. 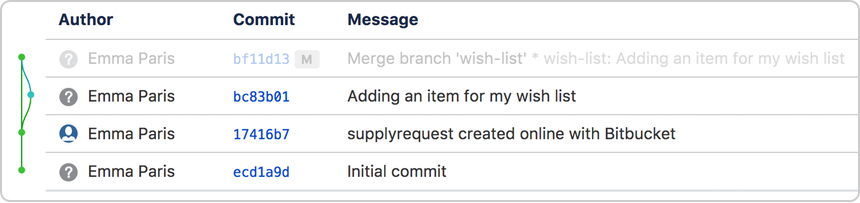
Click Source, then click the supplyrequest file. You can see the last change to the file has the commit code you just pushed.
Click the file history list to see the committed changes for this file, as shown in the following image.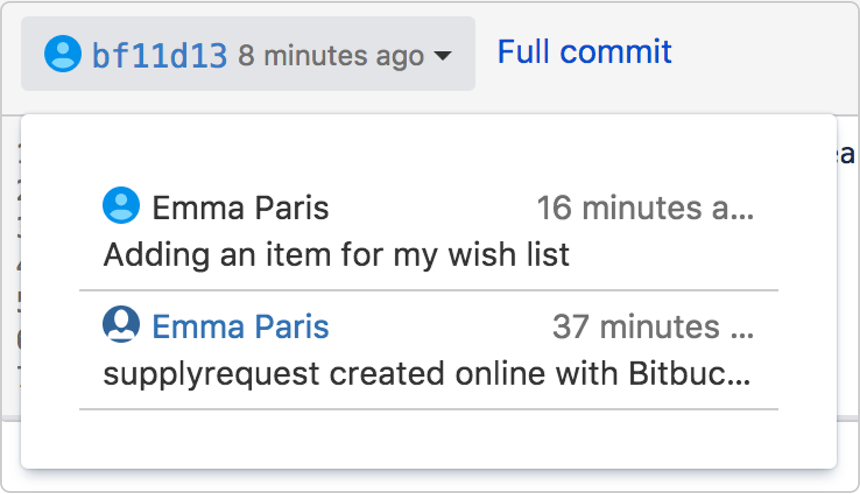
You are done!
That was intense! Maybe. Depends on how it compares to launching into space. Now that you know a lot more about Bitbucket, you are now prepared to run your space station’s activities a lot better. Now, take a break and go do some star gazing.
Want to learn more about Bitbucket and Sourcetree? You can take on the challenge of updating a teammate’s repository.