Папка System Volume Information
По умолчанию в Windows включена функция «восстановление системы», за нее отвечает папка System Volume Information. Если жесткий диск компьютера разбит на несколько логических разделов, она будет находиться в каждом из них. В ней хранятся все файлы, которые потребуются для восстановления системы, неопытные пользователи могут посчитать ее ненужной или зараженной, но это неверное мнение.
Вирусы в папке System Volume Information
Действительно, вирусы в папке System Volume Information могут появиться, при создании точки восстановления системы уже после ее заражения. Не надо сразу же полностью удалять эту папку, попробуйте проверить компьютер на вирусы или восстановить систему до более ранней версии и в том случае, если ничего не получается – можно попробовать ее удаление.
Как удалить папку System Volume Information
Есть два способа, которые помогут понять, как удалить папку System Volume Information.
Первый способ: отключить восстановление Windows, применив следующие указания.
- Щелкаем по значку «компьютер» на рабочем столе или в меню пуск.
- Переходим во вкладку «защита системы».

- В новом окне выбираем пункт «настроить».
- Открывшееся дополнительно окно содержит в себе настройки восстановления системы, выбираем отключить защиту системы.
- Применяем изменения, нажав на «ОК».
- Соглашаемся с диалоговым окном, которое предупреждает о последствиях.


Второй способ: вручную удалить папку System Volume Information, он более утомительный, так как надо получить доступ к этой папке, однако с его помощью, можно оставить нужные файлы.
Как получить доступ к папке System Volume Information
Теперь детально разберемся в том, как получить доступ к папке System Volume Information. Мы обязательно должны иметь права администратора, так как она системная. На первом скриншоте видно: она еще и скрыта по умолчанию.
Следуем дальнейшим инструкциям для того, чтобы показать скрытые файлы и папки:
- Заходим в меню «пуск».
- Выбираем вкладку «панель управления».
- Далее переходим в параметры папок.
- Нажимаем на раздел «вид».
- Убираем галочку «скрывать защищенные системные файлы».
- Отмечаем пункт «показывать скрытые файлы, папки и диски».
- Жмем на кнопку «ОК».

Теперь эту папку будет видно в каждом логическом разделе, только вот доступ к ней все еще закрыт. Если попытаться зайти в нее, появится ошибка-предупреждение.
Чтобы все-таки попасть в папку System Volume Information делаем следующее:
- С помощью ПКМ нажимаем на нее.
- Переходим в ее свойства.
- В открывшемся окне выбираем раздел «безопасность».
- Далее нажимаем на кнопку «изменить».
- В появившемся окне выбираем пункт «добавить».
- В текстовом поле вводим: Администратор.
- После чего подтверждаем свои действия нажатием на кнопку «ОК».
- Разрешаем для нового пользователя полный доступ.
- Нажимаем на кнопку «Применить».


Теперь пользователь свободно может заходить в папку System Volume Information и управлять файлами, которые находятся внутри нее или полностью удалить ее. Бывают случаи, когда пользователь не смог получить доступ или удалить ее, тогда на помощь придет Unlocker — https://dontfear.ru/unlocker/.
Доступ к папке System Volume Information может понадобиться в различных ситуациях: она засорена вирусами, занимает слишком много места или иные случаи. Некоторые удаляют ее сразу после установки операционной системы, а другим она и вовсе не мешает, в любом случае, важно знать как можно больше о данной папке.
System volume information windows server 2012
С миру по нитке. В своём блоге я стараюсь не публиковать решение проблем, которые легко нагуглить. Большинство моих статей — сборная солянка из множества методов, один из которых обязательно поможет именно вам.
четверг, 19 июня 2014 г.
Получение доступа к папке System Volume Information
Для чего нужна папка System Volume Information?
Папка «System Volume Information» — это скрытая системная папка, которая используется программой восстановления системы для хранения своих данных и точек восстановления. Такая папка создается в каждом разделе жесткого диска компьютера.
Для чего получать доступ к этой папке?
Доступ к этой папке иногда необходим в процессе устранения возникших в системе неполадок.
Как получить доступ к этой папке?
1. Откройте Проводник (WIN+E);
2. В главном меню окна откройте Сервис и выберите пункт меню Свойства папки (для XP) или Параметры папок (для Vista и выше);
Примечание. В Vista/7 строка меню может быть скрыта, для отображения нажмите Alt.
3. В окне Свойства папки (Параметры папки), перейдите на вкладку Вид;
4. В окошке Дополнительные параметры, в разделе Файлы и папки снимите галочку с параметра Скрывать защищенные системные файлы (рекомендуется);
5. В разделе Скрытые файлы и папки выберите параметр Показывать скрытые фалы и папки;
6. Если вы используете Windows XP Professional с файловой системой NTFS, то дополнительно нужно снять галочку Использовать простой общий доступ к файлам (рекомендуется);
7. Нажмите кнопку ОК;
8. Теперь открываем диск C: (предполагается что Windows установлена на диск C:) и находим папку System Volume Information. Она будет затенена, это признак скрытой папки.
9. Щелкаем правой кнопкой мыши на папке и выбираем пункт Свойства;
10. Переходим на вкладку Безопасность;
11. В окне Группы и пользователи в списке будет только одна группа SYSTEM. Для того чтобы Вы могли открывать эту папку, нужно добавить Вашего пользователя в этот список. Для этого:
- Нажмите кнопку Добавить;
- В окне Выбор: Пользователи или группы нажмите кнопку Дополнительно;
- Нажмите кнопку Поиск;
- В появившемся списке найдите своего пользователя, затем выделите его мышкой и нажмите кнопку ОК;
- Ваш пользователь должен появится в окне Введите имена выбираемых объектов (примеры);
- Нажмите кнопку ОК;
12. Убедившись в том, что Ваш пользователь появился в окошечке Группы и пользователи рядом с группой SYSTEM, нажмите кнопку ОК.
Теперь можно пробовать открыть папку System Volume Information.
How to Clean Up “System Volume Information” Folder
One of the servers (running Windows Server 2012 R2) has run out of free disk space on a system drive (C:\). I checked and cleaned all resource-consuming locations (WinSxS, TEMP folders, user profiles, outdated updates, etc.), but it didn’t give a noticeable effect. There was still not enough disk space. At last, I have found that a large part of a system disk has been occupied by System Volume Information folder. In this article I will try to tell you how the System Volume Information folder is used on Windows systems, what is stored in it, and how to clean it up .
How to Gain Access to the System Volume Information Folder?
The System Volume Information folder is located at the root of each disk (be it a local HDD / SSD, or removable USB flash drive). It stores system data related to system recovery service, indexing, File History feature, etc.
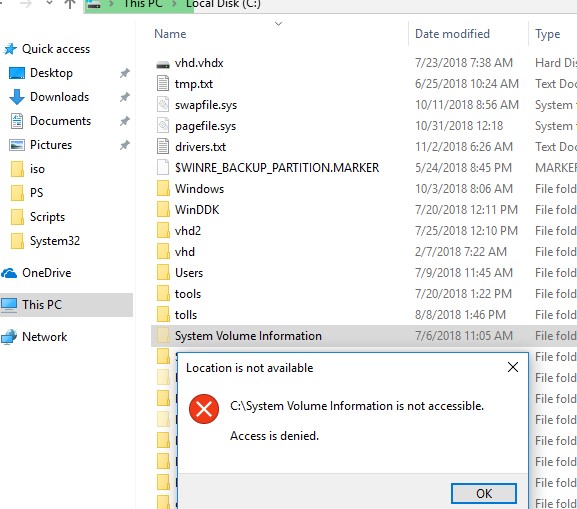
By default, the System Volume Information folder is hidden and only the SYSTEM has access to it. Even the administrator cannot open it and view the contents of the folder. If you try to open the System Volume Information folder in Explorer, under any user (even an administrator), you will receive an access denied error:
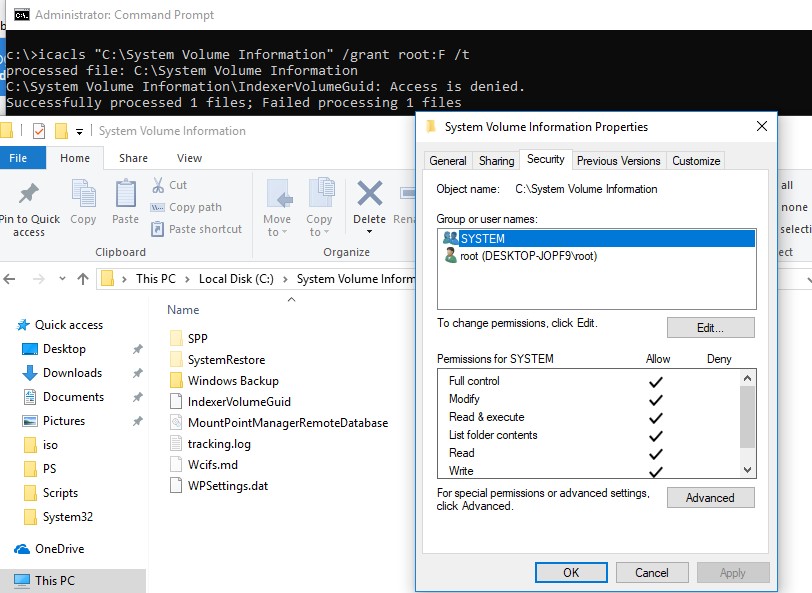
To view the contents of the folder, you have to assign yourself as the directory owner and grant your account the NTFS permissions to access it (this can be done through the Security tab in the folder properties). But you can grant your account (for example, username) permissions to access the folder much faster with the command:
icacls «C:\System Volume Information» /grant username:F /t
Check in the folder properties on the Security tab that your account has full access permissions to the folder.
To restrict access to the System Volume Information folder, run:
icacls «C:\System Volume Information» /remove username /t
What is System Volume Information Folder Used For?
What is stored in System Volume Information folder? I found information about the following services, which store their files in this folder (the list is not exhaustive):
- System restore points on client systems or System State backups made using Windows Server Backup (wbadmin) in server OSs;
- The contents of Indexing Service database used for fast file search;
- Distributed Link Tracking Service database;
- Disk snapshots made by Volume Shadow Copy, which can be used to recover older versions of files;
- NTFS disk quota settings;
- The database of file deduplication service;
- DFS Replication database (dfsr.db).
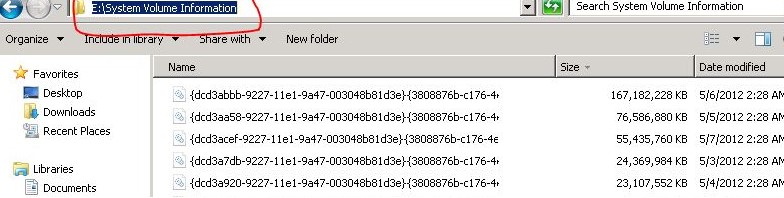
If you use shadow copies on your computer or server to roll back to old versions of files / system states, keep in mind: each new VSS snapshot saves data to the System Volume Information directory, increasing its size. The more often shadow copies are created and the more often the files on the disk change, the faster the size of this directory grows.
In the screenshot below, you can see that in the System Volume Information folder there is a system file larger than 160 GB.
How to Clean Up System Files in the System Volume Information Folder?
You can radically clean up the System Volume Information directory by disabling the system restore points and file history. But this is not always permissible.
Firstly, let’s see what is stored in this directory. Display the statistics of using shadow copies:
vssadmin list shadowstorage
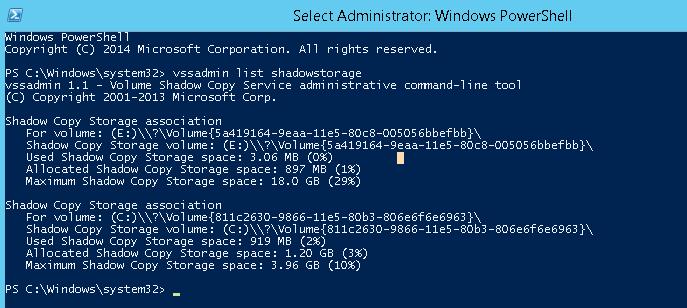
vssadmin 1.1 – Volume Shadow Copy Service administrative command-line tool
(C) Copyright 2001-2013 Microsoft Corp.
Shadow Copy Storage association
For volume: (E:)\\?\Volume<5a419164-9eba-11e5-84c5-004046bbefbb>\
Shadow Copy Storage volume: (E:)\\?\Volume<5a419164-9eba-11e5-84c5-004046bbefbb>\
Used Shadow Copy Storage space: 3.08 MB (0%)
Allocated Shadow Copy Storage space: 896 MB (1%)
Maximum Shadow Copy Storage space: 19.0 GB (29%)
Shadow Copy Storage association
For volume: (C:)\\?\Volume<843c6330-9866-11e5-80b3-806e6f6e6942>\
Shadow Copy Storage volume: (C:)\\?\Volume<843c6330-9866-11e5-80b3-806e6f6e6942>\
Used Shadow Copy Storage space: 912 MB (2%)
Allocated Shadow Copy Storage space: 1.20 GB (3%)
Maximum Shadow Copy Storage space: 3.98 GB (10%)
As you can see, 10% of system drive space C:\ is allocated for snapshot files and only 2% of which is occupied. If the value of Maximum Shadow Copy Storage space is set to UNBOUNDED, it means that the limit for shadow copies is not set and they may occupy all free space on the disk. By default, the system gives 10% of the total disk space to store this data.
You can reduce the disk usage limit by VSS to 2 GB using the vssadmin command. The vssadmin command has the following syntax:
vssadmin resize shadowstorage /on=[drive letter]: /For=[drive letter]: /MaxSize=[maximum size]
In our example it will look like this:
vssadmin resize shadowstorage /on=c: /for=c: /maxsize=2GB

vssadmin 1.1 – Volume Shadow Copy Service administrative command-line tool
(C) Copyright 2001-2013 Microsoft Corp.
Successfully resized the shadow copy storage association
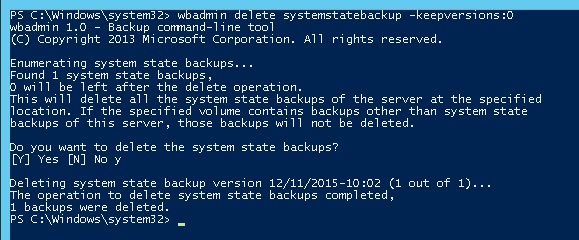
If you create system state backups using Windows Server Backup, the all old system state copies can be deleted as follows (in the Windows Server editions):
wbadmin delete systemstatebackup -keepversions:0
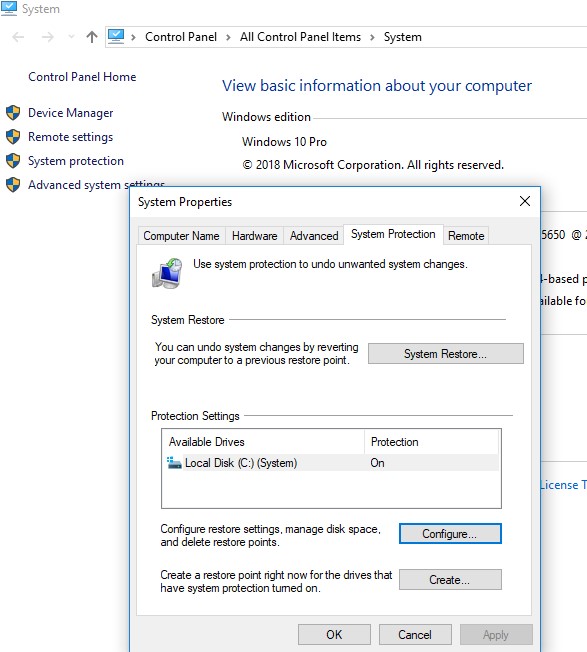
When you run the wbadmin delete systemstatebackup command in Windows 10, an error appears: “The DELETE BACKUP command is not supported in this version of Windows“. The fact is that in client systems (Windows 10/ 8.1/ 7), management of recovery points and limits is possible only from the GUI. Open the System properties and click on the System Protection tab.
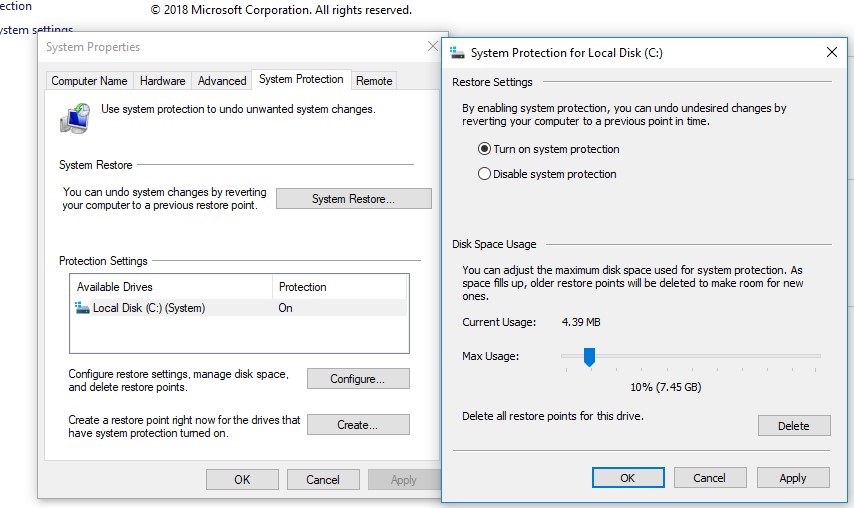
By pressing Configure, we proceed to the settings of quotas for restore point storage. You can delete the existing restore points here.
Select the system drive and click the Configure button. The quota configuration dialog box for storing system restore points will open. You can reduce the size of the disk for storing shadow copies. Here you can either delete all existing restore points (Delete button), or completely disable the creation of recovery points by selecting Disable system protection.
To reduce the size of the System Volume Information catalog you can also:
- Move the VSS data to another NTFS drive ( vssadmin add shadowstorage /for=c: /on=d: /maxsize=30% );
- Disable or reconfigure the Windows File History feature;
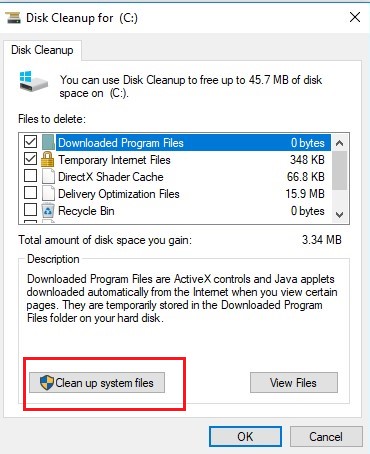
- Perform system cleanup using the built-in utility – cleanmgr.exe;
- If you use the data deduplication, you must disable deduplication and run the file de-optimization command: Start-DedupJob -Volume D: -Type Unoptimization (the command may take quite a long time, also make sure that the disk has enough free space).