Как сгенерировать открытый/закрытый SSH-ключ в Linux
Если вы часто используете ssh для подключения к удаленному хосту, одним из способов обеспечения безопасности соединения является применение открытого/закрытого SSH-ключа, так как при этом по сети не передается никакой пароль и система устойчива к атакам методом «грубой силы».
Создать открытый/закрытый SSH-ключ в Linux очень просто.
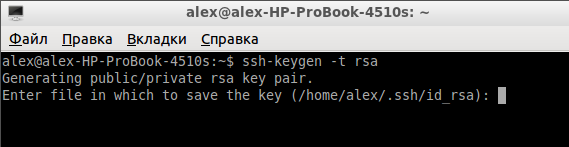
1. Откройте терминал. Введите:
Альтернативой является использование для создания ключа технологии DSA (Digital Signing Algorithm):
Примечание: Было много дебатов о том, что безопаснее, DSA или RSA. По моему мнению, если только вы не любитель копаться в технических подробностях, большой разницы между этими технологиями нет. Обе работают хорошо.
2. На нижеследующем скриншоте вы видите предложение указать место для сохранения ключа. По умолчанию это папка .ssh в вашей домашней директории. Для того, чтобы согласиться с настройками по умолчанию, просто нажмите «Enter».
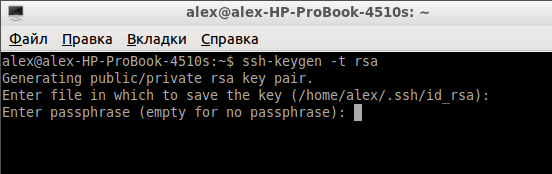
3. Далее, вас попросят ввести идентификационную фразу. Это не идентификационная фраза для соединения с удаленным хостом. Это идентификационная фраза для разблокировки закрытого ключа, поэтому она не поможет вам получить доступ к удаленному серверу, даже если на нем хранится ваш закрытый ключ. Ввод идентификационной фразы не является обязательным. Чтобы оставить ее пустой, просто нажмите «Enter».
4. Теперь ваши открытый и закрытый SSH-ключи должны быть сгенерированы. Откройте файловый менеджер и перейдите в директорию .ssh. Вы должны увидеть два файла: id_rsa и id_rsa.pub.
5. Загрузите файл id_rsa.pub в домашнюю директорию вашего удаленного хоста (предполагается, что удаленный хост работает под Linux). Подключитесь к удаленному хосту с помощью SSH и переместите открытый ключ в его целевую директорию с помощью команд:
6. Оставаясь на удаленном хосте, откройте конфигурационный файл SSH:
Убедитесь, что следующие атрибуты имеют корректные значения:
Нажмите «ctrl + o», чтобы сохранить изменения, затем «ctrl + x», чтобы закрыть файл.
7. И последнее, перезапустите сервер SSH на удаленном хосте:
На этом все. Теперь вы можете соединяться со своим удаленным хостом с помощью команды:
Авторизация по ключу SSH
SSH или Secure Shell — это зашифрованный протокол, который часто используется для взаимодействия и удаленного управления серверами. Если вы захотите что-либо сделать на удаленном сервере, скорее всего, вам придется воспользоваться SSH и работать через терминал.
В SSH существует несколько способов авторизации. Вы можете каждый раз вводить пароль пользователя или использовать более безопасный и надежный способ — ключи SSH. Что самое интересное, он более удобен для применения, вам даже не нужно будет вводить пароль. В этой статье мы рассмотрим как настраивается авторизация по ключу SSH.
Как работают ключи SSH?
SSH сервер может выполнять аутентификацию пользователей с помощью различных алгоритмов. Самый популярный — это аутентификация по паролю. Он достаточно прост, но не очень безопасный. Пароли передаются по безопасному каналу, но они недостаточно сложны для противостояния попыткам перебора. Вычислительная мощность современных систем в сочетании со специальными скриптами делают перебор очень простым. Конечно, существуют другие способы дополнительной безопасности, например, fail2ban, но аутентификация по ключу SSH более надежна.
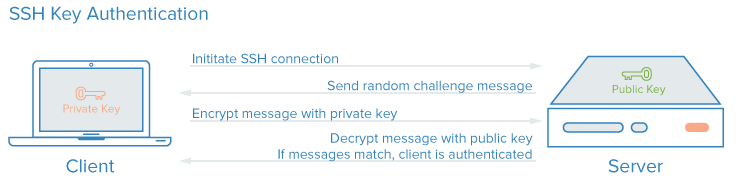
Каждая пара ключей состоит из открытого и закрытого ключа. Секретный ключ сохраняется на стороне клиента и не должен быть доступен кому-либо еще. Утечка ключа позволит злоумышленнику войти на сервер, если не была настроена дополнительная аутентификация по паролю.
Открытый ключ используется для шифрования сообщений, которые можно расшифровать только закрытым ключом. Это свойство и используется для аутентификации с помощью пары ключей. Открытый ключ загружается на удаленный сервер, к которому необходимо получить доступ. Его нужно добавить в специальный файл
Когда клиент попытается выполнить проверку подлинности через этот ключ, сервер отправит сообщение, зашифрованное с помощью открытого ключа, если клиент сможет его расшифровать и вернуть правильный ответ — аутентификация пройдена.
Как создать ключи SSH?
Сначала необходимо создать ключи ssh для аутентификации на локальном сервере. Для этого существует специальная утилита ssh-keygen, которая входит в набор утилит OpenSSH. По умолчанию она создает пару 2048 битных RSA ключей, которая подойдет не только для SSH, но и для большинства других ситуаций.
И так, генерация ключей ssh выполняется командой:
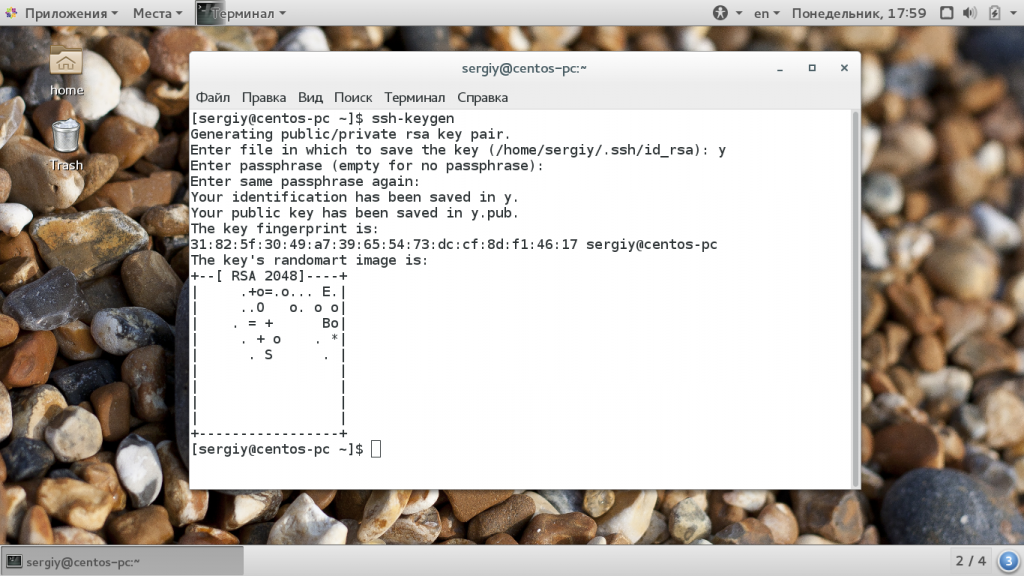
Утилита предложит вам выбрать расположение ключей. По умолчанию ключи располагаются в папке
/.ssh/. Лучше ничего не менять, чтобы все работало по умолчанию и ключи автоматически подхватывались. Секретный ключ будет называться id_rsa, а публичный id_rsa.pub.
Затем утилита предложит ввести пароль для дополнительного шифрования ключа на диске. Его можно не указывать, если не хотите. Использование дополнительного шифрования имеет только один минус — необходимость вводить пароль, и несколько преимуществ:
- Пароль никогда не попадет в сеть, он используется только на локальной машине для расшифровки ключа. Это значит что перебор по паролю больше невозможен.
- Секретный ключ хранится в закрытом каталоге и у клиента ssh нет к нему доступа пока вы не введете пароль;
- Если злоумышленник хочет взломать аутентификацию по ключу SSH, ему понадобится доступ к вашей системе. И даже тогда ключевая фраза может стать серьезной помехой на его пути.
Но все же, это необязательное дополнение и если не хотите, то вы можете просто нажать Enter. Тогда доступ по ключу ssh будет выполняться автоматически и вам не нужно будет что-либо вводить.
Теперь у вас есть открытый и закрытый ключи SSH и вы можете использовать их для проверки подлинности. Дальше нам осталось разместить открытый ключ на удаленном сервере.
Загрузка ключа на сервер
Когда генерация ключей завершена, нам осталось только загрузить ключ на сервер. Для загрузки ключа можно использовать несколько способов. В некоторых случаях вы можете указать ключ в панели управления сервером, например, сPanel или любой другой. Но мы такой способ рассматривать не будем. Мы рассмотрим ручные способы.
Самый простой способ скопировать ключ на удаленный сервер — это использовать утилиту ssh-copy-id. Она тоже входит в пакет программ OpenSSH. Но для работы этого метода вам нужно иметь пароль доступа к серверу по SSH. Синтаксис команды:
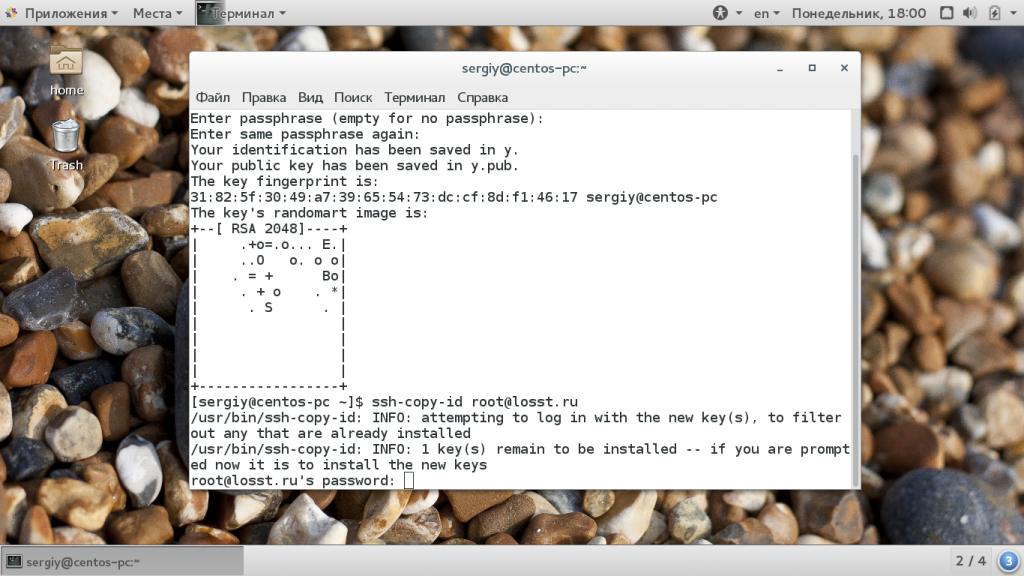
При первом подключении к серверу система может его не распознать, поэтому вам нужно ввести yes. Затем введите ваш пароль пользователя на удаленном сервере. Утилита подключится к удаленному серверу, а затем использует содержимое ключа id.rsa.pub для загрузки его на сервер в файл
/.ssh/authorized_keys. Дальше вы можете выполнять аутентификацию с помощью этого ключа.
Если такой способ по какой-либо причине для вас не работает, вы можете скопировать ключ по ssh вручную. Мы создадим каталог
/.ssh, а затем поместим наш ключ в файл authorized_keys с помощью символа >>, это позволит не перезаписывать существующие ключи:
/.ssh/id_rsa.pub | ssh username@remote_host «mkdir -p
Здесь вам тоже нужно набрать yes, если вы подключаетесь к новому серверу, а затем ввести пароль. Теперь вы можете использовать созданный ключ для аутентификации на сервере:
Если вы не захотели создать ssh ключ с доступом по паролю, то вы сразу же будете авторизованы, что очень удобно. Иначе, сначала вам придется ввести фразу-пароль для расшифровки ключа.
Отключение проверки пароля
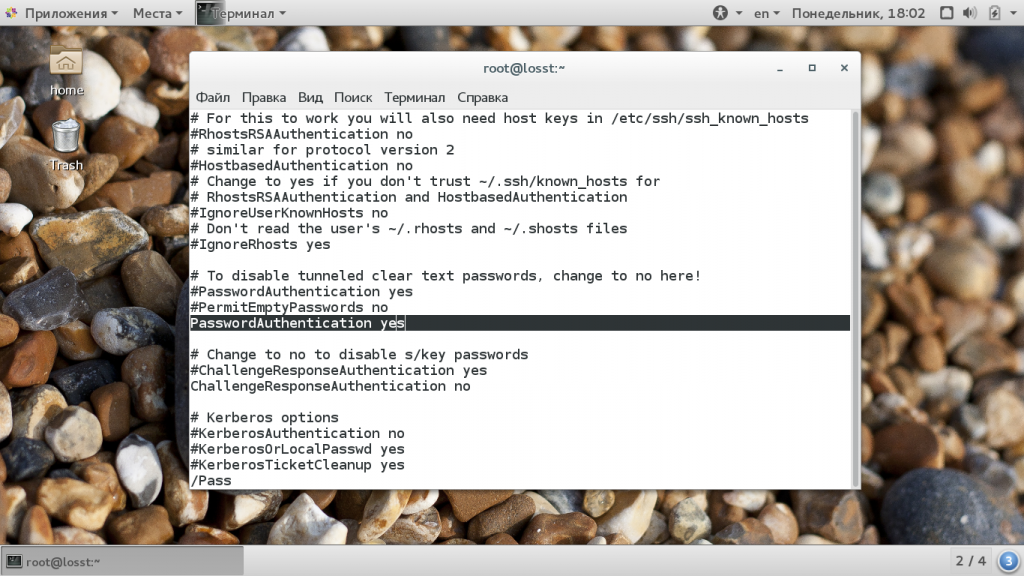
Если пароль больше не будет использоваться, то для увеличения безопасности системы лучше его вовсе отключить. Но убедитесь, что ключ надежно сохранен и вы его не потеряете, потому что по паролю вы больше не войдете. Авторизуйтесь на сервере, затем откройте конфигурационный файл /etc/ssh/sshd_config и найдите там директиву PasswordAuthenticatin. Нужно установить ее значение в No:
sudo vi /etc/ssh/sshd_config
Теперь сохраните файл и перезапустите службу ssh:
sudo service ssh restart
Дальше будет возможно только подключение по ключу ssh, пароль не будет приниматься.
Выводы
В этой статье мы рассмотрели как выполняется авторизация по ключу ssh, настройка ключей ssh и добавить ssh ключ. Теперь вы можете войти на сервер без ввода пароля. Если у вас остались вопросы, спрашивайте в комментариях!
ssh-keygen — Generate a New SSH Key
This page is about the OpenSSH version of ssh-keygen . For Tectia SSH , see here . If you wish to generate keys for PuTTY , see PuTTYgen on Windows or PuTTYgen on Linux .
Contents
What Is ssh-keygen ?
Ssh-keygen is a tool for creating new authentication key pairs for SSH. Such key pairs are used for automating logins, single sign-on, and for authenticating hosts.
SSH Keys and Public Key Authentication
The SSH protocol uses public key cryptography for authenticating hosts and users. The authentication keys, called SSH keys , are created using the keygen program.
SSH introduced public key authentication as a more secure alternative to the older .rhosts authentication. It improved security by avoiding the need to have password stored in files, and eliminated the possibility of a compromised server stealing the user’s password.
However, SSH keys are authentication credentials just like passwords. Thus, they must be managed somewhat analogously to user names and passwords. They should have a proper termination process so that keys are removed when no longer needed.
Creating an SSH Key Pair for User Authentication
The simplest way to generate a key pair is to run ssh-keygen without arguments. In this case, it will prompt for the file in which to store keys. Here’s an example:
First, the tool asked where to save the file. SSH keys for user authentication are usually stored in the user’s .ssh directory under the home directory. However, in enterprise environments, the location is often different. The default key file name depends on the algorithm, in this case id_rsa when using the default RSA algorithm. It could also be, for example, id_dsa or id_ecdsa .
Then it asks to enter a passphrase . The passphrase is used for encrypting the key, so that it cannot be used even if someone obtains the private key file. The passphrase should be cryptographically strong. Our online random password generator is one possible tool for generating strong passphrases.
Choosing an Algorithm and Key Size
SSH supports several public key algorithms for authentication keys. These include:
rsa — an old algorithm based on the difficulty of factoring large numbers. A key size of at least 2048 bits is recommended for RSA; 4096 bits is better. RSA is getting old and significant advances are being made in factoring. Choosing a different algorithm may be advisable. It is quite possible the RSA algorithm will become practically breakable in the foreseeable future. All SSH clients support this algorithm.
dsa — an old US government Digital Signature Algorithm. It is based on the difficulty of computing discrete logarithms. A key size of 1024 would normally be used with it. DSA in its original form is no longer recommended.
ecdsa — a new Digital Signature Algorithm standarized by the US government, using elliptic curves. This is probably a good algorithm for current applications. Only three key sizes are supported: 256, 384, and 521 (sic!) bits. We would recommend always using it with 521 bits, since the keys are still small and probably more secure than the smaller keys (even though they should be safe as well). Most SSH clients now support this algorithm.
ed25519 — this is a new algorithm added in OpenSSH. Support for it in clients is not yet universal. Thus its use in general purpose applications may not yet be advisable.
The algorithm is selected using the -t option and key size using the -b option. The following commands illustrate:
Specifying the File Name
Normally, the tool prompts for the file in which to store the key. However, it can also be specified on the command line using the -f option.
Copying the Public Key to the Server
To use public key authentication, the public key must be copied to a server and installed in an authorized_keys file. This can be conveniently done using the ssh-copy-id tool. Like this:
Once the public key has been configured on the server, the server will allow any connecting user that has the private key to log in. During the login process, the client proves possession of the private key by digitally signing the key exchange.
Adding the Key to SSH Agent
ssh-agent is a program that can hold a user’s private key, so that the private key passphrase only needs to be supplied once. A connection to the agent can also be forwarded when logging into a server, allowing SSH commands on the server to use the agent running on the user’s desktop.
For more information on using and configuring the SSH agent, see the ssh-agent page.
Creating Host Keys
The tool is also used for creating host authentication keys. Host keys are stored in the /etc/ssh/ directory.
Host keys are just ordinary SSH key pairs. Each host can have one host key for each algorithm. The host keys are almost always stored in the following files:
The host keys are usually automatically generated when an SSH server is installed. They can be regenerated at any time. However, if host keys are changed, clients may warn about changed keys. Changed keys are also reported when someone tries to perform a man-in-the-middle attack. Thus it is not advisable to train your users to blindly accept them. Changing the keys is thus either best done using an SSH key management tool that also changes them on clients, or using certificates.
Using X.509 Certificates for Host Authentication
OpenSSH does not support X.509 certificates. Tectia SSH does support them. X.509 certificates are widely used in larger organizations for making it easy to change host keys on a period basis while avoiding unnecessary warnings from clients. They also allow using strict host key checking, which means that the clients will outright refuse a connection if the host key has changed.
Using OpenSSH’s Proprietary Certificates
OpenSSH has its own proprietary certificate format, which can be used for signing host certificates or user certificates. For user authentication, the lack of highly secure certificate authorities combined with the inability to audit who can access a server by inspecting the server makes us recommend against using OpenSSH certificates for user authentication.
However, OpenSSH certificates can be very useful for server authentication and can achieve similar benefits as the standard X.509 certificates. However, they need their own infrastructure for certificate issuance. See more information on certificate authentication .
Key Management Requires Attention
It is easy to create and configure new SSH keys. In the default configuration, OpenSSH allows any user to configure new keys. The keys are permanent access credentials that remain valid even after the user’s account has been deleted.
In organizations with more than a few dozen users, SSH keys easily accumulate on servers and service accounts over the years. We have seen enterprises with several million keys granting access to their production servers. It only takes one leaked, stolen, or misconfigured key to gain access.
In any larger organization, use of SSH key management solutions is almost necessary. SSH keys should also be moved to root-owned locations with proper provisioning and termination processes. For more information, see how to manage SSH keys . A widely used SSH key management tool for OpenSSH is Universal SSH Key Manager .
Practically all cybersecurity regulatory frameworks require managing who can access what. SSH keys grant access, and fall under this requirement. This, organizations under compliance mandates are required to implement proper management processes for the keys. NIST IR 7966 is a good starting point.
Make Sure There Is Enough Randomness
It is important to ensure there is enough unpredictable entropy in the system when SSH keys are generated. There have been incidents when thousands of devices on the Internet have shared the same host key when they were improperly configured to generate the key without proper randomness.
General Purpose Systems
On general purpose computers, randomness for SSH key generation is usually not a problem. It may be something of an issue when initially installing the SSH server and generating host keys, and only people building new Linux distributions or SSH installation packages generally need to worry about it.
Our recommendation is to collect randomness during the whole installation of the operating system, save that randomness in a random seed file. Then boot the system, collect some more randomness during the boot, mix in the saved randomness from the seed file, and only then generate the host keys. This maximizes the use of the available randomness. And make sure the random seed file is periodically updated, in particular make sure that it is updated after generating the SSH host keys.
Many modern general-purpose CPUs also have hardware random number generators. This helps a lot with this problem. The best practice is to collect some entropy in other ways, still keep it in a random seed file, and mix in some entropy from the hardware random number generator. This way, even if one of them is compromised somehow, the other source of randomness should keep the keys secure.
Embedded Devices and Internet of Things
Available entropy can be a real problem on small IoT devices that don’t have much other activity on the system. They may just not have the mechanical randomness from disk drive mechanical movement timings, user-caused interrupts, or network traffic. Furthermore, embedded devices often run on low-end processors that may not have a hardware random number generator.
The availability of entropy is also critically important when such devices generate keys for HTTPS.
Our recommendation is that such devices should have a hardware random number generator. If the CPU does not have one, it should be built onto the motherboard. The cost is rather small.
Command and Option Summary
Here’s a summary of commonly used options to the keygen tool:
-b “Bits” This option specifies the number of bits in the key. The regulations that govern the use case for SSH may require a specific key length to be used. In general, 2048 bits is considered to be sufficient for RSA keys.
-e “Export” This option allows reformatting of existing keys between the OpenSSH key file format and the format documented in RFC 4716 , “SSH Public Key File Format”.
-p “Change the passphrase” This option allows changing the passphrase of a private key file with [-P old_passphrase] and [-N new_passphrase] , [-f keyfile] .
-t “Type” This option specifies the type of key to be created. Commonly used values are: — rsa for RSA keys — dsa for DSA keys — ecdsa for elliptic curve DSA keys
-i «Input» When ssh-keygen is required to access an existing key, this option designates the file.
-f «File» Specifies name of the file in which to store the created key.
-N «New» Provides a new passphrase for the key.
-P «Passphrase» Provides the (old) passphrase when reading a key.
-c «Comment» Changes the comment for a keyfile.
-p Change the passphrase of a private key file.
-q Silence ssh-keygen.
-l «Fingerprint» Print the fingerprint of the specified public key.
-B «Bubble babble» Shows a «bubble babble» (Tectia format) fingerprint of a keyfile.
-F Search for a specified hostname in a known_hosts file.
-R Remove all keys belonging to a hostname from a known_hosts file.
-y Read a private OpenSSH format file and print an OpenSSH public key to stdout.
This only listed the most commonly used options. For full usage, including the more exotic and special-purpose options, use the man ssh-keygen command.