Installation Guide of SoftEther VPN Client on Linux

If you have a VPN account from CITeS (Center for IT Services — UoM) and you want to configure your SoftEther VPN client on your ubuntu machine, this is the best guide for you. This blog post is a conversion to the linux environment from the guide here given for windows environment . I’ll explore the steps in general and give the example using CITeS VPN account. So you can apply the same procedure for another VPN server account too.
As a prerequisite you should have created an account from a VPN server. (For this case from CITeS VPN server)
1. Download and Install SoftEther VPN Client
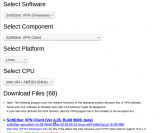
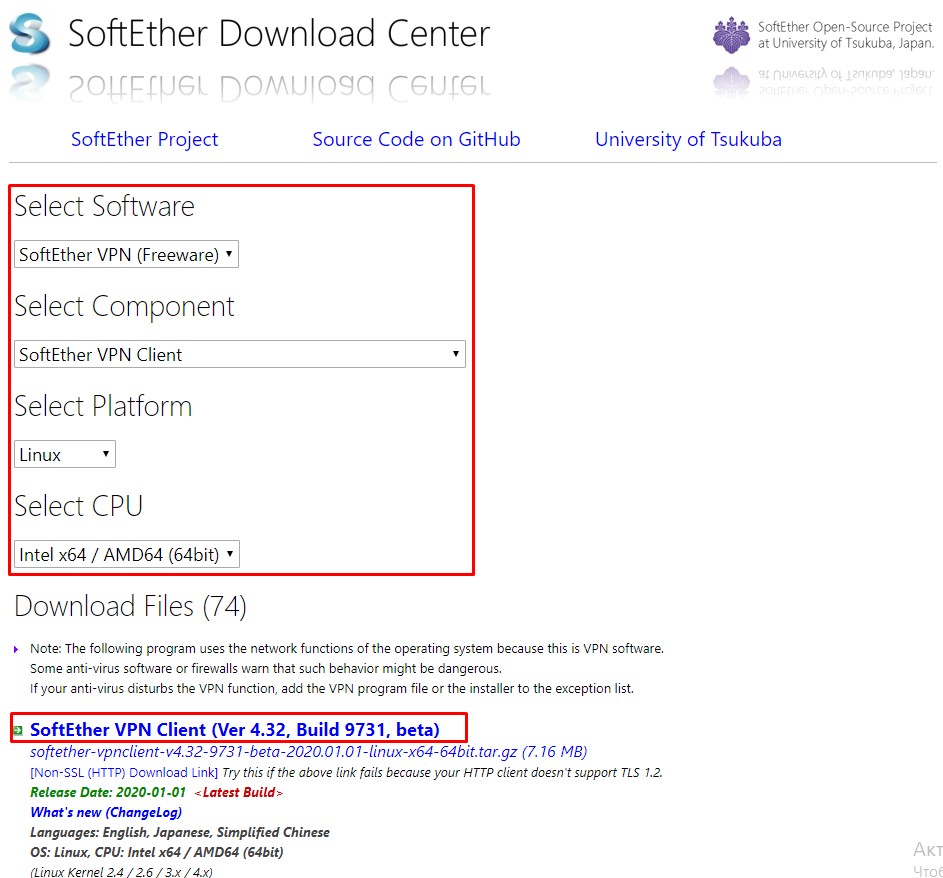
- Download SoftEther VPN Client software from their official website (https://www.softether.org)
- Navigate to Download — > Download SoftEther VPN
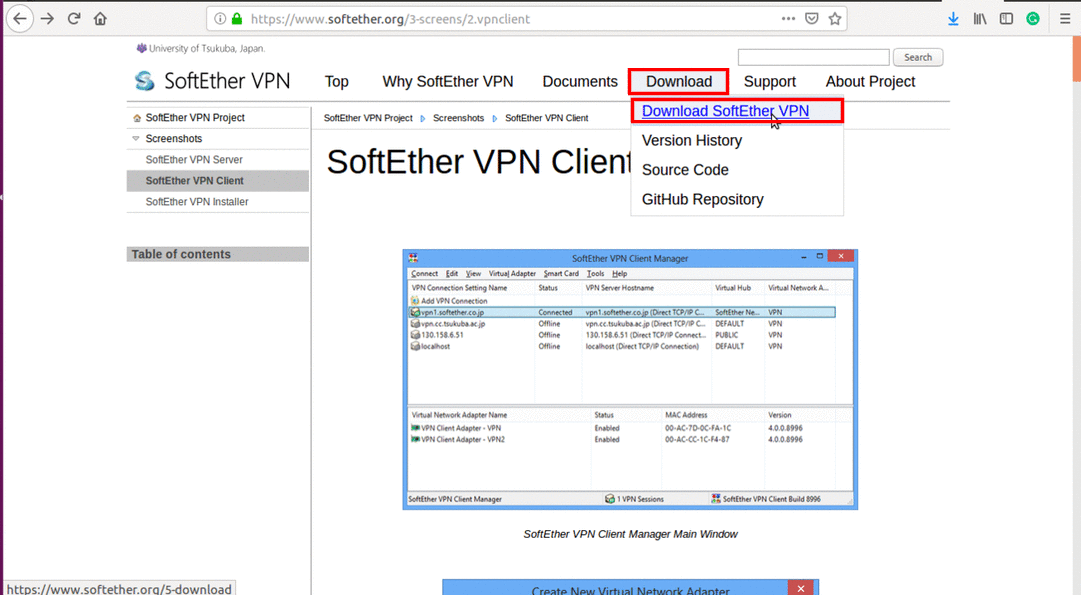
3.Click on Download SoftEther VPN link.

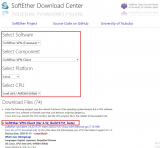
Select Component : SoftEther VPN Client
Select Platform : Linux
Select CPU : Select the appropriate CPU from the Drop down

4. Click on the appropriate downloading link based on the version of the software.
5. Extract the downloaded tar.gz file. Here after I will refer the extracted folder as
6. Navigate to folder and open a terminal.
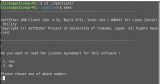
7. Execute make command and accept all license agreements by entering the number relevant to “Yes”.

8. After the completion of make command process, start the vpn client using:
sudo ./vpnclient start
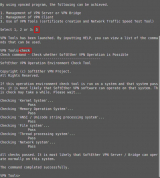
9. Then you will get the following message.

10. Before going to the configuration part please test the VPN client installation.
11. Execute ./vpncmd and select No 3 to enter to Use of VPN Tools (certificate creation and Network Traffic Speed Test Tool) option.
12. Then run check command.
If all tests are passed, you are good to go.

13. Press Ctrl+C to terminate that process.
2. Configure SoftEther VPN Client
- Execute ./vpncmd on a terminal opened inside the folder.
- Select №2 to enter to the Management of VPN Client option.
- Press Enter when you are asked for Hostname of IP Address of Destination
- Then you will connect to the localhost .

5. Create a virtual interface to connect to the VPN server.
eg : NicCreate vpn_se
6. Create an VPN client account using the following command.
In this case : AccountCreate CITeS
7. Then setup the account with your details.
Destination VPN Server Host Name and Port Number: :
Destination Virtual Hub Name:
Connecting User Name:
Used Virtual Network Adapter Name:
Destination VPN Server Host Name and Port Number:svpn.mrt.ac.lk:443
Destination Virtual Hub Name:

Connecting User Name:
Used Virtual Network Adapter Name: vpn_se (earlier created one)
You will get The command completed successfully message if you do it correctly.
8. Setup a password to the created account.
Set a password and confirm it. SPECIALLY, for CITeS account you should give LMS/ Moodle/ UoM_Wireless/ UoM Email password
For Specify standard or radius: input give radius
9. Now you can connect to the SoftEther VPN clinet account through the created account. For that issue:
In this example: AccountConnect CITeS
10. Issue the command AccountList and check the connectivity. If you get Connected status it is good to to for the next step.

3. Add Route to the Routing Table
- Issue cat /proc/sys/net/ipv4/ip_forward to check whether ip forward is enabled in your system.
If you get “1” go to the step №2 .
If you get “0” , Navigate to /etc/sysctl.conf file and uncomment net.ipv4.ip_forward=1 line. Open a terminal and issue command sysctl -p
Then check whether you get “1” for the first step.
2. Open a terminal and issue the command sudo ifconfig . Now you should see the virtual network adapter you created earlier. But you do not have a ip address for it.
3. Issue the command sudo dhclient
According to the above example : sudo dhclient
After few moments you will get an ip address from the VPN Server.
4. Then issue sudo netstat -rn command to see the routing table. You need to add a static route here.
sudo ip route add / via
Except the last route adding step all of the above steps are one time work.
Now you should able to connect to the required server through the VPN Client. 😃
Настройка SoftEther VPN Client на Linux Debian/Ubuntu/Mint (связка Linux-Windows)


Скачиваем SoftEteh VPN for Linux, распаковываем загруженный файл (tar.gz).
Извлечение произвел в домашний каталог (/home/clickup/vpnclient)
1. Установка
Открываем терминал (Ctrl+Alt+T) и вводим команды:
Переходи в домашний каталог и вводим «make» принимаем лицензионные соглашения: 1

После завершения команды «make» запускаем установленный VPN клиент из того же каталога:
sudo ./vpnclient start
2. Первоначальная настройка vpn client
Чтобы перейти к конфигурированию клиентской части переходим в командную строку VPN-клиента:
Перед настройкой проверим готовность клиента:
Выбираем «3» чтобы попасть в раздел Use of VPN Tools (certificate creation and Network Traffic Speed Test Tool
Выполняем команду «check»
Если все тесты пройдены без ошибок, можно переходит дальше, выход из vpncmd Ctrl+C.

После выхода, опять выполняем команду: «sudo ./vpncmd» выбираем пункт «2» (Management of VPN Client)
Программа запросит IP адрес хоста, нажимаем «Enter» (по умолчанию подключается к «localhost»).
2.1 Создание и настройка VPN адаптера, и аккаунта для подключение к VPN сети
- Создайте виртуальный интерфейс для подключения к VPN-серверу:
— NicCreate vpn (где «vpn» это имя виртуального адаптера), другие команды (NicDelete — удалить адаптер, NicList — список адаптеров)
- Создайте учетную запись VPN-клиента с помощью следующей команды
— AccountCreate NameConnect /SERVER: :5555 /HUB: /USERNAME: /NICNAME:
— ПРИМЕР: AccountCreate Terminal /server:91.91.91.91:5555 /HUB:VPN /USERNAME:Clickup /NICNAME:VPN
(где «NameConnect» это просто имя подключения), другие команды (AccountDelete — удалить, AccountList — список)
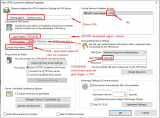
- Настройка учетной записи по вашим данным для подключения по аналогии как в Windows клиенте:

Если вы получите сообщение «The command completed successfully», то все сделано верно, c помощью AccountList можно посмотреть созданное подключение.
ВАЖНО! Варианты аутентификации на сервере.
В некоторых случаях необходимо указать тип аутентификации пользователя и указать необходимые параметры. Чтобы изменить эту информацию, вы можете использовать такие команды, как AccountAnonymousSet, AccountPasswordSet, AccountCertSet и AccountSecureCertSet.
AccountAnonymousSet — анонимная аутентификация
AccountPasswordSet— аутентификация по пользователю и паролю
AccountCertSet — аутентификация по пользовательскому сертификату
AccountSecureCertSet— аутентификация пользователя по смарт-картам
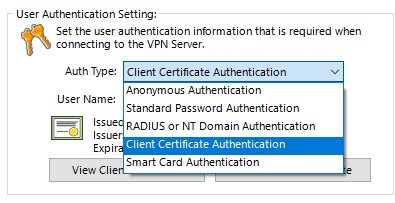
В нашем случае аутентификация будет происходить по пользовательскому сертификату AccountCertSet, для этого выполняем команду:
— AccountSecureCertSet [имя] [/ CERTNAME: путь до сертификата] [/ KEYNAME: путь до ключа]
— ПРИМЕР: AccountCertSet Terminal /LOADCERT:/home/clickup/Serv/Terminal.cer /LOADKEY:/home/clickup/Serv/Terminal.key
После выполнения у вас запросит пароль для сертификата (если он установлен).
Подключение готово, можно посмотреть список подключений выполнив команду AccountList, в статусе подключение будет видно его текущее состояние (offline, connected).
Чтобы подключиться необходимо выполнить команду:
— AccountConnect Terminal (где Terminal это имя созданного аккаунта для подключения)
После чего статус должен измениться на Connected.
Если все сделано верно то вы подключитесь к VPN сети со своими учетными данными.
На сервере VPN вы сможете увидеть активное подключение, работающее пока по Ipv6.
3. Получение IP адреса для виртуального адаптера и настройка маршрутизации.
Прежде чем начать необходимо проверить включен ли «ip forward» (маршрутизация), выполняем команду:
cat /proc/sys/net/ipv4/ip_forward если после выполнения возврат «1», то все включено, если «0» то выполняем команду:
sudo nano /etc/sysctl.conf (переходим к редактированию файла конфига), находим строку net.ipv4.ip_forward=1 и раскомментируем ее, сохраняем файл.
и проверяем cat /proc/sys/net/ipv4/ip_forward команда должна вернуть «1».
Получение IP адреса от сервера.
В терминале выполняем команду:
— Пример: sudo dhclient vpn_vpn
VPN-сервер должен выдать вам IP-адрес для вашего виртуального адаптера (если на сервере не отключен DHCP).

Либо IP адрес можно прописать вручную выполнив команду:
sudo nano /etc/network/interfaces
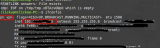
Завершающем шагом будет указание статических маршрутов, выполняем команду, чтобы увидеть таблицу маршрутизации:
Количество маршрутов зависит от сложности построения сети и как далеко необходимо пробиться в нашем случае схема была следующая:
Команда трассировки: sudo traceroute -I 10.10.10.1 (параметр -I «icmp» отправлять пакеты из Linux, которые понимает Windows)
Поэтому в нашем случае достаточно 2 маршрутов.
sudo ip route add 10.10.10.0/24 dev vpn_vpn
sudo ip route add 192.168.100.0/24 via 10.10.10.1
Возможно, вам понадобится больше маршрутов.
Доступ был получен вход по RDP осуществлен во внутреннюю сеть.