Serial to midi windows
Hairless MIDI Serial Bridge is the easiest way to connect serial devices (like Arduinos) to send and receive MIDI signals. 100% Free Software. For Mac OS X, Windows & Linux.

Why Use Hairless MIDI Serial?
Cross platform — same program on OS X, Windows, Linux.
Has no dependencies, can be run out of the box on nearly any computer.
Improves FTDI latency on Linux & Windows. This means better MIDI latency when using FTDI-based devices like the Arduino Duemilanove.
Compatible with the Linux program ttymidi, and their Ardumidi library (included in the download.)
Downloads
System Requirements
OS X 10.4 or later, either PowerPC or Intel based Macs.
Linux, any common x86 or x64 (with 32-bit compatibility libraries) Linux distribution.
If you’re a command line user in Linux, you may want to try the very nice ttymidi command line bridge program instead.
Windows XP or later, 32- or 64-bit.
NB: To convey Windows MIDI data from one bit of software to another, you’ll need a Virtual MIDI passthrough driver. We recommend loopMIDI, or there is alternatively the older MIDI Yoke (MIDI Yoke is not recomended for Vista or newer.)
Windows Vista, 7 & 8 special notes:
To use Hairless MIDI Serial Bridge’s automatic FTDI latency reduction feature, you may need to “Run As Administrator” when you launch the program.
I never got around to making a demo video, but Greg was kind enough to let me link his Arduino tone synth video here:
History
Version 0.4 — 7 August 20102
When using ‘Debug MIDI Messages’, channel numbers now range 1-16 not 0-15, as per MIDI standard.
Add two-way (output to serial port) support for SysEx, time & sense messages.
Added latest & final version of Ardumidi library (Ardumidi is now longer being developed, another option is the Arduino MIDI Library.)
(Linux) fixed a bug where ‘ACM’ type USB serial devices (like Arduino UNO) weren’t recognised.
Version 0.3 — 8 May 2012
Ardumidi updated to work with Arduino 1.0 (thanks to Jorge Falcão.)
Fixed bug with receiving simultaneous MIDI notes.
Added support for running MIDI status, as used by Arduino MIDI Library.
Now supports variable-length SysEx (“System Extension”) data messages.
Version 0.2 — 28 September 2011
Fixed issue where UI could become overloaded if serial device sent excess data.
Version 0.1 — Initial release, 20 September 2011.
Source Code
Getting Started
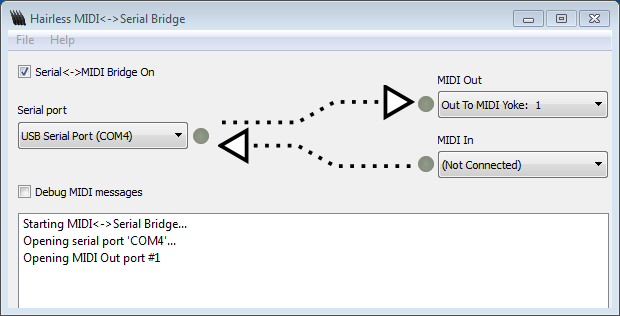
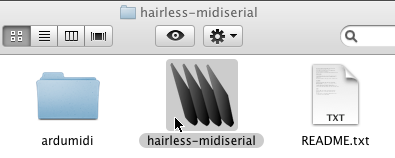
Launch “Hairless MIDI Serial Bridge” by double-clicking the application.
Plug in your serial MIDI device, if it’s not already.
Select Preferences from the menu and check that the serial settings look correct (defaults are 115200bps, no flow control.)
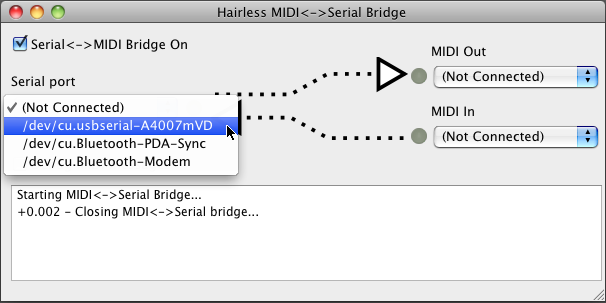
Choose your serial port from the “Serial port” box.
Launch the music app that will be sending and/or receiving MIDI data.
Set your music app to send or receive MIDI data, if it’s not enabled already.
Select your app’s MIDI port from the MIDI dropdown (on Windows, set both sides to connect to the same loopMIDI virtual MIDI port.)
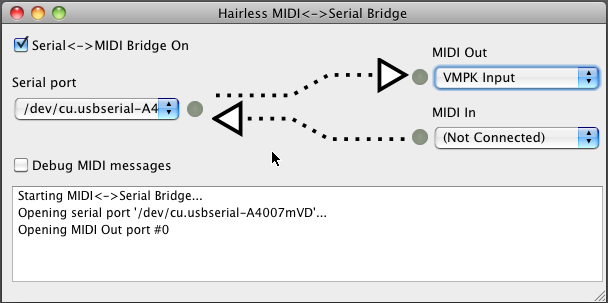
Go crazy! You should see lights flashing in the UI when MIDI and/or serial messages come through.
You can enable “Debug MIDI messages” if you want to see all of the MIDI messages as they come through the bridge.
To disable the bridge, uncheck the “Serial MIDI Bridge” checkbox at the top of the window.
I think I found a bug
Please report it via the Issues page on github.
If you’re a programmer and you’re feeling awesome, I’d love it if you could submit a github pull request (or a patch) along with the bug report. 🙂
How do I use the Arduino MIDI Library?
The Arduino MIDI Library is a newer MIDI library than Ardumidi, and seems to be the way of the future.
To use this library with Hairless Bridge, you can mostly follow their instructions exactly. The only difference is that you need to initialise the Serial port after the MIDI library, like this:
I can’t reprogram my Arduino any more
You need to disable the Serial MIDI Bridge before sending other data (like Arduino programming) to the serial port. You can do this by unchecking the “Serial MIDI Bridge” checkbox in the interface.
I’m not receiving any data
Check the serial port settings (like baud rate) are correct (select Preferences from the menu.) Try disabling Flow Control if it was enabled.
Try using a Serial Terminal program like minicom or Hyperterminal and see if any data is received from there.
My MIDI program (Ableton, Logic) doesn’t show up in the dropdown
… On OS X
You may need to enable the “IAC” virtual MIDI port. This makes a “channel” that can join the two together:
- Open the OS X built-in “Audio MIDI Setup” application (under Applications->Utilities.)
- Choose “Show MIDI Window” from the Window menu.
- Double-click the “IAC Driver” in the MIDI window.
- Check the “Device is online” box in the dialog that appears.
- Go back to Hairless MIDI Serial and there should be a new “IAC Bus” option in the dropdown. The other MIDI program should also see the IAC bus option.
… On Windows
You need to create a loopMIDI virtual port (there’s a link under System Requirements) to create a “channel” that joins the two together.
After intalling loopMIDI, launch it and click the ”+” button to create a new virtual MIDI port with the specified name. Both Hairless Bridge and your MIDI program should then connect to this port.
… On Linux
You may need to use the “Passthrough” port in Linux ALSA to join them together, or use the “Create Virtual MIDI channel” feature if it exists in your other program.
What similar software is available?
- ttymidi command-line bridge on Linux.
- Serial-MIDI Converter on OS X, Windows, Linux untested. Requires Java.
- midiserial another command-line bridge. Only tested on OS X.
- Some microcontrollers, such as Arduino Uno and Teensy are capable of being proper USB MIDI devices, so you don’t need a serial bridge.
Can I use the native MIDI baud rate, 31250bps?
It would be nice to be able to use the hardware MIDI baud rate, 31250bps. This means the logical signals from Hairless Bridge can be used with real MIDI hardware, with just some electronics to adjust the serial voltages to become MIDI current loop signals.
Unfortunately, most computer serial ports can’t actually talk at 31250bps. For historical & technical reasons they’re usually limited to multiples of 300bps.
However, if you’re prepared to hack around a bit, the FTDI USB/Serial chip (as found on the Arduino Duemilanove) can talk the native MIDI rate. Have a read through these Arduino forum posts and you can see how to hack the driver on OS X or Windows, so that when you choose a different rate (like 38400bps) it is actually 31250, behind the scenes.
This is not a supported configuration for Hairless Bridge, but it can be made to work in some circumstances.
Where did the name come from?
Do you see any hairy yaks around here? No? Hairless it is. 🙂
That is also where the poor excuse for an icon (supposed to look like clippers) came from. 🙂
Why was this initially created?
For a workshop, ”Drop-Dead Simple MIDI Controllers with Arduino”, as part of the Electrofringe 2011 festival in Newcastle, Australia.
While preparing I couldn’t find any MIDI Serial bridges that were fully cross-platform, low latency and didn’t have setup dependencies. So I decided to shave a yak and make one. 🙂
Libraries
Big thanks to the authors of the Free Software libraries that Hairless MIDI Serial Bridge builds on. Those are Qt, qextserialport, RtMidi and ArduMIDI, from the ttymidi project.
More details can be found in the About Box of Hairless MIDI Serial Bridge.
Licensing
Hairless MIDI Serial Bridge is released under the GNU Lesser General Public License 2.1, as described in the About Box for compiled versions and the LICENSE file for source versions.
Incorporated libraries are sometimes relicensed with additional terms, also as described in these places.
This page and the Hairless MIDI Serial Bridge are Copyright (c) 2011 Angus Gratton.
Serial to midi windows
Serial to MIDI bridge Python script for OS X and Windows
Join GitHub today
GitHub is home to over 50 million developers working together to host and review code, manage projects, and build software together.
Use Git or checkout with SVN using the web URL.
Work fast with our official CLI. Learn more.
Launching GitHub Desktop
If nothing happens, download GitHub Desktop and try again.
Launching GitHub Desktop
If nothing happens, download GitHub Desktop and try again.
Launching Xcode
If nothing happens, download Xcode and try again.
Launching Visual Studio
Latest commit
Git stats
Files
Failed to load latest commit information.
README.md
This command line script establishes Serial to MIDI bridge. It will be useful with micro controller boards such as Arduino, ESP32, they only have UART-USB interface.
I made this since useful Hairless MIDI Serial bridge program stopped working with OS X Catalina.
It processes most of MIDI messages. It has only very low latency (probably less than 5ms) so far.
This script needs python-rtmidi, PySerial and Python 3.
- Install Python 3
- Install pip
- pip install python-rtmidi
- pip install pyserial
- Download serialmidi.py
- Run serialmidi.py -h to see this help.
- Figure out serial port name and baud rate. Baud rate default is 115200.
- Run serialmidi.py —serial_name=[serial_port] —baud=[baud] . Make sure it doesn’t say «Serial port opening error.».
- The script prints recognized MIDI devices. Use one of listed name as argument of —midi_in_name and —midi_out_name . Here is an example on OS X.
You may want to use MIDI loop bus such as IAC Bus for OS X, or loopMIDI for Windows. Also, you need to use different bus in order to avoid signal loop.
- If it is not working, try —debug option. It will dump all incoming / outgoing MIDI messages. Or create an issue on the GitHub page.
- Tested with OS X Catalina with ESP32 board, and Windows10 with loopMIDI.
- It’s made for my ESP32 based synthesizer, so I tested MIDI IN a lot, but MIDI OUT. MIDI OUT message processing might have some bugs. Please let me know if you find it.
About
Serial to MIDI bridge Python script for OS X and Windows
Serial to midi windows
The Serial — MIDI converter (SM = Serial MIDI Converter) is a software solution to get your computer’s serial port (or virtual serial port over USB) talking with your MIDI software and hardware.
Normally, to use an Arduino or other micro-controller with your MIDI software you had to build a MIDI-in and MIDI-out circuit with a few parts and an opto-coupler. Easy enough, but then you would typically need a MIDI to USB adaptor to connect it to your computer.
With the SM and a board like you the Arduino with USB, you don’t need any other hardware to get your Arduino to play music with software such as Apple’s GarageBand or Ableton’s Live !

What it does:
Once the SM is configured it will;
1. Take “MIDI” incoming serial data and forward it to the desired MIDI port.
2. Take MIDI data coming from the chosen MIDI port and forward it out of the serial port.
What can you do with it;
1. Build a drum machine
2. Build a keyboard
3. Build a completely new type of musical instrument
4. Make a score that controls bells and tapping solenoids
5. Make a score that flashes lights and triggers special effects
6. Send data from your existing MIDI controller out to a serial device
The MIDI-IN and MIDI-Out ports do not have to be same. For example, lets say you have an Arduino connected to sensors and visual effects, an external MIDI keyboard and Ableton Live software. You could send the Arduino’s sensor data to Live to play sounds and at the same time you could have the keyboards MIDI input routed back to the Arduino to activate visual effects !
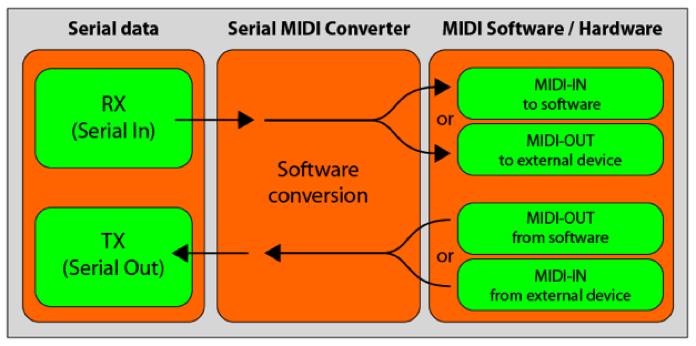
Illustration of how the data flows to and from the serial ports and MIDI.
A little bit about MIDI:
MIDI (Musical Instrument Digital Interface) uses a form of serial to communicate at a data rate of 31250 bps with each byte made of 8 bits plus a stop and start bit. MIDI commands are most often three bytes in length but sometimes more or less. The Serial-MIDI converter currently only handles three byte MIDI commands.
The first byte is called the Status byte and contains both the type of MIDI command and the channel number. The high nibble of this byte tells the MIDI device what it is doing, such as Note Off, Note ON, Control change etc. The low nibble is the channel, it is used to differentiate between devices that are on the same MIDI bus and varies from 0 to 15.
The second byte is the Pitch byte and is simply the note being played, stopped, altered etc. This byte is in the range of zero to 127.
The third byte (when used with Note-On or Note-Off) is the velocity, which is a form of volume for the note being played. Imagine that you hit a drum softly, then the velocity would be a low number, but if you really whaled on it then the velocity would be higher. This byte is also in the range of zero to 127.
Typical MIDI Message:

MIDI message are often three bytes long. Note: The first byte, the Status byte is different from the other bytes since the MSB (the 8th bit) is always set and it is never set in the other bytes. This is so the MIDI devices can tell whether it is receiving data or a command.

Important update for Mac OS X:
Apple has released a Java update the reintegrates native MIDI support into the Java. This means that as of Apple’s Java 6 update, you will no longer require mmj.jar and libmmj.jnilib.
1. To use the Serial MIDI Converter version 2D or later, you have to have 10.5.x with the Java for Mac OS X Update 6. (To see if it is installed, you can go into the Software Update in system preferences and click on the Installed Updates tab or just keep doing software updates until there are no more.)
2. REMOVE: both mmj.jar and libmmj.jnilib from /Library/Java/Extensions. (These are no longer needed and cause a bug with the Java Update 6.)
3. Restart and follow the regular Serial MIDI instructions.
Set-up for Mac OS X:
Using the SM on the Mac is easy, but the set-up takes a few steps. To use it you just double click the SM icon, then follow the instructions; choose a serial port, MIDI-in port and then a MIDI-Out port.
To set it up you will need two other pieces of software.
1. Apple’s Audio MIDI Setup (comes with your OS, in your Applications folder / Utilities )
2. mmj — Mac OS X universal binary java MIDI subsystem. No longer available from humatic.de
mmj is needed since as of Mac OS 10.4.8 Apple no longer supports some java MIDI packages.
Steps:
1. Download mmj and copy both mmj.jar and libmmj.jnilib into /Library/Java/Extensions.
2. Launch Audio MIDI Setup, then double click on the IAC Driver.

3. Now in the IAC driver, click the “More Information” triangle if it is not showing already.
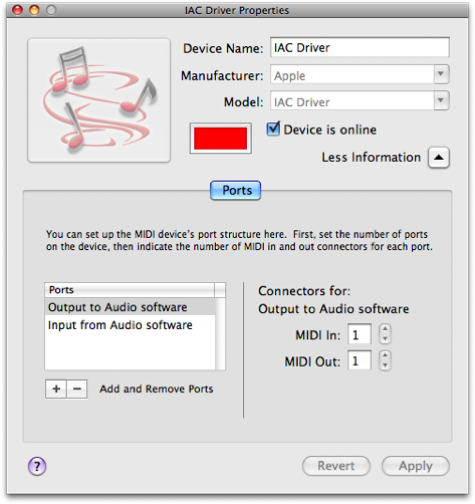
4. In the lower left; double click the MIDI port name to edit it and click the + to add a new port. Your screen will not say “Output to Audio Software”, this is just the name I gave it. You can give them any name you want. I also added a second MIDI port so as to not conflict with the first one. You can try this or different combinations.
5. Important, check the “Device is online” box or nothing will work!
6. Click “Apply”, and now you are done. You may quit the Audio MIDI Setup software, it does not need to be running for the SM to work.

Set-up Windows:
For the SM to work on a Windows machine you will also need other software to create a “virtual” MIDI port.
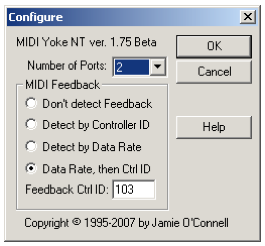
Download MIDI Yoke from the Downloads area below.

After installing MIDI Yoke, I recommend going into Control Panel and changing the default number of ports from 8 to 2. (With eight extra MIDI ports the SM interface gets too full (10 max). You will need to reboot after changing the number of ports.

How to use it: All Platforms
The SM is basically a traffic cop, you know the type that would direct traffic in an intersection with white gloves .
Launch the SM and follow along with these steps.
Step 1. Choose a serial port.
This is the serial port that will be used for both serial TX and RX. Your micro-controllers serial port must be set to 57600 bps 8N1. (Even though MIDI is transmitted at 31250 bps, the serial port is set at a faster baud rate to help minimize any lag time.)
Step 2. Choose a MIDI-in port.
This is the source of MIDI data that will be sent out of the serial port. This can be a little confusing, if you are using audio software this will be the MIDI-out of the software ! If you are using an external controller like a keyboard, this will be the MIDI-in port from that device.
Step 3. Choose a MIDI-out port.
When the SM receives serial data it will pass the data out of this MIDI port. You will most often choose the port that your audio software uses as input, but you could also choose another MIDI device.
Done. You are now ready for some fun.
The SM must be running to direct MIDI to and from serial ports. So, just let it run in the background.
NOTE: If you are using SM with an Arduino, you must quit SM before you can upload a new sketch to the Arduino. This is because, as long as the SM is running it will keep the serial port open and this will make it unavailable to other programs, like the Arduino IDE.

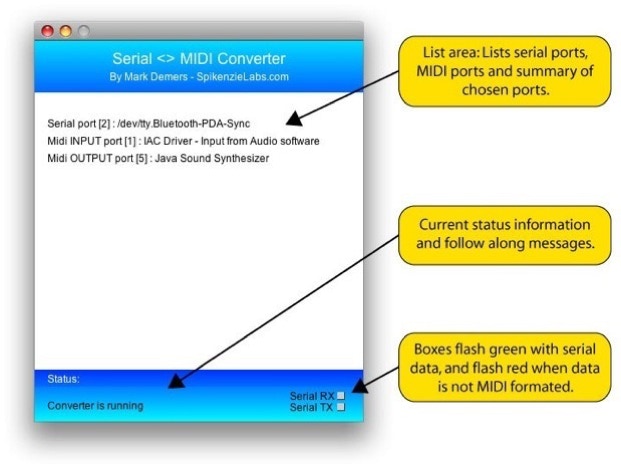

Screen shot of the Serial MIDI Converter. In this example the converter is set-up and running, with the summary of chosen ports displayed.