Как разделить экран в Windows 10 на части и просматривать приложения рядом
Функция разделения экрана в Windows 10 отлично подходит для многозадачности, особенно если вы используете большой дисплей.
Вы можете просматривать приложения в Windows 10 бок о бок, друг над другом или в обоих сразу, поскольку можно одновременно привязать до четырех окон приложений на экране. А с помощью Snap Assist, перенести каждое окно в нужное вам место, стало легче, как никогда. Вот как разделить экран в Windows 10 и просматривать приложения рядом:
Многозадачность Windows 10
Многозадачность Windows 10 — это официальное название функции разделения экрана Windows, которая существует с Windows 7. В более ранних версиях Windows Snap позволяла пользователям располагать два окна рядом, каждое из которых занимает половину экрана, что особенно полезно, когда сравнение двух документов или при перемещении файлов из одного места в другое.
В Windows 10 разделенный экран был обновлен. Теперь вы также можете привязать три или четыре окна приложений на экране (по одному на каждый угол), и вы можете сделать это, используя мышь, клавиатуру или палец (если у вас сенсорный экран). Это позволяет сравнивать или копировать и вставлять данные без необходимости переключаться между окнами и терять следы того, что вы делали.
Как следует из названия, многозадачность windows 10 — это функция, которая помогает пользователям привязывать окна рядом. Если эта опция включена, после того, как вы закрепите окно на своем месте, многозадачность позволит вам выбрать между другими открытыми окнами, которые вы хотите разместить на остальной части экрана.
Некоторые приложения вообще нельзя использовать в режиме разделенного экрана. Другие, такие как приложение «Фотографии» , могут быть свернуты только до определенной степени, но при этом остаются полезными. Поэтому, в зависимости от вашего дисплея, они могут не изменяться автоматически, как вы ожидаете, когда их привязка занимает четверть экрана.
Как включить разделение экрана (многозадачность) в Windows 10
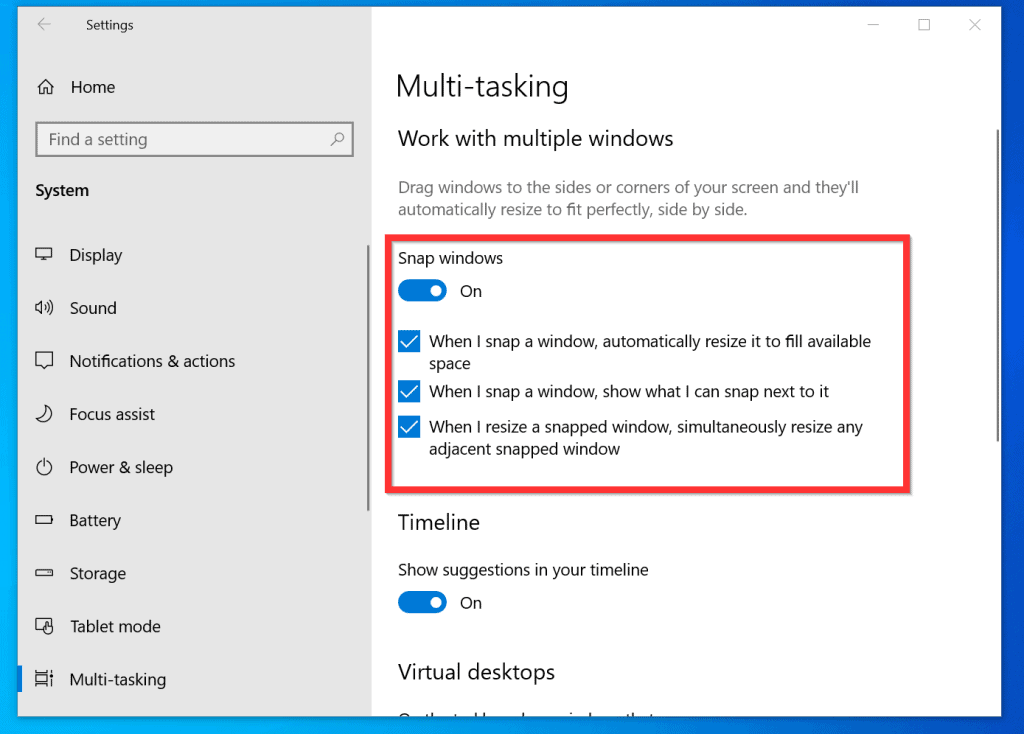
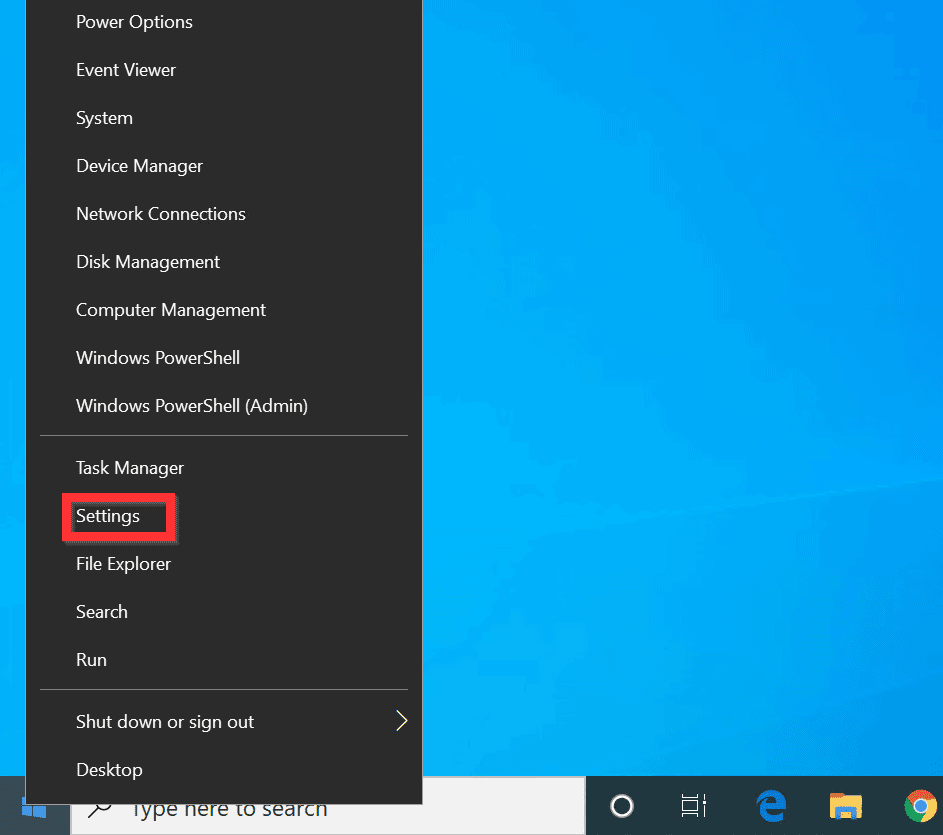
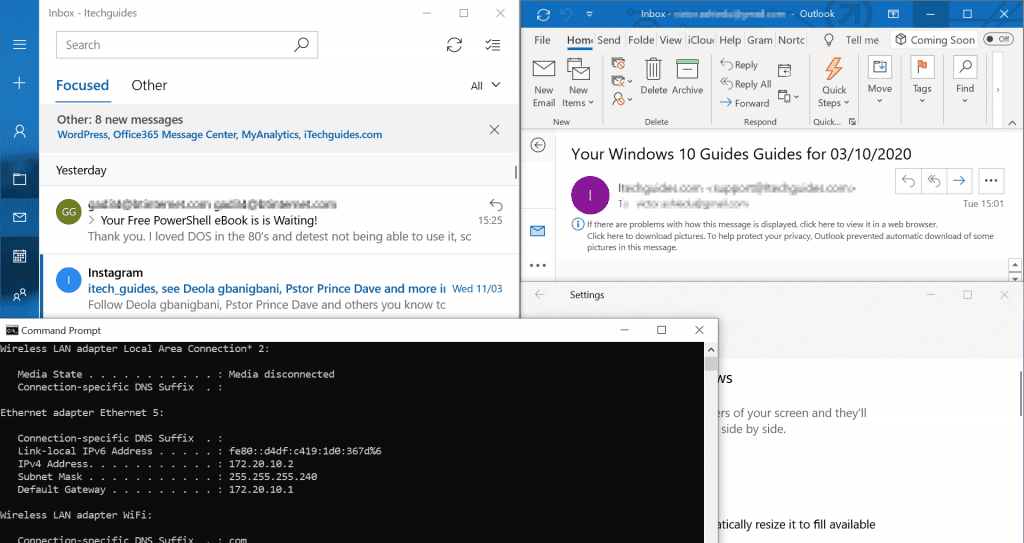
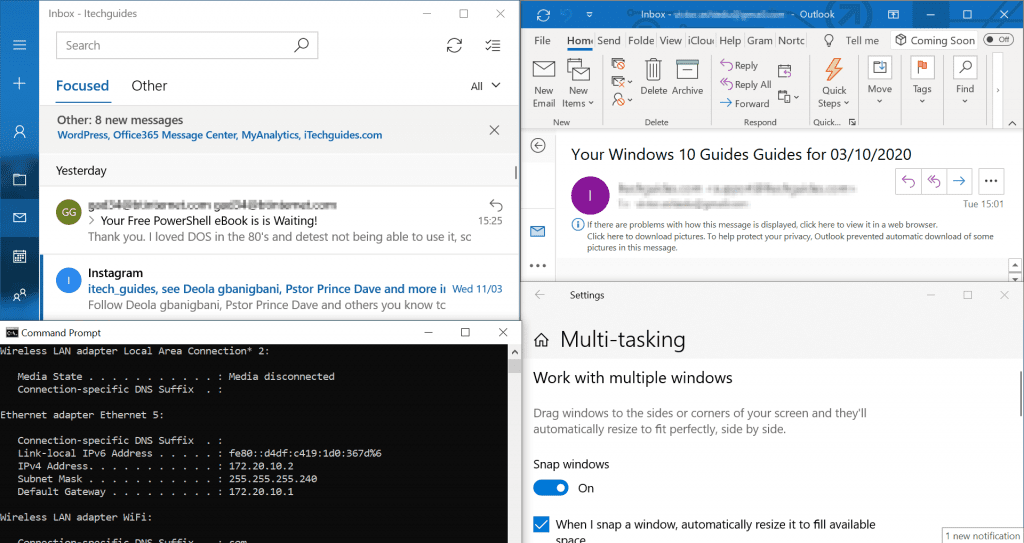
Разделенный экран Windows 10 и связанные с ним параметры должны быть включены по умолчанию, но вы всегда можете убедиться, что они включены. Откройте приложение «Настройки», одновременно нажав Win + I на клавиатуре, и войдите в систему.

С левой стороны прокрутите, если нужно, и перейдите на вкладку Многозадачность. Настройки разделенного экрана отображаются с правой стороны. Для эффективного использования многозадачности должны быть включены все параметры в разделе «Работа с несколькими окнами». Убедитесь, что переключатель «Прикрепить окна» в положении Вкл, как на картинке вверху.
Как разделить экран на 2 (два) части в Windows 10
Самый быстрый способ использования окон разделенного экрана и оснастки — это сочетания клавиш. Перейдите к одному из окон, которое вы хотите привязать, и одновременно нажмите клавиши со стрелками Win + Left, чтобы привязать его к левой стороне экрана, или стрелку Win + Right, чтобы переместить его к правой половине. Если вы предпочитаете использовать мышь или сенсорный экран для привязки, щелкните или нажмите в строке заголовка окна, чтобы взять его и перетащить на левый или правый край экрана.

Появится прозрачное наложение, показывающее предварительный просмотр размещения окна. Отпустите кнопку мыши или уберите палец с экрана, чтобы зафиксировать окно в указанном месте.

Используете ли вы мышь или клавиатуру, многозадачность появляется на пустой половине экрана, как только появляется первое окно. Нажмите на окно, которое вы хотите занять другую половину экрана. Вы также можете использовать клавиши со стрелками для перемещения между отображенными окнами предварительного просмотра и нажать Enter, чтобы выбрать тот, который вы хотите, занимая оставшуюся часть экрана.

Чтобы выйти из разделенного экрана без привязки ко второму окну приложения, нажмите клавишу Esc (или щелкните или коснитесь любого другого места на экране). Окно привязанного приложения остается на месте, а остальные окна возвращаются в исходное положение. Используйте мышь или комбинацию клавиш, соответствующую свободной половине экрана, если вы хотите, чтобы позже вручную открылось второе окно.
ПРИМЕЧАНИЕ. Вы можете легко изменить размеры двух параллельных окон, щелкнув (или нажав на сенсорном экране, но это займет несколько попыток) на темной разделительной линии между ними и перетащив его в любую сторону экрана. Поскольку они привязаны друг к другу, окна изменяют размер одновременно.

Если вы используете режим планшета, существует дополнительный способ разделения экрана между двумя окнами. Подробнее читайте в режиме планшета Windows 10: узнайте все о нем и как его использовать!
Как разделить экран на 4 части с помощью клавиатуры в Windows 10
Если у вас большой дисплей и вам нужно получить доступ к более чем двум окнам, вы можете использовать функцию Corner Snap, чтобы разместить на экране 3 или 4 части (окон) одновременно. Если вы предпочитаете сочетания клавиш, проще всего сначала разбить экран на две части, как показано в предыдущем разделе, прежде чем использовать функцию Corner Snap. Выберите одно из двух окон, закрепленных на месте, и используйте сочетание клавиш «Win + Стрелка», стрелка вверх, чтобы переместить его в верхний угол его половины экрана, или стрелку в низ, чтобы переместить его в нижний угол экрана.

Как только окно переместится, появится Snap Assist, предлагающий выбрать одно из других открытых окон, чтобы заполнить пустую часть экрана. Используйте стрелки для перемещения между предварительными просмотрами и нажмите Enter, чтобы выбрать третье окно для отображения на экране. Чтобы показать четыре приложения, вы можете выбрать окно, занимающее половину экрана, и повторить процесс. Теперь у вас на экране одновременно отображаются четыре окна приложений.
Как разделить экран на 4 части с помощью мыши в Windows 10
Когда дело доходит до встраивания окон приложений в четверть экрана, мышь — лучший способ сделать это. Нажмите на строку заголовка приложения, чтобы захватить его, и перетащите его в один из четырех углов экрана, чтобы отобразить прозрачное наложение. Отпустите кнопку мыши, когда вы будете довольны предварительным просмотром размещения.

Затем вы можете открыть другое окно, которое хотите использовать, и сделать то же самое. Если у вас есть сенсорный экран, вы также можете перетаскивать приложения в угол экрана с помощью этого метода. Однако это может занять несколько попыток, потому что наложение не всегда отображается, когда речь идет о Corner Snap.
Как разделить экран при использовании нескольких мониторов в Windows 10
Привязка окон друг к другу работает почти так же, как в Windows 10, когда у вас два монитора или больше. Чтобы узнать больше, прочитайте: Как привязать приложения Windows рядом и разделить экран на два монитора
Связанные материалы
Выводы
Функция разделения экрана в Windows 10 удобна, но мы обычно используем ее только с двумя окнами. Добавление большего количества приложений делает их слишком маленькими на наших мониторах, и мы теряем время, пытаясь найти нужную нам информацию.
How do I split the screen in windows 10 ?
Replies (36)
* Please try a lower page number.
* Please enter only numbers.
* Please try a lower page number.
* Please enter only numbers.
Thank you for being a part of Windows 10.
Windows logo key +Shift+Left Arrow or Right Arrow will move de active screen automatically to the other monitor. Then, press Windows logo key + Left Arrow or Right Arrow to make the active window split in have and move it to the left or right of the screen.
Hope this helps. Let us know if you have any other issues with Windows in future.
203 people were helped by this reply
Did this solve your problem?
Sorry this didn’t help.
Great! Thanks for marking this as the answer.
How satisfied are you with this reply?
Thanks for your feedback, it helps us improve the site.
How satisfied are you with this response?
Thanks for your feedback.
23 people were helped by this reply
Did this solve your problem?
Sorry this didn’t help.
Great! Thanks for marking this as the answer.
How satisfied are you with this reply?
Thanks for your feedback, it helps us improve the site.
How satisfied are you with this response?
Thanks for your feedback.
I agree!! This among other bugs is my greatest annoyance with Windows 10! Bring back the easy split screen (side by side) ability.
I understand that you can size windows to whatever you want, but that is painstakingly annoying to size it.
13 people were helped by this reply
Did this solve your problem?
Sorry this didn’t help.
Great! Thanks for marking this as the answer.
How satisfied are you with this reply?
Thanks for your feedback, it helps us improve the site.
How satisfied are you with this response?
Thanks for your feedback.
![]()
7 people were helped by this reply
Did this solve your problem?
Sorry this didn’t help.
Great! Thanks for marking this as the answer.
How satisfied are you with this reply?
Thanks for your feedback, it helps us improve the site.
How satisfied are you with this response?
Thanks for your feedback.
9 people were helped by this reply
Did this solve your problem?
Sorry this didn’t help.
Great! Thanks for marking this as the answer.
How satisfied are you with this reply?
Thanks for your feedback, it helps us improve the site.
How satisfied are you with this response?
Thanks for your feedback.
5 people were helped by this reply
Did this solve your problem?
Sorry this didn’t help.
Great! Thanks for marking this as the answer.
How satisfied are you with this reply?
Thanks for your feedback, it helps us improve the site.
How satisfied are you with this response?
Thanks for your feedback.
I want to split the screen like you could do with widows 8.1 but I can’t find help anywhere.
Simply click the Task View button (next to the search window, on the left end of the task bar.)
My complaint with Windows 10 is that they removed the «Help» option from the start menu to get help with Windows 10. We don’t need 100,000 answers from the internet for a simple question (such as how to split the screen on Windows 10.)
26 people were helped by this reply
Did this solve your problem?
Sorry this didn’t help.
Great! Thanks for marking this as the answer.
How satisfied are you with this reply?
Thanks for your feedback, it helps us improve the site.
How satisfied are you with this response?
Thanks for your feedback.
8 people were helped by this reply
Did this solve your problem?
Sorry this didn’t help.
Great! Thanks for marking this as the answer.
How satisfied are you with this reply?
Thanks for your feedback, it helps us improve the site.
How satisfied are you with this response?
Thanks for your feedback.
14 people were helped by this reply
Did this solve your problem?
Sorry this didn’t help.
Great! Thanks for marking this as the answer.
How satisfied are you with this reply?
Thanks for your feedback, it helps us improve the site.
How satisfied are you with this response?
Thanks for your feedback.
Grab the top of the window (or application) you are using. If you drag it to the top of the screen it will snap to full screen, if you drag it to the either side of the screen it will snap to half screen and the task view will appear in the other half of the screen and will allow you to select a second window/app to use in split screen.
Also if you were to drag a window/app into a corner of the screen it will snap to quarter screen so you can now actually split the screen into quarters if you wanted to.
Thanks go to ChrisShaida for the YouTube link.
177 people were helped by this reply
Did this solve your problem?
Sorry this didn’t help.
Great! Thanks for marking this as the answer.
How satisfied are you with this reply?
Thanks for your feedback, it helps us improve the site.
How to Split Screen on Windows 10
This Itechguide teaches you how to split screen on Windows 10. The guide covers steps to enable Snap windows setting and steps to split screen on Windows 10 into 2, 3 or 4 screens.
Expand “Browse Post Topics” below to go straight to a topic.
Browse Post Topics
How to Enable “Snap windows” in Windows 10
Before you can split screen, Snap windows must be enabled. Though it is enabled by default, it pays to confirm that it has’t been previously disabled. Here are the steps.
- Right-click the Windows 10 Start menu and click Settings.
- On Windows Settings, click the System category.
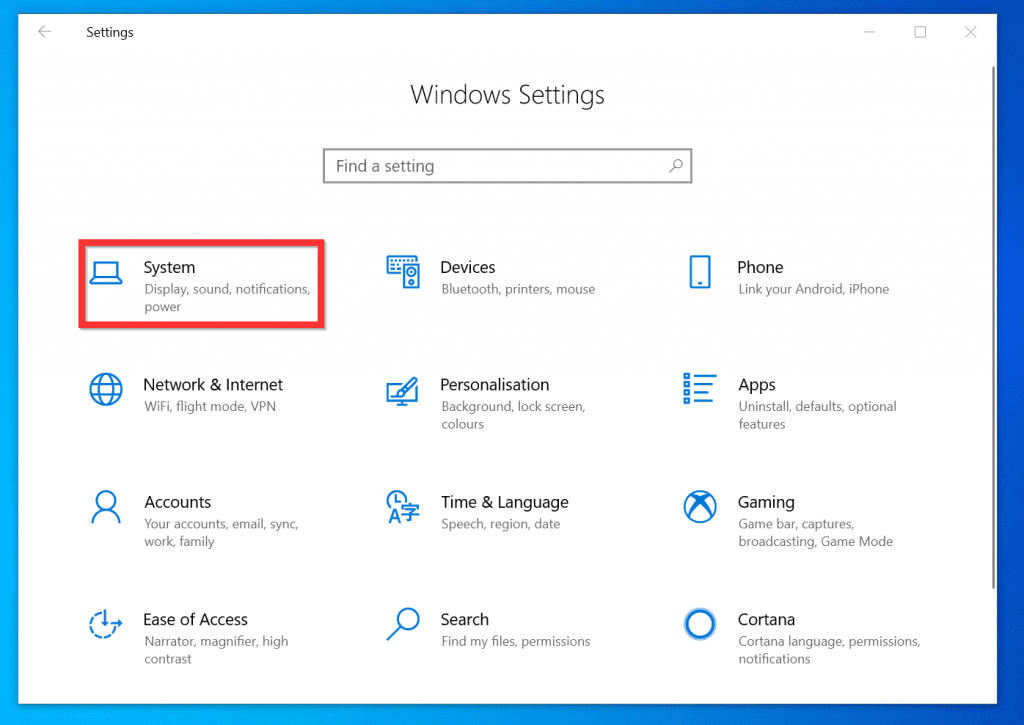
- Then, on the left pane of System Settings, click Multi-tasking.
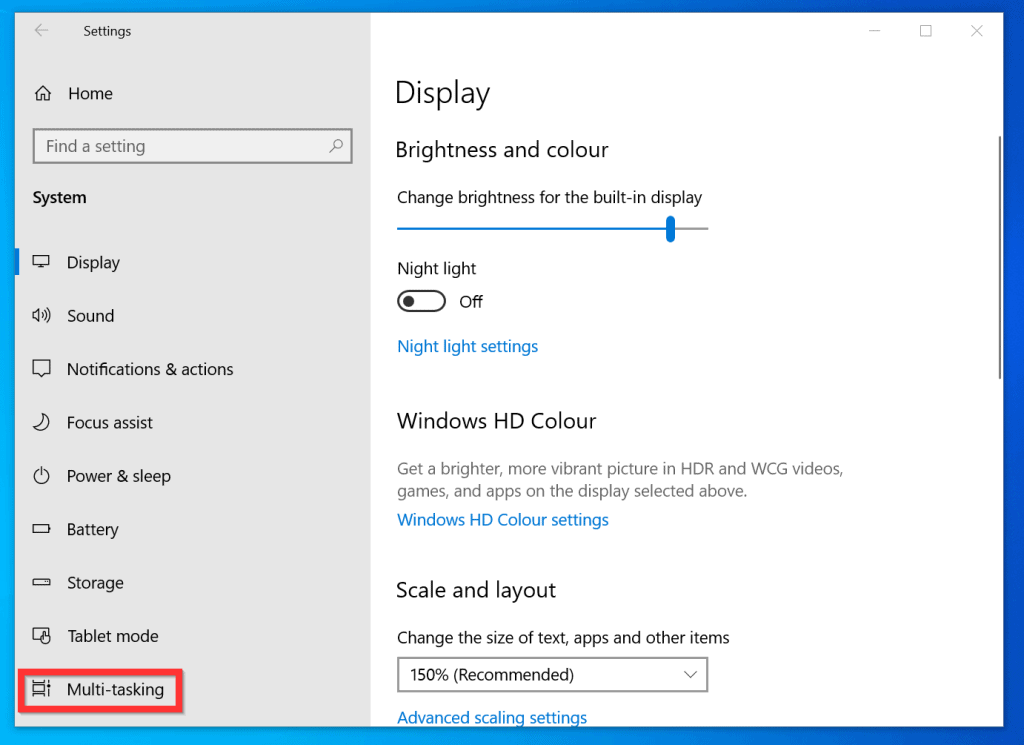
- When the Multi-tasking setting opens, confirm that Snap windows is turned on. Also, make sure that all the checkboxes underneath Snap windows are checked.
How to Split Screen on Windows 10 into 2, 3 or 4 Screens

Once you confirm that Snap windows is enabled, proceed with the steps below to split your screen.
How to Split Screen on Windows 10 into 2 Screens
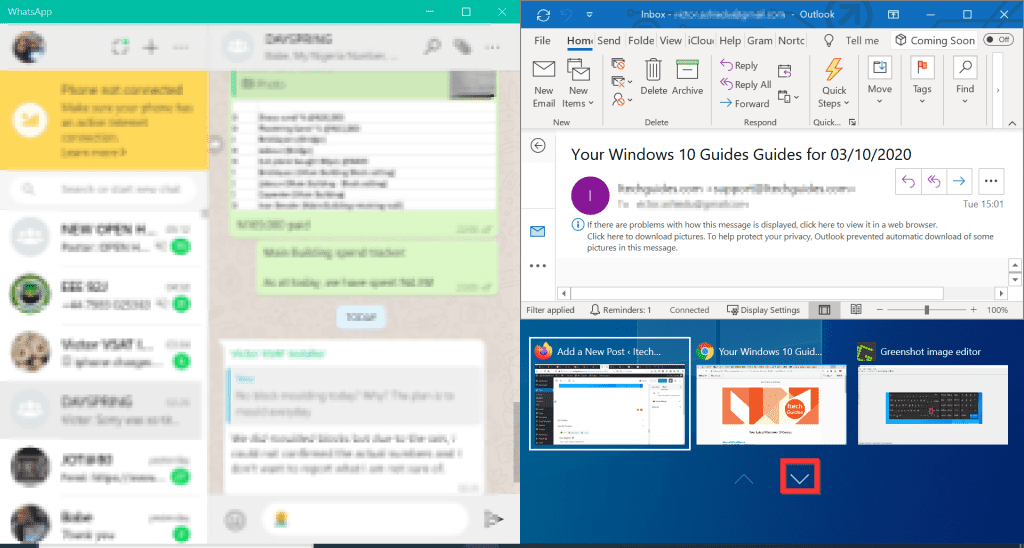
- Open the first Window you want to split. In this example, I am using WhatsApp as my first window to display on the split screen.

- Next, press the Windows key on your keyboard. Then, if you want the first screen to be displayed on the left, press the left arrow key (Home key for most keyboards).


- The open Window will move to the left of your screen. Then, all other available Windows that you can snap to the right will be displayed on the right of the screen.
- To display one of the Windows on the right of the screen, click it.
How to Split Screen on Windows 10 into 3 Screens
- With the first 2 screens open, click on the Window on the right to select it. Then, press the Windows key on your keyboard. Finally, press the up arrow key.

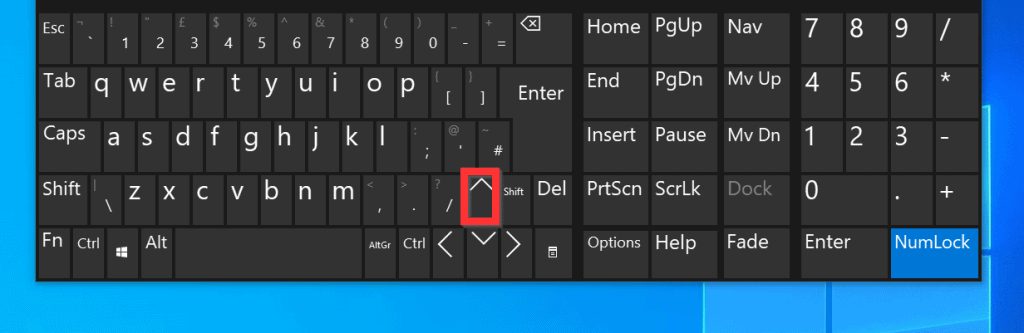
- The Window on the right side of your screen will split into 2. Also, additional Windows you can display on the 3rd screen will become available on the bottom right of the screen – the screen will also have an arrow key to view more available Windows.
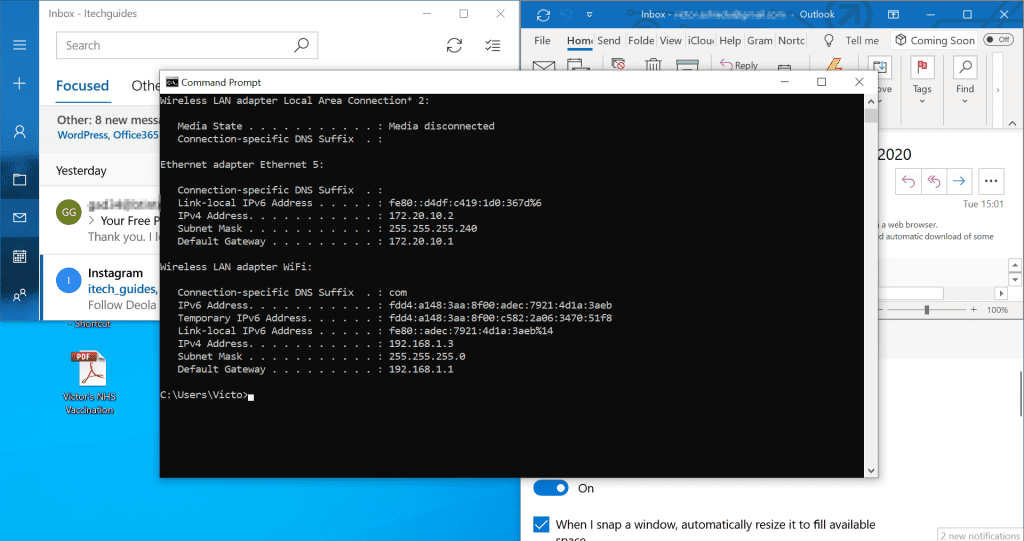
- Click on one of the Windows displayed on the third screen (bottom right of the screen).
- Your screen will be split into 3!
How to Split Screen on Windows 10 into 4 Screens
- With the 3 screens open, click on the Window on the left of the screen. Then, press the Windows key on your keyboard. Finally, press the up arrow key.
- The 4th screen (bottom left of the screen) will become free. Click on an open Window on your taskbar. The 4th Window will be displayed in the middle of the screen.

- Drag the Window to the bottom left of the screen (the 4th screen).
- Finally, resize the screen to fit into the 4th screen. The 4 Windows will fit into the available 4 screens!
It is very easy to split screen on Windows 10! I hope you found this Itechguide helpful. If you found it helpful, kindly vote Yes to the “Was this post Helpful” question below.
Alternatively, you could ask a question, leave a comment or provide feedback with the “Leave a Reply” form found towards the end of this page.
Finally, for more Windows 10 Itechguides, visit our Windows How-To page.