How to Create Restore Point in Windows Server 2012 (R2)?
A restore point allows you to restore system to the previous state. This article will show you how to create Windows Server 2012 restore point with two ways.

By AOMEI  / Last Updated June 23, 2020
What Is Restore Point?
Restore points are a component of the Windows System Restore utility. Therefore, it can be called system restore point sometimes. It is actually a collection of important system files stored with a specific date and time. It’s quite necessary to create Windows Server 2012 restore point.
When a restore point is established, your computer creates a backup copy of all data at that particular time. You can save the state of the operating system and important data. If your system has a problem, you can restore the system and data back to an early point.
Can You Create Restore Point in Windows Server 2012 (R2)?
Searching for «Create a restore point» on Windows Server 2012, brings up a link that when clicked takes you to System Properties. However, there is no System Protection tab or option to create a system restore point.
As a matter of fact, there is no System Restore in Windows Server 2012. You cannot create restore point. So, what can you do if you want to create restore point in Windows Server 2012?
As above mentioned, system restore point is actually to make an Operating System backup of your computer. That is to say, creating a system restore point just likes creating a system state backup.
There happens to have a similar feature called “Windows Server Backup”. It can be used to create system image backup. This feature can be used as an alternative to restore point.
Create System Image Backup Using Windows Server Backup Feature
Windows Server Backup is a powerful feature. By using this, you can create a single backup, schedule a periodic backup and restore system state to any point. Next, let’s see how to create Windows Server 2012 (R2) system image backup.
Actually, besides Windows Server Backup (WSB), there is another Server backup software provides an easier way to create system restore point. It lets you set daily/weekly/monthly scheduled backup tasks while WSB only allows you to create one daily backup schedule. It also offers various powerful functions to help you better manage system backup. Refer to the next part to learn more >
To use this feature, first, you should install Windows Server Backup.
Step 1. After the installation completes, press Win + R and type “wbadmin.msc” to open Windows Server Backup. Or you can use another way. Click Start and select Administrative Tools. Find Windows Server Backup and click it.
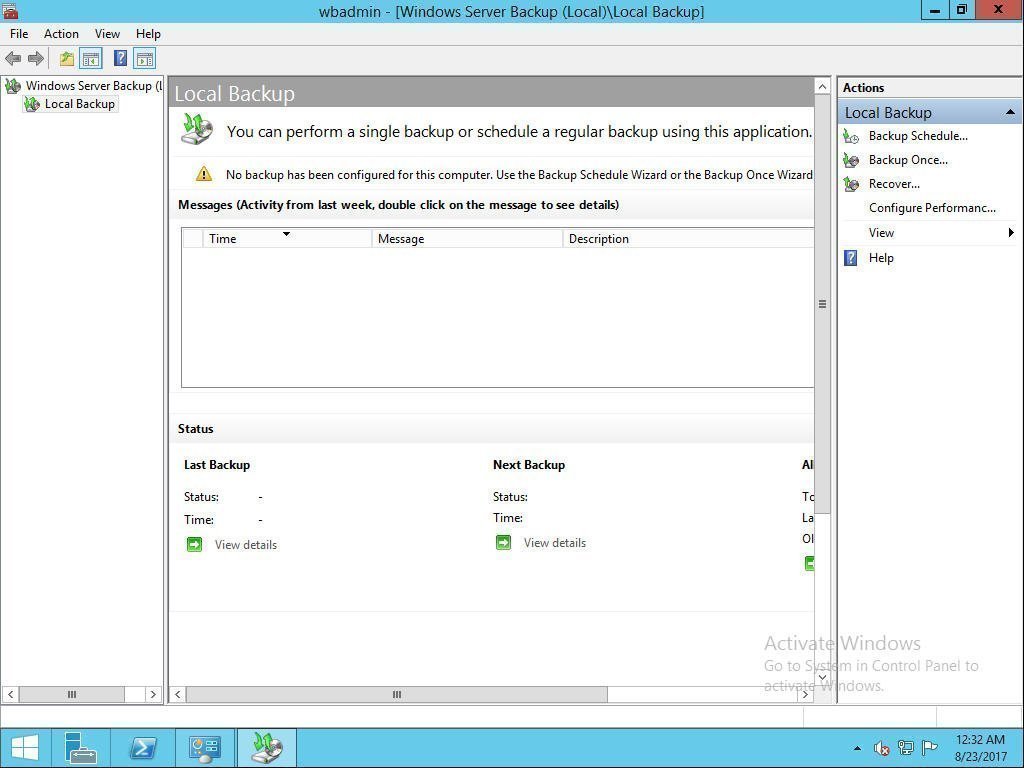
Step 2. On the Right Panel, you will find various options like Backup Schedule, Backup Once, Recover, etc., Click Backup Once option. Then you come to Backup Option. By default, it will tick create a backup now using Different options, just click Next.

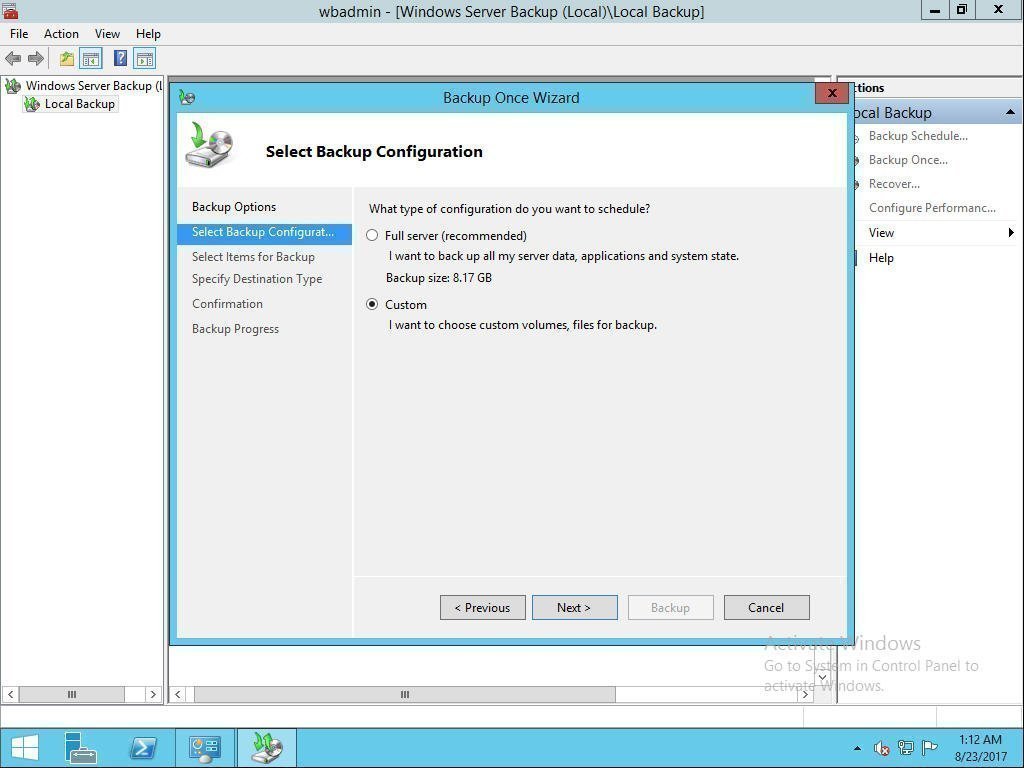
Step 3. Then you come to Select Backup Configuration. You can choose it based on your needs. Take Custom as an example. Tick Custom and click Next.
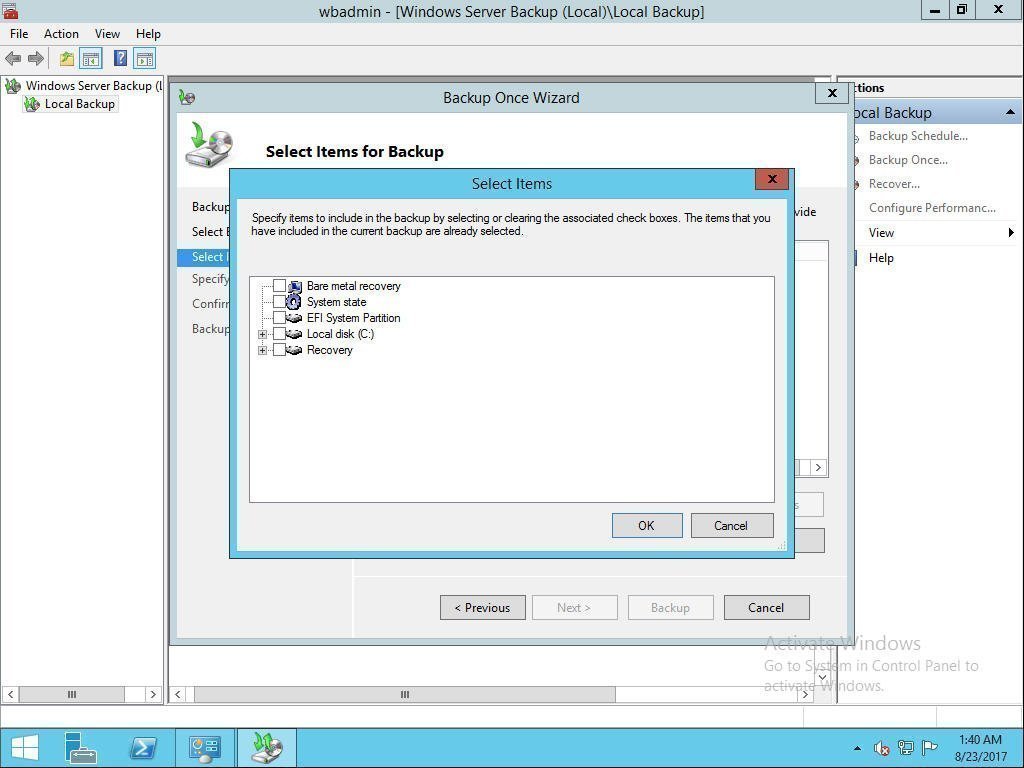
Step 4. Then come to Select Items for Backup. Click Add Items and select items you want to backup. Tick System state and click OK. Then click Next to continue.
Step 5. Then choose the type of storage for the backup. There are two options: local drive and remote shared folder. Take local drive as an example. Click Next. Then choose a hard drive and click Next.

Step 6. Confirm your option and click Backup. Wait until the process completes.
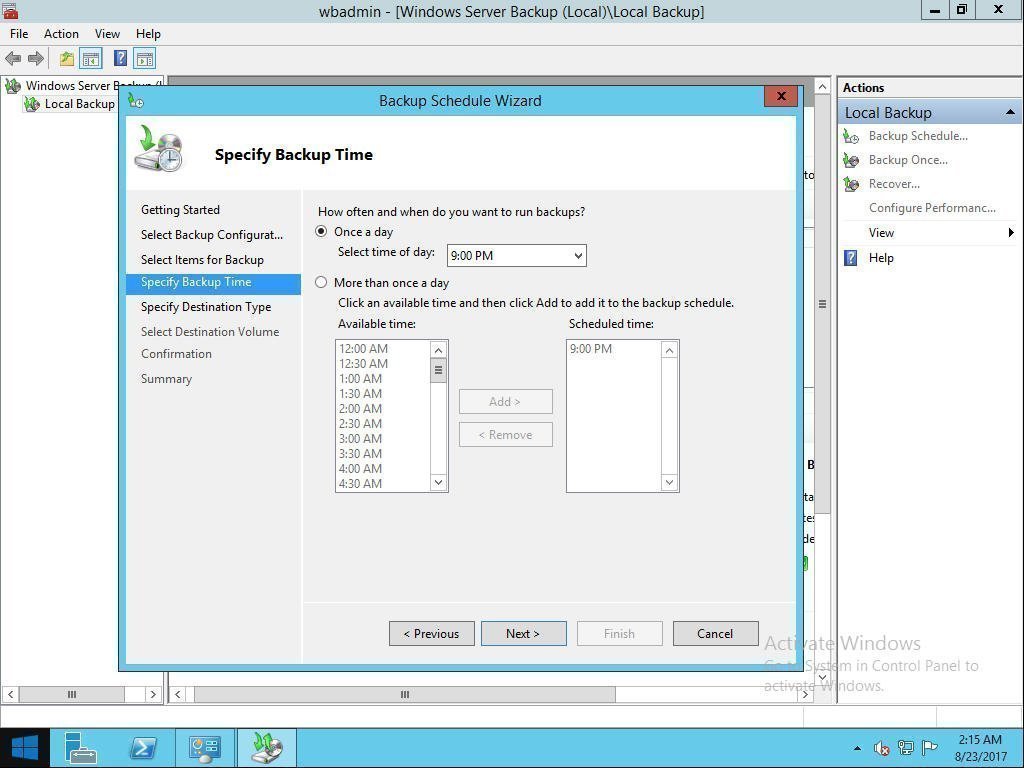
As system states may change often, it cumbersome to manually create system state backup every time when there is a change happens. In this case, you can also create a scheduled backup by clicking Backup Schedule Wizard.
This method can be also applied to create Windows Server 2012 R2 restore point. By the way, you can click to learn more about Server 2008 restore points.
Easier Way to Create System Restore Point in Windows Server 2012 R2
There is another way to create system image backup: use a third-party tool AOMEI Backupper.
AOMEI Backupper Server is a professional server backup software. It allows you to create system image backup easily and quickly. If any emergency happens to your computer, you can perform a quick recovery to the previous state.
It lets you set multiple scheduled backup tasks (daily/weekly/monthly) and also supports incremental/differential backups. The amount of space that system image backup can take up is limited. However, with this software, you can save storage space by automatically delete old backups.
Let’s take a look at how this software works to create system image backup.
Step 1. Download AOMEI Backupper Server and open this software. Click the System Backup under the Backup tab.
Win 10/8.1/8/7 & Server
 Secure Download

Step 2. You do not have to choose a source, the software has chosen it automatically for you. Just select another location as the destination path to store your system image files. And the destination location can be verified like internal hard drive, external hard drive, and NAS.

Step 3. To automatic backup system, click «Schedule» and select one or more settings. To delete old imges, click «Scheme» to select a specific role and set the retained backup versions. Finally, click Start Backup.
Daily/weekly/monthly backup: To continuously backup system and keep the latest updates, newly installed apps, added or deleted files, you could try daily backup, weekly backup or monthly backup.
Event triggers: To backup system without any interfering of your operations, «System Shutdown» in Event triggers is recommended.
Wake the computer to run scheduled tasks: To backup system during off-peak hours, you can set the backup time to midnight or any other times, then tick «Wake the computer to run scheduled tasks».
Incremental or differential backup: To save backup time and disk space, both features are available, because they only backup the changed content.

After creating system image backup, you can restore Windows Server 2012 (R2) from the backup very easily if there is any bad happen to your computer. Besides Windows Server 2012, AOMEI Backupper Server can also support Windows Server 2012 R2/2008/2008 R2/2003/2003 R2/2016 and Windows 7/8/8.1/10/XP/Visa.
Conclusion
Basically, there are two alternative ways to create Windows Server 2012 restore point. You can choose one based on your own preferences. Or if you prefer an easier method, then AOMEI Backupper Server is the way to go. It also offers more functions compared to WSB. By the way, besides system backup, it also can help you backup disk or important files as per your needs.
If you want to protect unlimited PCs and servers within your company, you may choose AOMEI Backupper Technician Plus. It offers unlimited billable technical services to clients. It also enables you to copy installation directory for portable version creation.
How to Perform Windows Server 2012 System Restore Using Command Line
Command line is easy to use even you are not within windows. This article will introduce how to create Windows Server 2012 system restore using command line.
By AOMEI / Last Updated September 11, 2020
In Windows Server, system restore is a great utility to roll back system to the previous state if any emergency happens to system. You can run system restore from inside Windows with Recovery Wizard, or you can run Windows Server 2012 system restore with command line.
Why use command line to do system restore?
Command Prompt is available on every Windows NT-based operating system which includes Windows 10, Windows 8, Windows 7, Windows Vista, Windows XP, Windows 2000, as well as Windows Server 2012/2008/2003.
Sometimes, however, a problem is so bad that your computer won’t start normally, meaning you can’t run System Restore from inside Windows. Fortunately, even if all you can do is start in Safe Mode and access Command Prompt, you can start the System Restore by executing a simple command.
Also, using command line is more convenient for batch files and batch commands.
Wbadmin values for system restore in Windows Server 2012
version:[versionidentifier]: Specifies the version for the backup to recover in MM/DD/YYYY-HH:MM format, as listed by wbadmin get versions.
authsysvol: Performs an authoritative restore of Sysvol.
backupTarget: : Specifies the storage location that contains the backup or backups that you want to recover. Useful when the location is different from the location where backups of this computer are usually stored. NetworkSharePath should be in Universal Naming Convention (UNC) format.
showsummary: Reports the summary of the last run of this command. This parameter cannot be accompanied by any other parameters.
recoveryTarget:[targetpathforrecovery]: Specifies the directory to restore to. This is useful if the files that comprise the system state are restored to an alternate location.
machine:[backupmachinename]: Specifies the name of the computer for which you want to recover a backup. Useful when multiple computers have been backed up to the same location. Should be used when -backupTarget is specified.
quiet: Runs the command with no prompts to the user.
How to restore Windows Server 2012 with Wbadmin
As above mentioned, when you cannot start your computer normally, you can run Windows Server 2012 system restore with command line from recovery options.
Boot the Windows Server into WinRE with the installation disc if needed. At Windows Setup interface, click Repair your computer. Select Troubleshoot. Then choose Command Prompt in the advanced options.
At the prompt, type: wbadmin start systemstaterecovery –version:01/09/2013-18:28 –backuptarget:E:. This means run system state recovery from system state backup at E drive created at 18:28pm in 01/09/2013.

For example, to run a system state recovery of the backup from 04/30/2005 at 9:00 A.M. that is stored on the remote shared folder \\servername\share for server01, type:
wbadmin start systemstaterecovery -version:04/30/2005-09:00 -backupTarget:\\servername\share -machine:server01
вњЋ Additional consideration:
To recover the system state using Windows Server Backup, you must be a member of the Backup Operators or Administrators group, or you must have been delegated the appropriate authority.
Another way to do Windows Server 2012 system restore with command line
AOMEI Backupper Server is a professional backup and restore software. It can be used to backup and restore the system from graphic user interface or command line. It supports both Windows system (Windows 7/8/8.1/10/XP/Visa) and Windows Server system (Windows Server 2003/2008/2008r2/2012/2012R2/2016). You can benefit a lot from its following features:
в‘ Various backup types
It offers different backup types for different needs. You can choose from system backup, disk backup, partition backup, and file backup according to your situation.
в‘Ў Multiple backup schedules
It enables you to set automatic backups. There are six schedule modes available: “Daily”, “Weekly”, “Monthly”, “Event triggers”, and “USB plug in”.
в‘ў Advanced backup schemes
It can help you delete obsolete backups automatically so that you won’t worry that the backup destination drive is filled up. Five schemes are offered: «Full Backup Scheme», «Incremental Backup Scheme», «Differential Backup Scheme», «Space Management Scheme», and «Other Backup Scheme».
Before you run Windows Server 2012 system restore with command line by AOMEI Backupper, make sure you have already created a system backup, and you can check if system image backup is intact and without error by using Check Image utilities. Also, if you cannot boot your computer, create a bootable media.
After all this done, let’s take a look at how to run Windows Server 2012 (R2) system restore from command prompt.
Step 1. Boot the machine from the bootable media, and it will bring you to the interface of AOMEI Backupper. Then open Windows shell command under Tools.
Tip: if you can boot the computer, press Win + R and type cmd to open command prompt.
Step 2. Type in the following command in command prompt to navigate to AOMEI Backupper installation directory by typing in: cd [installation path of AOMEI Backupper] and press Enter. For example: cd C:\Program Files\AOMEI Backupper. Note that the drive letters might change under Windows PE environment.
Step 3. Run the following command to start restore: AMBackup /r /t [backup type] /s «[backup location path]» /d [destination location]
For example: To restore the system backup saved in D:\system backup to disk 2.
AMBackup /r /t system /s “D:\system backup\system backup.adi” /d 2
If you want to perform a universal restore, AOMEI command line still can do this for you.
For example: Restore system in the image named «system backup10.adi» to the partition 0 on disk 0 and perform a universal restore.
AMBackup /r /t system /s «D:\system backup\system backup10.adi» /d 0:0 /x
Besides system restore, this can be used to perform disk restore and partition restore. Also, it is very easy to create data backup using CMD and clone with command line.
All in all, there are two methods to create Windows Server 2012 (R2) system restore with command line, you can choose one based on your preference.
If you want to protect unlimited PCs and servers within your company, you may choose AOMEI Backupper Technician Plus. It offers unlimited billable technical services to clients. It also enables you to copy installation directory for portable version creation.