6 приложений для камер видеонаблюдения в Linux

Безопасность — главная проблема в мире технологий, но мы говорим не только о фишинг-атаках и вредоносных программах. Старые опасности, такие как взломы и кражи, угрожают нашим домам и предприятиям, поэтому существует рынок высококачественных систем наблюдения.
К счастью, вам не нужно платить сотни долларов за систему видеонаблюдения, если у вас есть запасной компьютер под управлением Linux и несколько запасных камер. К тому же, такой путь дешевле и даст вам больше контроля, если вы выберете правильное программное обеспечение. Вот лучшие варианты программного обеспечения для камер видеонаблюдения в Linux, которые вы можете попробовать.
1. ZoneMinder

ZoneMinder — это отличный вариант для системы видеонаблюдения «сделай сам». Профессиональные функции превращают ZoneMinder в идеальное решение для домашней и коммерческой безопасности. Он поставляется с совместимостью как для IP-камер, так и для стандартных веб-камер. Если вы находитесь в пути, приложения для Android и iOS позволяют удаленно контролировать ваши камеры.
У вас есть много вариантов настройки ZoneMinder в соответствии с вашими требованиями, с поддержкой как живого видео, так и обычных изображений. Уведомления по электронной почте и SMS помогут вам оставаться в курсе, даже если вы не осуществляете мониторинг напрямую. Кроме того, ZoneMinder предлагает уровни доступа пользователей, чтобы вы могли ограничить, кто имеет доступ. Это довольно гибкий инструмент с возможностью масштабирования, наклона и панорамирования камер.
Пользователи Linux CCTV могут воспользоваться установщиками для различных дистрибутивов, таких как Ubuntu и Debian, но вы также можете скомпилировать их из исходного кода, если хотите. Вы также можете развернуть ZoneMinder на устройствах с низким энергопотреблением, таких как Raspberry Pi.
2. Xeoma
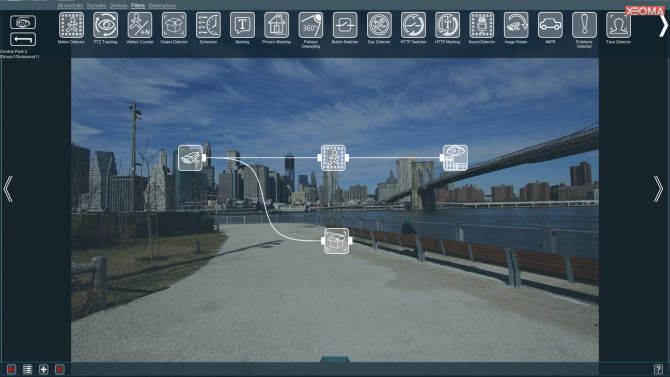
Если вы ищете простое в использовании программное обеспечение для IP-камер Linux, Xeoma — это хороший вариант, поскольку он позиционируется как «по-детски простое» видеонаблюдение. Он имеет модульный подход, позволяющий добавлять необходимые компоненты и компоненты при настройке системы.
Это программное обеспечение для Linux-камеры безопасности является богатым. Он совместим со всем, от обычных веб-камер USB до камер видеонаблюдения Wi-Fi. К одной установке Xeoma можно подключить до 2000 камер, что делает ее идеальной для коммерческого использования.
Снимки экрана со всех мониторов одновременно, удаленный доступ и обнаружение движения — все это делает Xeoma хорошим выбором для пользователей. Он также поддерживает мобильный доступ с оповещениями по SMS и электронной почте, а также удаленный доступ к архивам, камерам и настройкам. Вы также можете воспользоваться различными настройками хранения, отложенными записями и даже алгоритмами, чтобы избежать ложных срабатываний. Эта последняя функция отлично подходит для пользователей с домашними животными или маленькими детьми.
Хотя он доступен для покупки, Xeoma предлагает бесплатную версию с несколькими ограничениями (восемь камер, три модуля в цепочке). В целом, Xeoma — это простой, но всеобъемлющий вариант для наблюдения за вашим домом или работой.
3. Motion
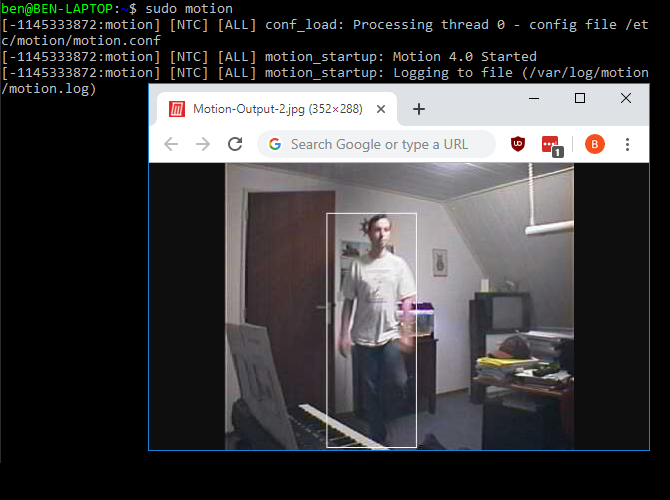
Motion — эта бесплатная программа определяет, изменилась ли основная часть изображения из видеосигнала. Написанный на C, Motion был создан специально для дистрибутивов Linux с интерфейсом video4linux.
Несмотря на то, что видео сохраняется при обнаружении движения, Motion также включает настройки промежутка времени для регулярного мониторинга. Вы также можете установить движение для сохранения как видео или изображений. Он работает без головы и графический интерфейс не требуется, что делает его более компактным по сравнению с другими конкурентами программного обеспечения для наблюдения в Linux.
Вот что делает Motion таким прекрасным выбором, если вы хотите создать недорогой сетевой видеомагнитофон (или сетевой видеорегистратор) для работы на маломощных устройствах, таких как Raspberry Pi. Он будет записывать ваши изображения наблюдения или видео в цифровом виде, либо локально (на SD-карту), либо через вашу внутреннюю сеть.
Motion может не хватать функций по сравнению с другим программным обеспечением Linux NVR, но это хороший вариант, если вы ищете базовую систему камер с датчиком движения.
4. Bluecherry
Если вы хотите использовать исключительно программное обеспечение с открытым исходным кодом, Bluecherry — это Linux NVR для вас. Это кроссплатформенная система видеонаблюдения, поэтому вы можете запускать ее на других платформах.
Установка проста, с однострочным установочным скриптом, доступным для Ubuntu, Debian и CentOS. Он поддерживает более 2600 IP-камер с возможностью воспроизведения записей и потокового вещания в браузере. К сожалению, в Bluecherry отсутствует собственное мобильное приложение для Android и iOS, но поддерживается интеграция с IP Cam Viewer.
Хотя Bluecherry является бесплатным и с открытым исходным кодом, платные пакеты поддержки доступны для бизнес-пользователей. Благодаря богатому набору функций и платной поддержке, Bluecherry является отличным вариантом для использования как в бизнесе, так и в быту.
5. Ivideon
Если вы разрабатываете систему видеонаблюдения с ограниченным бюджетом, вы должны рассмотреть Ivideon. Системные требования являются одними из самых легких, которые вы найдете для любого цифрового видеорегистратора. Вы можете запустить Ivideon на ПК с процессором Itnel Atom с 1 ГБ ОЗУ и всего лишь 500 МБ памяти. Однако для ежедневного хранения видеоматериалов вам потребуется как минимум 11 ГБ, если вы хотите хранить их локально.
Несмотря на нехватку ресурсов, Ivideon — это сервис, интегрированный с облаком, с уведомлениями и воспроизведением, доступными через Интернет. Вы также можете хранить свои записи, используя облачное хранилище Ivideon.
Установка довольно проста. Вы можете либо загрузить и запустить скрипт установки, либо запустить отдельные команды из окна терминала самостоятельно. Как и многие другие системы видеонаблюдения, Ivideon предлагает мобильное приложение для устройств Android и iOS. Он официально поддерживает самые последние выпуски Debian и Ubuntu, но так же может быть установлен на другие дистрибутивы.
Домашние пользователи могут выбирать из ряда планов, в том числе базовый (но функциональный) бесплатный онлайн-план, хотя бизнес-пользователям придется платить за пакет в 5 долларов в месяц.
6. Kerberos.io
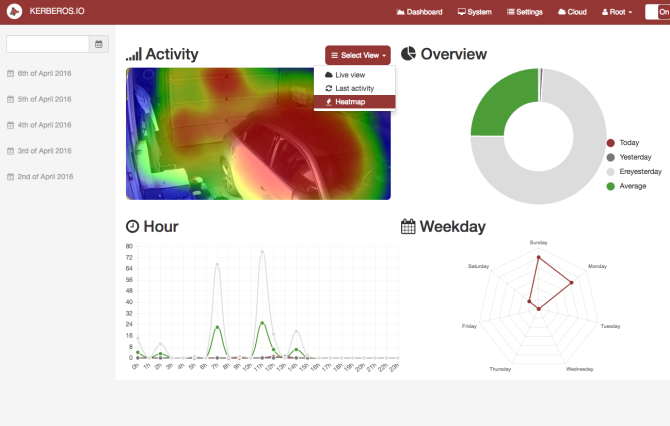
Kerberos.io — еще одно бесплатное кроссплатформенное программное обеспечение NVR для Linux, совместимое практически со всеми камерами, поддерживаемыми Linux. Вы даже можете загрузить Docker-контейнер, чтобы настроить всё за считанные минуты.
Kerberos.io с поддержкой Raspbian — лучший вариант для пользователей, желающих создать систему видеонаблюдения с использованием маломощных технологий. Примечательно, что Kerberos.io также имеет чистый, современный и простой в использовании веб-интерфейс.
Если вы не хотите тратить много времени на настройку или обслуживание вашей системы, то Kerberos.io — один из лучших вариантов для вас в Linux. Хотя для некоторых функций (например, для просмотра камер удаленно) требуется облачная подписка, стоимость которой составляет менее 2 долларов в месяц.
Будьте в безопасности с Linux
Создание вашей собственной системы видеонаблюдения на основе Linux поможет защитить ваш дом и бизнес от более традиционных угроз. Они также могут сыграть свою роль в создании умного дома с другими проектами DIY.
Building Linux-based NVRs

Overview
This article describes common steps for a partner who wants to make an NVR-like hardware product – an embedded computer (called here an «NVR») with a pre-installed Server application. Typically, such an NVR is a Linux-based computer with an ARM CPU.
The basic steps to make such a product include the following:
- Choose hardware
- Platform
- Storage
- Choose Linux flavor
- Install Server application
- Implement extra features
- Establish a support policy
These steps are described below in detail.
Choose hardware
To make a product successful it should be cost-effective and provide the required performance – support the desired number of cameras with the desired bitrate/resolution. Hardware used should have at least 1GB of RAM and an ARM Cortex A7 chipset or higher.
It is recommended to first study the performance of the supported ARM platforms (see ARM Support Policy for the list of such platforms), and then choose a platform closest to your requirements.
Platform
The chosen supported ARM platform can be used as one of the following:
- a ready-to-buy computer (e.g. a standard Raspberry Pi mainboard), possibly with a custom case and power supply unit;
- a reference for designing a custom computer with the mainboard that may host additional hardware components like peripheral interfaces or hard drive controllers.
If the NVR is expected to have additional software onboard besides the Server application, such as a web server providing a web interface to the user, video analytics software (e.g. a VMS plugin and/or its backend), or the like, make sure to add sufficient RAM and CPU processing power to cover that.
Video transcoding is not supported on ARM devices due to limited computing power. Additionally, some dependencies such as OpenSSL may have compatibility issues. If the initial analysis shows that a typical ARM-based platform will not provide the required performance, an x64 platform can be considered.
The storage performance of the platform should be good enough for the planned load. For example, it is known that such solutions as SATA-over-USB may lead to poor HDD performance, insufficient for recording the required number of cameras.
The network performance of the platform should be good enough for the planned load. For example, it is known that such solutions as software-based Ethernet implementation takes a lot of CPU resources and thus may lead to frame drops while recording cameras or streaming to Clients, or other issues. Additionally, hardware models that implement ethernet via USB hub may have less than advertised network bandwidth.
The platform should be equipped with a Real-Time Clock (RTC) hardware, and/or time synchronization via the network (e.g. using the NTP protocol) should be enabled – for the VMS to function correctly, the OS date and time must be correct. If there is no hardware RTC, and the only date/time source is planned to be the network, it is recommended that the device will refuse to start at all in case it cannot synchronize the date/time.
Storage
Make sure there is enough space on the filesystem for the VMS to function properly. The Server uses the following storage locations:
- VMS installation – binaries and dynamic libraries (.so files)
- Located at /opt/ /mediaserver/
- Required space: can be calculated measuring the total size of the respective files in the distribution with some added margin; the higher the margin – the less chances for issues with updating to future versions. Generally, a 30% margin is recommended.
- If there is not enough storage at /opt, .so files can be moved via symlinks to another location, including FAT32 storage (but in this case only files which are not symlinks can be moved).
- Typically located at /opt/ /mediaserver/var/; can be changed in the Server configuration file.
- Requires ext4 filesystem
- Required space: depends on the number of cameras and Servers in the VMS System, but generally at least 500 MB is recommended.
- Typically located at /opt/ /mediaserver/var/data ; can be changed in the Server configuration file.
- Required space: depends on whether Analytics Plugins are in use on this Server, and how much metadata will the Plugins send. Generally, 20% of the Video Archive Storage size is recommended if Analytics Plugins are used on this Server.
- Located at /opt/ /mediaserver/var/log/
- Can be relocated via mediaserver.conf.
- Can be relocated via mediaserver.conf.
- Logs are automatically overwritten in a loop.
- Required space: at least 260 MB is recommended.
- NOTE: We noticed that on specific ARM devices (e.g., Raspberry Pi 3), the internal flash memory (Micro SD in that case) was not good enough to accept logs. The system would freeze for up to 4 seconds. We recommended redirecting logs to the same location as the video archive for such devices.
- Typically located at /opt/ /mediaserver ; can be changed in the Server configuration file.
- The system partition will likely be restricted from recording by default unless there is at least 10 GB of free space.
- Internal flash memory (eMMC) or SD Card
- Estimate how many write cycles the memory can accept. The video archive is automatically overwriting itself in a loop, thus, the duration of a single write cycle can be calculated by dividing the free space by the combined bitrate of all cameras being recorded on the Server.
- Make sure that the memory throughput is enough for the combined bitrate of all cameras being recorded on the Server, with a safety margin of 30%.
- Make sure that the disk throughput is enough for the combined bitrate of all cameras being recorded on the Server, with a safety margin of 30%.
- Make sure that the network adapter actual bandwidth is enough for the combined bitrate of all cameras being recorded on the Server multiplied by 2 (because the cameras presumably send their streams to the Server using the same network adapter), with a safety margin of 30%.
- To be able to update, the Server application needs to download its newer version and unpack it.
- Located at /tmp/
- Required space: the total size of the packed Server distribution file multiplied by 2.6; this includes the margin. More space can be recommended to minimize chances for issues with updating to future versions.
- OS temporary files
- Typically located at /tmp/
- Required space: at least 100 MB is recommended, not including the required space for the Server application update files (see above).
Most of the things listed above can be assigned to be stored in a different location in the Server configuration file: /opt/ /mediaserver/etc/mediaserver.conf
Since the typical SD card storage is not reliable and known to fail during intensive read-write operations, we recommend to install the OS and store the video archive on a hard drive(s). If an SSD/hard drive or SD card is considered for storing the video archive, assess its capability for multiple rewrite operations using the typical bitrate of a desired supported camera multiplied by the desired number of supported cameras.
For instance, for the Raspberry Pi 3 B+:
- Use USB-SATA adapter and external hard drive for the archive.
- Install OS (Raspbian) to an external hard drive. See the article How to boot your Raspberry Pi from a USB mass storage device for details. This process should be automated depending on how ARM devices are going to be distributed: with or without hard disk:
- With hard disk — make a pre-configured image with VMS installed and clone it to hard drives.
- Without hard disk — you will have to create a set of scripts that formats HDD, copies the OS and does all necessary tweaks. This is a pretty complex and time-consuming task.
Choose Linux Flavor
There are usually several options for Linux OS on a given NVR:
- «Busybox» – just Linux kernel and the basic set of command-line tools; used on relatively low-performance NVRs such as «edge» cameras (cameras with the VMS Server running on them).
- Standard Debian, or one of its flavors like Ubuntu.
- Modified version of Debian or another Linux distribution, usually modified by the device vendor (e.g., Raspbian for Raspberry Pi).
Generally, it is recommended to choose a Linux variant which is the native choice for the platform the NVR is based on. For example, when developing an NVR similar in hardware to Raspberry Pi (or even using the exact Raspberry Pi mainboard), it is recommended to choose Raspbian.
If several Linux distributions with different sets of packages are available for the device, the least heavy one is recommended. For example, if there is no plan to show GUI on the NVR, there is no need for the X Window System.
Make sure that the Linux version and its set of packages satisfy the requirements of the VMS. For ARM-based devices, consult the OS details specified in the ARM Support Policy .
Install Server application
After the NVR is loaded with a suitable Linux OS, the Server application should be installed on the NVR. There are basically two options:
- For Debian-based OS: install the official .deb package from the VMS distribution using dpkg.
- See the detailed instructions for installing the VMS on a device: ARM SBC installation instructions
- For Busybox-based OS: extract the required files from the VMS .deb package to the desired directory, and manually take care of the following aspects:
- How the Server will be started upon boot and if system.d support from the distribution is not suitable?
- Where will the Server take .so libraries missing in the installed Linux?
- Will the standard VMS automatic update system be enabled?
For less typical OS setups, some combination of options 1 and 2 may be required.
Implement extra features
Typically, an NVR is not just a standard Linux computer with the Server application installed – it often provides additional features to the user:
- Hardware buttons, LEDs or even embedded displays.
- A web interface which allows you to customize the NVR beyond just setting up the Server application via its own web interface, such as
- networking options: IP address, subnet, etc.;
- system time and time zone;
- Video output (e.g., HDMI) which shows a GUI or at least a welcome screen with basic configuration values like the NVR’s IP address;
- Additional software which runs in parallel to the VMS, such as a configuration daemon or a video analytics backend.
- If the additional software has a password-based authentication for the end user, consider implementing password synchronization, so that the VMS Server password is always the same as the one for the additional software. If ssh is offered to the user to access the NVR, consider synchronizing its password as well.
- Additional tweaks, like minimizing video (GPU) memory. For instance, for the Raspberry Pi 3 B+ s et the GPU memory to 16 MB. See Raspberry Pi documentation for details.
To implement such features, it may be required to write or modify scripts that control the Server application, or write additional programs in C/C++.
Time Synchronization
Make sure the NVR has a built-in CMOS battery to prevent its clock from resetting in the event of power loss. For instance, Raspberry Pi 3 B+ does not have a CMOS battery onboard. If the device is rebooted, the time will reset and it will result in incorrect archive writing. To avoid this, there are some options:
- Make sure it is connected to the internet to synchronize time.
- If it is a closed network, you will have to set up an NTP server.
- Add a Real-Time Clock (RTC) module to the board and pre-configure it. See Adding a Real Time Clock to your Raspberry Pi.
Finding/Building an Enclosure for Your NVR
It is necessary to find or design a case that will fit all the hardware mentioned above.
Conduct Extensive Load/Stress Test
To ensure everything works together, it is necessary to plan an intensive stress test to ensure there is no overheating or component malfunction. The test should be able to load all the system components like CPU, Memory, Hard disk(s), Network, and Wi-Fi (if necessary), etc.
Establish Support Policy
The NVR is going to be supplied to its end users, and they will definitely require some kind of technical support. The support team of the VMS vendor cannot render such services to the end users, thus, a policy for providing such support should be developed, like an online support desk, a community forum, or the like.
When the support team of the NVR vendor is sure that the particular issue is not related to the specifics of the NVR itself, but rather is a problem in the VMS, it may request the support from the VMS vendor according to the above-mentioned ARM Support Policy , and then use the outcome of this support case to satisfy the support request from an end user.
Questions
If you have any questions related to this topic or you want to share your experience with other community members or our team, please visit and engage in our support community or reach out to your local reseller.