How to shrink C drive with Windows 10 Extend Volume function
Updated on: November 16, 2019
This article introduces how to shrink C drive with Windows 10 Shrink Volume function in Disk Management, and better method to shrink partition with partition editor software.
When installing Windows 10 to a new hard disk, if you forgot to create volumes, all disk space will be used by C drive except the small reserved partitions. As we know, it is not a good idea to use such big C drive and put everything into it. Instead, you’d better create separate volumes for applications and data. Then is there a way to decrease C drive and create more volumes without reinstalling? Yes, in this article I’ll introduce how to shrink C drive volume with Windows native and third party tools.
Shrink volume in Windows 10 Disk Management
The same with Windows 7, Windows 10 Disk Management tool has Shrink Volume function, which can decrease system and data volumes without losing data and on the fly. However, you can’t shrink C drive in some situations.
Steps to shrink C drive with Windows 10 DM:
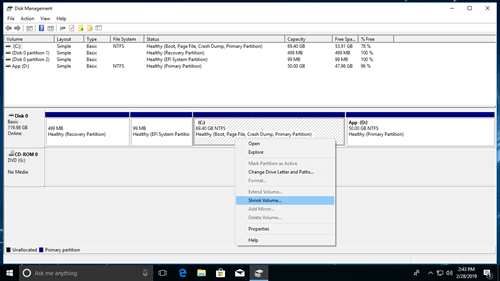
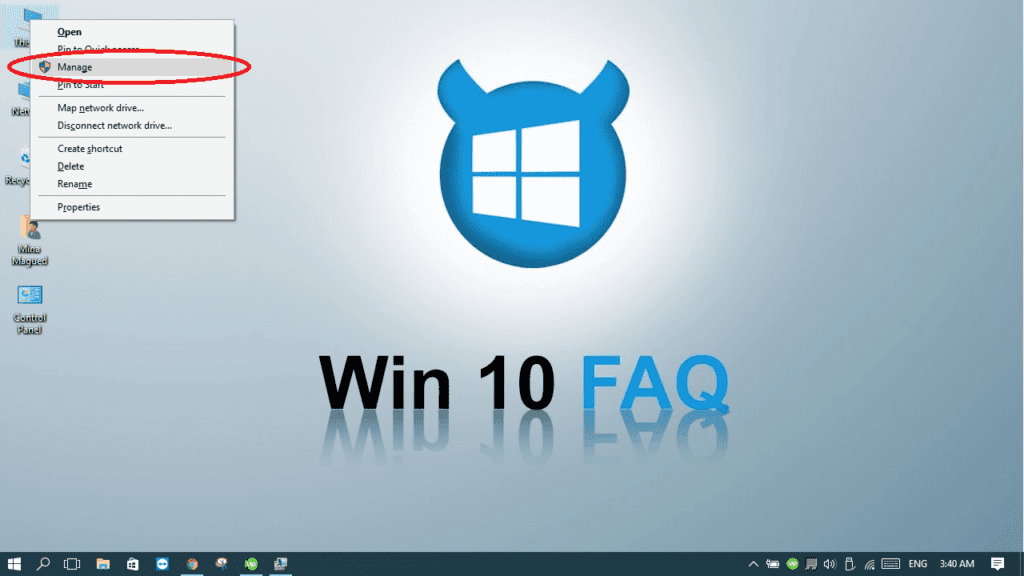
Step 1: Press Windows and X on the keyboard and select Disk Management from the list.
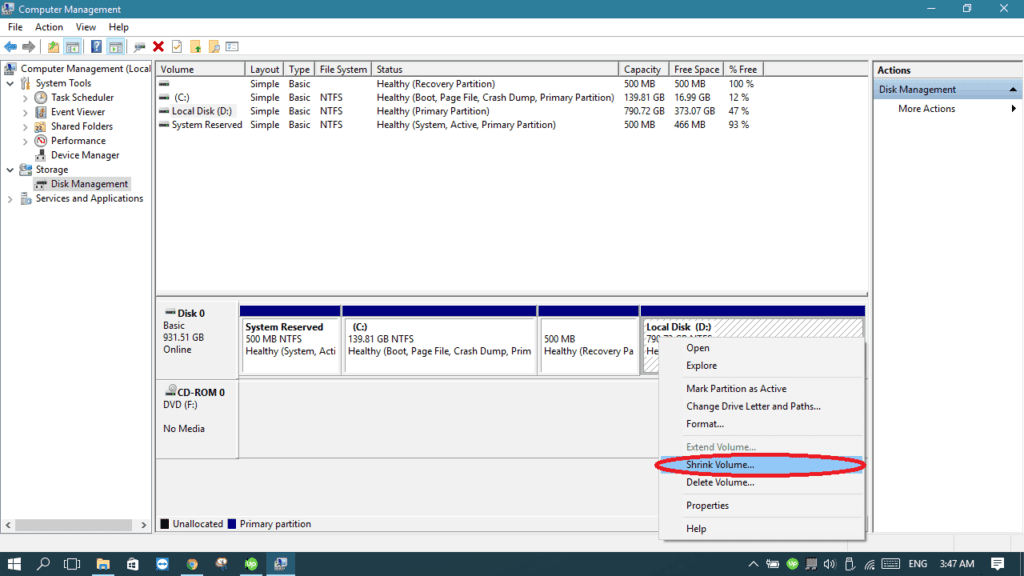
Step 2: Right click C drive and select Shrink Volume
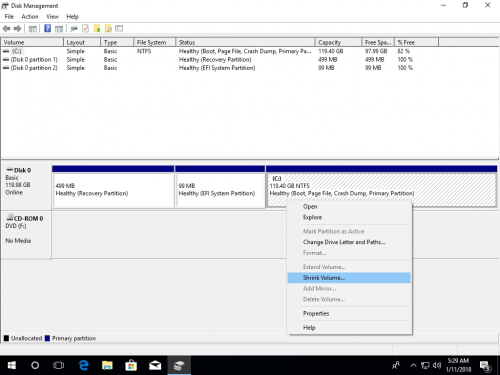
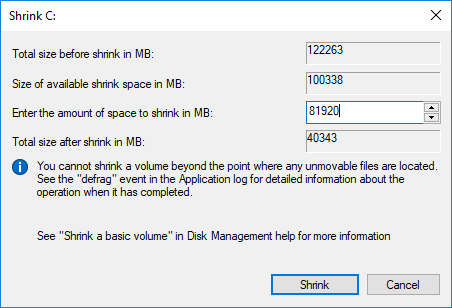
Step 3: Enter the amount of space and then click Shrink to execute.
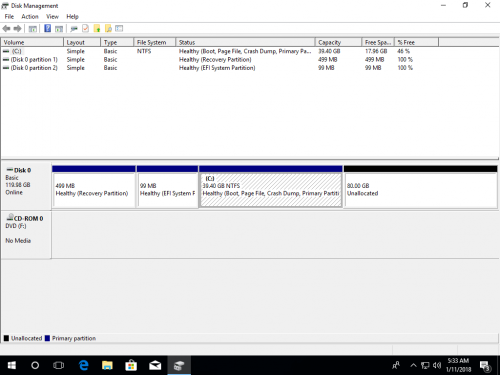
In a short time, C drive is shrank. Windows 10 Shrink Volume function can only make Unallocated space on the right side.
Cannot shrink C drive in some situation
Disk Management is easy to use, but you may encounter error when shrinking C drive volume.
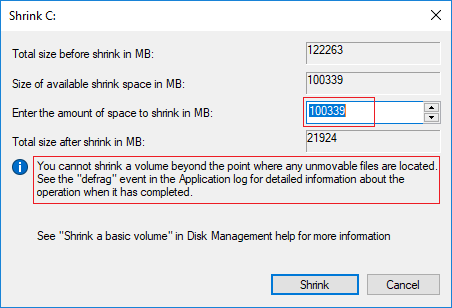
In the Shrink window, Disk Management give you maximum available space by default. Generally speaking, you’d better enter the amount manually according to your C drive size. (1024MB=1GB)
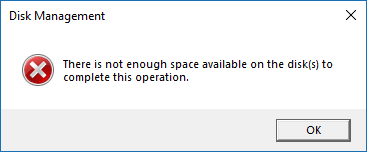
When I testing, I did click Shrink with default maximum amount of space. After clicking Shrink, I got the error message: «There is not enough space available on the disk(s) to complete this operation.»
Another common issue: there is plenty of free space in C drive but Disk Management only allow shrinking with little space.
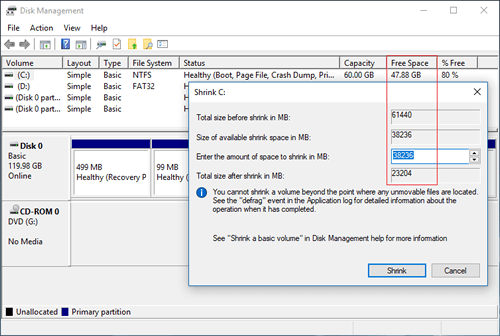
As you see in my test computer, there is 47.88GB unused space in C drive, but Disk Management give me maximum 38226 (37.33GB).
Have you noticed the tip on the bottom of the Shrink Window: «You cannot shrink a volume beyond the point where any unmovable files are located.«
For example: C drive is made up of 4 blocks. If the unmovable files are located in block 3, you cannot shrink C drive to block 2 or 1 even though there is free space.
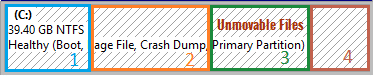
This is the reason why I got error message when using the default maximum space. «Unmovable» files include Paging file and the very large file such as hibernation, system backup files. If there are such files in C drive, you can only shrink a little space.
Shrink volume with partition editor
Comparing to Windows Disk Management, NIUBI Partition Editor has many advantages such as:
- Both NTFS and FAT32 partitions can be shrank.
- Unallocated space can be generated on either side.
- It can move the «unmovable» files, so it can shrink volume to minimum size if you want.
To shrink C drive volume in Windows 10, you just need to click and drag on the disk map. Besides shrinking partition, it also helps you extend, merge, copy, convert, defrag, wipe, hide partition, etc.
How to shrink partition in Windows 10 with NIUBI:
Download NIUBI Partition Editor, right click the partition that you want to shrink and select «Resize/Move Volume».
Option 1: If you drag left border towards right in the pop-up window,
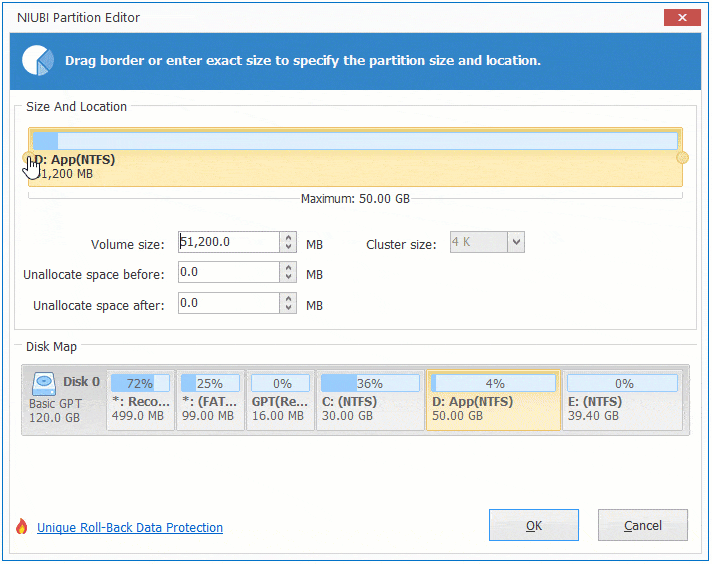
Unallocated space will be produced on the left side.
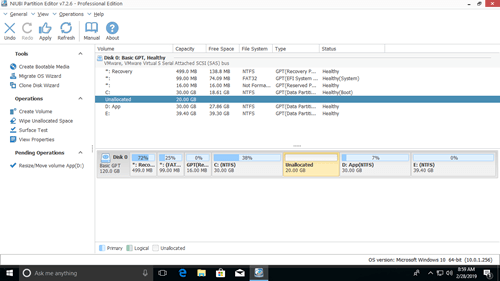
Option 2: If you drag right border towards left in the pop-up window,
Unallocated space will be produced on the right side.
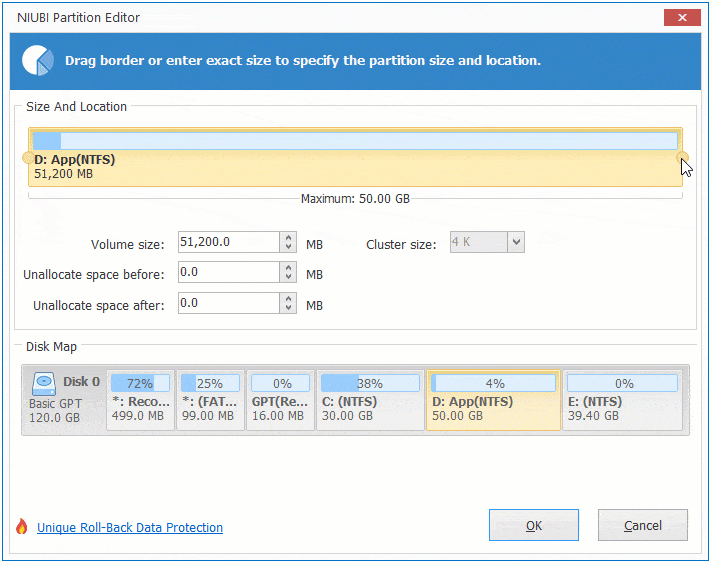
This software work in virtual mode to avoid mistake, to shrink physical disk partition, click Apply on top left to execute.
In Summary
To shrink partition in Windows 10 (either system or data partitions), the build-in Disk Management tool is one of the choices, but it has limitations including:
- Only support NTFS partition, FAT32 and other types of partitions can’t be shrank.
- It can only make Unallocated space on the right side.
- Can only shrink little space if there are some unmovable files.
- Cannot shrink even 1MB is some special situations.
NIUBI Partition Editor is better choice. Besides shrinking and extending disk drive, it can do many other operations.
Win10 FAQ
Windows 10 Guides and Help
How to shrink a partition in Windows 10

We are a participant in the Amazon Services LLC Associates Program, an affiliate advertising program designed to provide a means for us to earn fees by linking to Amazon.com and affiliated sites.
Warning: It’s always better to backup your important data before resizing your partitions.
I- Why would I ever need to resize a drive?
Well, I’ll start with our famous problem: Drive C: doesn’t have enough space for Windows updates, programs, downloads …etc. Therefore, we need to extend its volume. Another reason could be that you want to install another operating system, like Linux, and need to make room for it on a different partition. There are plenty of other reasons and here we are going to learn how to shrink/extend our partitions.
II- How to resize a partition in Windows 10?
There are two methods: Windows 10, like many other versions of Windows, has a built-in Disk Manager where we can perform plenty of actions. Some people find that one hard and prefer to use other programs with better user-interfaces. We’ll discuss both.
First method: Windows 10 built-in Disk Manager
- Right-click on the “This PC” (which is my computer) and choose Manage.

- From the list on the left, expand the Storage list and choose Disk Management.
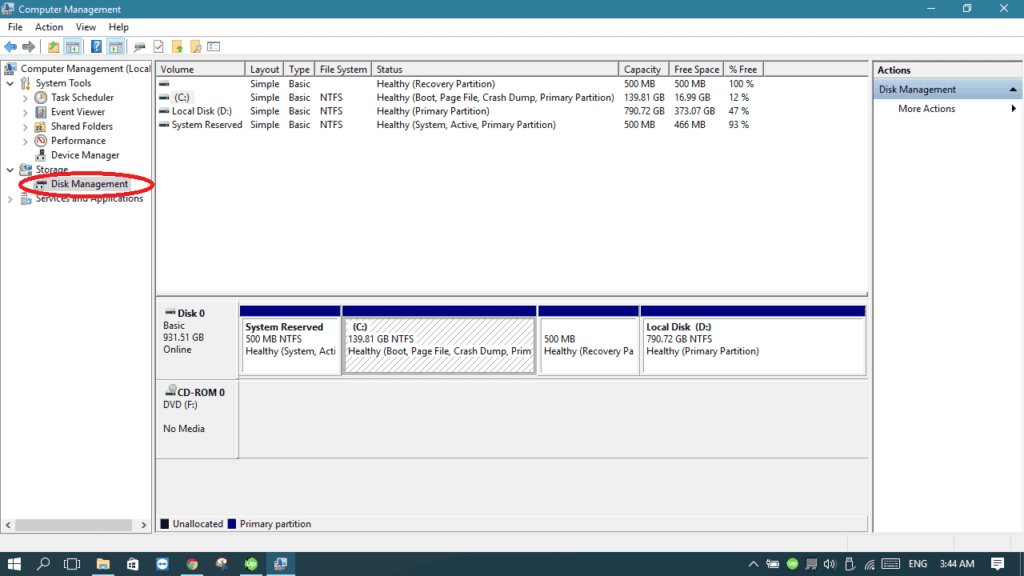
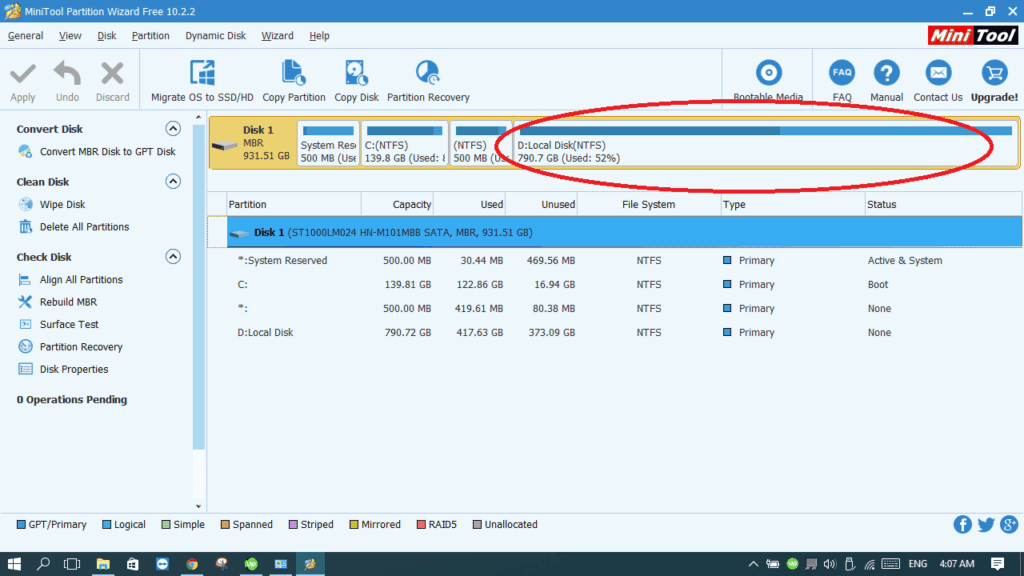
- Now you can see all the partitions (drives) your hard disk has. Let’s say I’ll need to shrink Local Disk (D:) by taking 10 GBs from it. To do that, right-click on Local Disk (D:) and choose Shrink Volume…
- After a few seconds, I will have to input the space I want to take from that drive. Remember, 1 GB = 1024 MBs, which means if I want to take 10 GBs from this drive, I have to input 10240 MBs. Click Shrink.
- As you see, I have now an unallocated space of 10 GBs, and Local Disk (D:) went from 790 GBs to 780 GBs. The unallocated space can be used to extend another partition later.
- If you want to extend another Partition like Drive C using the unallocated space, it’s highly recommended to use a tool like in method 2 because it doesn’t usually work in Windows 10 Disk Manager. They only allow to extend the drive you’ve already taken the space from. I mean if you took 10 GBs from Drive D then you can only extend Drive D another time with the unallocated space, which is useless.


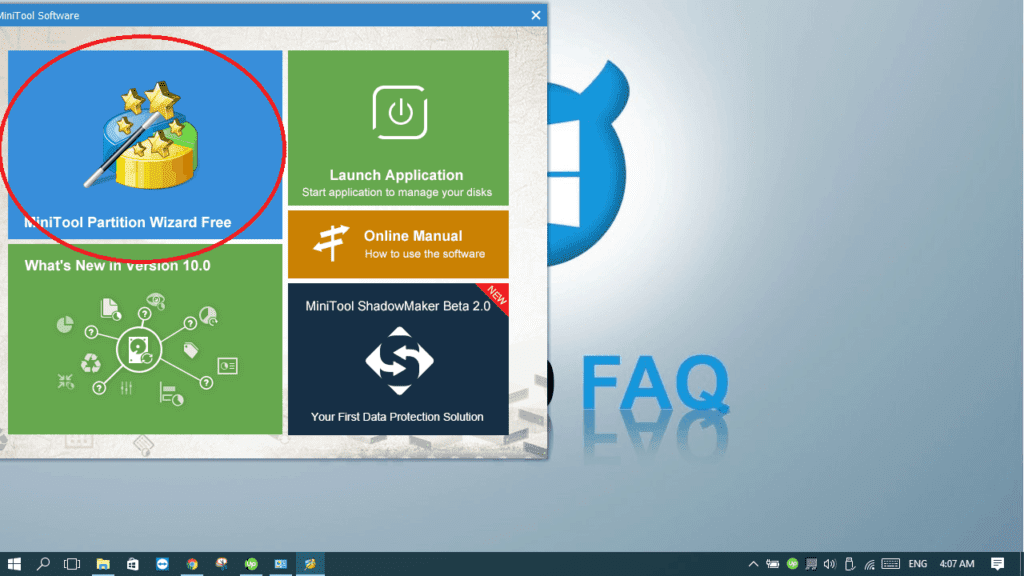
Second Method: use a resizing tool like MiniTool Partition Wizard Free Edition:
- Go to https://www.partitionwizard.com/free-partition-manager.html and press Download. It’s fully compatible with Windows 10 and the free version can do everything we need.
- After the setup file is downloaded, open it and proceed the installation process and launch it once it’s finished.
- Click on the MiniTool Partition Wizard Free button to open the program.
- As you see, we can see all the partitions of the hard drive. Let’s take 10 GBs away from Local Disk (D:).
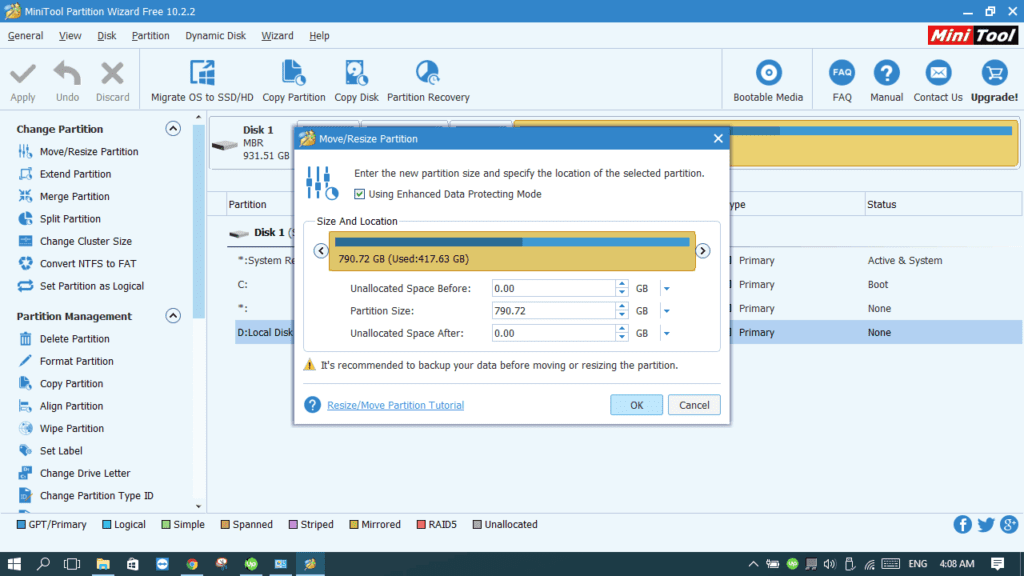
- Right-click on Local Disk (D:) and choose Move/Resize.
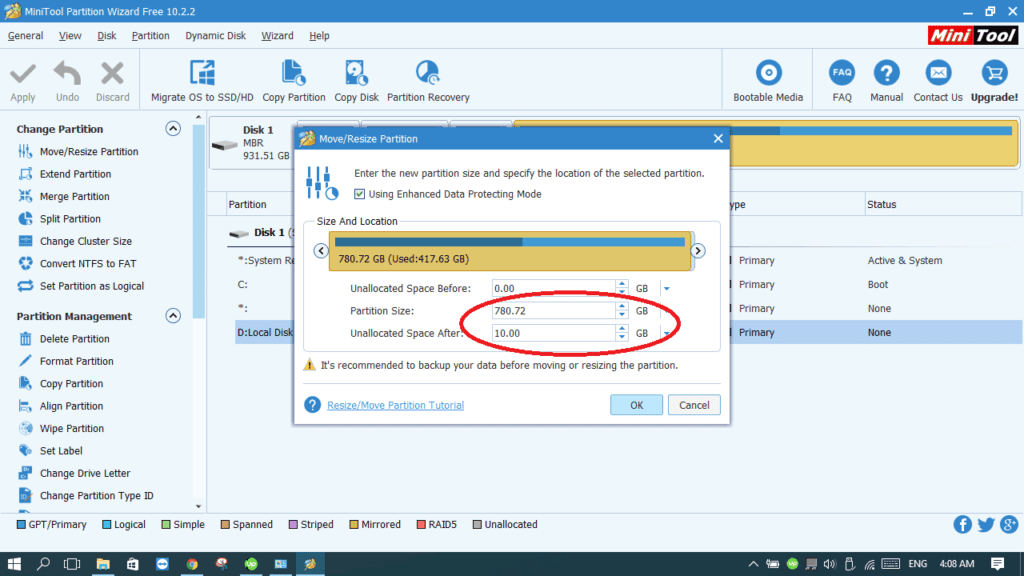
- Now, we can edit the Partition size by making it from 790 GBs to 780 GBs. Check the difference.
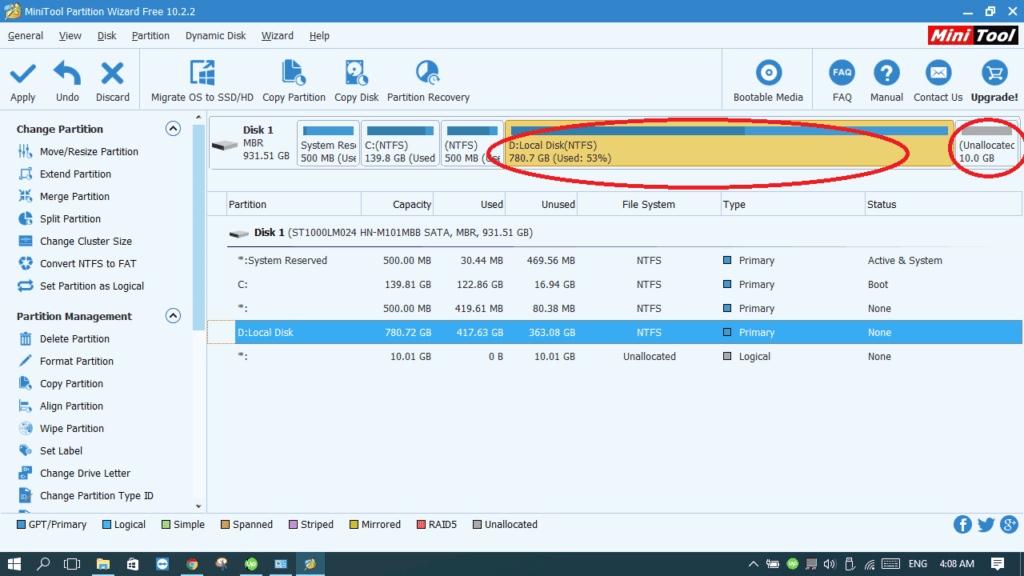
- Click OK. Now you can see that Local Disk (D:) is shrunk to 780 GBs and there’s an unallocated space of 10 GBs standing alone.
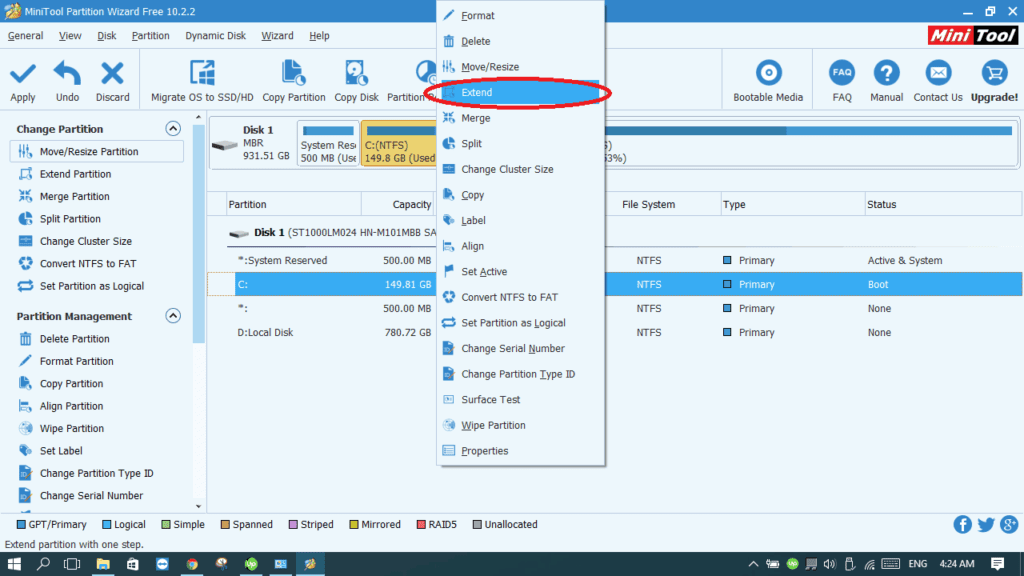
- Go to step 11 if you’ve done your job. If you need to use the unallocated space to extend another drive, like Drive C for example, right-click on Drive C and choose Extend.
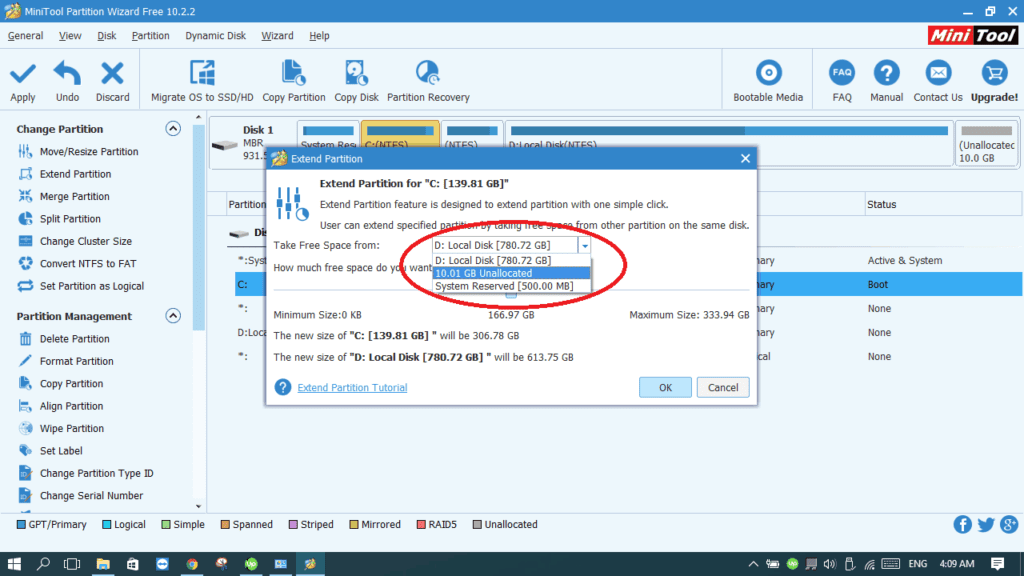
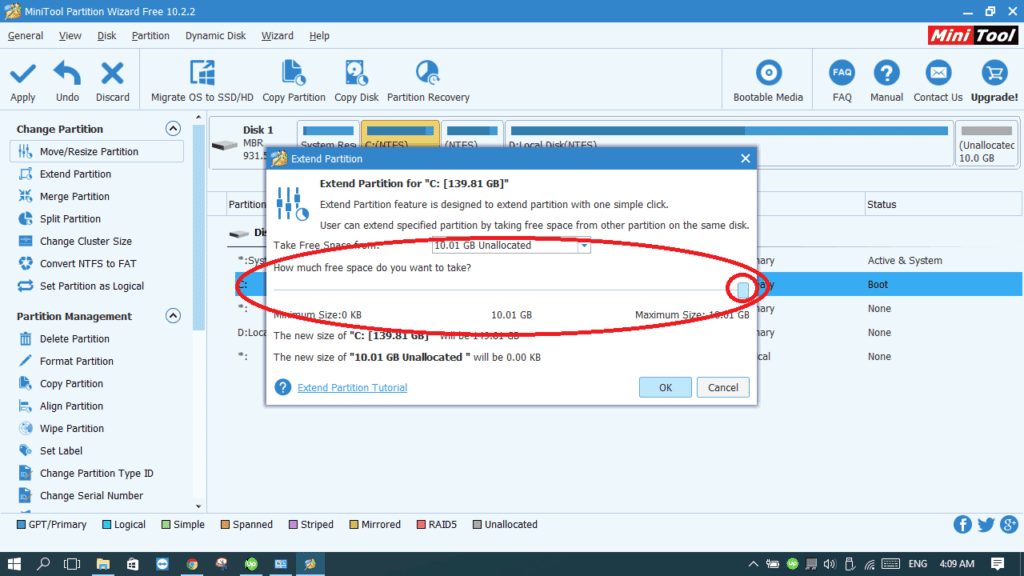
- From the list, choose the unallocated space we will be taking space from.
- Use the scroll to determine how much space you will take from the unallocated space to extend the desired Partition and then click Ok.
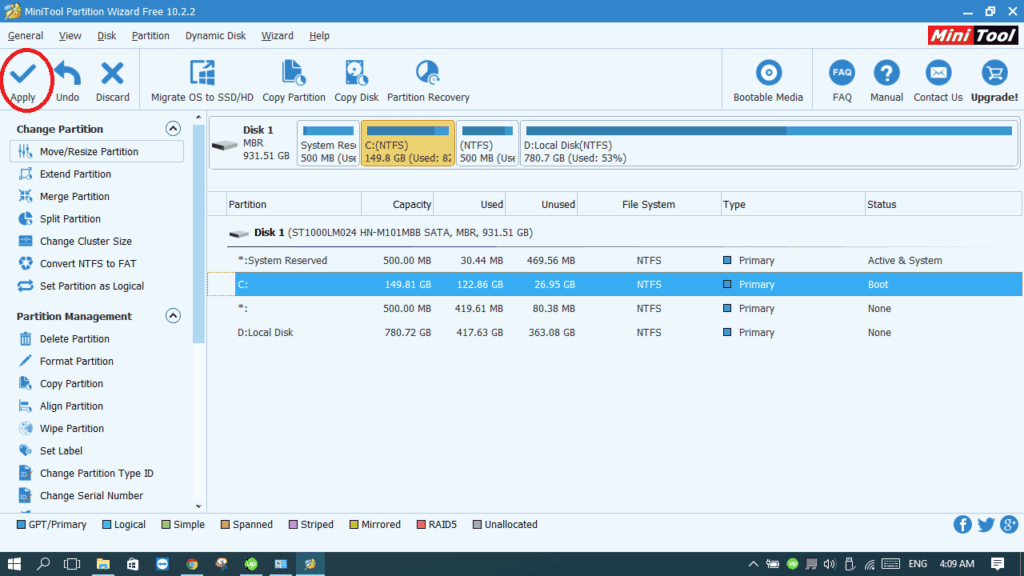
- Now make sure everything is okay. Finally, click Apply.
- Before pressing Yes, make sure to close any other applications with unsaved data. Now click Yes and wait until the process finishes. It takes time depending on how much space you are transferring. Once finished, a restart is preferred and you can enjoy your Partitions with their new sizes.


Always remember, as I mentioned above, to backup all your important data. If the process gets interrupted for any reason, you may lose valuable data. Good Luck!
Submit a Comment Cancel reply
This site uses Akismet to reduce spam. Learn how your comment data is processed.
Сжатие базового тома Shrink a basic volume
Относится к: Windows 10, Windows 8.1, Windows Server (Semi-Annual Channel), Windows Server 2019, Windows Server 2016, Windows Server 2012 R2, Windows Server 2012 Applies To: Windows 10, Windows 8.1, Windows Server (Semi-Annual Channel), Windows Server 2019, Windows Server 2016, Windows Server 2012 R2, Windows Server 2012
Объем существующих основных разделов и логических дисков можно уменьшить, выполнив для них операцию сжатия, перемещающую файлы в соседнюю, нефрагментированную область того же диска. You can decrease the space used by primary partitions and logical drives by shrinking them into adjacent, contiguous space on the same disk. Например, если возникает потребность в дополнительном разделе, но дополнительных дисков нет, можно сжать существующий раздел со стороны конца тома, чтобы создать незанятое пространство, которое можно использовать для нового раздела. For example, if you discover that you need an additional partition but do not have additional disks, you can shrink the existing partition from the end of the volume to create new unallocated space that can then be used for a new partition. Операция сжатия может быть заблокирована наличием определенных типов файлов. The shrink operation can be blocked by the presence of certain file types. Дополнительные сведения см. в разделе Дополнительные рекомендации. For more information, see Additional considerations
При сжатии раздела все обычные файлы автоматически перемещаются на диск для формирования нового незанятого пространства. When you shrink a partition, any ordinary files are automatically relocated on the disk to create the new unallocated space. Для сжатия тома повторно форматировать диск не нужно. There is no need to reformat the disk to shrink the partition.
Если раздел является необработанным (то есть не отформатирован в какой-либо файловой системе) и содержит данные (например, файл базы данных), сжатие раздела может привести к уничтожению этих данных. If the partition is a raw partition (that is, one without a file system) that contains data (such as a database file), shrinking the partition might destroy the data.
Сжатие базового тома Shrinking a basic volume
Для выполнения следующих шагов необходимо как минимум состоять в группе Операторы архива или Администраторы. You must be a member of the Backup Operators or Administrators group, at minimum, to complete these steps.
Процедура сжатия базового тома с помощью интерфейса Windows To shrink a basic volume using the Windows interface
В диспетчере дисков щелкните правой кнопкой мыши том, который требуется сжать. In Disk Manager, right-click the basic volume you want to shrink.
Выберите пункт Сжать том. Click Shrink Volume.
Следуйте инструкциям на экране. Follow the on-screen instructions.
Сжать можно только те базовые тома, у которых нет файловой системы или которые отформатированы в файловой системе NTFS. You can only shrink basic volumes that have no file system or that use the NTFS file system.
Процедура сжатия базового тома с помощью командной строки To shrink a basic volume using a command line
Откройте командную строку и введите: diskpart . Open a command prompt and type diskpart .
В командной строке DISKPART введите list volume . At the DISKPART prompt, type list volume . Запомните номер простого тома, который требуется сжать. Note the number of the simple volume you want to shrink.
В командной строке DISKPART введите select volume . At the DISKPART prompt, type select volume . Выбирает простой том volumenumber, который требуется сжать. Selects the simple volume volumenumber you want to shrink.
В командной строке DISKPART введите shrink [desired= ] [minimum= ] . At the DISKPART prompt, type shrink [desired= ] [minimum= ] . Сжимает выбранный том до размера desiredsize в мегабайтах (МБ), если возможно, или до размера minimumsize, если размер desiredsize слишком велик. Shrinks the selected volume to desiredsize in megabytes (MB) if possible, or to minimumsize if desiredsize is too large.
| Применение Value | Описание Description |
|---|---|
| list volumelist volume | Отображает список базовых и динамических томов на всех дисках. Displays a list of basic and dynamic volumes on all disks. |
| select volumeselect volume | Выбирает указанный том, где volumenumber — номер тома, и переводит на него фокус. Selects the specified volume, where volumenumber is the volume number, and gives it focus. Если том не указан, команда select отображает текущий том с фокусом. If no volume is specified, the select command lists the current volume with focus. Для указания тома можно использовать номер, букву диска или путь к точке подключения. You can specify the volume by number, drive letter, or mount point path. При выборе тома на базовом диске фокус переводится на соответствующий раздел. On a basic disk, selecting a volume also gives the corresponding partition focus. |
| shrinkshrink | Сжимает том с фокусом для создания нераспределенного пространства. Shrinks the volume with focus to create unallocated space. Все данные остаются в сохранности. No data loss occurs. Если раздел содержит неперемещаемые файлы (например, файл подкачки или область хранения теневых копий), том сожмется до того места, в котором расположены эти файлы. If the partition includes unmovable files (such as the page file or the shadow copy storage area), the volume will shrink to the point where the unmovable files are located. |
| desired=desiredsizedesired=desiredsize | Объем пространства в мегабайтах, который требуется восстановить в текущем разделе. The amount of space, in megabytes, to recover to the current partition. |
| minimum=minimumsizeminimum=minimumsize | Минимальный объем пространства в мегабайтах, который требуется восстановить в текущем разделе. The minimum amount of space, in megabytes, to recover to the current partition. Если не указать желаемый или минимальный размеры, команда освободит максимально возможное пространство. If you do not specify a desired or minimum size, the command will reclaim the maximum amount of space possible. |
Дополнительные сведения Additional considerations
При сжатии раздела определенные файлы (например, файл подкачки или область хранения теневых копий) невозможно переместить автоматически, а также невозможно сократить распределенное пространство дальше того места, в котором расположены неперемещаемые файлы. When you shrink a partition, certain files (for example, the paging file or the shadow copy storage area) cannot be automatically relocated, and you cannot decrease the allocated space beyond the point where the unmovable files are located. Если операция сжатия завершается сбоем, проверьте журнал приложений на наличие события 259, которое определит неперемещаемый файл. If the shrink operation fails, check the Application Log for Event 259, which will identify the unmovable file. Если вам известно, какие кластеры, связанные с файлом, мешают операции сжатия, можно использовать команду fsutil в командной строке (введите fsutil volume querycluster /? If you know the cluster(s) associated with the file that is preventing the shrink operation, you can also use the fsutil command at a command prompt (type fsutil volume querycluster /? для получения справки об использовании). for usage). Если указать параметр querycluster, в выходных данных команды будет указан неперемещаемый файл, мешающий выполнить операцию сжатия. When you provide the querycluster parameter, the command output will identify the unmovable file that is preventing the shrink operation from succeeding. В некоторых случаях этот файл можно переместить временно. In some cases, you can relocate the file temporarily. Например, если требуется еще сильнее сжать раздел, можно использовать панель управления, чтобы переместить файл подкачки или сохраненные теневые копии на другой диск, удалить сохраненные теневые копии, сжать том, а затем переместить файл подкачки обратно на диск. For example, if you need to shrink the partition further, you can use Control Panel to move the paging file or stored shadow copies to another disk, delete the stored shadow copies, shrink the volume, and then move the paging file back to the disk. Если число поврежденных кластеров, обнаруженных при динамическом сопоставлении поврежденных кластеров, слишком велико, сжать раздел не удастся. If the number of bad clusters detected by dynamic bad-cluster remapping is too high, you cannot shrink the partition. В этом случае следует переместить данные и заменить диск. If this occurs, you should consider moving the data and replacing the disk.
Не используйте копию уровня блоков для переноса данных. Do not use a block-level copy to transfer the data. При этом будет также скопирована таблица поверженных секторов и новый диск будет считать эти секторы поврежденными, хотя на самом деле они будут исправными. This will also copy the bad sector table and the new disk will treat the same sectors as bad even though they are normal.
Можно сжать основные разделы и логические диски в необработанных разделах (не отформатированных в какой-либо файловой системе) или разделах, отформатированных в файловой системе NTFS. You can shrink primary partitions and logical drives on raw partitions (those without a file system) or partitions using the NTFS file system.