Enable or Disable Windows Features Using DISM
The Deployment Image Servicing and Management (DISM) tool is a command-line tool that is used to modify WindowsВ® images. You can use DISM to enable or disable Windows features directly from the command prompt, or by applying an answer file to the image. You can enable or disable Windows features offline on a WIM or VHD file, or online on a running operating system.
To mount an offline image for servicing
Open a command prompt with administrator privileges.
To use DISM from an installation of the Windows Assessment and Deployment Kit (WindowsВ ADK), locate the WindowsВ ADK servicing folder and navigate to this directory. By default, DISM is installed at C:\Program Files (x86)\Windows Kits\10.0\Assessment and Deployment Kit\Deployment Tools\ in WindowsВ 10, C:\Program Files (x86)\Windows Kits\8.1\Assessment and Deployment Kit\Deployment Tools\ in WindowsВ 8.1and C:\Program Files (x86)\Windows Kits\8.0\Assessment and Deployment Kit\Deployment Tools\ in WindowsВ 8.
DISM is available in:
- WindowsВ 10
- WindowsВ 8.1
- WindowsВ 8
- Windows ServerВ 2016 Technical Preview
- WindowsВ Server 2012 R2
- Windows ServerВ 2012
- Windows Preinstallation Environment (WinPE) for WindowsВ 10
- WinPE 5.0
- WinPEВ 4.0
You can install DISM and other deployment and imaging tools, such as Windows System Image Manager (WindowsВ SIM), on another supported operating system from the WindowsВ ADK. For more information, see DISM Supported Platforms.
Use the /Get-ImageInfo option to retrieve the name or index number for the image that you want to modify. An index or name value is required for most operations that specify an image file.
For example, at the command prompt type:
Mount the offline Windows image. For example, type:
To find available Windows features in an image
List all of the features available in the operating system. For example, type:
To service an offline image, specify the location of the mounted image directory. For example, type:
You can use >featurelist.txt to redirect the output of the command to a text file that is named featurelist.
Review the list of features to find the feature that you want to enable, disable, remove, or restore.
Use /Get-FeatureInfo to list information about the specific feature you are interested in. For example, type:
To enable Windows features
Enable a specific feature in the image. You can use the /All argument to enable all of the parent features in the same command. For example, type:
To service an offline image, specify the location of the mounted image directory. For example, type:
Optional: Get the status of the feature you have enabled. For example, type:
If the status is Enble Pending, you must boot the image in order to enable the feature entirely.
To restore removed Windows features
Enable a specific feature in the image. If you do not specify a source, DISM will look in the default location specified by group policy for the required files needed to enable the feature For more information, see Configure a Windows Repair Source.
If the files are not found in the default location, DISM will contact Windows Update (WU) for the required files. You can use the /LimitAccess argument to prevent DISM from contacting WU.
If you specify multiple /Source arguments, the files are gathered from the first location where they are found and the rest of the locations are ignored.
To service an offline image, specify the location of the mounted image directory. For example, type:
Optional: Get the status of the feature you have enabled. For example, type:
If the status is EnablePending, you must boot the image in order to enable the feature entirely.
To disable Windows features
Disable a specific feature in the image. For example, type:
To service an offline image, specify the location of the mounted image directory. For example, type:
Optional: Use DISM /GetFeatureInfo to get the status of the feature you have disabled. For example, type:
If the status is DisablePending, you must boot the image in order to disable the feature entirely.
To remove Windows features for on-demand installation
Remove a specific feature in the image without removing the feature’s manifest from the image. This option can only be used when servicing WindowsВ 10, WindowsВ 8.1, WindowsВ 8, Windows ServerВ 2016 Technical Preview, WindowsВ Server 2012 R2, or Windows ServerВ 2012. For more information, see Configure a Windows Repair Source.
To service an offline image, specify the location of the mounted image directory. For example, type:
Optional: Use DISM /GetFeatureInfo to get the status of the feature you have disabled. For example, type:
The status is Disabled. Beginning with Windows 10, the payload is not removed from Windows client SKUs in order to support push-button reset. The payload is removed from Windows Server SKUs.
To enable or disable Windows features by using DISM and an answer file
In WindowsВ SIM, open an existing catalog by clicking Select a Windows Image on the File menu and specifying the catalog file type (.clg) in the drop-down list, or create a new catalog by clicking Create Catalog on the Tools menu.
Expand the catalog in the Windows Image pane, and then expand Packages.
Expand Foundation, and right-click Microsoft-Windows-Foundation-Package.
Click Add to Answer File.
Click Enabled or Disabled next to the features that you intend to enable or disable. Click the arrow to select the opposite choice.
You might have to expand an item to see all its children. You must enable the parent if any one of its children are enabled.
NoteВ В You can’t restore or remove a Windows feature for features on demand with an unattended answer file.
Click Tools on the main menu, and then click Validate Answer File.
Correct any errors that appear in the Messages pane, and save the answer file.
At the command prompt, type the following command to apply the unattended answer file to the image.
To service an offline image, specify the location of the mounted image directory. For example, type:
To commit changes on an offline image
Commit the changes and unmount the image. For example, type:
Включение и отключение компонентов Windows 7

Операции с компонентами Windows 7
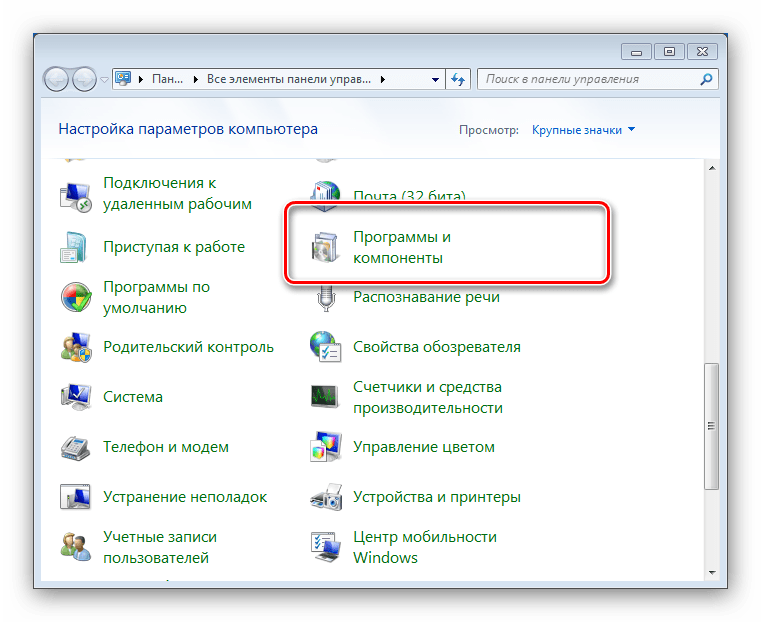
Такого рода действия, как и иные манипуляции, связанные с настройкой ОС, совершаются через «Панель управления». Процедура выглядит следующим образом:
- Вызовите «Пуск» и щёлкните ЛКМ по варианту «Панель управления».

Для доступа к управлению надстройками ОС найдите и перейдите в пункт «Программы и компоненты».
Читайте также: Как получить права администратора в Windows 7
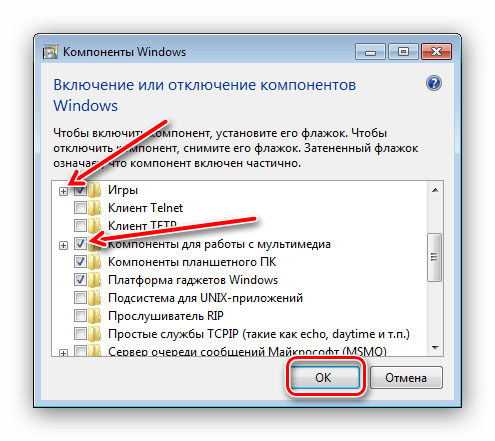
На этом руководство по манипуляциям с системными компонентами окончено.
Вместо списка компонентов вижу белый экран
Достаточно частая проблема у пользователей Windows 7, а также Vista – окно управления компонентами выглядит пустым, а список функций не отображается. Может также отображаться сообщение «Пожалуйста, подождите», когда происходит попытка составления списка, но затем и оно исчезает. Самое простое, но и самое ненадёжное решение неполадки – средство проверки системных файлов.
Следующий вариант – ввод специальной команды в «Командной строке».
- Запустите «Командную строку» с правами администратора.

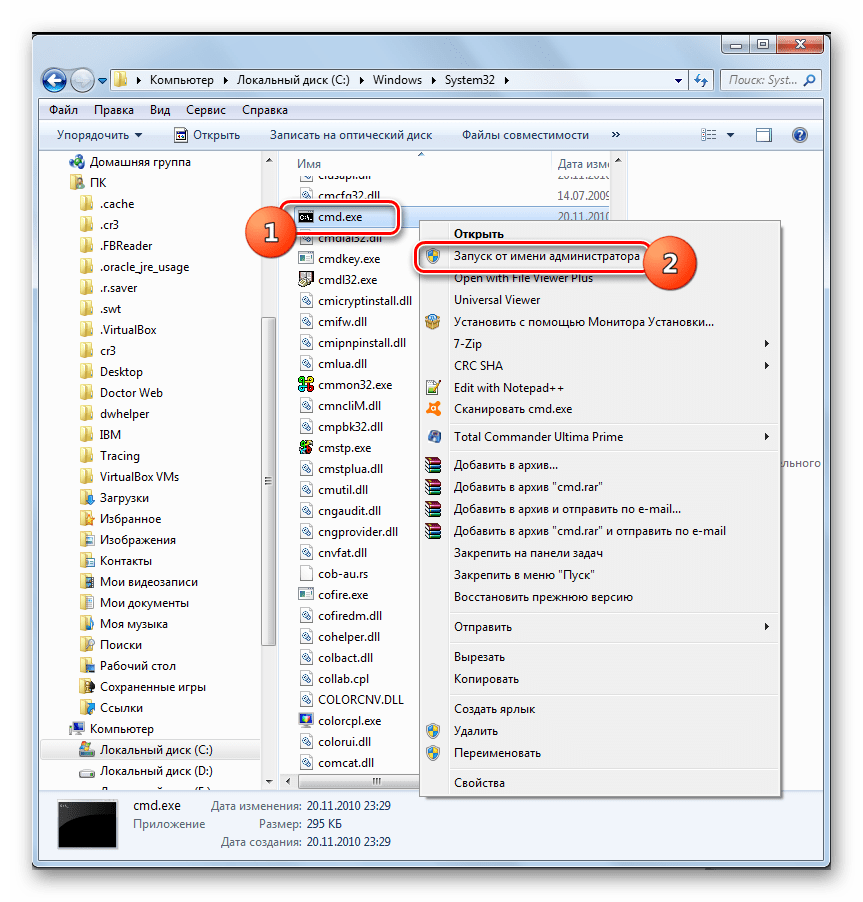
Подробнее: Как запустить «Командную строку» в Windows 7
Напишите этот оператор и подтвердите ввод нажатием на Enter:
reg delete HKLM\COMPONENTS /v StoreDirty
Однако и этот вариант не всегда срабатывает. Самый радикальный и самый надёжный способ – задействование специальной утилиты System Update Readiness Tool, которая способна либо самостоятельно устранить неполадку, либо указать на сбойный компонент. Записи, связанные с последней категорией, необходимо удалить из реестра вручную, в чём и заключается решение проблемы.
Загрузить System Update Readiness Tool для Windows 7 64-бит/32-бит
- По окончании загрузки файла закройте все запущенные программы и запустите полученный инсталлятор. Для пользователя это выглядит как ручная установка обновлений, но на самом деле вместо инсталляции происходит проверка и исправление любых сбоев, которые утилита находит в системе. Нажмите «Да» для начала процедуры.
Процедура займет некоторое время, от 15 минут до нескольких часов, поэтому будьте терпеливы и позвольте ПО закончить свою работу.
Как только Windows загрузится, попробуйте снова вызвать менеджер управления компонентами и посмотреть, загружается ли список в окно или нет. Если проблема не решена, продолжайте следовать руководству.
Дальнейшие шаги, возможно, будут несколько сложными, потому что для каждого отдельного случая в файле журнала появляются разные результаты. Обращать внимание необходимо на раздел «Checking Package Manifests and Catalogs» в файле CheckSUR.log. Если есть ошибки, вы увидите строку, начинающуюся с «f», за которой идёт код ошибки и путь. Если вы видите «fix» на следующей строке, то это означает, что инструменту удалось исправить эту конкретную ошибку. Если сообщения об исправлении нет, придётся действовать самостоятельно.
Теперь вам нужно вручную удалить связанные разделы реестра в соответствии с ошибками, которые помечены как неисправленные в логе утилиты восстановления. Запустите редактор реестра – проще всего это сделать через окошко «Выполнить»: нажмите сочетание Win + R, напишите в строке regedit и кликните «ОК».
Перейдите по этому пути:
HKEY_LOCAL_MACHINE\SOFTWARE\Microsoft\Windows\CurrentVersion\Component Based Servicing\Packages
Дальнейшие действия зависят от того, какие именно пакеты отмечены в CheckSUR.log – надо найти директории в реестре с именами этих пакетов и удалить через контекстное меню.
После удаления всех поврежденных ключей реестра список компонентов Windows должен отображаться. Кроме того, System Update Readiness Tool может также исправить некоторые другие неполадки, о которых вы можете и не подозревать.
Мы познакомили вас с методом включения и отключения компонентов Виндовс 7, а также рассказали, что делать, если перечень компонентов не отображается. Надеемся, что это руководство стало для вас полезным.
Включение параметра «Блокировка страниц в памяти» (Windows) Enable the Lock Pages in Memory Option (Windows)
Применимо к: Applies to: SQL Server SQL Server (все поддерживаемые версии) SQL Server SQL Server (all supported versions) Применимо к: Applies to: SQL Server SQL Server (все поддерживаемые версии) SQL Server SQL Server (all supported versions)
Эта политика Windows определяет, какие учетные записи могут использовать процесс для сохранения данных в физической памяти, чтобы система не отправляла страницы данных в виртуальную память на диске. This Windows policy determines which accounts can use a process to keep data in physical memory, preventing the system from paging the data to virtual memory on disk.
Блокировка страниц в памяти может повысить производительность, если требуется подкачка памяти на диск. Locking pages in memory may boost performance when paging memory to disk is expected.
Для включения этой политики для учетной записи, используемой SQL Server SQL Server , воспользуйтесь средством «Групповая политика Windows» (gpedit.msc). Use the Windows Group Policy tool (gpedit.msc) to enable this policy for the account used by SQL Server SQL Server . Чтобы изменить эту политику, необходимо быть системным администратором. You must be a system administrator to change this policy.
Включение параметра «Блокировка страниц в памяти» To enable the lock pages in memory option
В меню Пуск выберите команду Выполнить. On the Start menu, click Run. В окне Открыть введите gpedit.msc. In the Open box, type gpedit.msc.
В консоли Редактор локальных групповых политик разверните узел Конфигурация компьютера, затем узел Конфигурация Windows. On the Local Group Policy Editor console, expand Computer Configuration, and then expand Windows Settings.
Разверните узлы Настройки безопасностии Локальные политики. Expand Security Settings, and then expand Local Policies.
Выберите папку Назначение прав пользователя . Select the User Rights Assignment folder.
Политики будут показаны на панели подробностей. The policies will be displayed in the details pane.
На этой панели дважды щелкните параметр Блокировка страниц в памяти. In the pane, double-click Lock pages in memory.
В диалоговом окне Параметр локальной безопасности — блокировка страниц в памяти щелкните Добавить пользователя или группу. In the Local Security Setting — Lock pages in memory dialog box, click Add User or Group.
В диалоговом окне Выбор пользователей, учетных записей служб или групп выберите учетную запись службы SQL Server. In the Select Users, Service Accounts, or Groups dialog box, select the SQL Server Service account.
Чтобы этот параметр вступил в силу, перезапустите службу SQL Server. Restart the SQL Server Service for this setting to take effect.