Настройка OpenVPN сервера на Mikrotik
Роутеры Mikrotik позволяют поднять различные сервер VPN. В данной инструкции мы рассмотрим настройку OpenVPN. Мы выполним:
- Генерирование сертификатов.
- Настройку сервера OpenVPN.
- Тестовое подключение к серверу.
Подключение к Mikrotik осуществим при помощи Winbox, однако ход настройки через веб-интерфейс аналогичен.
Настройка времени на Mikrotik
Для правильной работы роутера с сертификатами, необходима корректно настроенное время. Переходим в System — Clock:

Проверяем правильность установки времени и часового пояса.
Создаем сертификаты для OpenVPN
Сертификаты мы можем создать несколькими способами. Разберем 2 — на роутере Mikrotik и с помощью утилиты на компьютере с Windows.
Способ 1. На Mikrotik’е.
Проще и быстрее всего сгенерировать сертификаты на самом роутере.
1. Открываем терминал и создаем последовательность для центра сертификации:
> /certificate add name=template-ca country=»RU» state=»Sankt-Petersburg» locality=»Sankt-Petersburg» organization=»Organization» unit=»DMOSK» common-name=»CA» key-size=2048 days-valid=3650 key-usage=crl-sign,key-cert-sign
> /certificate sign template-ca ca-crl-host=127.0.0.1 name=»ca»
* первая команда создает файл-шаблон запроса, на основе которого мы генерируем сертификаты второй командой. В шаблоне мы указываем опции для сертификата — так как сам сертификат самоподписный, можно указать любые значения и это никак не отразится на его использовании (стоит только указать корректные значения для стойкости шифрования key-size и срока действия сертификата days-valid).
2. Генерируем сертификат сервера OpenVPN:
> /certificate add name=template-server country=»RU» state=»Sankt-Petersburg» locality=»Sankt-Petersburg» organization=»Organization» unit=»DMOSK» common-name=»SERVER» key-size=2048 days-valid=3650 key-usage=digital-signature,key-encipherment,tls-server
> /certificate sign template-server ca=»ca» name=»server»
* как и в примере выше, мы сначала создали файл запроса и на его основе — сам сертификат. В качестве центра сертификации мы указываем созданный ранее сертификат ca.
Способ 2. На Windows.
Если по каким-либо причинам нам не подходим первый способ создания сертификатов (например, нужны особые опции, которые не поддерживаются роутером), воспользуемся способом, описанным ниже.
Нам нужно будет установить утилиту для генерирования сертификатов, создать их и скопировать на роутер.
Генерация сертификатов
И так, заходим на сайт OpenVPN и переходим на страницу загрузки. Скачиваем openvpn-install для нашей операционной системы, например, Windows 7 или 10:

Запускаем установку клиента — снимаем все галочки, оставляем EasyRSA 2 Certificate Management Scripts:

Завершаем установку. После чего в папке C:\Program Files\OpenVPN\easy-rsa создаем файл vars.bat со следующим содержимым:
set «PATH=%PATH%;%ProgramFiles%\OpenVPN\bin»
set HOME=%ProgramFiles%\OpenVPN\easy-rsa
set KEY_CONFIG=openssl-1.0.0.cnf
set KEY_DIR=keys
set KEY_SIZE=2048
set KEY_COUNTRY=RU
set KEY_PROVINCE=Sankt-Petersburg
set KEY_CITY=Sankt-Petersburg
set KEY_ORG=Organization
set KEY_EMAIL=master@dmosk.ru
set KEY_CN=DMOSK
set KEY_OU=DMOSK
set KEY_NAME=server.domain.ru
set PKCS11_MODULE_PATH=DMOSK
set PKCS11_PIN=12345678
* где для нас имеют значение:
- HOME оставляем, если не меняли путь установки программы по умолчанию.
- KEY_DIR — каталог, куда будут генерироваться сертификаты.
- KEY_CONFIG может быть разным — его лучше посмотреть в файле vars.bat.sample или по названию соответствующего файла в папке easy-rsa.
- KEY_NAME желательно, чтобы соответствовал полному имени VPN-сервера; остальные опции можно заполнить произвольно.
- опции KEY_COUNTRY, KEY_PROVINCE, KEY_CITY, KEY_ORG, KEY_EMAIL, KEY_CN, KEY_OU — атрибуты для сертификата. Их можно оставить, как в данном примере или задать свои собственные.
В этой же папке C:\Program Files\OpenVPN\easy-rsa создаем каталог keys — в нем будут создаваться сертификаты.
Запускаем командную строку от имени администратора:

Переходим в каталог easy-rsa:
Openvpn client windows mikrotik

Сегодня мы рассмотрим довольно изъезженную тему про поднятие OpenVPN сервера на Mikrotik. Но в отличие от множества мануалов, которые можно найти в сети мы будем настраивать именно TUN (в терминологии Mikrotik — IP), а не TAP (Ethernet) сервер, причем таким образом, чтобы к нему могли подключаться как Windows клиенты, так и клиенты на Android. Большинство мануалов в сети, например, этот предполагают поднятие OpenVPN сервера в Mode: Ethernet. Однако при таком варианте настройки Windows клиенты будут подключаться к нему без проблем, а вот при попытке подключения с Android ничего не получится, т.к. два распространенные клиента под Android — OpenVPN Connect и OpenVPN for Android не умеют работать с TAP-интерфейсом.
Вообщем, наша цель — создать такой сервер, чтобы мы без проблем коннектились к нему и из под Windows, и из под Android и не испытывали при этом никаких проблем. Предполагается что вы уже знакомы с генерацией сертификатов для OpenVPN-сервера и можете сгенерировать их либо в самом Mikrotik’е, либо с использованием OpenSSL. Последний вариант, кстати, хорошо расписан в этой статье. Поэтому здесь мы подробно не будем останавливаться на этом.
Настраиваем OpenVPN следующим образом:

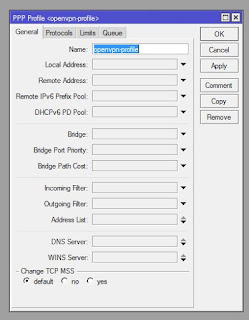

Теперь давайте разберемся . у нас используется tun интерфейс, при этом должна использоваться маска подсети /30 (почему так — описывать здесь не буду, почитайте мануалы по OpenVPN) . Что же такое маска /30 (255.255.255.252), чтобы было нагляднее — давайте я приведу вам пример нескольких подсетей с такой маской, включая адреса хостов:
Сеть 1:
| Сеть: | 172.16.0.0/30 | ||
| Кол-во хостов: | 4 | ||
| Базовый адрес сети: | 172.16.0.0 | ||
| Широковещательный адрес сети: | 172.16.0.3 | ||
| Первый адрес хоста: | 172.16.0.1 | ||
| Последний адрес хоста: | 172.16.0.2 | ||
| Маска сети: | 255.255.255.252 | ||
| Сеть: | 172.16.0.4/30 | ||
| Кол-во хостов: | 4 | ||
| Базовый адрес сети: | 172.16.0.4 | ||
| Широковещательный адрес сети: | 172.16.0.7 | ||
| Первый адрес хоста: | 172.16.0.5 | ||
| Последний адрес хоста: | 172.16.0.6 | ||
| Маска сети: | 255.255.255.252 | ||
Т.о. мы получаем что при использовании tun-адаптера local и remote address должны быть из одной подсети /30, так, для клиента android01 мы прописали local address 172.16.0.1, а remote address 172.16.0.2, для android02 — 172.16.0.5 и 172.16.0.6 соответственно. Теперь напишем клиентский конфиг:
Обратите внимание, здесь в auth-user-pass задается имя файла с логином и паролем auth.cfg (файл состоит из двух строк, на первой логин, на второй пароль), redirect-gateway def1 — нужна для переопределения основного шлюза, т.е. чтобы при подключении к OpenVPN-серверу весь траффик шел через него, и последняя строка tls-cipher задает используемый тип шифрования. Без нее мы получим проблему с TLS failed при соединении, которая подробно описана вот здесь (вообще на форуме Mikrotik’a очень много тем про ошибку TLS при подключении, но решения так нигде и не приведено, по-крайней мере сходу оно не находится, причем как утверждают там же на ранних версиях RouterOS все работало, а вот после обновления версии прошивки почему-то перестало).
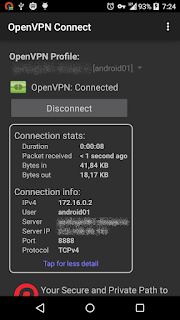

Как видно, все работает. Под Windows, с использованием OpenVPN 2.3.8 x86_64-w64-mingw32 все также отлично подключается:
MikroTik OpenVPN Setup with Windows Client
VPN (Virtual Private Network) technology provides a secure and encrypted tunnel across a public network. So, a private network user can send and receive data to any remote private network through VPN tunnel as if his/her network device was directly connected to that private network.
MikroTik OpenVPN Server provides a secure and encrypted tunnel across public network for transporting IP traffic using PPP. OpenVPN uses SSL Certificates. So, OpenVPN Tunnel is a trusted tunnel to send and receive data across public network. MikroTik OpenVPN Server can be applied in two methods.
- Connecting remote workstation/client: In this method, OpenVPN client software installed any operating system such as Windows can communicate with MikroTik OpenVPN server through OpenVPN tunnel whenever required and can access remote private network as if it was directly connected to the remote private network.
- Site to Site OpenVPN: This method is also known as VPN between routers. In this method, an OpenVPN client supported router always establishes an OpenVPN tunnel with MikroTik OpenVPN Server. So, private networks of these routers can communicate with each other as if they were directly connected to the same router.
The goal of this article is to connect a remote client using OpenVPN Tunnel across public network. So, in this article I will only show how to configure MikroTik OpenVPN Server for connecting a remote workstation/client (Windows Client).
Network Diagram
To configure a MikroTik OpenVPN Tunnel for connecting a remote workstation/client, I am following a network diagram like below image.

OpenVPN Remote Office Network
In this network, MikroTik Router (RouterOS v6.38.1) is connected to internet through ether1 interface having IP address 192.168.30.2/30. In your real network, this IP address should be replaced with public IP address. MikroTik Router’s ether2 interface is connected to local network having IP network 10.10.11.0/24. We will configure OpenVPN server in this router and after OpenVPN configuration the router will create a virtual interface (OpenVPN Tunnel) across public network whose IP address will be 10.10.11.1. On the other hand, a remote laptop (workstation/client) is connected to internet and wants to connect to our OpenVPN server for accessing local network resources. We will configure OpenVPN client in this laptop and after establishing an OpenVPN Tunnel across public network, this laptop will get a MikroTik Router’s local IP 10.10.11.10 and will be able to access MikroTik Router’s private network.
MikroTik OpenVPN Server Configuration
We will now start OpenVPN Server configuration. Complete OpenVPN configuration can be divided into two parts.
- Part 1: OpenVPN Server Configuration in MikroTik Router
- Part 2: OpenVPN Client Configuration in Windows OS
Part 1: OpenVPN Server Configuration in MikroTik Router
According to our network diagram, MikroTik Router is our OpenVPN Server. So, we will setup and configure OpenVPN Server in MikroTik Router. Complete MikroTik RouterOS configuration for OpenVPN Server can be divided into five steps.
- Step 1: MikroTik Router basic configuration
- Step 2: Creating SSL certificate for OpenVPN server and client
- Step 3: OpenVPN Server configuration
- Step 4: PPP Secret creation for OpenVPN client
- Step 5: Enabling Proxy ARP on LAN interface
Step 1: MikroTik Router basic configuration
In MikroTik Router basic configuration, we will assign WAN, LAN and DNS IP and perform NAT and Route configuration. The following steps will show how to do these topics in your RouterOS.
- Login to MikroTik RouterOS using winbox and go to IP > Addresses. In Address List window, click on PLUS SIGN (+). In New Address window, put WAN IP address (192.168.30.2/30) in Address input field and choose WAN interface (ether1) from Interface dropdown menu and click on Apply and OK button. Click on PLUS SIGN again and put LAN IP (10.10.11.1/24) in Address input field and choose LAN interface (ether2) from Interface dropdown menu and click on Apply and OK button.
- Go to IP > DNS and put DNS servers IP (8.8.8.8 or 8.8.4.4) in Servers input field and click on Apply and OK button.
- Go to IP > Firewall and click on NAT tab and then click on PLUS SIGN (+). Under General tab, choose srcnat from Chain dropdown menu and click on Action tab and then choose masquerade from Action dropdown menu. Click on Apply and OK button.
- Go to IP > Routes and click on PLUS SIGN (+). In New Route window, click on Gateway input field and put WAN Gateway address (192.168.30.1) in Gateway input field and click on Apply and OK button.
Basic RouterOS configuration has been completed. Now we will Create SSL certificate for OpenVPN server and client.
Step 2: Creating SSL certificate for OpenVPN Server and Client
OpenVPN server and client configuration requires SSL certificate because OpenVPN uses SSL certificate for secure communication. MikroTik RouterOS version 6 gives ability to create, store and manage certificates in certificate store. So, we will create required OpenVPN certificate from our RouterOS. OpenVPN server and client configuration requires three types of certificates:
- CA (Certification Authority) certificate
- Server certificate and
- Client certificate
Creating CA certificate
The following steps will show how to create CA certificate in MikroTik RouterOS.
- Go to System > Certificates menu item from winbox and click on Certificates tab and then click on PLUS SIGN (+). New Certificate window will appear.
- Put your CA certificate name (for example: ca) in Name input field. Also put a certificate common name (for example: ca) in Common Name input field.
- You will find some optional fields in General tab. You can fill if you wish. All fields are self-defined.
- Click on Key Usage tab and uncheck all checkboxes except crl sign and key cert. sign
- Click on Apply button and then click on Sign button. Sign window will appear now.
- Your newly created certificate template will appear in certificate dropdown menu. Select your newly created certificate template if it is not selected.
- Put MikroTik Router’s WAN IP address (192.168.30.2) in CA CRL Host input field.
- Click on Sign button. Your Sign certificate will be created within few seconds.
- Click on OK button to close New Certificate window.
- If newly created CA certificate does not show T flag or Trusted property shows no value, double click on your CA certificate and click on Trusted checkbox located at the bottom of General tab and then click on Apply and OK button.
CA certificate has been created successfully. Now we will create server certificate.
Creating Server Certificate
The following steps will show how to create server certificate in MikroTik RouterOS.
- Click on PLUS SIGN (+) again. New Certificate window will appear.
- Put your server certificate name (for example: server) in Name input field. Also put a certificate common name (for example: server) in Common Name input field.
- If you have put any optional field for CA certificate, put them here also.
- Click on Key Usage tab and uncheck all checkboxes except digital signature, key encipherment and tls server
- Click on Apply button and then click on Sign button. Sign window will appear now.
- Your newly server created certificate template will appear in certificate dropdown menu. Select your newly created certificate template if it is not selected.
- Also select CA certificate from CA dropdown menu.
- Click on Sign button. Your Sign certificate will be created within few seconds.
- Click on OK button to close New Certificate window.
- If newly created server certificate does not show T flag or Trusted property shows no value, double click on your server certificate and click on Trusted checkbox located at the bottom of General tab and then click on Apply and OK button.
Server certificate has been created successfully. Now we will create client certificate.
Creating Client Certificate
The following steps will show how to create client certificate in MikroTik RouterOS.
- Click on PLUS SIGN (+) again. New Certificate window will appear.
- Put your client certificate name (for example: client) in Name input field. Also put a certificate common name (for example: client) in Common Name input field.
- If you have put any optional field for CA certificate, put them here also.
- Click on Key Usage tab and uncheck all checkboxes except tls client
- Click on Apply button and then click on Sign button. Sign window will appear now.
- Your newly created client certificate template will appear in certificate dropdown menu. Select your newly created certificate template if it is not selected.
- Also select CA certificate from CA dropdown menu.
- Click on Sign button. Your Sign certificate will be created within few seconds.
- Click on OK button to close New Certificate window.
- Client certificate does not require T flag.
Client certificate has been created successfully. Now we will export CA and Client certificates so that OpenVPN client can use this certificate.
Exporting CA and Client Certificates
OpenVPN server will use server certificate from MikroTik RouterOS certificate store. But client certificate has to supply to the OpenVPN client. So, we need to export client certificate as well as CA certificate from RouterOS certificate store. The following steps will show how to export CA certificate and client certificate from MikroTik certificate store.
- Click twice on your CA certificate and then click on Export button from right button panel. Export window will appear.
- Choose your CA certificate from Certificate dropdown menu.
- Click on Export button now. Your CA certificate will be exported and Export window will be closed. Your exported CA certificate will be stored in File List.
- Again, click on Export button from right button panel and choose your client certificate from Certificate dropdown menu.
- Put a password in Export Passphrase input field. The password must be at least 8 characters and this password has to provide when OpenVPN client will be connected.
- Click on Export button now. Your client certificate and key file will be exported in File List.
- Now click on Files menu from winbox left menu panel. You will find two certificate file (.crt) and one key (.key) are exported here.
- Drag and Drop these three files in a folder on your Desktop. We will use these files when OpenVPN client will be configured.
Creating SSL certificate for OpenVPN server and client has been completed. Now we will configure our OpenVPN Server in MikroTik Router.
Step 3: OpenVPN Server Configuration in MikroTik Router
After creating SSL certificate, we are now eligible to enable OpenVPN Server in MikroTik Router. The following steps will show how to enable OpenVPN Server in your MikroTik Router with proper configuration.
OpenVPN Server is now running in MikroTik Router. Now we will create OpenVPN user who will be connected to this server.
Step 4: PPP Secret creation for OpenVPN client
After OpenVPN Server setup, we need to create OpenVPN user who will be connected to OpenVPN Server. OpenVPN Server uses PPP user for authentication. So, we will now create PPP secret (username and password) for OpenVPN client. The following steps will show how to create PPP secret in MikroTik Router.
- Click on PPP menu item from winbox and then click on Secrets tab.
- Click on PLUS SIGN (+). New PPP Secret window will appear.
- Put username (For example: sayeed) in Name input and password in Password input field. This username and password will be required at the time of OpenVPN client configuration.
- Choose ovpn from Service dropdown menu.
- Put the gateway IP (10.10.11.1) in Local Address input field and put a LAN IP (10.10.11.10) that will be assigned in client workstation when this user will be connected, in Remote Address input field.
- Click on Apply and OK button.
PPP user who will be connected from remote client machine has been created. At this point, if the user gets connected from the remote client machine and try to ping any workstation from the remote machine, the ping will time out because the remote client is unable to get ARPs from workstations. The solution is to set up proxy-arp on the LAN interface.
Step 4: Enabling Proxy ARP on LAN Interface
The following steps will show how to enable proxy-arp on the LAN interface.
- Click on Interfacesmenu item from winbox and then click on interface tab.
- Click twice on your LAN interface (ether2). Interface property window will appear.
- Under General tab, choose proxy-arp from ARP dropdown menu.
- Click Apply and OK button.
After enabling proxy-arp, the remote client can successfully reach all workstations in the local network behind the router.
MikroTik OpenVPN Server is now completely ready to accept OpenVPN client. So, we will now configure OpenVPN client in Windows Operating System.
Part 2: OpenVPN Client configuration in Windows OS
OpenVPN.net provides OpenVPN client software for all the operating systems. You can visit to download page and download your OpenVPN client that is matched with your system requirement. I am using Windows 7, 64-bit operating system. So, I have downloaded Installer (64-bit), Windows Vista and later package. At the time of this article, the OpenVPN client version was 2.3.18.
After downloading, install OpenVPN client in your operating system following the instruction. Installation process is as simple as installing other software in Windows operating system.
After OpenVPN client installation, go to configuration file location (by default: C:\Program Files\OpenVPN\config or C:\Program Files (x86)\OpenVPN\config depending on your operating system) and follow my below steps to configure OpenVPN client.