Download v7 | Ubuntu

Ubuntu Versions
OpenFOAM 7 is a major new release of OpenFOAM provided by the openfoam7 pack. It is accompanied by ParaView 5.6.0, compiled with the official OpenFOAM reader module, provided by the paraviewopenfoam56 pack. Both packs are available for the following versions of Ubuntu, 64 bit only:
- 16.04 LTS, codename xenial
- 18.04 LTS, codename bionic
- 19.04, codename disco
- 19.10, codename eoan (since November 2019)
- 20.04 LTS, codename focal (since May 2020)
Installation
OpenFOAM and ParaView can be simply installed for the first time using the apt package management tool. The user will need to provide superuser password authentication when executing the following commands with sudo
- Copy and paste the following in a terminal prompt (Applications → Accessories → Terminal) to add dl.openfoam.org to the list of software repositories for apt to search, and to add the public key ( gpg.key ) for the repository to enable package signatures to be verified.
Note: use secure https:// for the public key to ensure secure transfer, but use http:// for the repository, since https:// may not be supported and is not required since the key provides secure authentication of the package files.
**Note: This only needs to be done once for a given system
OpenFOAM 7 and ParaView 5.6.0 are now installed in the /opt directory.
Patching OpenFOAM 7
OpenFOAM-7 is periodically recompiled into a new openfoam7 pack. The package will be upgraded automatically whenever repository package files are updated and the software is upgraded, e.g. by typing
Users can also specifically upgrade openfoam7 only by the following option:
Installation Problems
1. Networking must be enabled in order to be able to install software packages in Ubuntu. Installation failure due to networking problems usually results in an error message that reports failures in fetching archives and ends with a line like the following:
2. If ParaView shows a blank screen when Ubuntu is installed on a Virtual Machine, try using an alternative desktop such as Gnome Classic or MATE. To install Gnome Classic, type the following in a terminal window, then reboot and login using the Classic window manager:
3. A few users have encountered an error message similar to the following during installation (step 3):
The most likely cause of this error message is that the universe repositories are not enabled. To enable them, type the following in a terminal window:
4. If MPICH is installed on the system, then during user configuration (below), the following error message might occur when sourcing the etc/bashrc file in the OpenFOAM installation:
The user can check whether MPICH is installed by typing the following:
which returns /usr/mpich/include if MPICH is installed. This error is caused when the default mpicc is MPICH, rather than OpenMPI. The simplest way to fix the problem is to set mpicc to OpenMPI is by running the following command in a terminal prompt:
The .deb files for different versions of Ubuntu supplied can be downloaded directly from the OpenFOAM Download Repository.
User Configuration
In order to use the installed OpenFOAM package, complete the following:
- Open the .bashrc file in the user’s home directory in an editor, e.g. by typing in a terminal window (note the dot)
- At the bottom of that file, add the following line (see Note 1 below) and save the file
- Open a new terminal window (see Note 2 below) and test that the simpleFoam application, from the OpenFOAM package, is working by typing
- A “Usage” message should appear. Your installation and user configuration is complete.
Note 1: If a similar line has already been added to the user’s .bashrc file, e.g. for a previous version of OpenFOAM, then the line should be deleted or, alternatively, commented out by inserting a # at the beginning of the line.
Note 2: If a user wishes to execute simpleFoam in the same terminal window, they must first register the change to the .bashrc file by typing at the terminal prompt (note the dots): source $HOME/.bashrc
Getting Started
Create a project directory within the $HOME/OpenFOAM directory named -7 (e.g. chris-7 for user chris and OpenFOAM version 7) and create a directory named run within it, e.g. by typing:
Copy across the backward facing step example, generate the mesh with blockMesh and run the steady flow, incompressible solver simpleFoam
Refer to the OpenFOAM User Guide to get started.
Reporting Bugs in OpenFOAM
We appreciate that bugs in OpenFOAM are reported so we can fix them. Please refer to the OpenFOAM Issue Tracking to report bugs.
Download v4.0 | Ubuntu
Ubuntu Versions
OpenFOAM 4.0 is a major new release of OpenFOAM provided by the openfoam4 pack . It is accompanied by ParaView 5.0.1, compiled with the official OpenFOAM reader module, provided by the paraviewopenfoam50 pack. Both packs are available for the following versions of Ubuntu:
- 14.04 LTS, codename trusty
- 16.04 LTS, codename xenial
Note: The pack for 16.04 includes foamyHexMesh, which uses CGAL v4.7; the pack for 14.04 does not include foamyHexMesh because the packaged version of CGAL (v4.2) is no longer supported.
Installation
OpenFOAM and ParaView can be simply installed using the apt package management tool. The user will need to provide superuser password authentication when executing the following commands with sudo
- Copy and paste the following in a terminal prompt (Applications → Accessories → Terminal) to add dl.openfoam.org to the list of software repositories for apt to search, and to add the public key ( gpg.key ) for the repository to enable package signatures to be verified.
**Note: This only needs to be done once for a given system
OpenFOAM 4.0 and ParaView 5.0.1 are now installed in the /opt directory.
Installation Problems
1. Networking must be enabled in order to be able to install software packages in Ubuntu. Installation failure due to networking problems usually results in an error message that reports failures in fetching archives and ends with a line like the following:
2. A few users have encountered an error message similar to the following during installation (step 3)
The most likely cause of this error message is that the universe repositories are not enabled. To enable them, type the following in a terminal window:
3. If MPICH is installed on the system, then during user configuration (below), the following error message might occur when sourcing the etc/bashrc file in the OpenFOAM installation:
The user can check whether MPICH is installed by typing the following:
which returns /usr/mpich/include if MPICH is installed. This error is caused when the default mpicc is MPICH, rather than OpenMPI. The simplest way to fix the problem is to set mpicc to OpenMPI is by running the following command in a terminal prompt:
The .deb files for different versions of Ubuntu supplied can be downloaded directly from the OpenFOAM Download Repository.
User Configuration
In order to use the installed OpenFOAM package, complete the following
- Open the .bashrc file in the user’s home directory in an editor, e.g. by typing in a terminal window (note the dot)
- At the bottom of that file, add the following line (see Note 1 below) and save the file
- Open a new terminal window (see Note 2 below) and test that the simpleFoam application, from the OpenFOAM package, is working by typing
- A “Usage” message should appear. Your installation and user configuration is complete.
Note 1: If a similar line has already been added to the user’s .bashrc file, e.g. for a previous version of OpenFOAM, then the line should be deleted or, alternatively, commented out by inserting a # at the beginning of the line.
Note 2: If a user wishes to execute simpleFoam in the same terminal window, they must first register the change to the .bashrc file by typing at the terminal prompt (note the dots): source $HOME/.bashrc
Getting Started
Create a project directory within the $HOME/OpenFOAM directory named -4.0 (e.g. chris-4.0 for user chris and OpenFOAM version 4.0) and create a directory named run within it, e.g. by typing:
Copy across the backward facing step example, generate the mesh with blockMesh and run the steady flow, incompressible solver simpleFoam
Refer to the OpenFOAM User Guide to get started.
Reporting Bugs in OpenFOAM
We appreciate that bugs in OpenFOAM are reported so we can fix them. Please refer to the OpenFOAM bugs pages to report bugs.
Установка OpenFOAM на Ubuntu 14.04

OpenFOAM — свободно распространяемый инструментарий вычислительной гидродинамики для операций с полями (скалярными, векторными и тензорными). На сегодня является одним из «законченных» и известных приложений, предназначенных для FVM-вычислений.В частности пакет позволяет решать задачи гидродинамики ньютоновских и неньютоновских вязких жидкостей как в несжимаемом, так и сжимаемом приближении с учётом конвективного теплообмена и действием сил гравитации. Для моделирования турбулентных течений возможно использование RANS-моделей, LES- и DNS-методов. Возможно решение дозвуковых, околозвуковых и сверхзвуковых задач.
На данный момент инсталляционные пакеты доступны для следующих версий ОС
- 12.04 LTS codename precise
- 12.10 codename quantal
- 13.04 codename raring
- 13.10 codename saucy
Однако, инсталляционный пакет ОС Ubuntu 14.04 отсутствует. Поэтому для версии 14.04, необходимо самостоятельно собрать OpenFOAM 2.3 Это является достаточно не простой задачей для новичков, которые недавно используют данную операционную систему.
Этому и посвящена статья.
Внимание процесс сборки может занять до 6 часов.
Работать будем в гостевой операционной системе под управлением системы на основе гипервизора Hyper-V. Если впервые используете Hyper-V с Ubuntu то разрешение при подключении к виртуальной машине может быть отлично от разрешения вашего экрана. Это можно исправить следующим образом. Вызовите командную строку введите следующую команду.
Найдите строку с GRUB_CMDLINE_LINUX_DEFAULT и дополните ее «video=hyperv_fb:1600×900». Где вместо 1600х900 подставьте разрешение вашего монитора. В моем случае она выглядела так.
Далее выполните обновление внесенных настроек командой
Изменения вступят после перезагрузки виртуальной машины.
Для сборки нам понадобится установить необходимые пакеты.
- Перейдите в режим root.
Создадим папку в для OpenFOAM и перейдем в нее.
Следующие команды выполнят загрузку исходных кодов.
Так же исходники доступны тут
Разархивируем ThirdParty-2.3.0.tgz с помощью утилиты tar с ключами x распаковать z тип архива .gz f записать архив в файл (следующий параметр указывает имя файла). Следом удалим не нужный уже нам архив.
Вернемся в домашнюю директорию и установим переменные окружения.
В открывшемся текстовом редакторе, добавьте следующую строку в конец файла.
Сделаем доступными эти переменные окружения и протестируем одну из них.
Используя переменную окружения, перейдем в нужную директорию и выполним компиляцию.
Скомпилируем ParaView — постпроцессор для просмотра результатов и геометрий.
Заключительный шаг, выполнить компиляцию OpenFOAM ( Внимание эта операция самая продолжительная )
Осталось скопировать учебные задачи и проверить результат компиляции.
Если все хорошо у вас будет следующее на экране. 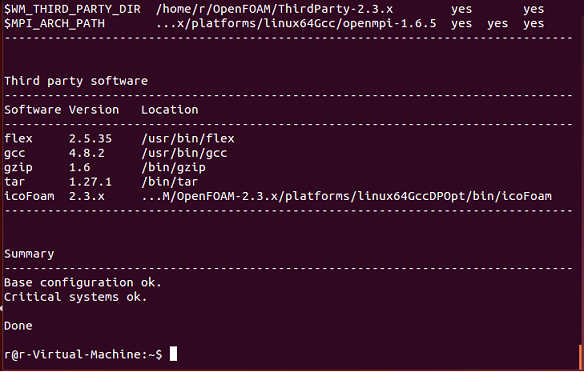
Выполним параллельный расчет мотоцикла.
После расчета, остается просмотреть что у нас получиться.

Отобразим только интересующий нас мотоцикл. Остальные галочки нужно убрать и оставить как на рисунке. 
Нажмите Apply она будет зеленого цвета
Отобразим распределение давления. Выставив параметры в красном квадрате вы должны получить следующую картинку. 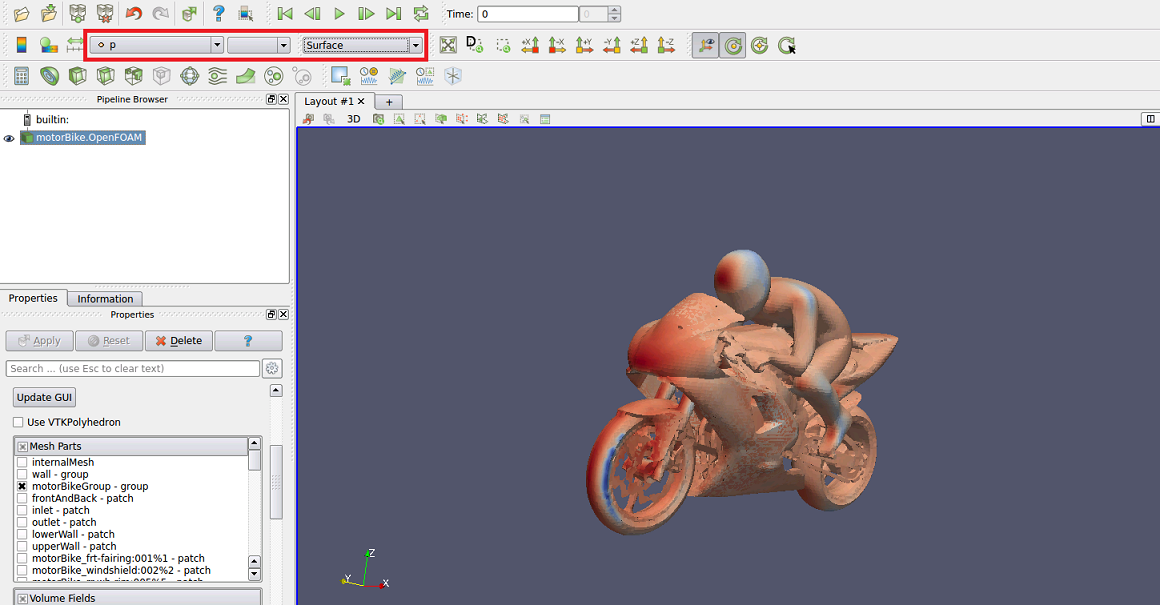
Надеюсь, данная инструкция поможет в работе начинающим пользователям OpenFOAM.
PS>Если вы обнаружили ошибку или недочет напишите мне.