Установка Openoffice Ubuntu
OpenOffice — это один из популярных офисных пакетов для Linux. В большинстве дистрибутивов уже по умолчанию поставляется LibreOffice, но многие организации и отдельные люди продолжают использовать оригинальный проект OpenOffice, несмотря на то, что его разработка ведется все медленнее.
В этой статье мы рассмотрим как выполняется установка OpenOffice Ubuntu. На данный момент, самая новая версия — это 4, ее мы и будем устанавливать. Узнать чем отличается Openoffice от Libreoffice вы можете из отдельной статьи.
Установка OpenOffice в Ubuntu
После формирования проекта LibreOffice, исходный OpenOffice был исключен из официальных репозиториев, поэтому сейчас можно установить программу только скачав установочный пакет из официального сайта. Последняя на данный момент версия — 4.1.3. В ней было внесено несколько улучшений интерфейса, аннотаций, форм, функций и других элементов.

Вот основные системные требования программы:
- Ядро Linux версии 2.6 и выше, glibc2 версии 2.5 и выше;
- Оперативная память — 256 Мб, рекомендовано 512 Мб;
- Свободное место на диске: 400 Мб;
- Дисплей с разрешением 1024×768 на 256 цветов;
- Установленная Java машина JRE 1.6 или более новая.
Перед тем как установить OpenOffice Ubuntu, давайте проверим версию Java. Нужна 6 и выше, это значит, что 7 и 8 тоже подойдут:

Если Java еще не установлена, можете обратиться к этой инструкции. Дальше нам нужно загрузить установщик. Для этого можно использовать такие команды. Для 32 бит:
wget https://freefr.dl.sourceforge.net/project/openofficeorg.mirror/4.1.3/binaries/ru/Apache_OpenOffice_4.1.3_Linux_x86_install-deb_ru.tar.gz
$ tar xzf Apache_OpenOffice_4.1.3_Linux_x86_install-deb_ru.tar.gz
wget https://netcologne.dl.sourceforge.net/project/openofficeorg.mirror/4.1.3/binaries/ru/Apache_OpenOffice_4.1.3_Linux_x86-64_install-deb_ru.tar.gz
$ tar xzf Apache_OpenOffice_4.1.3_Linux_x86-64_install-deb_ru.tar.gz
Команды создадут папку ru, а в ней будет папка DEBS, именно здесь расположены установочные файлы. Но сначала убедитесь, что в вашей системе не установлен LibreOffice, если этот офисный пакет установлен, то его необходимо удалить. Затем перейдите в папку с deb файлами и запустите установку:
cd ru/DEBS/
$ sudo dpkg -i *.deb
Также здесь есть еще подпапка — desktop-integration. Вы уже, наверное, догадались зачем она. Файлы из нее тоже нужно установить:
cd desktop-integration/
$ sudo dpkg -i openoffice4.0-debian-menus*.deb
Последнее действие после того как установка OpenOffice Ubuntu 16.04 будет завершена — запуск программы. Вы можете запустить OpenOffice из главного меню или же с помощью команды:

Выводы
Теперь вы знаете как установить openoffice в ubuntu. Хотя это не так просто, как, скажем, Libreoffice, но все же достаточно проста. Надеюсь, эта информация была полезной для вас.
Как установить OpenOffice в Ubuntu, Debian, Mint
Apache OpenOffice свободный офисный пакет приложений, поддерживающий новый формат OpenDocument ( .odt). Apache OpenOffice работает со следующими операционными системами: Linux, Microsoft Windows, macOS. Программа написана на языке C++ и Java. Офисный пакет Apache OpenOffice может свободно устанавливаться и использоваться на домашних компьютерах, в школах, офисах, вузах, государственных, бюджетных и коммерческих организациях и учреждениях согласно лицензии Apache.
Перед тем как установить Apache OpenOffice в Ubuntu необходимо проверить наличие java в системе:
Перед установкой OpenOffice нужно проверить установлен ли Libre Office. И если да, то его следует удалить:
Теперь перейдём в папку со скаченным архивом Open Office и распакуем его:
Должно получится примерно так:
Переходим в папку с распакованным архивом:
Устанавливаем все DEB-пакеты:
Apache OpenOffice
Windows
Mac OS
Linux
Характеристики
Обновлено: 2019-09-23 11:06:29
Разрядность: 64 бит
Язык: Русский, Английский
Описание
Пакет офисных программ. Бесплатная и полноценная замена коммерческому Microsoft Office.
OpenOffice содержит набор приложений полностью заменяющих самый популярный офисный пакет Microsoft Office, который далеко не бесплатный. OpenOffice.org поддерживает практически все форматы файлов конкурента от Микрософт.
В пакет OpenOffice входят:
— Writer — Текстовый процессор (аналог MS Word);
— Calc — Табличный процессор (MS Excel);
— Impress — Программа подготовки презентаций (MS PowerPoint);
— Base — Механизм подключения к внешним СУБД и встроенная — СУБД HSQLDB (MS Access);
— Draw — Векторный графический редактор (MS Visio, Adobe Illustrator, CorelDRAW);
— Math — Редактор формул MathType (MS Equation Tools).
Как установить OpenOffice в Linux

Вам не подходит Libre Office? Вас интересует установка OpenOffice в Linux? Следуйте этому руководству, чтобы узнать, как установить OpenOffice в Ubuntu, Debian, Arch Linux, Fedora и OpenSUSE.
Кстати, мы уже рассказывали про лучшие аналоги Office для Linux. Очень рекомендую!
Установка OpenOffice в Ubuntu / Debian
OpenOffice Apache раньше был стандартным офисным пакетом для Ubuntu, и это означало, что его было невероятно легко установить. Однако времена меняются. OpenOffice больше не входит в пакет программ по умолчанию в Ubuntu. Если вы хотите использовать OpenOffice в Linux, вы должны загрузить пакет DEB и сами его установить.
Примечание: эти инструкции работают в Debian Linux и в Ubuntu. Если вы используете Debian, следуйте инструкциям ниже, но при необходимости измените apt на apt-get.
Чтобы начать установку, откройте окно терминала, и нажмите сочетание клавиши Ctrl + Alt + T или Ctrl + Shift + T. После этого используйте wget, чтобы скачать пакет OpenOffice.
Пакет OpenOffice не является автономным пакетом DEB. Это архив TarGZ, заполненный множеством разных пакетов DEB. По этой причине процесс загрузки займет довольно много времени.
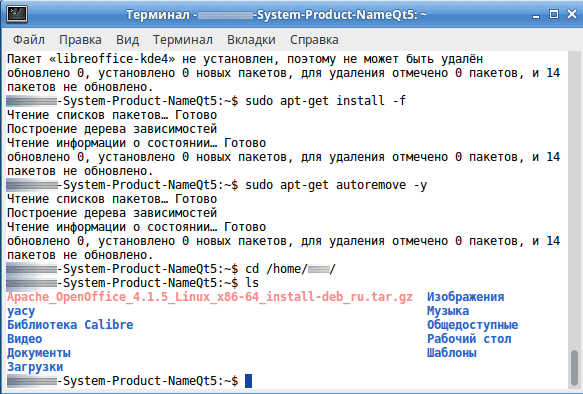
Когда процесс будет завершен, распакуйте архив TarGZ в домашний каталог, выполнив команду tar:
После завершении процесса извлечения в вашей домашней папке появится новый каталог с именем ru. Перейдите в этот каталог с помощью команды CD:
Как только вы окажетесь внутри папки ru, можете просмотреть справку запустив команду cat и открыв файл «readme».
Когда закончите, нажмите сочетание клавиш Ctrl + C. Затем с помощью команды CD перейдите в папку «DEBS», в ней находятся все установочные файлы Apache OpenOffice,
Запустите команду ls, чтобы просмотреть содержимое каталога DEBS. Вы заметите, что существуют десятки различных файлов пакетов DEB. Практический невозможно установить все эти файлы один за другим, файл за файлом. Чтобы быстро установить все в Ubuntu, мы будем использовать функцию подстановки (*).
Как установить Apache OpenOffice на Ubuntu / Debian / Mint

Apache OpenOffice лучше подходит для работы с документами созданными в пакете Microsoft Office, и вызывает существенно меньше нареканий.
Поэтому мы используем именно его,
а Libre Office который стоит в популярных дитрибутивах вроде Ubuntu по-умолчанию, старательно удаляем.
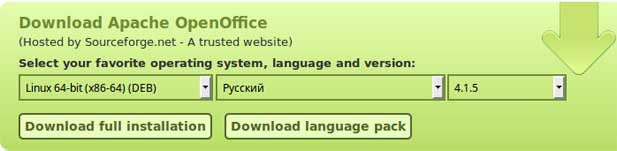
Первое что следует сделать, это скачать архив OpenOffice по ссылке.
Теперь запускаем терминал: ctrl+alt+t
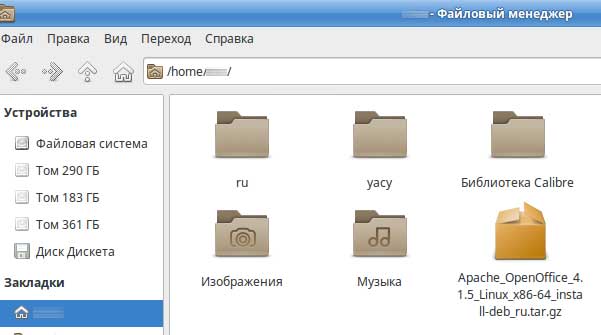
Будем считать, что архив скачался в папку /home/user/Загрузки
Перед установкой OpenOffice если установлен Libre Office, то его следует удалить:
Теперь перейдём в папку с архивом Open Office и распакуем его:
Переходим в папку с куда распаковали архив:
Устанавливаем все DEB-пакеты:
Теперь включаем отображение иконок офиса:
Установка закончена, самое время начать пользоваться 🙂
Open office for linux
Instructions for Downloading and Installing
Apache OpenOffice 4.0, 4.1 Versions
As of release 3.4, a JRE (Jave Runtime Environment) is no longer packaged with OpenOffice. However, you may still need a JRE for full functionality. (See Java and Apache OpenOffice). Please ensure that your system has at least Java 1.6 installed for full functionality.
Apache OpenOffice 4.x versions have significant changes to your OpenOffice directory setup which effect your older OpenOffice profile. The Apache OpenOffice 4.0 Release Notes provide an explanation of these changes. However, you should have the opportunity to migrate your old profile settings to the new profile area.
Windows XP/2003/Vista/7/8/10 Quick-Start Guide for Apache OpenOffice 4.x Versions
Welcome to Apache OpenOffice Quick-Start Guide for Windows environments. Below you will find step-by-step instructions to download and install Apache OpenOffice 4.x versions on your system. You may want to print this instruction sheet for reference before beginning to download and install Apache OpenOffice.
If you are experienced with the Windows operating system, you can use the instructions provided in the next section. Otherwise, skip to Comprehensive Installation Instructions section.
Overview of the download and installation procedure
To download and install Apache OpenOffice 4.x, follow this checklist:
- Review the System Requirements for Apache OpenOffice use.
- Download and install Java JRE if you need the features that are Java dependent.
- Download Apache OpenOffice 4.x.x.
- Login as administrator (if required).
- Unpack and install the downloaded Apache OpenOffice 4.x.x files.
- Upgrading OpenOffice for Windows
- If the current version is 3.x, you can remove it before you upgrade to version 4.x, or keep it and install 4.x as an additional version.
In the Installation Wizard, do one of the following:- To remove 3.x and install 4.x, select *Remove all older product versions*. The startup group item, desktop icon, and entry in the Add/Remove Programs list will all refer to 4.x.
- To have both 3.x and 4.x on your computer, deselect *Remove all older product versions*. Each version will have its own startup group item, desktop icon, and entry in the Add/Remove Programs list.
- If the current version is 4.x, but is older than the point version that you want to install (for example, you have 4.0.0 but want to install 4.0.1), the older version will be removed and the later one will be installed. The startup group item, desktop icon, and entry in the Add/Remove Programs list will all refer to the later version.
- If the current version is 3.x, you can remove it before you upgrade to version 4.x, or keep it and install 4.x as an additional version.
- Run Apache OpenOffice 4.x.x to ensure that the installation was successful.
Comprehensive Installation Instructions
This section describes in detail how to install Apache OpenOffice on your computer system.
The first thing you’ll want to do is read through these instructions completely, and use the Apache OpenOffice site to answer any questions you might have. The site contains documentation for users of all levels, beginner to advanced; a good place to get started for all new users of Apache OpenOffice would be browsing the FAQ.
Note: Log in as an administrator if your computer only allows people with administrator privileges to install programmes.
Review the System Requirements
Your computer needs these resources as a minimum to run Apache OpenOffice 4.x versions:
- Windows XP, Windows 2003, Windows Vista, Windows 7, Windows 8, Windows 10
- 256 Mbytes RAM (512 MB RAM recommended)
- At least 650 Mbytes available disk space for a default install (including a JRE) via download. After installation and deletion of temporary installation files, Apache OpenOffice will use approximately 440 Mbytes disk space.
- 1024 x 768 or higher resolution with at least 256 colours
Download Apache OpenOffice 4.x.x
To download Apache OpenOffice from our website, you do not need to login. Also, it does not cost anything other than what your costs are to connect to the internet and download a large file.
If your connection is not very fast (and or you are behind a dial up connection), you might consider a program that enables you to pause/resume the download. We’ve listed some popular download managers here.
To download the most current version of Apache OpenOffice:
Display Download Apache OpenOffice, and click on the large green download button displayed on the top of the web page.
NOTE: Much of the information that follows here can be found in the Win 86 Setup Guide, secton 4. Installer Setup from the developer wiki.
Unpack and install the downloaded Apache OpenOffice 4.x.x files
- Either using Windows Explorer or Mozilla/Netscape’s Download Manager, navigate to the Apache OpenOffice file you downloaded.
Windows Explorer users will want to find the file and double-click to launch the unpacking and installation program. Alternately, Mozilla/Netscape users will want to open the Download Manager, highlight the file, and click Launch File. In either case, the unpacking program will start.
The Welcome window is displayed to note that you have downloaded Apache OpenOffice 4.x.x. Click Next to continue.
The License Agreement window appears.
Note: You will need to use the scroll bar to view all of the license text If you do not wish to accept the license, you will be prompted to confirm this before the installation programme closes.
Read the license, select «I accept the terms in the license agreement», and click Next.
The Customer Information window appears.
You may leave this form blank, or enter your User Name and if applicable, Organisation.
Note: If you logged in as administrator you will be prompted to install for all users.
Complete Customer Information form and click Next.
The Setup Type window appears.
Select a setup type (we recommend Complete) and click Next.
The File Type window is displayed.
Select the file types that you wish to open with the Apache OpenOffice program.
The default configuration is that all the file types are selected. This means that the Apache OpenOffice programme will start when these file types are opened. De-select (click on the ticks) to view, edit and print these file types with your existing word processing, spreadsheet or presentation program.
Note: If you change your mind, returning to the prior state is tedious. You will need to reassociate all word processing, spreadsheet or presentation files with the appropriate file type. You can watch this video to find information on how to proceed in this kind of situations.
You can use file types not associated with Apache OpenOffice, by starting Apache OpenOffice then open the file by choosing Open from the File menu.
Once you have selected the file types click Next.
The Ready to Install the Program window is displayed.
Click the Back button to return to previous windows to change your installation options, otherwise click Install to begin the installation process.
Click the Finish button when the Installation Wizard Finished window is displayed.
If you logged in as administrator, logout. Each user can then invoke Apache OpenOffice from the program menu which will allow the user to configure Apache OpenOffice as a workstation copy with no further effort on the part of the user.
Run Apache OpenOffice to ensure that the installation was successful
When you first run Apache OpenOffice after a successfully installing the program, you will be prompted to accept the license, enter your user name and register your copy.
Login using your user account, and if you installed Apache OpenOffice successfully it will appear on the Programs sub-menu of the Start menu.
Click on one of the Apache OpenOffice components (we recommend Writer). The Welcome window is displayed.
Click Next to display the License Agreement window.
Scroll to read the license and click Accept to continue. The Transfer personal data window is displayed.
If you wish to reuse personal data from a previous installation click [Next].
If you do not wish to reuse any settings from a previous installed version, unmark the checkbox and click [Next].
The user information window is displayed.
You are prompted to enter your name. This is used in the document properties, templates and when you record changes made to documents. This is useful if you are working on a document with others, but you don’t need to complete this information in order to proceed. This information can also be entered later when using the program.
You have successfully installed and run Apache OpenOffice. You should now refer to the online help (Choose «Apache OpenOffice Help» from the Help menu) or connect to the internet to obtain support from the web site by clicking the Support tab available from any web page.
Thank you for using Apache OpenOffice, and welcome!
Installation Instructions for Apple Macintosh
OS X and Gatekeeper
Apache OpenOffice 4.x versions will be flagged by the new Gatekeeper facility in OS X Mountain Lion. This is a feature to help guard against malware on Mac systems. There is a procedure laid out at the following link to allow applications not installed from the Mac App store to run. See the article at Mac support at https://support.apple.com/en-us/HT202491.
Macintosh Installation Resources
Linux Installations
Linux Pre-installation Notes
The following preinstallation steps are recommended for Linux distributions. These should be taken to assure that you have a clean install of Apache OpenOffice due to internal considerations and/or the installation of LibreOffice, if it exists, on your system.
- Check to see if LibreOffice has re-routed the OpenOffice binary.
Type «whereis soffice» from a console.
If this is symlinked to libreoffice, remove the symlink. (see your favorite reference for how to do this)
This will NOT remove LibreOffice, this will only disallow LibreOffice to redirect the normal OpenOffice binary — typically /usr/bin/soffice — to libreoffice instead.
Installation Steps — RPM or DEB: Download to Installation Directory, Unpack
- Review the System Requirements
- Download your favorite Linux version of Apache OpenOffice
- Unpack the downloaded package to prepare for installation.
The following command should work: tar -xvzf «linux package name».tar.gz
where «linux package name» is the beginning part of the archive you just downloaded.
This will create an installation directory.
The name of the installation directory will likely be the language abbreviation for the install set, e.g., en-US. - Add the install directory as a «local repository» for your GUI package manager if possible. This will enable you to do a GUI install rather than command line.
- Desktop integration.
Desktop integration for deb-based systems requires installation of one package.
Historically, for rpm based systems, OpenOffice has provided desktop integration packages for madriva, redhat, suse, and now freedesktop. These packages are located in the desktop-integration subdirectory of the install directory.
Many desktop window managers like KDE4, Gnome3, and Unity now adhere to the freedsktop.org standard for icon placement and mime-type definitions. For this reason, you may want to install the freedesktop desktop integration package first before trying the others.
Linux RPM-based Installation
- su to root, if necessary, and navigate to Apache OpenOffice installation directory.
You will likely need to be root to run the rpm command to install the software. - cd into the RPMS subdirectory of the installation directory.
You should see a lot of rpms here and one sub-directory called «desktop-integration». - Install this new version by typing rpm -Uvih *rpm .
By default, this will install Apache OpenOffice in your /opt directory.
Alternatively, you can use a GUI package installer, reference the installation directory, and install all rpms at the top level. This may also aid you in determing any dependency problems if they exist.
Install the desktop integration features for your setup.
cd to desktop-integration (in the installation directory),
and install an appropriate desktop interface using RPM. (Try the freedesktop-menus first.)
Linux DEB-based Installation
- One you download the Apache OpenOffice tar.gz package, you should be able to decompress typing.
tar Apache-OpenOfficeX.X.X.tar.gz package or using programs such as Ark, or File-Roller. - cd into the DEBS subdirectory of the installation directory.
You should see a lot of debs here and one sub-directory called «desktop-integration». - Install this new version by typing sudo dpkg -i *.deb or become root using su command.
By default, this will install/update Apache OpenOffice in your /opt directory.
Alternatively, you can use a GUI package installer, reference the installation directory, and install all debs at the top level. This may also aid you in determing any dependency problems if they exist.
cd to desktop-integration (in the installation directory),
and install the desktop intgration using dpkg.
Note: Apache OpenOffice executable is called soffice and is located in /opt/OpenOffice4/program/
A softlink is created on your /usr/local/bin/ directory. You can always map to the original at /opt/ if it doesnt start
for whatever reason.
Additional Linux Information
Apache OpenOffice provided packages
The Linux downloads provided on the Apache OpenOffice site (mirrors) are generic for either the RPM- or DEB-based package managers. If you have experience in directly installing these types of packages on your system, one of these types of installs should work for you. They are not specific to a particular Linux distribution.
Apache OpenOffice from Linux distros
Some Linux distributions now include a version of Apache OpenOffice in their own native package manager format (.rpm, .deb, etc.) either from their own repositories or community repositories which they support. These packages have been built and are supported by the distributions’ own teams or community members, not by Apache OpenOffice. Some distributions have strict policies around licensing, which means they have chosen to disable parts of Apache OpenOffice which rely on software which does not meet their criteria.
Note: Please check carefully before using a third-party build that it does actually include all the parts of Apache OpenOffice that you will require. Replacing a ‘native’ distribution build with the full Apache OpenOffice original build can be tricky, but can usually be successfully accomplished by completely removing the existing ‘native’ install.
Useful sites for Linux installation
Installation Problems
The best resources to help you with installation problems are:
Additional Installation Information
A more extensive, though older, Installation Guide is available in PDF and ODT formats from the Apache OpenOffice Documentation Project.
You may also find the Installation FAQs useful as well.