NumPy, часть 1: начало работы
NumPy — это библиотека языка Python, добавляющая поддержку больших многомерных массивов и матриц, вместе с большой библиотекой высокоуровневых (и очень быстрых) математических функций для операций с этими массивами.
Установка NumPy
На linux — пакет python3-numpy (или аналогичный для вашей системы), или через pip. Ну или же собирать из исходников https://sourceforge.net/projects/numpy/files/NumPy/.
На Windows на том же сайте есть exe установщики. Или, если возникают проблемы, рекомендую ещё хороший сборник библиотек http://www.lfd.uci.edu/
Начинаем работу
Основным объектом NumPy является однородный многомерный массив (в numpy называется numpy.ndarray). Это многомерный массив элементов (обычно чисел), одного типа.
Наиболее важные атрибуты объектов ndarray:
ndarray.ndim — число измерений (чаще их называют «оси») массива.
ndarray.shape — размеры массива, его форма. Это кортеж натуральных чисел, показывающий длину массива по каждой оси. Для матрицы из n строк и m столбов, shape будет (n,m). Число элементов кортежа shape равно ndim.
ndarray.size — количество элементов массива. Очевидно, равно произведению всех элементов атрибута shape.
ndarray.dtype — объект, описывающий тип элементов массива. Можно определить dtype, используя стандартные типы данных Python. NumPy здесь предоставляет целый букет возможностей, как встроенных, например: bool_, character, int8, int16, int32, int64, float8, float16, float32, float64, complex64, object_, так и возможность определить собственные типы данных, в том числе и составные.
ndarray.itemsize — размер каждого элемента массива в байтах.
ndarray.data — буфер, содержащий фактические элементы массива. Обычно не нужно использовать этот атрибут, так как обращаться к элементам массива проще всего с помощью индексов.
Создание массивов
В NumPy существует много способов создать массив. Один из наиболее простых — создать массив из обычных списков или кортежей Python, используя функцию numpy.array() (запомните: array — функция, создающая объект типа ndarray):
Функция array() трансформирует вложенные последовательности в многомерные массивы. Тип элементов массива зависит от типа элементов исходной последовательности (но можно и переопределить его в момент создания).
Можно также переопределить тип в момент создания:
Функция array() не единственная функция для создания массивов. Обычно элементы массива вначале неизвестны, а массив, в котором они будут храниться, уже нужен. Поэтому имеется несколько функций для того, чтобы создавать массивы с каким-то исходным содержимым (по умолчанию тип создаваемого массива — float64).
Функция zeros() создает массив из нулей, а функция ones() — массив из единиц. Обе функции принимают кортеж с размерами, и аргумент dtype:
Функция eye() создаёт единичную матрицу (двумерный массив)
Функция empty() создает массив без его заполнения. Исходное содержимое случайно и зависит от состояния памяти на момент создания массива (то есть от того мусора, что в ней хранится):
Для создания последовательностей чисел, в NumPy имеется функция arange(), аналогичная встроенной в Python range(), только вместо списков она возвращает массивы, и принимает не только целые значения:
Вообще, при использовании arange() с аргументами типа float, сложно быть уверенным в том, сколько элементов будет получено (из-за ограничения точности чисел с плавающей запятой). Поэтому, в таких случаях обычно лучше использовать функцию linspace(), которая вместо шага в качестве одного из аргументов принимает число, равное количеству нужных элементов:
fromfunction(): применяет функцию ко всем комбинациям индексов
Печать массивов
Если массив слишком большой, чтобы его печатать, NumPy автоматически скрывает центральную часть массива и выводит только его уголки.
Если вам действительно нужно увидеть весь массив, используйте функцию numpy.set_printoptions:
И вообще, с помощью этой функции можно настроить печать массивов «под себя». Функция numpy.set_printoptions принимает несколько аргументов:
precision : количество отображаемых цифр после запятой (по умолчанию 8).
threshold : количество элементов в массиве, вызывающее обрезание элементов (по умолчанию 1000).
edgeitems : количество элементов в начале и в конце каждой размерности массива (по умолчанию 3).
linewidth : количество символов в строке, после которых осуществляется перенос (по умолчанию 75).
suppress : если True, не печатает маленькие значения в scientific notation (по умолчанию False).
nanstr : строковое представление NaN (по умолчанию ‘nan’).
infstr : строковое представление inf (по умолчанию ‘inf’).
formatter : позволяет более тонко управлять печатью массивов. Здесь я его рассматривать не буду, можете почитать здесь (на английском).
И вообще, пользуйтесь официальной документацией по numpy, а в этом пособии я постараюсь описать всё необходимое. В следующей части мы рассмотрим базовые операции над массивами.
Installing NumPy
The only prerequisite for NumPy is Python itself. If you don’t have Python yet and want the simplest way to get started, we recommend you use the Anaconda Distribution — it includes Python, NumPy, and other commonly used packages for scientific computing and data science.
NumPy can be installed with conda , with pip , or with a package manager on macOS and Linux. For more detailed instructions, consult our Python and NumPy installation guide below.
conda
If you use conda , you can install it with:
If you use pip , you can install it with:
Python and NumPy installation guide
Installing and managing packages in Python is complicated, there are a number of alternative solutions for most tasks. This guide tries to give the reader a sense of the best (or most popular) solutions, and give clear recommendations. It focuses on users of Python, NumPy, and the PyData (or numerical computing) stack on common operating systems and hardware.
Recommendations
We’ll start with recommendations based on the user’s experience level and operating system of interest. If you’re in between “beginning” and “advanced”, please go with “beginning” if you want to keep things simple, and with “advanced” if you want to work according to best practices that go a longer way in the future.
Beginning users
On all of Windows, macOS, and Linux:
- Install Anaconda (it installs all packages you need and all other tools mentioned below).
- For writing and executing code, use notebooks in JupyterLab for exploratory and interactive computing, and Spyder or Visual Studio Code for writing scripts and packages.
- Use Anaconda Navigator to manage your packages and start JupyterLab, Spyder, or Visual Studio Code.
Advanced users
Windows or macOS
- Install Miniconda.
- Keep the base conda environment minimal, and use one or more conda environments to install the package you need for the task or project you’re working on.
- Unless you’re fine with only the packages in the defaults channel, make conda-forge your default channel via setting the channel priority.
Linux
If you’re fine with slightly outdated packages and prefer stability over being able to use the latest versions of libraries:
- Use your OS package manager for as much as possible (Python itself, NumPy, and other libraries).
- Install packages not provided by your package manager with pip install somepackage —user .
- Install Miniconda.
- Keep the base conda environment minimal, and use one or more conda environments to install the package you need for the task or project you’re working on.
- Use the defaults conda channel ( conda-forge doesn’t have good support for GPU packages yet).
- Install Miniforge.
- Keep the base conda environment minimal, and use one or more conda environments to install the package you need for the task or project you’re working on.
Alternative if you prefer pip/PyPI
For users who know, from personal preference or reading about the main differences between conda and pip below, they prefer a pip/PyPI-based solution, we recommend:
- Install Python from, for example, python.org, Homebrew, or your Linux package manager.
- Use Poetry as the most well-maintained tool that provides a dependency resolver and environment management capabilities in a similar fashion as conda does.
Python package management
Managing packages is a challenging problem, and, as a result, there are lots of tools. For web and general purpose Python development there’s a whole host of tools complementary with pip. For high-performance computing (HPC), Spack is worth considering. For most NumPy users though, conda and pip are the two most popular tools.
Pip & conda
The two main tools that install Python packages are pip and conda . Their functionality partially overlaps (e.g. both can install numpy ), however, they can also work together. We’ll discuss the major differences between pip and conda here — this is important to understand if you want to manage packages effectively.
The first difference is that conda is cross-language and it can install Python, while pip is installed for a particular Python on your system and installs other packages to that same Python install only. This also means conda can install non-Python libraries and tools you may need (e.g. compilers, CUDA, HDF5), while pip can’t.
The second difference is that pip installs from the Python Packaging Index (PyPI), while conda installs from its own channels (typically “defaults” or “conda-forge”). PyPI is the largest collection of packages by far, however, all popular packages are available for conda as well.
The third difference is that pip does not have a dependency resolver (this is expected to change in the near future), while conda does. For simple cases (e.g. you just want NumPy, SciPy, Matplotlib, Pandas, Scikit-learn, and a few other packages) that doesn’t matter, however, for complicated cases conda can be expected to do a better job keeping everything working well together. The flip side of that coin is that installing with pip is typically a lot faster than installing with conda.
The fourth difference is that conda is an integrated solution for managing packages, dependencies and environments, while with pip you may need another tool (there are many!) for dealing with environments or complex dependencies.
Reproducible installs
Making the installation of all the packages your analysis, library or application depends on reproducible is important. Sounds obvious, yet most users don’t think about doing this (at least until it’s too late).
The problem with Python packaging is that sooner or later, something will break. It’s not often this bad,
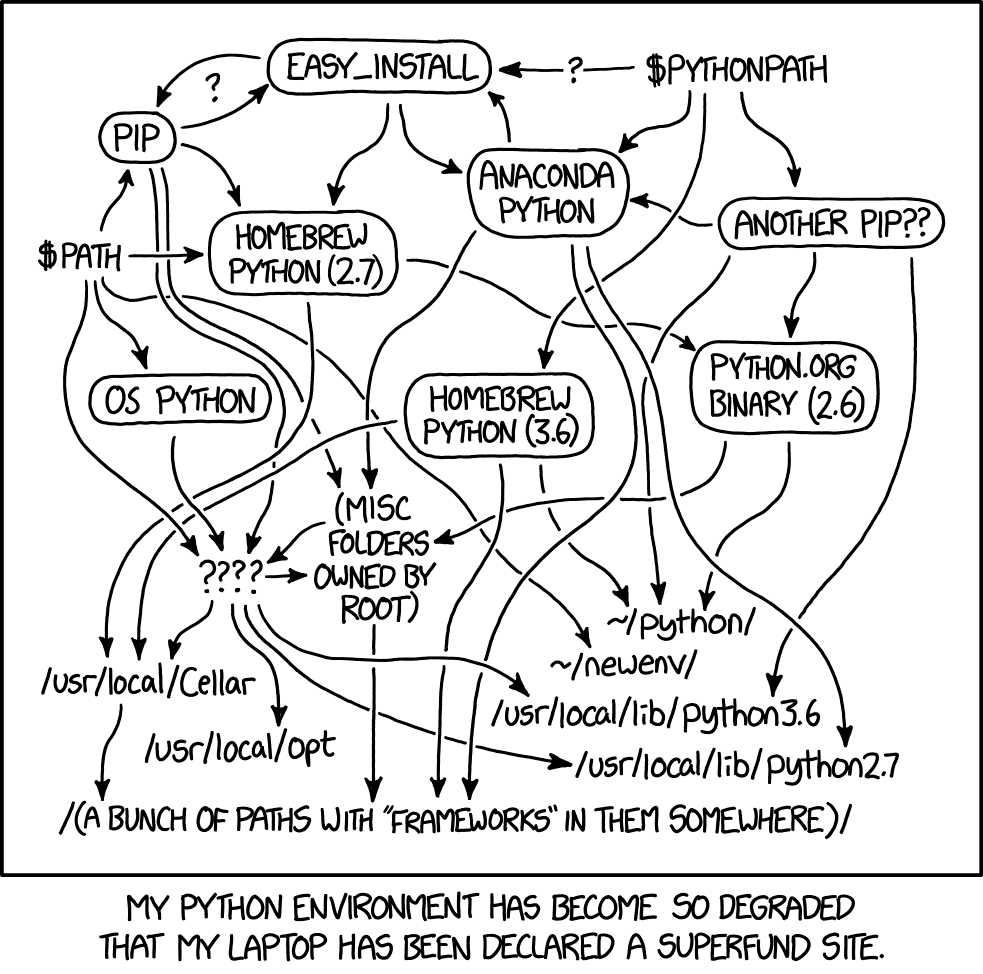
XKCD illustration — Python environment degradation
but it does degrade over time. Hence, it’s important to be able to delete and reconstruct the set of packages you have installed.
Best practice is to use a different environment per project you’re working on, and record at least the names (and preferably versions) of the packages you directly depend on in a static metadata file. Each packaging tool has its own metadata format for this:
Sometimes it’s too much overhead to create and switch between new environments for small tasks. In that case we encourage you to not install too many packages into your base environment, and keep track of versions of packages some other way (e.g. comments inside files, or printing numpy.__version__ after importing it in notebooks).
NumPy packages & accelerated linear algebra libraries
NumPy doesn’t depend on any other Python packages, however, it does depend on an accelerated linear algebra library — typically Intel MKL or OpenBLAS. Users don’t have to worry about installing those, but it may still be important to understand how the packaging is done and how it affects performance and behavior users see.
The NumPy wheels on PyPI, which is what pip installs, are built with OpenBLAS. The OpenBLAS libraries are shipped within the wheels itself. This makes those wheels larger, and if a user installs (for example) SciPy as well, they will now have two copies of OpenBLAS on disk.
In the conda defaults channel, NumPy is built against Intel MKL. MKL is a separate package that will be installed in the users’ environment when they install NumPy. That MKL package is a lot larger than OpenBLAS, several hundred MB. MKL is typically a little faster and more robust than OpenBLAS.
In the conda-forge channel, NumPy is built against a dummy “BLAS” package. When a user installs NumPy from conda-forge, that BLAS package then gets installed together with the actual library — this defaults to OpenBLAS, but it can also be MKL (from the defaults channel), or even BLIS or reference BLAS.
Besides install sizes, performance and robustness, there are two more things to consider: