Msi драйвера для windows 10 официальный сайт


1.After installation and launch Live Update6, you will see the main page of Live Update 6 — [Live Update]. System information will be displayed at the bottom of this page, includes the last scan date.

2.At [Live Update] page, there are two ways to scan update items, includes [Manual], and [Automatic Scan]. Choose [Automatic Scan], system will automatically scan all the items and search for the latest update files. Or you can choose [Manual] and select the items you wish to scan.
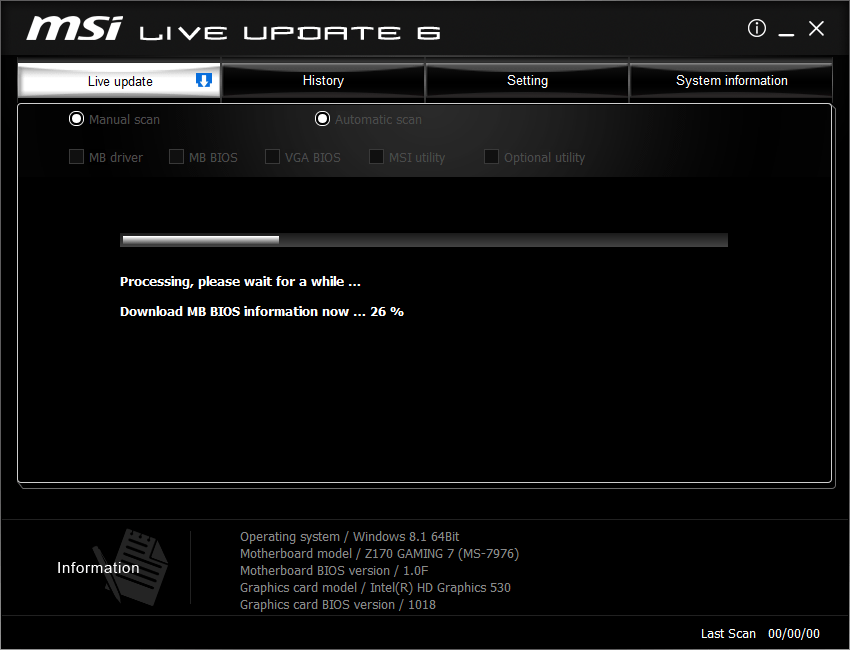
3.At [Live Update] page, there are two ways to scan update items, includes [Manual], and [Automatic Scan]. Choose [Automatic Scan], system will automatically scan all the items and search for the latest update files. Or you can choose [Manual] and select the items you wish to scan.

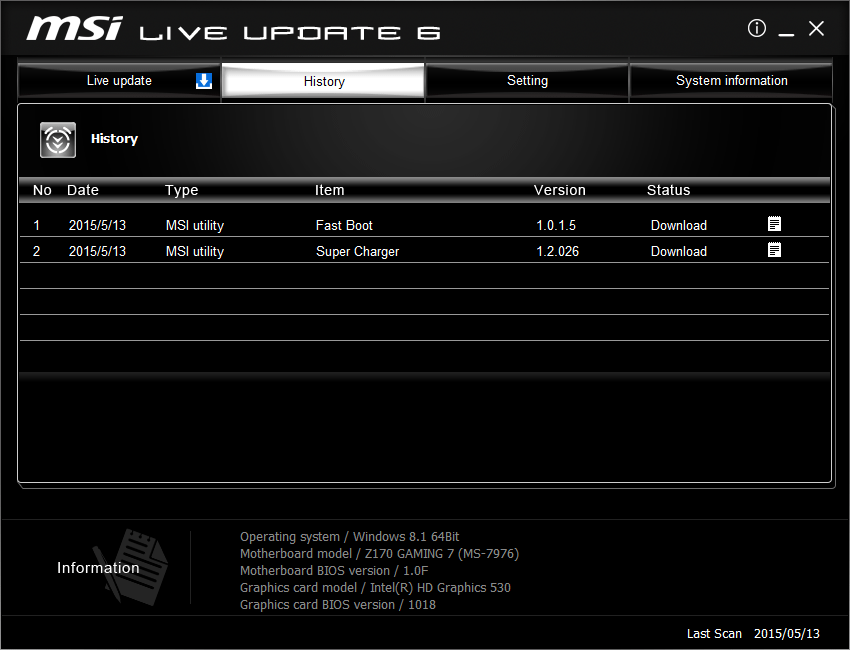
4.At [History] page, you will see the download history record. Click the icon to see detail information.
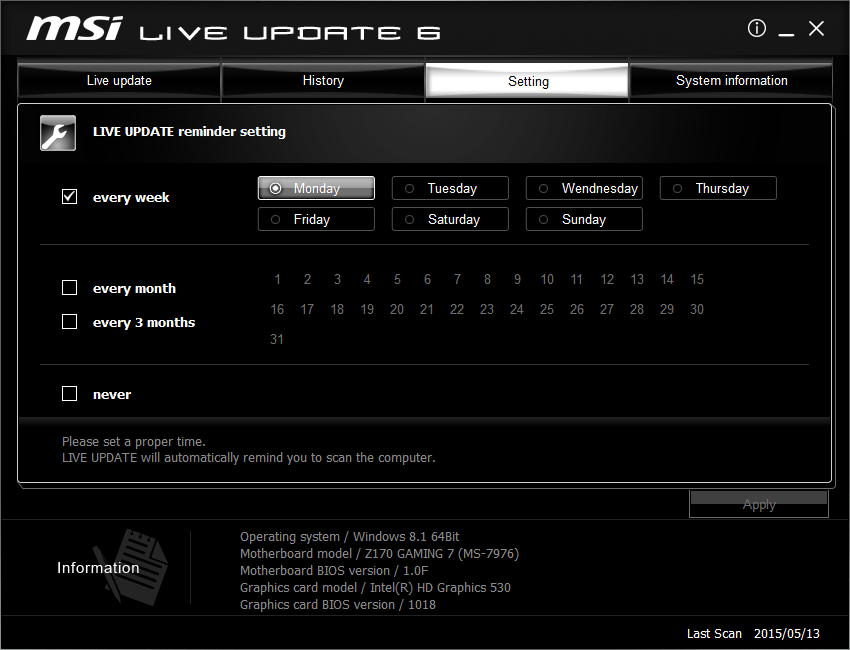
5.At [Setting] page, you can set a proper time for Live Update reminder in order to keep your system in the updated environment. The default frequency is every month. Live Update reminder will remind you to do system scan and update according to your frequency setting. Click the [Apply] button to save the settings.
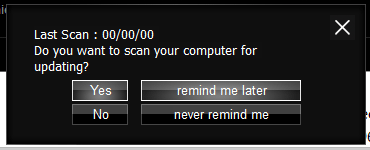
6.Live Update 6 Reminder will automatically pop up at the reminding time. Choose [Yes] or [No] to do update. Choose [Remind me later] or [Never remind me] for the reminder setting.
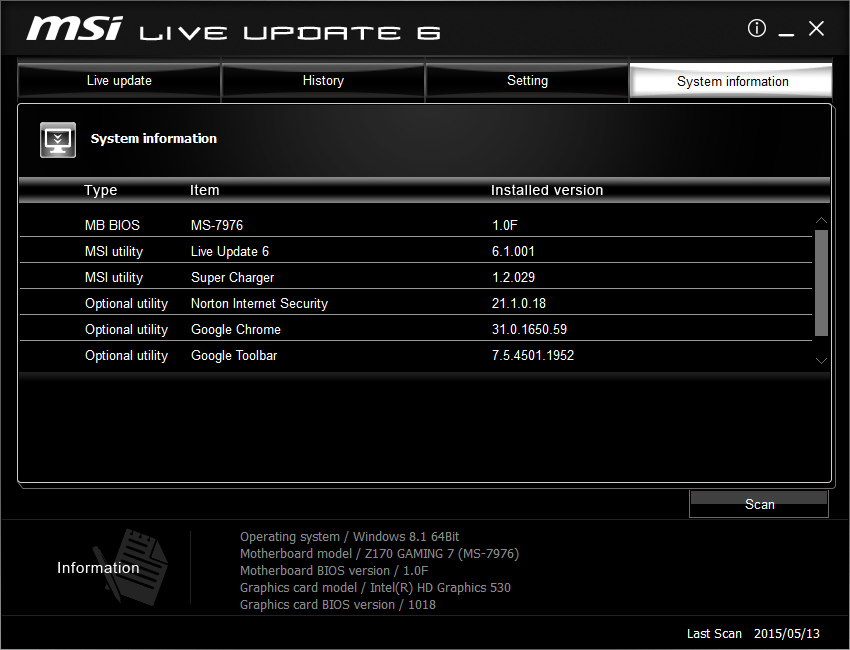
7.At [System information] page, you can see all installed drivers and applications, when you click [Scan] button.
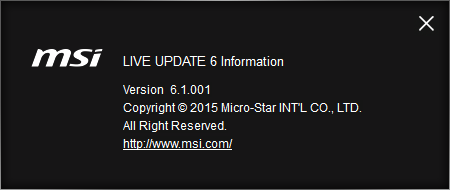
8.At [ i ] button, you can see [msi website], also the Live Update 6 version.
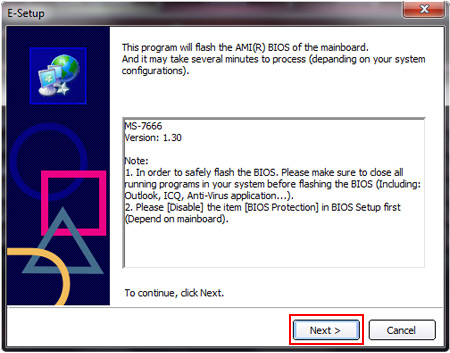
BIOS Flash Instruction:
1.Choose the [download and install] icon to download the MB BIOS. The MSISetup will automatically start up after download. Click the [Next] button at the following page.
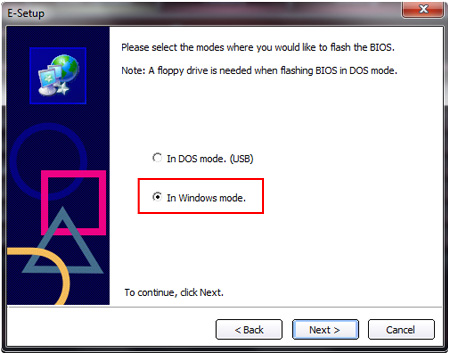
2.There are two ways to flash BIOS. Default setting is [In Windows mode], and click [Next] to finish BIOS update.
3.Choose [In Dos mode (USB)], and click [Next]. Then BIOS will be downloaded to USB pen drive.

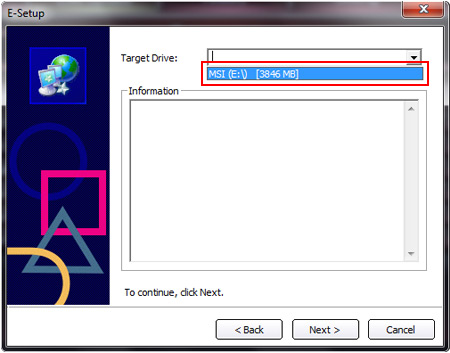
4.Insert the USB disk to make USB boot disk, then choose the target drive from the drop down list.
5.fter click the [Next] button, the system will pop up to ask “All data on drive will be lost, are you sure?” Choose [OK] to continue, or [Cancel] to cancel the process.
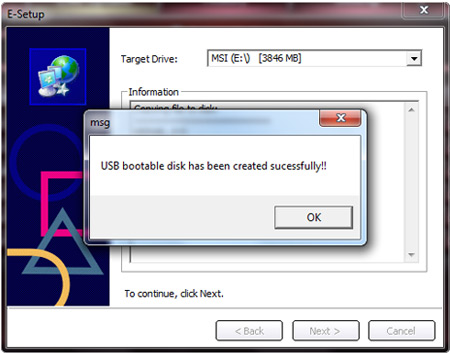
6.After click the [OK] button, the system will start to do the USB boot disk. The processing time will depends on the size of the USB disk. For a USB disk with 4GB will take around 1 minute. A pop up message “USB bootable disk has been created successfully!!” will show up when finish.
7.Click [Start] to restart the computer. Click [Cancel] to cancel the restart. Click [Back] to go back to the previous step
8.After restart, please set the computer to boot from USB. When the computer restarts from USB, please follow the instruction to update BIOS.p
9.There are two ways to flash BIOS. Choose [In Windows mode], and click [Next].
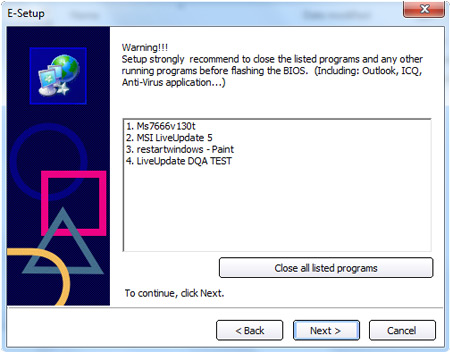
10.Choose [Close all listed programs], then click [Next]
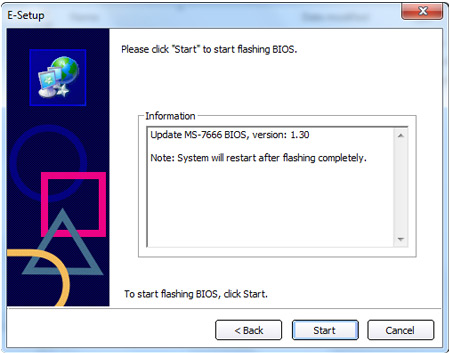
11.Click [Start] to start flashing BIOS. The system will restart when the process is complete.
Msi драйвера для windows 10 официальный сайт


Ваша оценка отправлена, спасибо. Сообщите нам, пожалуйста, как можно сделать ответ вам еще более полезным.
Благодарим за ваше мнение.
How to fix audio static problem?
Please check with following suggestion.
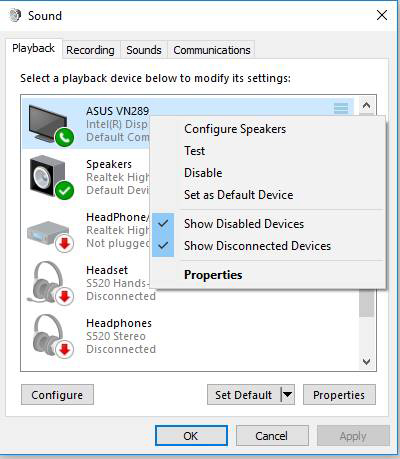
Set as Default Device
If you are connecting to the audio device by USB or HDMI, you might need to set the device as the default. Select the [Start button], type [Sound] in the search box and choose icon [Sound] from the list of results. Then, select the device and choose [Set as Default Device] on the Playback tab.
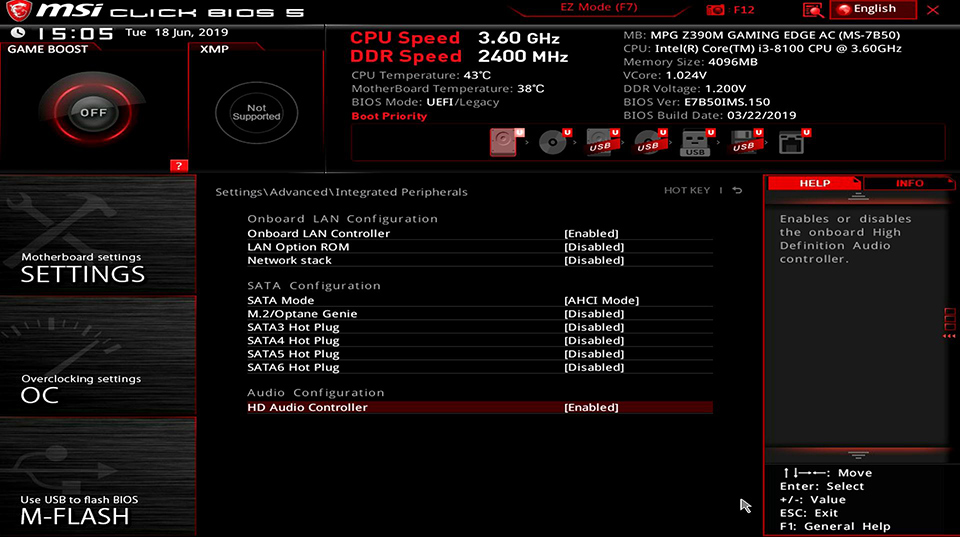
HD Audio Controller in BIOS is enable
Power on the device and press Delete to enter BIOS menu. Then, select「SETTINGS」to enable the onboard High Definition Audio controller.
Install latest audio driver
1. Right click on「My computer」and select「Properties」

2. Select 「Device Manager」.

3. Select 「Sound, video and game controllers」and check the Realtek audio device.
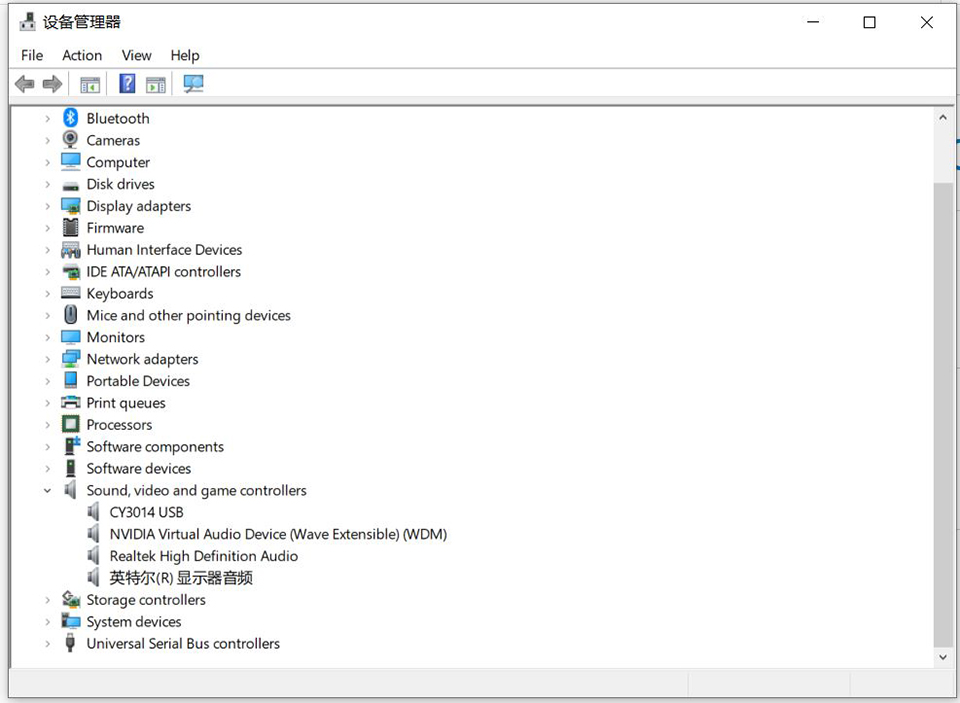
(Hint) If there is no such audio device, please download and install latest driver from MSI official website.

Realtek Audio Console
Select 「Windows key」and check with「Realtek Audio Console」. If there is no such control panel, please download and install from Microsoft Store.
(Warning) Some platforms do NOT support UWP Realtek Audio Driver. For those devices, Realtek Audio Console will be activated directly after audio driver installation.

Identify the external speaker
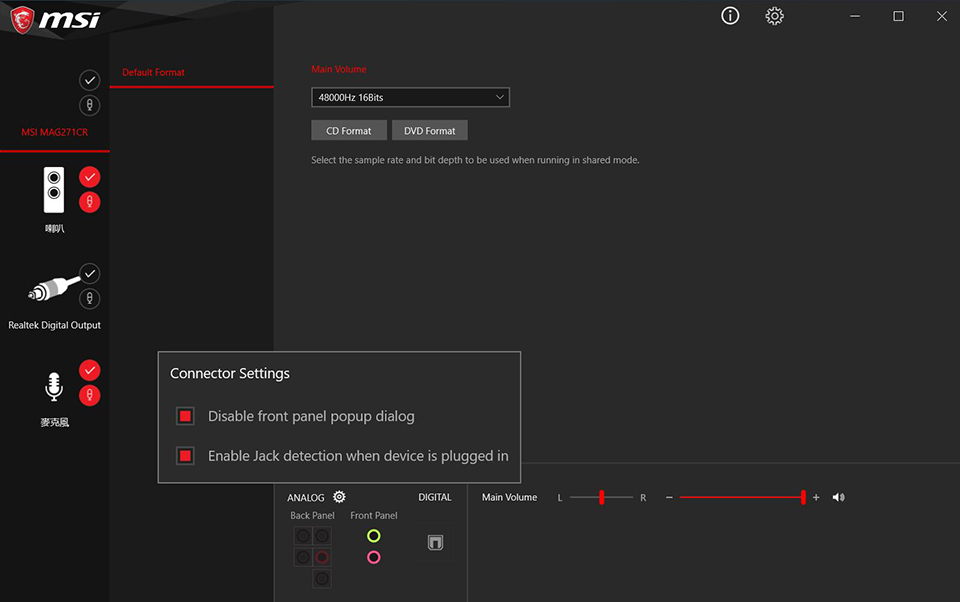
Make sure audio cable and PC have a tight connection.

Check the audio port indicator in [Realtek Audio Console]. If there is no any audio device plugin. Please switch another external speaker and try the same step again.
Check audio device is correct
1. Click the speaker icon in the bottom right corner and check default speaker. If there is no speaker icon, please click icon in right. Then, click the speaker icon.

Check audio device is enable or not. If there is no such device, please refer to [Install latest audio driver] and [Realtek Audio Console].

Check the speaker status. If the speaker does not exist, please refer to [Identify the external speaker].
LIVE UPDATE 6 ИНСТРУКЦИЯ
Загрузить Live Update 6
Live Update 6 поддерживает следующие обновления для изделий MSI:
Материнские платы: Драйверы / BIOS / Утилиты;
Графические карты: Драйверы / BIOS
НЕ ИСПОЛЬЗУЙТЕ Live Update для моноблоков AIO и ноутбуков.
1. После установки и запуска Live Update 6, откроется главная страничка Live Update 6 — — [Live Update]. На ней будут отображены сведения о системе, включая дату последнего сканирования и номера пунктов, требующих особого внимания.

2. На страничке [Live Update] предлагаются два режима проверки объектов на возможность обновления — ручной [Manual] и автоматическое сканирование [Automatic Scan]. Выберите автоматическое сканирование [Automatic Scan], Система автоматически произведет проверку всех объектов и поиск последних версий файлов для обновления. Можно также выбрать ручной режим [Manual] и указать объекты, которые желаете проверить на возможность обновления.

3. После завершения проверки ознакомьтесь с содержаением нижеследующей колонки, содержащей результаты поиска. В ней будут перечислены удаленные объекты и объекты, для которых имеются новые версии. Щелкните по значку  , чтобы ознакомиться со сведениями об объекте и далее по значку
  для загрузки и установки. Вы можете также выбрать объекты, которые желаете установить и щелкнуть по кнопке [Download] для загрузки.

4. На страничке [History] (История) вы увидите сведения об истории обновлений. Щелкните по значку , чтобы получить подробные сведения.

5. На страничке [Setting] (настройки) можно задать период напоминания об обновлениях, чтобы постоянно поддерживать свою систему в обновленном состоянии. Заданная по умолчанию частота напоминаний — раз в месяц. Система напоминаний Live Update напомнит, что нужно проверить систему и произвести обновление в сосответствии с заданными периодом. Щелкните по кнопке [Apply] (Применить), чтобы сохранить настройки.

6. Напоминание Live Update 6 автоматически откроется в заданное время. Выберите [Yes] (да) или [No] (нет) для обновления. Выберите [Remind me later] (напомнить позже) или [Never remind me] не напоминать никогда) для настройки напоминаний.

7. На страничке [System information] (Информация о системе) вы увидите список всех установленных драйверов и прилоржений, кликнув по кнопке [Scan].

8. Кликнув на кнопку [ i ] можно увидеть адрес веб-сайта MSI [msi website], а также версию Live Update 6.
- ВКонтакте
- РћРТвЂВВВВВВВВнокласснРСвЂВВВВВВВВРєРСвЂВВВВВВВВ