The Seven Best MQTT Client Tools 2019

Written by The HiveMQ Team
Category: MQTT MQTT Client
Published: July 15, 2019


Everybody from MQTT beginner to expert needs a handy tool to try out stuff or for debugging. A while ago we had already taken a look at such tools, but since then a lot of new tools have emerged, which definitely justifies an update on that topic. The goal of this blog post is to give a brief overview of the best MQTT client tools for different platforms and highlight special features.
We from HiveMQ are very active in spreading the word about MQTT at conferences in Germany & Europe and to the whole world over the internet. So we often demonstrate and explain how MQTT works and what its benefits are. Also during the further development of HiveMQ and when implementing IoT solutions for customers, we need tools to publish and subscribe to different topics easily. These are only 2 use cases out of many others where a MQTT client tool comes very handy and is often inevitable. Due to the particular suitability of MQTT for mobile devices, tools for mobile platform are as important as desktop versions.
So there’s definitely a right to exist for tools on different platforms and we will directly jump into our top 7 in no particular order.
The MQTT CLI is an open-source Java MQTT client tool that enables you to interact quickly and easily with any MQTT Broker in various ways. The CLI gives you a single compact tool for the most important client operations (PUBLISH and SUBSCRIBE). The CLI tool also provides an interactive and comfortable SHELL mode that enables you to work with multiple MQTT clients in parallel and supports connection handling. The MQTT CLI supports all MQTT features for MQTT Version 5 & 3.1.1. The tool uses the HiveMQ-MQTT client library, which is a fast, low-overhead, high-throughput, and modern MQTT library written in Java. The MQTT CLI comes in various binary packages that can be downloaded from the documentation homepage on GitHub.
HiveMQ has released the HiveMQ MQTT Client, a Java library that is available under the Apache license on GitHub. This new MQTT client is compatible with MQTT 3.1.1 and MQTT 5. It is designed for high-performance so it is very useful for server-side MQTT clients that integrate enterprise systems. The client features a reactive, blocking and non-blocking API. Download if for free from the HiveMQ Github repo.
MQTT.fx
(available for Win/MacOSX/Linux, Link, free)
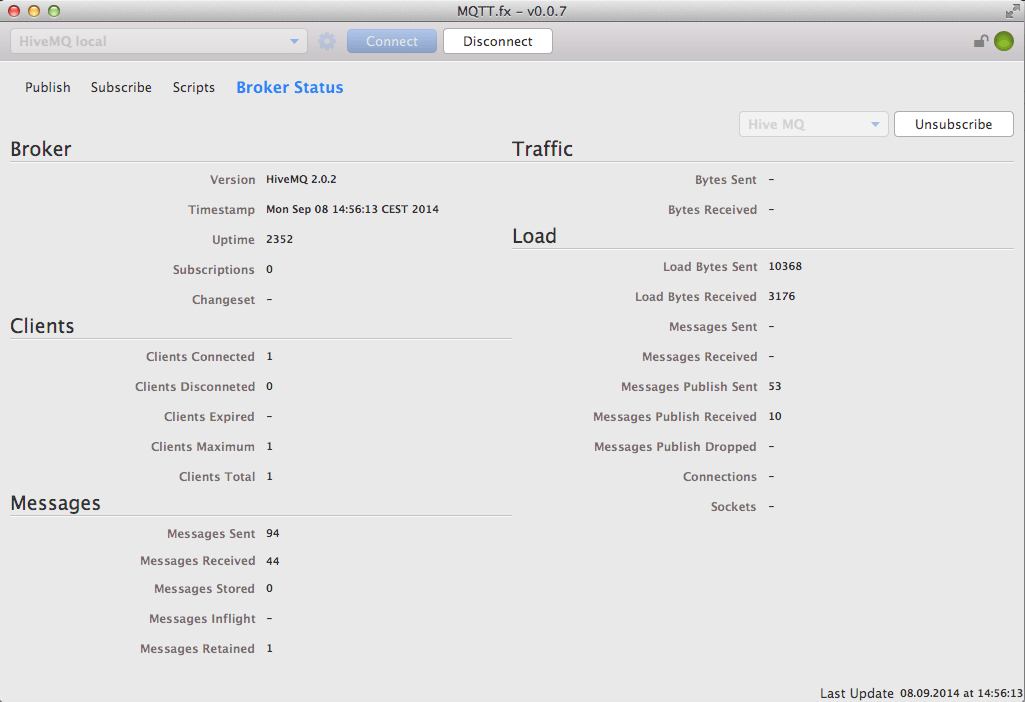
MQTT.fx — Broker status via $SYS-topics
MQTT.fx has been around since 2014 and built its fan base in our team. It comes with the portability of the Java VM and a quite impressive feature set. MQTT.fx is implemented with JavaFX, which is quite obvious, when opening the tool for the first time. Due to the native packaging available for JavaFX, there are binaries for Windows, MacOSX and Linux, which makes the installation a breeze. But lets have a look at the MQTT part. Besides standard publish/subscribe functionality it provides support for $SYS topics and connection profiles for connecting to different brokers. Especially the $SYS topic support is awesome, it helps to inspect the internals of the broker from time to time. We haven’t seen that kind of displaying in another tool. The connection profiles allow the configuration of connection options like client id, SSL/TLS, username/password and Last Will and Testament. Another functionality which has been introduced in one of the last releases is scripting. This makes the simulation of different sensors, etc. easily possible. Just for the record, there are also a few small things, which sometimes makes the user experience inconvenient. For example the publish/subscribe functionality is separated in two tabs, which results in constant switching the tabs. Update: It is possible to view publisher and subscriber at the same time by detaching one of the tabs. Also here and there small bugs occur. But regardless of these little things, the listed features makes it definitely one of the best choices, when experimenting with MQTT at the moment.
mqtt-spy
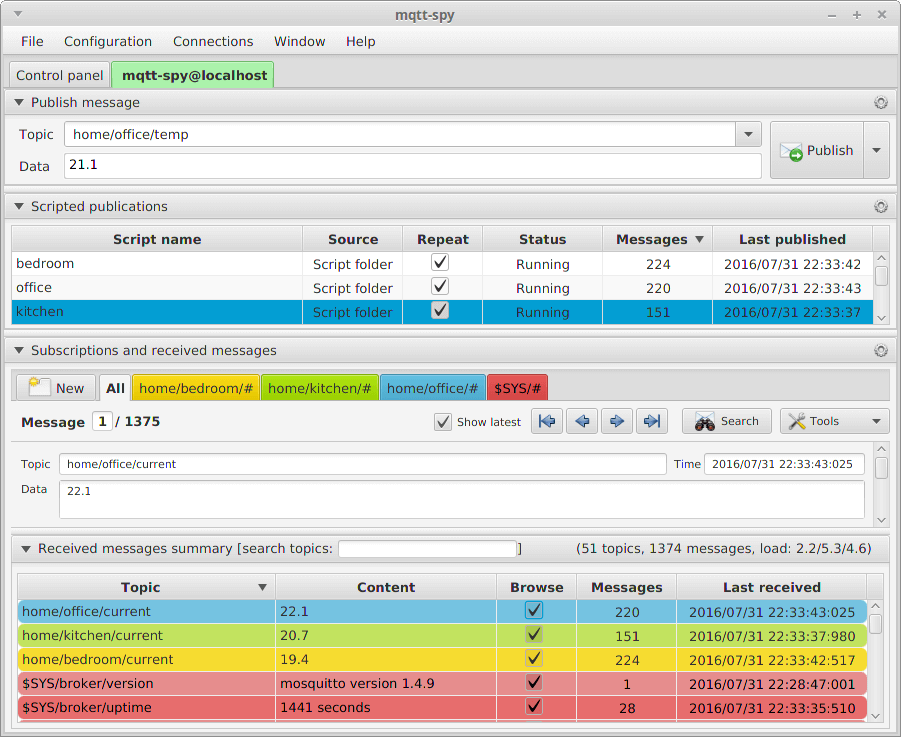
mqtt-spy publish/subscribe (source: github.com/eclipse/paho.mqtt-spy)
mqtt-spy has been around since 2014 and as of early 2016 is part of Eclipse Paho and Eclipse IoT. It ships as a JAR file and runs on top of Java 8 and JavaFX. MQTT-Spy has a very nice way of displaying the basic MQTT publish/subscribe mechanism. It makes it easy to publish and subscribe at the same time and there are different tabs for connections to several brokers. The different areas of the pub/sub window (publish, new subscription, subscription & messages) can be closed down to make room for the currently used ones. Its search functionality allows to find and filter the often heavy load of MQTT messages running through such a tool. Another handy feature is that it logs every published and received message in the standard output and also into a file. So it is easy to open the file in any text editor and make deeper analysis of the messages, which is often necessary when dealing with many MQTT messages. It also comes with advanced features like scripting, filtering & searching, decoding & formatting received messages and graphing/charts. It’s a sophisticated tool for the day-to-day usage.
MQTT Inspector
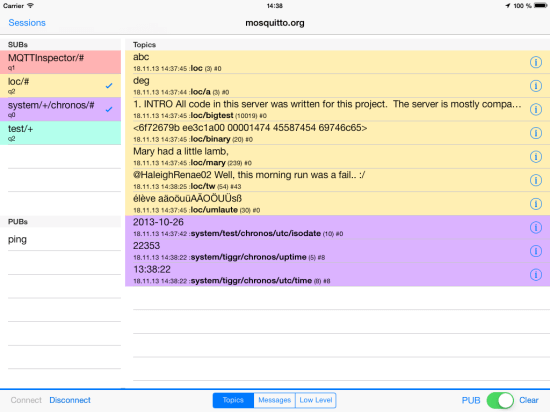
MQTT Inspector on iPad (source: jpmens.net/2013/11/19/mqtt-inspector-for-ios/)
The MQTT inspector is a really great tool for any iOS device. It is especially suited for power users. It is possible to create and store connection options, similar to most of the other tools. But this tool also allows to pre-configure publishes and subscriptions as templates. After connecting to the broker a simple click activates a subscription or triggers a publish. Therefore it is good to know beforehand to which topics MQTT Inspector should publish or subscribe to. Of course it is possible to change this during an open connection. As a power user tool it allows to switch between a simple message feed, a view grouped by topic and a low level view.The low level mode shows low-level MQTT command messages and some basic data plus its representation in hex. Another functionality allows to filter the message by their topic, attributes or payload. This is very handy when a lot of messages arrive and only some of them are of interest. As soon as you have understood the handling of MQTT inspector there’s no way it wouldn’t make it onto your iOS device.
MyMQTT
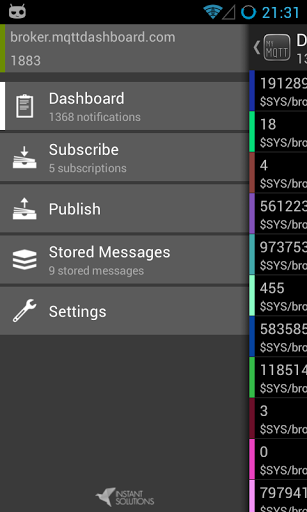
MyMQTT Android App (Picture from Google Play Store)
The Android App MyMQTT can be installed via the Google Play Store. It is a useful app that has basic publish and subscribe capabilities. A functionality which differentiates this app from others is its ability to store messages on the phone. These are shown in the menu under “Stored Messages”. The app is still under development and essential features like different quality of service levels, Last Will and Testament as well as retained messages are missing. However, the last update is almost one year old. So hopefully the announcement of the new MQTT standard this September will bring a new version of this useful app for Android.
HiveMQ Websocket Client
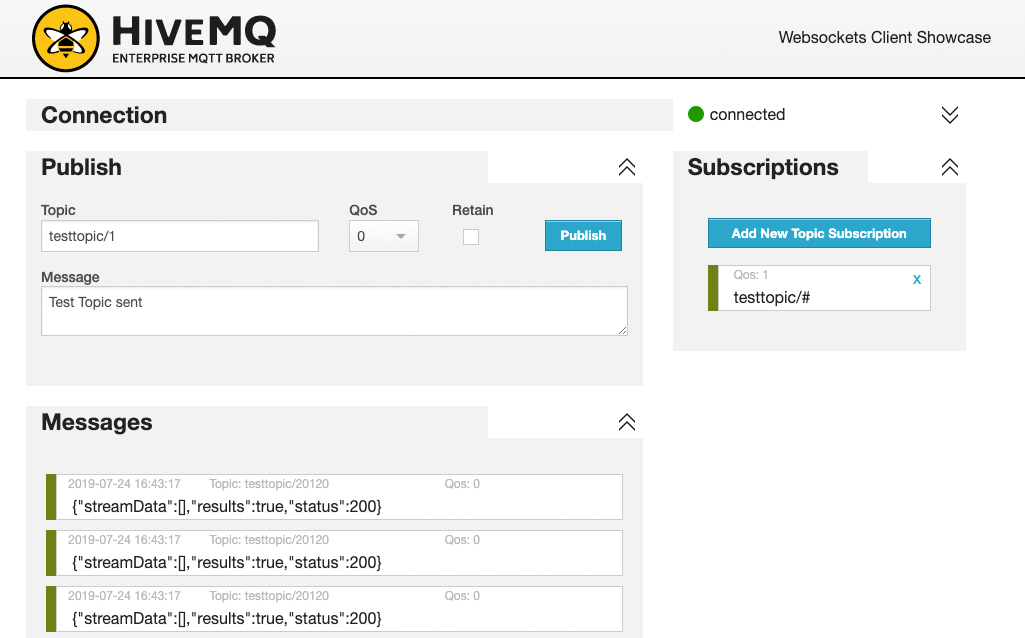 _HiveMQ Websocket Client_
The HiveMQ Websocket Client is a simple and clean tool made by us while implementing the native websocket support for HiveMQ. After websockets were introduced in HiveMQ, we decided to improve this app a little bit and made it available to everybody as open source. This application is also a perfect starting point to build your own app with the Eclipse Paho JavaScript library. It is a full-fledged MQTT client, which supports all common protocol features except persistent session. The visualization of the different subscription is colorized and the predefined defaults make it possible to publish and receive a message with 3 clicks and no input (Connect, Add new Topic Subscription, Publish). It can also connect to local brokers, when using a local IP address or hostname. The tool particularly comes handy when a MQTT connection over Websockets should be tested or a tool is needed without prior installation. Of course the HiveMQ websocket client works in every modern browser and on most operating systems, including iOS and Android.
MQTT Lens
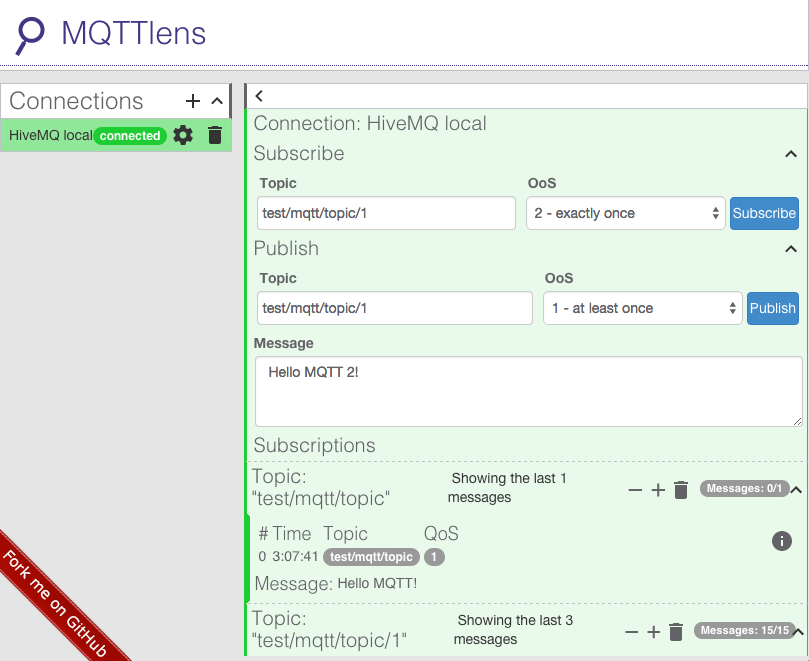
MQTT Lens — pub/sub view
MQTT Lens is also a quite new project, which was developed during the Google Summer of Code 2014. It can be easily installed through the Google Chrome App Store. The tool has a pretty clean interface and supports all the available connection options from the MQTT spec, except persistent sessions. It accepts connections to more than one broker at the same time and colors them differently for easy association. The interface for subscribing, publishing and seeing all received messages is simple and easy to grasp. Sadly there is no possibility to publish retained messages. But although this app is installed via Chrome, it runs as standalone application and can also connect to brokers via the plain MQTT port 1883, which can’t be done by pure JavaScript Web clients. A nice feature is the display of JSON payloads in a pretty way. In summary, MQTT Lens is particularly well suited for people who need basic pub/sub functionality without having power user needs.
mosquitto_tools
Nowadays with all the fancy client tools, there’s still a place for the mosquitto publish and subscribe tools. They are still the best option on a headless server for verifying the correct installation of a MQTT broker and doing other MQTT tests. The feature set is complete and it is ideal for devops, power users or everybody else who loves to work with the console.
Others
There are also other tools, which we didn’t cover in this post, they can be found on the official MQTT website. The following have also been covered in our earlier post:
- MQTT.app (MacOSX)
- SimpleMessage (MacOSX)
Summary
To sum things up, since the last time we had a look at MQTT client tools, the MQTT tool landscape has changed a lot and there are some really great new tools to get started with MQTT and for everday use.
What’s your favorite tool out there? Did we miss your favorite MQTT tool in this top 7 list? Tell us in the comments!
Mqtt client для windows
MQTT Paho C client for Windows
To run: Download the binary TT3.exe and the paho-mqtt3c.dll from the «release» directory. you might also need the mfc100.dll from the same dir.
Documentation — not complete at the moment
The main window is represented by the following picture:

To restart the application with most of your supplied information filled in, remember to click the «save» button after changes. This will update the associated .ini file
To save all the messages in the «Subscriptions Received» listbox click on the «Save Msgs» button. This will create a file TT3replay.mqtt with the following layout:

To replay the messages in the TT3replay.mqtt file, click the «Replay» button. If you edit the file and changes the [seconds] to a value bigger than zero, it will wait that amount of seconds before it publishes the message. Great for doing demos.
If you edit the soure file by hand please ensure to press enter at the end of the last line.
Please note that due to some timing issues, do not subscribe to the same topics in the same running instance of TT3, start up a seperate TT3 instance to do the replay from. Sorry.
To change the source file name and/or to replay in a loop, click on «Replay Setup» and then complete the popup window. 
To set up some performance tests, click on «Settings»

To receive alerts when specific text strings appear in a message received, click on «Alert».

To add a new alert complete the string to search for and what beep frequency and length the alert must be. Optionally add an application that must be called when this alert trigger. This application will be called with parameters Topic,Message. Your application must interpred the parameters. Enable the «Active» checkbox and «Add» the alert. The alert will be dsiplayed on the control listbox at the top of the screen. When clicking the «Start» button all the «active» alerts in the listbox will be enabled and alert monitoring will start.
The «Save» button will add the alerts to the TT3.ini file so that next time TT3 starts it will populate the listbox with the entries from the ini file.
Publish Messages on a regular basis
To publish messages on a regular basis, click on «Exerciser».
Протокол MQTT и открытый проект клиента MQTT на Delphi
Протокол MQTT применяется для обмена сообщениями в интернете вещей. Интересен прежде всего тем, что поддерживается крупнейшими провайдерами облачных сервисов, такими как IBM, Microsoft, Amazon.
Можно бесплатно получить аккаунт в этих сервисах, настроить там службу приема MQTT сообщений и наблюдать через эти сервисы за жизнью своих устройств, например, в умном доме. Также через эти сервисы устройства могут общаться между собой.
Демонстрация подключения клиента к службе MQTT облака IBM Bluemix прилагается.
Краткое описание.
MQTT предельно примитивен: с коротким заголовком, без контроля целостности, не накладывает никаких ограничения на структуру, кодирование или схему данных. Единственное требование к данным в каждом пакете – они должны сопровождаться идентификатором информационного канала. Этот идентификатор в спецификации называется Topic Name или проще топик. Данные передаются пакетам поверх протокола TCP. Количество данных в пакете может быть от одного байта до 268 435 455 байт. Весьма гибко! Хотя публичные облачные сервисы вводят здесь более жесткие ограничения, до нескольких килобайт.
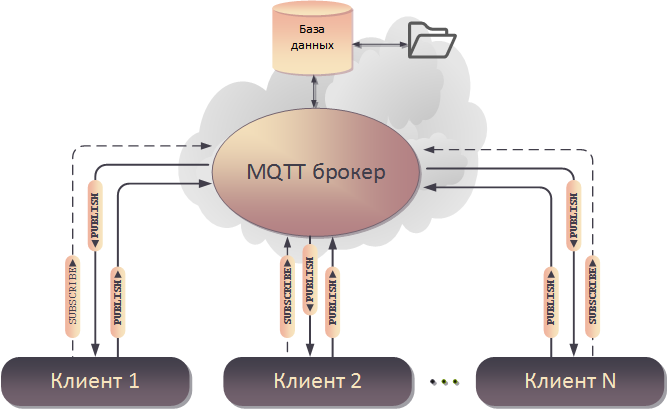
Протокол MQTT требует обязательного наличия брокера данных. Это центральная идея технологии. Все устройства посылают данные только брокеру и принимают данные тоже только от него. Брокер — это программа, выполняющая функции TCP сервера с динамической базой данных.
База данных брокера в частности содержит таблицу со всеми полученными пакетами с индексацией по топикам этих пакетов. Получив пакет, брокер рассылает его всем устройствам в сети согласно их подписке. Чтобы устройство что-то получило от брокера оно должно подписаться на топик. Топики возникают динамически по факту подписки или по факту прихода пакета с данным топиком. От подписки на топик можно и отказаться. Таким образом топики представляют собой удобный механизм организации связей разных видов: один ко многим, многие к одному и многие ко многим. Если у пакета нету подписчика, то он отбрасывается. Если подписчик не на связи, то пакет либо сразу стирается в базе брокера, либо ждет подключения подписчика некоторое заданное в конфигурации время. Вариант поведения определяется атрибутом QoS пакета.
Что еще здесь важно.
• Устройства первыми устанавливают связь с брокером. Т.е. устройства могут находится за трансляторами сетевых адресов (NAT-ами) и не иметь статических IP адресов и это не помешает связи.
• Может быть применён протокол SSL для шифрации трафика. Но можно работать и без SSL даже с сервисами IBM, что облегчает отладку.
• В исключительно тяжёлых случаях MQTT брокеры позволяют подключаться к ним через протокол WebSocket на 80-й порт.
• Также может быть произвольно изменен порт штатного протокола MQTT.
• И клиент/клиенты с графическим пользовательским интерфейсом и брокер могут находится на одном компьютере. Т.е. решение может быть и абсолютно локальным и масштабироваться в глобальное одним кликом.
• Разные брокеры могут соединяться между собой подписываясь на сообщения друг у друга.
• Концепция топиков хорошо ложится на технологию NoSQL баз данных. С той же целью облачные сервисы склоняют пользователей использовать JSON кодирование данных.
Открытые проекты
Выбор MQTT брокеров довольно большой. Но как ни странно удобных клиентов с оконным пользовательским интерфейсом под Windows практически нет. А клиент такой для освоения протокола MQTT просто необходим поскольку за рамками спецификаций находится много практических нюансов работы брокеров и все их надо как-то изучать и тестировать.
Было решено реализовать MQTT клиента на Delphi.
Google для Delphi может предложить только компонент TMQTTClient. Но это старый и не рабочий компонент. Большинство других клиентов, написанных на языках Java, Erlang, Haskell, Javscript в Delphi интегрировать весьма проблематично.
Нашелся единственный подходящий проект – Mosquitto
Написан на чистом C-и. Компилируется под разные операционные системы. Имеет скрипты генерации проекта для Visual Studio. На выходе под Windows получаем dll файлы с реализацией функциональности клиента и брокера. Применение C-и обнадёживает по части быстродействия. А динамические библиотеки, написанные на C-и легко подключаются к программам на Delphi.
Сам Delphi в лице Embarcadero RAD Studio XE8 весьма мощный инструмент для создания гибких и удобных пользовательских интерфейсов под Windows особенно если он вооружён пакетами DevExpress, TeeChart, RxLib, FireDAC и др.
Необходимые инструменты
Нам понадобится среда разработки MS Visual Studio 2015. В ней будет компилироваться проект Mosquitto и все вспомогательные проекты от которых зависит Mosquitto . Альтернативно Mosquitto под Windows можно компилировать с помощью пакета Cygwin, но Visual Studio показался удобней.
Для генерации файлов проекта Visual Studio надо скачать и установить утилиту Cmake. Источник cmake.org
И разумеется нужен RAD Studio XE8. Дополнительно в RAD Studio должен быть установлен пакет компонентов DevExpress VCL версии не ниже 14.2.2. Хотя это не имеет принципиального значения, проект пользовательского интерфейса можно легко переделать и под стандартные компоненты RAD Studio.
Порядок установки программного обеспечения
Скачиваем эти проекты.
OpenSSL не компилируем, а сразу берем от туда два нужных файла: libeay32.dll и ssleay32.dll из директории bin. Часто бывает, что на компьютере они уже установлены от других проектов. Это надо проверять.
Pthreads тоже не компилируем, а берем уже скомпилированный файл pthreadVC2.dll из директории dll\x86.
Libwebsockets идет без заранее скомпилированных файлов и без проекта под Visual Studio, но имеет конфигурационный файл CMakeLists.txt. В этом случае с помощью утилиты Cmake генерируем файл проекта Visual Studio в отдельную директорию (директория libwebsockets_VS_proj). А затем открыв сгенерированный файл проекта в Visual Studio компилируем. Получаем нужный нам файл websockets.dll.
После всех предыдущих действий можно компилировать проект Mosquitto . Здесь также сначала надо будет сгенерировать файл проекта Visual Studio (директория Mosquitto_VS_proj) из прилагающегося файла конфигурации CMakeLists.txt. Сгенерированный проект не совсем получается рабочим, придется поменять пути к некоторым внешним заголовочным файлам и библиотекам, включить некоторые макросы в проект и несколько модифицировать исходные тексты. В результате получаем файл mosquitto.dll.
Для простоты все файлы и структура директорий с упомянутыми проектами содержаться в архивном файле, прилагаемом к статье.
По ходу вместе с клиентской библиотекой компиляция проекта Mosquitto дает нам и исполняемый файл брокера MQTT — mosquitto.exe.
Таким образом мы получаем сразу и клиента, и брокера MQTT, т.е. практически все что нужно для организации эффективного интернета вещей.
Создание проекта клиента MQTT в Delphi
Чтобы интегрировать в Delphi библиотеку mosquitto.dll надо создать модуль объявлений функций библиотеки на Object Pascal. Для этого была выполнена конвертация файла mosquitto.h в файл MOSQUITTO.PAS.
Проект клиента очень простой, состоит всего из 4-х файлов с исходными текстами. Клиент демонстрирует подключение и отключение, формирование завещания (Will), посылку данных пакетом PUBLISH брокеру, прием данных пакетом PUBLISH от брокера, подписку и отказ от подписки.
Программа сохраняет все атрибуты подключения, именуемые термином профиль в таблицу профилей сохраняемую на диске. На диск также сохраняется отдельно логи полученных и отправленных пакетов PUBLISH.
Способ использования клиента
Запускаем файл TMQTTC.exe.
Для того чтобы было с кем обмениваться сообщениями запускаем тестового брокера командой Run_mosquitto.cmd в директории Mosquitto_1_4_5_bin. Для удобства брокер сконфигурирован на подключение без SSL и проверки пароля.
Заполняем поля как на скриншоте.
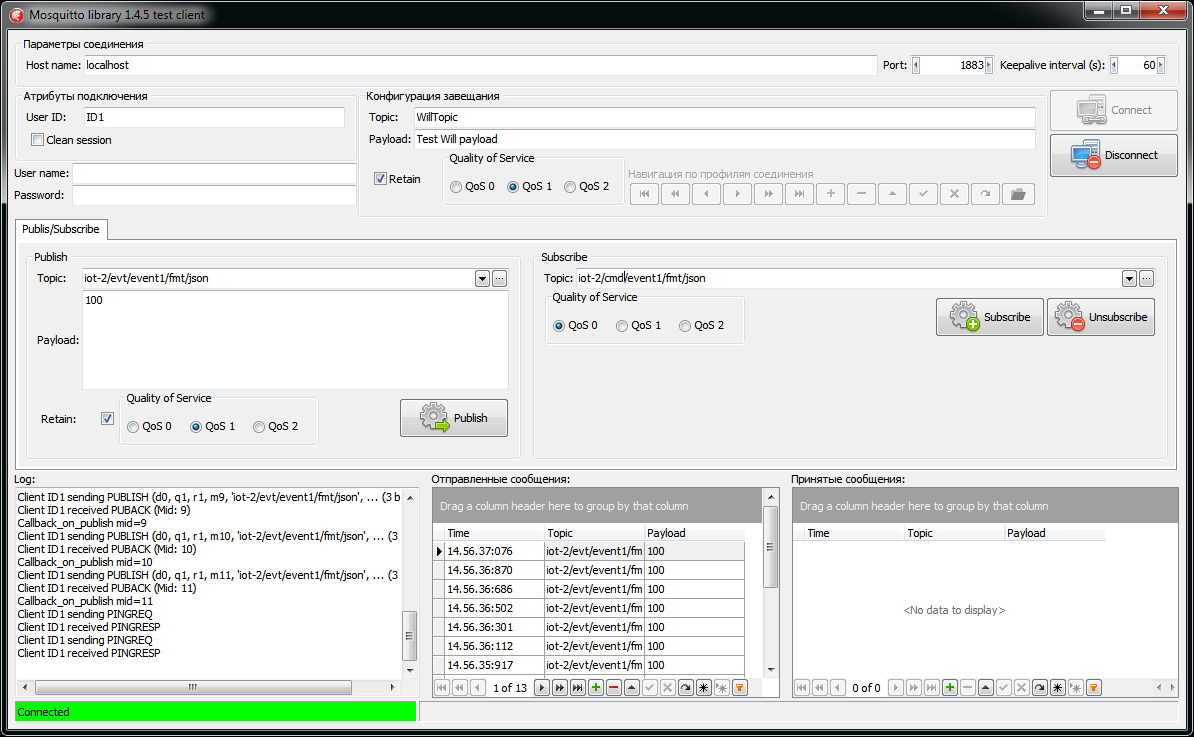
Пароль и имя пользователя не обязательны. В навигаторе нажимаем кнопку фиксации изменений, чтобы сохранить данные в таблице. После чего нажимаем кнопку Connect.
После соединения становятся доступны команды публикации и подписки. Команды PING клиент Mosquitto генерирует автоматически.
Чтобы клиент что-то получал следует еще раз запустить программу TMQTTC.exe с другим идентификатором клиента и подписаться одним клиентом на получение данных от другого.
Подключение к IBM Bluemix
Первое что надо сделать это получить акаунт в Bluemix
Получив акаунт, мы заходим в свою панель управления на Bluemix . Здесь сразу надо переключиться на регион US South. Для этого щелкаем в правом верхнем углу по пиктограме акаунта и меняем значение в поле Region. Всего есть три региона, но имеено US South дает возможность испытать большинство сервисов. Далее надо создать Space. Вид экрана должен быть как на криншоте ниже. Здесь создана организация INDEMSYS и Space INDEMSYS SPACE. 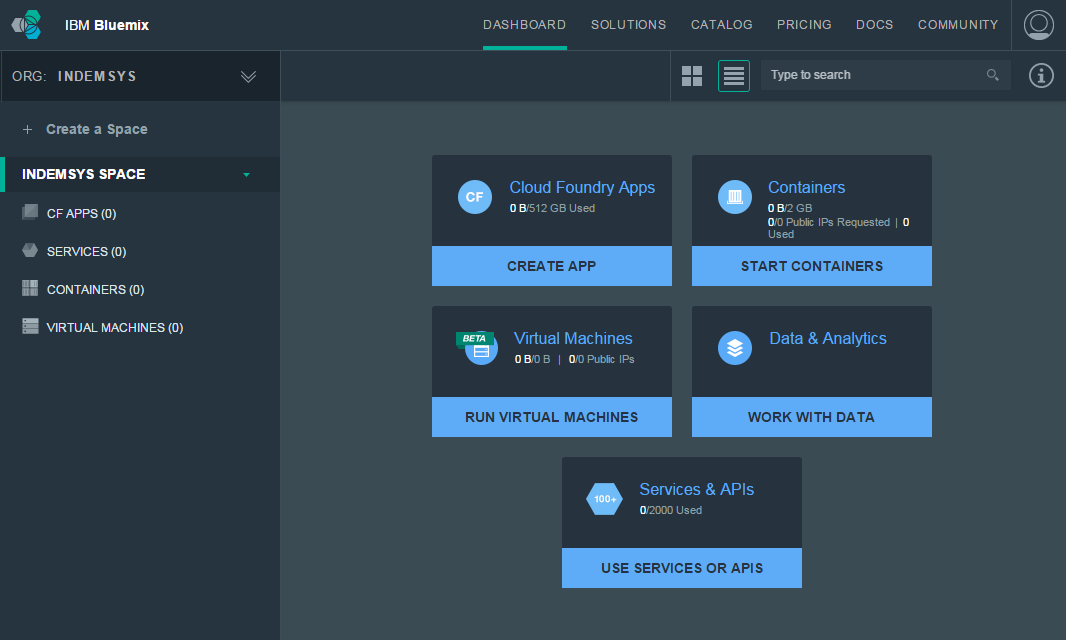
Теперь нажимаем на CATALOG в верхнем меню. Спускаемся в самый низ и выбираем Internet of Things Foundation. 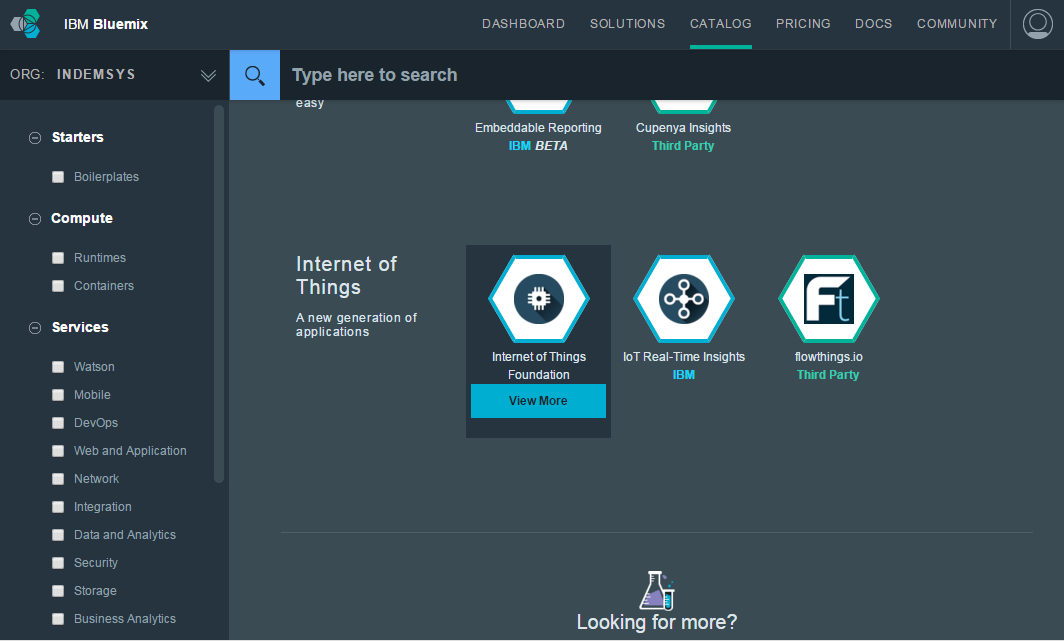
Предложенные поля по умолчанию не меняем и жмем Create 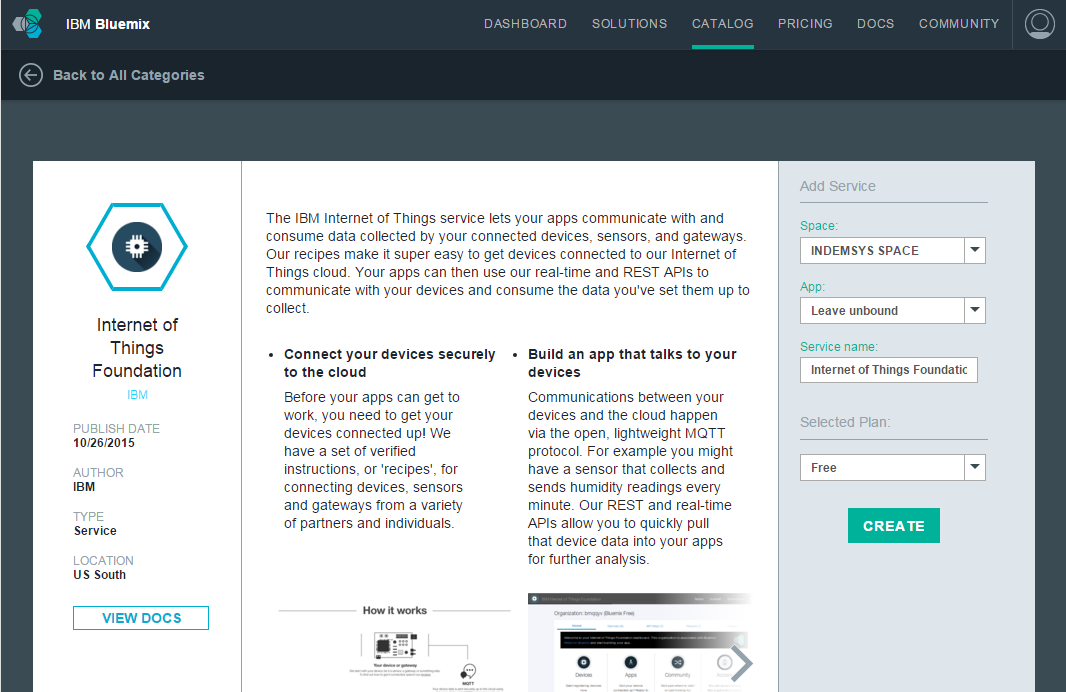
Internet of Things Foundation – это сервис включающий брокера MQTT и пользовательский интерфейс к нему.
После создания в появившемся окне нажимаем кнопку с надписью Launch dashboard.
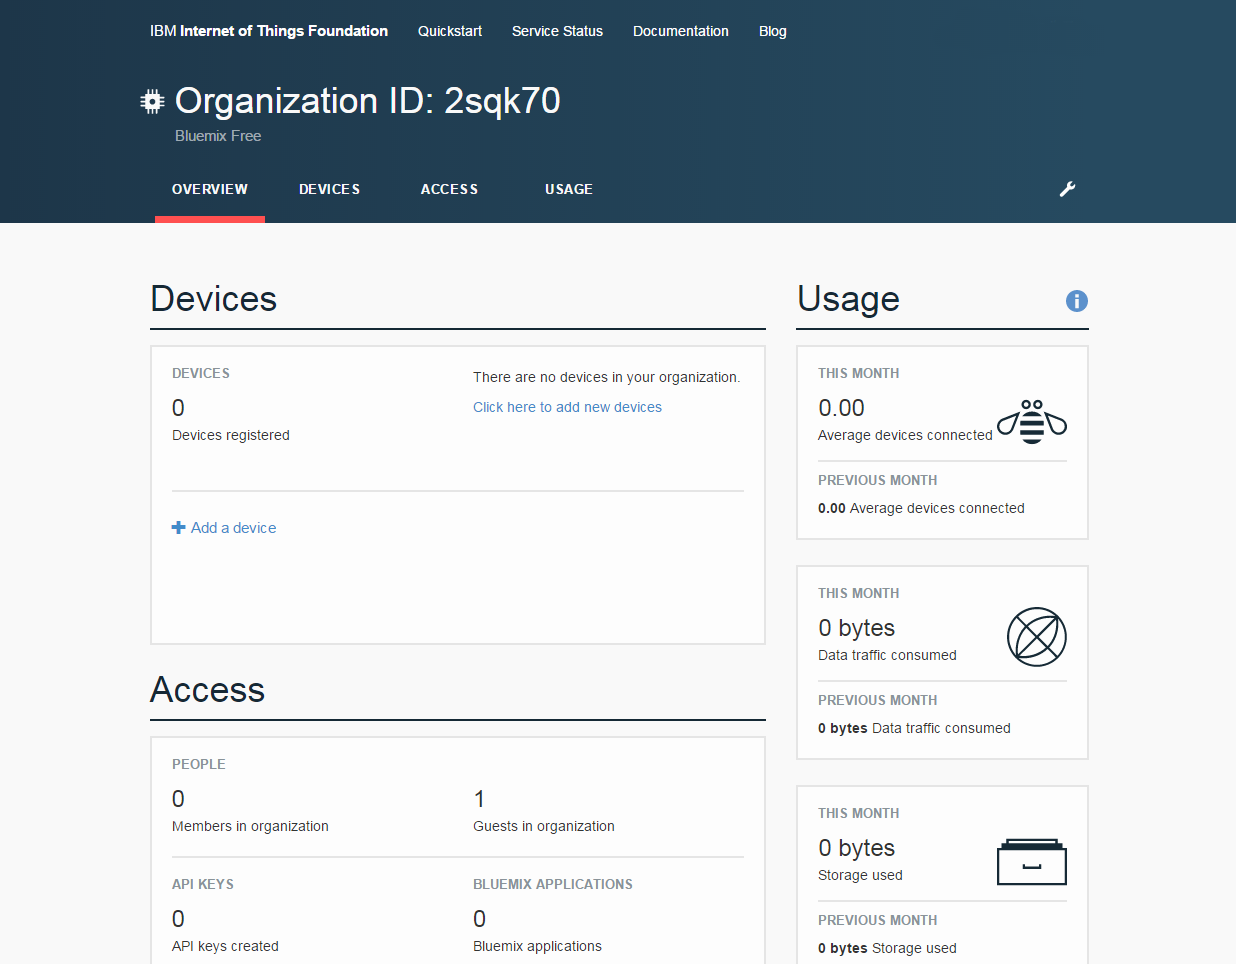
Это панель управления IoT. Теперь надо создать устройства. Нажимаем Add device. В появляющихся диалогах создаем тип устройства (Create device type) Даем ему имя Type1, остальные поля не заполняем для упрощения. Жмем Next -> Next -> Create -> Next. Даем имя устройству Device1. Далее Next -> Next -> Next -> Add. В результате получаем такое окно: 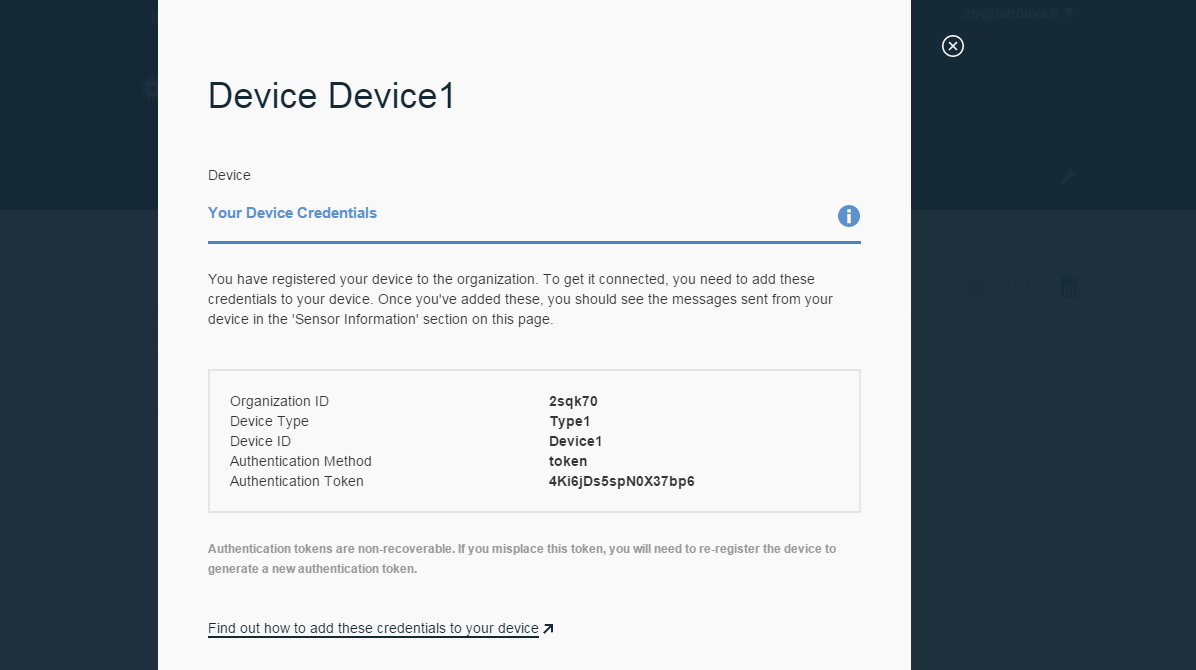
Все, здесь мы получили все реквизиты для подключения нашего первого устройства к MQTT брокеру Bluemix .
Испытаем сможет ли к нему подключиться наш клиент. Вводим реквизиты в окно клиента. 
Как видно клиент успешно подключился к Bluemix . Здесь следует обратить внимание на имя хоста. Оно начинается с Organization ID полученного при создании Internet of Things Foundation. Поле User ID тоже составное и кодируется как: d: : : . Поле User Name содержит фиксированную строку use-token-auth.
Топики сообщений для брокера Bluemix в отличие от брокера Mosquitto не могут содержать произвольные данные. Они кодируются по определенным правилам. Эти правила следует изучить в документации на Internet of Things Foundation. На скриншоте показан один из возможных допустимых топиков.