Mplab icd2 драйвер windows 7


Все о программном обеспечении ПК и ноутбука
Не теряйте время зря,
Расскажите про клон’я. 
Схему и прошивку откуда-то брали.
Ссылочку, пожалуйста, в студию. 
Небольшой список тем с меткой клон ИСД2.
Небольшое дополнение, при заливке прошивки в один чип второй надо удерживать в сбросе.
Небольшой список тем с меткой клон ИСД2.
Небольшое дополнение, при заливке прошивки в один чип второй надо удерживать в сбросе.
Опишите последовательно свои действия.
Возможна так же проблема с платой, первый вариант сделанный мною, так же работал неустойчиво, хотя с USB проблем не было.
Небольшой список тем с меткой клон ИСД2.
Небольшое дополнение, при заливке прошивки в один чип второй надо удерживать в сбросе.
Опишите последовательно свои действия.
Возможна так же проблема с платой, первый вариант сделанный мною, так же работал неустойчиво, хотя с USB проблем не было.
Почитал по вашей ссылке кое что нашел, прошивать с вашей конфигурацией пока не буду, подтянули мцлр 4550 к +5В. в диспетчере появился клиент с вопросом, пока пробую подключить.
Когда первый раз подключаешь программатор в нем кто то живет, загорается светодиод USB, винда находит новое устройство и автоматически ставит клиента. Вручную ставлю лоадер, связь вроде есть, светодиод горит, но лаб не видит программатор. Через некоторое врямя светодиод тухнет и все глухо. Попытки поставить снова драйвер приводят только к BSOD. Пробовал на трех разных машинах, одно и тоже. Удаление драйвера также невозможно при помощи утилит из мплаба. пишет один из файлов драйвера поврежден и чтение его невозможно. замена файлов также не приводит к успеху, винда точно также сообщает о поврежденном файле icd2w2kl.sys.
Вобщем цитирую свое первое сообщение. В принципе все так и делаю.
Почитал по вашей ссылке кое что нашел, прошивать с вашей конфигурацией пока не буду, подтянули мцлр 4550 к +5В. в диспетчере появился клиент с вопросом, пока пробую подключить.
If the driver for the REAL ICE™, ICD2, or ICD3 is not automatically installed, follow these steps to install them manually. The process is similar for Windows XP and Windows Vista, but the steps shown below were performed on a Windows 7 system.
From the Windows Menu, select Control Panel. Then click on Hardware and Sound.

Under Devices and Printers click on Device Manager.

In the device manager, under Other Devices you should see MPLAB® REAL ICE™ (www.microchip.com) listed (or ICD2 or ICD3). Other items you might see in this category are not related to a Microchip tool.

Right click on the Microchip tool and select Update Driver Software….

Select Browse my computer for driver software
Locate and install driver software manually

Click the Browse… button and navigate to the appropriate driver directory for your operating system.
For 32-bit Windows:
C:\Program Files\Microchip\MPLAB X IDE\Switcher\32bit\winusb
For 64-bit Windows:
C:\Program Files (x86)\Microchip\MPLAB X IDE\Switcher\64bit\winusb
For 64-bit systems, you might notice that under the winusb directory is a directory labelled amd64. This is the standard category name used for all 64-bit drivers, even if your processor is Intel based.

Click on Install this software anyway. Microchip has not registered the hardware tools with Microsoft, so this message is unavoidable.

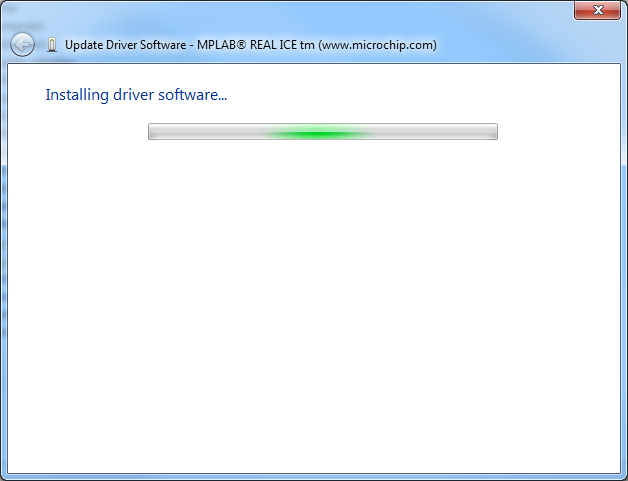
The driver will begin installing.
When the driver installation has finished, click on the Close button.

Back in the Device Manager, you will see a new category called Microchip Tools with Microchip WinUSB Device listed under it. The driver will show the same name for the REAL ICE and the ICDs. In Windows 7, this driver will now be automatically loaded for any Microchip WinUSB device, regardless of which USB port it is connected to.
An all-in-one debugger/programmer solution: MPLAB® ICD 2 is a low cost, real-time debugger and programmer for selected PIC® MCUs and dsPIC® DSCs. Using Microchip Technology’s proprietary In-Circuit Debug functions, programs can be downloaded, executed in real time and examined in detail with the debug functions of MPLAB. Set watch variables and breakpoints from symbolic labels in C or assembly source code, and single step through C source lines or into assembly code. MPLAB ICD 2 can also be used as a development programmer for supported MCUs.
The secret behind In Circuit Debugging is two dedicated hardware lines (microcontroller pins used only during debugging mode) that control In Circuit Serial Programming™ (ICSP™) of the device and, afterwards, debugging through proprietary, on-chip firmware. The ICD 2 debug features are built into the microcontroller and activated by programming the debug code into the target processor. There is some shared overhead expense that includes one stack level, some general purpose file registers and a small area of program memory when in the debug mode.
IMPORTANT NOTE: MPLAB ICD 2 requires minimal design guidelines be followed to ensure stable communications between the unit and the target. Check this page for some useful tips: http://www.microchip.com/icd2help
The MPLAB ICD 2 connects using USB or RS-232 between the design engineer’s PC operating with MPLAB IDE and their product board (target) being developed. It acts as an intelligent interface/translator between the two, allowing the engineer to look into the active target board’s microcontroller, viewing variables and registers at breakpoints with MPLAB watch windows. A breakpoint can be set to halt the program at a specific location. The program can be single-stepped or run at full speed. At breakpoints, data and program memory can be read and modified. Additionally, the MPLAB ICD 2 can be used to program or reprogram the Flash-based microcontroller while installed on the board.
Notes about MPLAB ICD 2 Headers
Some 8-, 14- and 18-pin devices use small header boards with a special MCU for debugging. This special MCU has extra pins for MPLAB ICD 2 communication and therefore allows the use of all pins on the part for the application. The header board is not used or needed for programming. However, when debugging these devices the header must be used.