«Microsoft Visual Studio Location Simulator Sensor» not working after clean install Windows 10 (1709)
I had Windows 10 PRO and it was working fine, but then I got the 1709 update and my network stopped working, I would have internet but I couldn’t access my NAS on my LAN. so, after uninstalling the antivirus, turning off the firewall, reinstalling network drivers (ethernet and wifi), refreshing DNS’, etc. nothing would work.
So, I decided to do a fresh/clean install of the lates Windows 10 (1709).
Now the device manager is showing errors with «Microsoft Visual Studio Location Simulator Sensor»
«This device is not working properly because Windows cannot load the drivers required for this device. (Code 31)
The requested operation was unsuccessful.»
This is after a CLEAN install of Visual Studio 2017 community (v15.3)\
**Moved from: (Windows / Windows 10 / Devices & drivers ).**
Replies (20)
* Please try a lower page number.
* Please enter only numbers.
* Please try a lower page number.
* Please enter only numbers.
The issue can be a result of incompatibility between your current operating system and Microsoft Visual Studio. You can try to run the compatibility troubleshooter. See the steps below on how to do so:
- From your desktop, right-click on the app >Troubleshoot compatibility.
Let us know if the troubleshooter helped you out.
7 people were helped by this reply
Did this solve your problem?
Sorry this didn’t help.
Great! Thanks for marking this as the answer.
How satisfied are you with this reply?
Thanks for your feedback, it helps us improve the site.
How satisfied are you with this response?
Thanks for your feedback.
The isdue is not on the application, the issue is wirh the driver on Device Manager.
Everything was working fine before I updated to Windows 10 (1709).
4 people were helped by this reply
Did this solve your problem?
Sorry this didn’t help.
Great! Thanks for marking this as the answer.
How satisfied are you with this reply?
Thanks for your feedback, it helps us improve the site.
How satisfied are you with this response?
Thanks for your feedback.
We would agree with you as most of the time, updated Windows requires its drivers to be updated as well. You can have your driver/s updated by following the steps on how to do so in this link.
If you haven’t tried the first resolution given, we highly suggest doing it first as it resolves issues like this.
Let us know what happens after doing the suggestions.
4 people were helped by this reply
Did this solve your problem?
Sorry this didn’t help.
Great! Thanks for marking this as the answer.
How satisfied are you with this reply?
Thanks for your feedback, it helps us improve the site.
How satisfied are you with this response?
Thanks for your feedback.
2 people were helped by this reply
Did this solve your problem?
Sorry this didn’t help.
Great! Thanks for marking this as the answer.
How satisfied are you with this reply?
Thanks for your feedback, it helps us improve the site.
How satisfied are you with this response?
Thanks for your feedback.
Thanks for the work around, but this doesnt solve my issue.
Before I formatted my PC and installed the latest version of windows 10, I had Visual Studio and everything worked without issues.
Why is not working now?
Did this solve your problem?
Sorry this didn’t help.
Great! Thanks for marking this as the answer.
How satisfied are you with this reply?
Thanks for your feedback, it helps us improve the site.
How satisfied are you with this response?
Thanks for your feedback.
I’m experiencing the same issue after clean installed Windows 10 1709, VS 2017, SQL Server 2017. Hope Microsoft will give an update regarding this issue asap.
Did this solve your problem?
Sorry this didn’t help.
Great! Thanks for marking this as the answer.
How satisfied are you with this reply?
Thanks for your feedback, it helps us improve the site.
How satisfied are you with this response?
Thanks for your feedback.
As mentioned above, the issue may be a result of incompatibility between your current operating system and Microsoft Visual Studio. We would like to know if you tried the troubleshooting steps given on the first responses. If not yet, we suggest trying them and see if one of them resolved your issue.
1 person was helped by this reply
Did this solve your problem?
Sorry this didn’t help.
Great! Thanks for marking this as the answer.
How satisfied are you with this reply?
Thanks for your feedback, it helps us improve the site.
How satisfied are you with this response?
Thanks for your feedback.
I have the same issue. Windows Defender Health Report states a device driver issue. Running the troubleshooter does not resolve the issue, though. To be clear here are my steps and screenshots.
1. I ran a Fresh Start install (FS) of update 1709.
2. I installed the latest version of MS SQL Server Management Studio 2017 (SSMS).
3. Then I get the notification of the device driver issue. I did not install Visual Studio (VS). VS is automatically installed as a consequence of installing SSMS 2017. Don’t know why VS is installed, though I have suspicions. I don’t use the VS IDE, so this is an extremely annoying consequence of installing SSMS.
4. I’ve run the troubleshooter and restarted (per troubleshooter instructions) multiple times (at least 3) without the issue being resolved.
If I ran a FS install, then installed SSMS 2017 AFTER completing the FS install, why would I continue to have problems? It doesn’t make sense. I even uninstalled my previous version of SSMS 2017 before I ran the FS program.
11/19/2017 reference dates are from running repair on VS 2017 programs.
10/28/2017 and 10/29/2017 reference dates are due to the fact that I installed SSMS 2017 before and after midnight local time across those two days.
12 people were helped by this reply
Did this solve your problem?
Sorry this didn’t help.
Great! Thanks for marking this as the answer.
How satisfied are you with this reply?
Thanks for your feedback, it helps us improve the site.
How satisfied are you with this response?
Thanks for your feedback.
Ultimately, what appears to have resolved the issue for me, was to uninstall the device driver using Control Panel > Device Manager > Sensors > Visual Studio Location Simulator Sensor
I haven’t tested to see if SSMS still works without errors. Your results may vary, especially if you use this feature/device in VS.
I have the same issue. Windows Defender Health Report states a device driver issue. Running the troubleshooter does not resolve the issue, though. To be clear here are my steps and screenshots.
1. I ran a Fresh Start install (FS) of update 1709.
2. I installed the latest version of MS SQL Server Management Studio 2017 (SSMS).
3. Then I get the notification of the device driver issue. I did not install Visual Studio (VS). VS is automatically installed as a consequence of installing SSMS 2017. Don’t know why VS is installed, though I have suspicions. I don’t use the VS IDE, so this is an extremely annoying consequence of installing SSMS.
4. I’ve run the troubleshooter and restarted (per troubleshooter instructions) multiple times (at least 3) without the issue being resolved.
If I ran a FS install, then installed SSMS 2017 AFTER completing the FS install, why would I continue to have problems? It doesn’t make sense. I even uninstalled my previous version of SSMS 2017 before I ran the FS program.
11/19/2017 reference dates are from running repair on VS 2017 programs.
10/28/2017 and 10/29/2017 reference dates are due to the fact that I installed SSMS 2017 before and after midnight local time across those two days.
Install the sensor driver
This topic shows you how to install the sensor driver on a development board, after you update the secondary system description table (SSDT) for the development board.
This topic uses the Sharks Cove development board and an ADXL345 accelerometer as a case study, to help explain the process of installing a sensor driver on a development board. So if you want to perform the tasks presented in this topic, you must first install an operating system on the Sharks Cove. For more information about how to do that, see Download kits and tools for Windows 10, and follow the instructions to install Windows 10.
After you finish installing the operating system on the Sharks Cove, See Build the sensor driver to learn how to build a driver in Microsoft Visual Studio. Then return here to continue.
The accelerometer is attached to the Sharks Cove via the I2C bus. Peripherals that are connected to the I2C bus are enumerated via the Advanced Configuration and Power Interface (ACPI). So the sample driver for the accelerometer was developed to support ACPI instead of Plug and Play.
To make the Sharks Cove’s ACPI driver aware of the new device (the accelerometer) on the I2C bus, you must add information about the accelerometer to the SSDT on the Sharks Cove. This table describes the hardware resources and interrupt requirements for a hardware platform’s devices, including attached peripherals like the accelerometer.
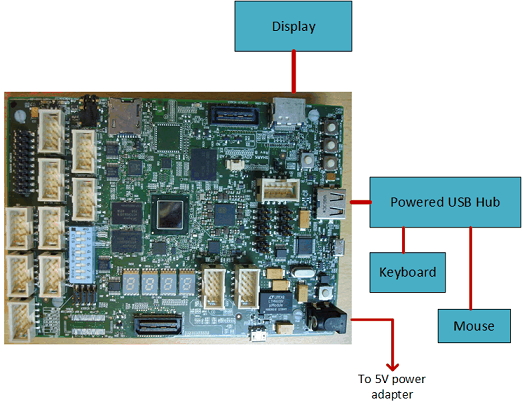
Before you begin
Before you start performing the tasks outlined below, please make sure that your Sharks Cove is set up as shown in the following image:
Retrieve and review the default SSDT
This section shows you how to use the ACPI Source Language (ASL) compiler to retrieve the factory default SSDT for the Sharks Cove, and then review it. You will also learn how to replace the default SSDT with an updated one.
On your development computer, navigate to the following location to copy the ASL compiler: c:\Program Files (x86)\Windows Kits\10\Tools\x86\ACPIVerify
Copy the Asl.exe file, and save it to a flash drive.
On the Sharks Cove, create a Tools folder in the root directory. Then Attach the flash drive to the Sharks Cove’s USB hub, and copy the Asl.exe file to the Tools folder.
Open a Command prompt window as an administrator, and enter the following commands: cd\tools dir Make sure that the Asl.exe file is listed in the directory.
Invoke the ASL compiler and create an ASL file by entering the following command: asl /tab=ssdt
Make sure that the ASL file was created successfully by entering the following command: dir ssdt.asl
Open the ASL file in Notepad by entering the following command: notepad ssdt.asl Review the ASL file, and notice that there are no references to the accelerometer, or the I2C bus.
Close Notepad. Then enter the following command in the Command prompt window, to rename the ssdt.asl file. ren ssdt.asl ssdt-old.asl Then use the dir command to make sure that the file is now listed as ssdt-old.asl.
Update the default SSDT
Perform the following tasks to update the SSDT, and load it to replace the factory default version. The updated SSDT will be stored in a potion of memory called battery-backed RAM. So make sure that the button cell (battery) that came with your Sharks Cove is plugged into its socket.
Copy the following updated SSDT and paste it into a new instance of Notepad.
In Notepad, select File > Save As. Then select the Save as type dropdown box, and select All Files.
In the File name box, type ssdt.asl, then select Save, and close Notepad.
In the Command prompt window, use the dir command to make sure that you can see the default file now listed as ssdt-old.asl, and the new file listed as ssdt.asl.
Compile the ssdt.asl file into a format that the Sharks Cove can understand by entering the following command: asl ssdt.asl
Verify that the compiled file was successfully created in Step 3 by entering the following command: dir ssdt.aml You should see the ssdt.aml file listed in the tools directory.
Load the compiled file into battery-backed RAM by entering the following command: asl /loadtable ssdt.aml
Turn on testsigning
Before you install the sample sensor driver, you must turn on testsigning. Perform the following tasks to turn on testsigning. Perform the following steps to install the sensor driver via Device Manager.
In the Command prompt window, enter the following command to see whether testsigning is already turned on.
bcdedit /enum
If you see a listing similar to the following, showing an entry for testsigning, with its value set to yes then skip to Step 5. 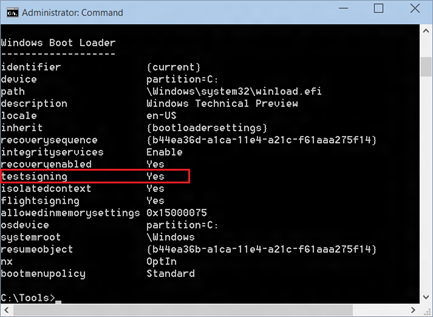
If you need to turn on test signing, then enter the following command: bcdedit /set testsigning on
Repeat Step 1 (in this exercise) to verify that the value of the testsigning system variable is now set to ‘yes’ in the Windows Boot Loader list.
Restart the Sharks Cove. As the board restarts, hold the Volume-up button for about 2 seconds, to enter system setup (UEFI) window.
In the UEFI window, select Device Manager > System Setup > Boot, and make sure that UEFI Security Boot is set to .
Save your changes and exit the UEFI window.
Install the sensor driver
There are four main methods for installing a driver on the Sharks Cove board:
- Download the driver from a network source directly onto the Sharks Cove.
- Develop the sensor driver on a host computer, with your Sharks Cove connected as a provisioned client. Then deploy the driver from the host computer to the Sharks Cove.
- Copy the driver package to a flash drive and attach the flash drive to the Sharks Cove. Then use the devcon command from a Command prompt window to install the driver manually.
- Copy the driver package to a flash drive and attach the flash drive to the Sharks Cove. Then install the driver manually via Device Manager.
For simplicity, we will use the last method in the preceding list. Perform the following steps to manually install the sensor driver via Device Manager.
You must connect your sensor to the Sharks Cove before you install the sensor driver. For information about how to modify the ADXL345 accelerometer breakout board from SparkFun, to get it to work with the sample sensor driver, see Prepare your sensor test board. And for information about how to connect the sensor breakout board to the Sharks Cove, see Connect your sensor to the Sharks Cove board.
Make sure that the ADXL345 accelerometer is connected to the Sharks Cove J1C1 connector, then power up the Sharks Cove.
Attach a flash drive with the sensor driver to the powered USB hub connected to the Sharks Cove. For example, this can be the flash drive onto which you saved the driver that you built by following the steps in Build the sensor driver.
Open Device Manager, and look for an «Unknown device» in the Other devices node with a yellow bang symbol against it (see the following screen shot).
Select and hold (or right-click) the device with the yellow bang (listed as Unknown device), and select Update Driver Software, and select Browse my computer for driver software.
Browse to the ADXL345 driver on the flash drive, then select Next. Follow the screen prompts to install the sensor driver.
After the sample sensor driver is successfully installed, Device Manager displays the sensor as shown in the following screen shot.
For information about how to use Visual Studio to deploy a driver to a client computer (like the Sharks Cove), see Deploying a Driver to a Test Computer.
After successfully installing the sample sensor driver, see Test your universal sensor driver for information about how to test a sensor.