How to install htop on macOS Unix desktop running on MacBook

How to install htop on macOS Unix desktop
You can install htop using the brew command and the procedure is as follows:
- Open the Terminal app on mac OS and type the following command
- brew install htop
- Start htop at the bash shell on the Mac OS or computer.
Let us see how to search and install htop in details on Apple MacBook Pro running macOS.
Search for htop
The command is as follows:
brew search htop
OR
brew info htop
htop: stable 2.2.0 (bottled), HEAD Improved top (interactive process viewer) https://hisham.hm/htop/ Not installed From: https://github.com/Homebrew/homebrew-core/blob/master/Formula/htop.rb ==> Dependencies Build: pkg-config ? Optional: ncurses ? ==> Options —with-ncurses Build using homebrew ncurses (enables mouse scroll) —HEAD Install HEAD version ==> Caveats htop requires root privileges to correctly display all running processes, so you will need to run `sudo htop`. You should be certain that you trust any software you grant root privileges.
Installation
Open the Terminal app on your macOS and type the following brew command to install htop:
$ brew install htop 
You just installed htop on macOS using Homebrew.
How do I use htop on macOS?
Simply type the htop at your bash prompt:
htop 
htop interactive commands on macOS
You can use the following keyboard shortcuts:
- Up, Down, Left, Right arrow keys – Select and scroll as per given direction
- Space – Tag or untag a process. Once tagged you can operate on processes like kill or see tree using function keys. For example, press function (fn) + F9 to kill the process. Press U to untag all processes.
- F10 or q – Quit htop
- F1, h, ? : Go to the help screen
How to set delay between updates, in tenths of seconds
Disable colors output
To start htop in monochrome mode:
htop -C
htop —no-color
Want to get info only for the given PIDs?
htop -p PID
htop —pid=2345,555,667,4242
How to show only the processes of a given user named vivek
How to show process in tree view
Conclusion
You learned that how to get htop for Mac OS X (macOS) to watch and manage system resources efficiently. It has a colorful display and provides information per core and threads too. For more info see htop project home page here.
Get htop for Mac OS X to Watch & Manage System Resources

If you like to keep an eye on system resources and you want to branch out from the GUI Activity Monitor, check out htop for Mac OS X. htop is basically a significantly improved version of top, which lets you monitor system resources, CPU core load, memory use, load averages, and manage running processes.
If you come from the linux world, you’re probably already familiar with htop, but if you’re not here’s why it’s better than top: for starters, it just looks better and is easier to read thanks to an improved layout and use of ANSII colors, but beyond that it’s great because it functions much like a task manager, allowing you select and then renice or kill processes as needed. I find this easier than manually entering PID’s through top. Anyway, let’s get htop installed in Mac OS X via a package manager like Homebrew or MacPorts.
How to Install htop in Mac OS X
The easiest way to get htop running on Mac OS X is by installing it through MacPorts or Homebrew, which package manager you use doesn’t matter but you’ll only want to install it in one so you don’t overlap and double-install. We’ll cover installing htop with Homebrew first, and MacPorts second.
Installing with Homebrew requires Homebrew as a prerequisite (obviously), this is easy:
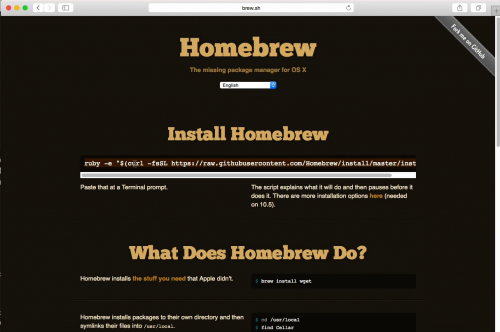
- Open a web browser and go to the homebrew webpage http://brew.sh here
- Copy and paste the install command string into the terminal, it usually looks something like the following – GET THE EXACT COMMAND from brew.sh as it sometimes changes the script reference, do not just copy and paste:
/usr/bin/ruby -e «$(curl -fsSL https://raw.githubusercontent.com/Homebrew/install/master/install)»
Once homebrew has successfully installed, you can install htop easily with the following command string:
And there you have it, htop runs in OS X!
Another option is to install htop through MacPorts as follows:
- Get MacPorts and install it if you don’t have it already
- After MacPorts is installed, launch a new Terminal window and type:
sudo port install htop
Installing htop may take a while because it requires quite a few dependencies (zlib, openssl, perl, etc), but Homebrew and MacPorts will handle installing and downloading them all for you. If you have none of this already on your Mac, it could take up to 15 minutes for all of the necessary files to download, compile, and install.
After Homebrew or MacPorts is complete, launch a new Terminal session and type ‘htop’ to access the app. You navigate and use htop through the arrow and function keys, which you’ll see are laid out at the bottom.
I find htop to look best at fullscreen against a white background, but if you have a slightly transparent black terminal it looks great too:
Finally, it’s worth pointing out you can also build htop from source, if you’re into that sort of thing. You will likely need a few dependencies in Mac OS X, however, but the source for htop can be found here at the Github page for htop.
Install HTOP on Mac OS X with Homebrew
If you’re a nerd like me, you love htop. It’s the nicer version of the usual ‘top’ command.
Who doesn’t love this kind of thing running on their computer?
A long time ago, the only way to install htop was to compile it from source yourself, or worse, copy a binary that someone else compiled.
Well, there’s a better way. And it’s also a great introduction to using the Homebrew package manager for Mac OS X.
Here’s a video of install htop on Mac OS X using Homebrew. Screenshots after the video.
The first step is to visit the http://brew.sh site and copy that line of code.
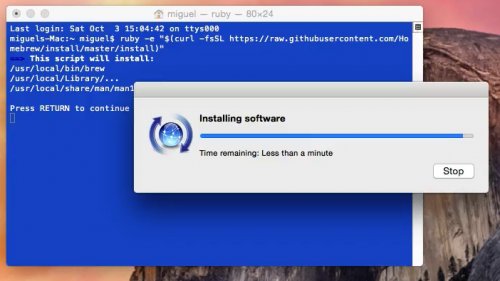
Great, now open a terminal window, and paste that command in there. If you don’t have Xcode installed, you’ll be prompted to download some components.
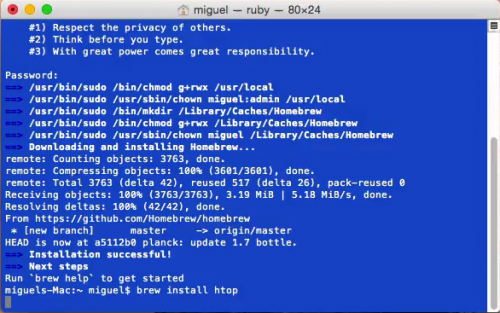
Great, now that Homebrew is installed, you can install packages by using the command “brew install” + the package name. i.e.: “brew install htop” will install htop.
All done. Now just run ‘htop’ in a terminal window for all your system-monitoring and process-viewing needs.
How to Install htop on Mac OS X using macports
Written by Guillermo Garron
Date: 2012-04-06 17:10:00 00:00
On a fresh Linux install the first thing I install is htop which is a top-like monitor tool, but better.
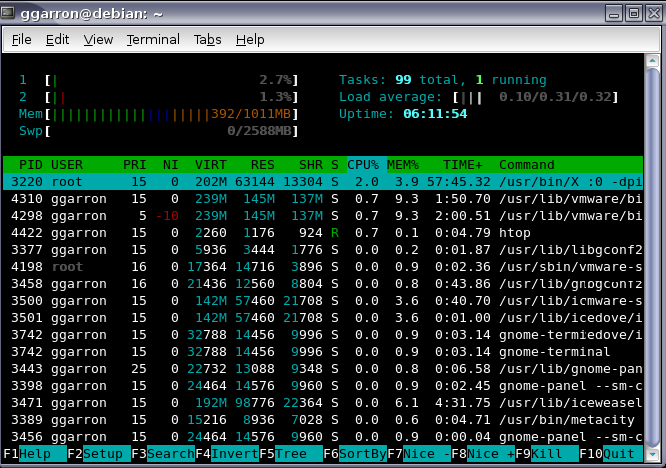
Here is a screenshot of it on my Debian Linux, taken some years ago:
Some months ago I’ve sold my IBM T60 laptop and bought a Macbook Pro, so now I’m using Mac OS X instead of Linux on the laptop. But I still want to have htop available so let’s see how to install it.
First install macports and once you have it installed, you will be able to install a lot of software just like in Linux. For htop just run:
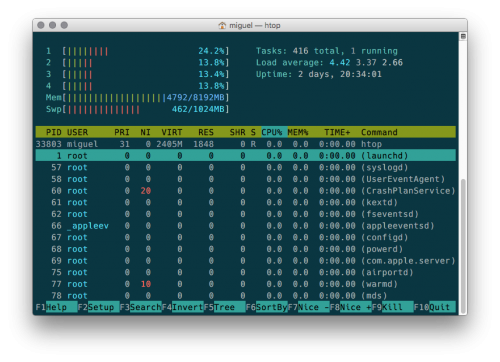
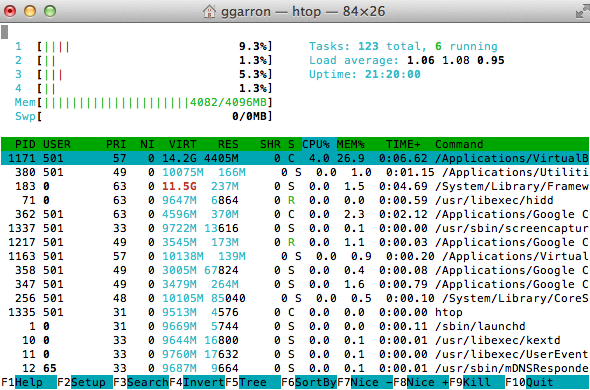
Now you have it installed, here is how it looks like in my Macbook
If you enjoyed the article, please share it
How do I install htop inside mac os x?
How do I install htop for Mac OS X? (The easiest and laziest path)

3 Answers 3
Here is the laziest way (or homebrew way)
First install Homebrew if you haven’t
Second brew install htop
I installed htop 0.8 (update: now 2.0.1) from MacPorts with
Pre-built binary
Found this tutorial that shows how to do it. The steps are as follows:
This binary is already pre-built so you should use caution when using executables such as this to make sure that they aren’t malicious.
Building it from scratch
You can also follow these directions if you’d like to attempt to build the executable yourself. The tutorial is called: htop for Snow Leopard. A copy of the original reference material is here on Tech Chutney.
General steps
Building this under Snow Leopard requires you to checkout the ‘osx’ branch:
and set your ‘CFLAGS’ environmental variable to specify a 32-bit build: