Создание загружаемого установщика для macOS
В качестве загрузочного диска для установки операционной системы на компьютер Mac можно использовать внешний диск или дополнительный том.
Эти расширенные инструкции предназначены в первую очередь для системных администраторов и других пользователей, имеющих опыт работы с командной строкой. Загрузочный установщик не требуется для обновления ОС macOS или переустановки ОС macOS, но он может оказаться удобен, если требуется выполнить установку на несколько компьютеров, не загружая установщик заново каждый раз.
Загрузка macOS
Найдите соответствующую ссылку для загрузки в инструкциях по обновлению для каждой версии ОС macOS:
macOS Catalina, macOS Mojave или macOS High Sierra
Установщики для каждой из этих версий macOS загружаются непосредственно в папку «Приложения» в виде приложения с именем «Установка macOS Catalina», «Установка macOS Mojave» или «Установка macOS High Sierra». Если установщик запускается сразу после загрузки, завершите его работу без продолжения установки. Важно! Чтобы получить подходящий установщик, выполняйте загрузку с компьютера Mac, на котором используется ОС macOS Sierra 10.12.5 или более поздней версии либо El Capitan 10.11.6. Корпоративным администраторам следует производить загрузку с сайта Apple, а не с сервера обновления ПО, размещенного в локальной сети.
OS X El Capitan
Установщик El Capitan загружается в формате образа диска. На компьютере Mac, совместимом с El Capitan, откройте образ диска и запустите с него установщик с именем InstallMacOSX.pkg. Приложение с именем «Установка OS X El Capitan» будет установлено в папку «Приложения». Загрузочный установщик создается именно из этого приложения, а не из образа диска или установщика .pkg.
Использование команды createinstallmedia в приложении «Терминал»
- Подключите флэш-накопитель USB или другой том, используемый для загружаемого установщика. Убедитесь, что на нем доступно не менее 12 ГБ свободного пространства и что он отформатирован с использованием файловой системы Mac OS Extended.
- Откройте приложение «Терминал» в подпапке «Утилиты» папки «Программы».
- Введите или вставьте в приложении «Терминал» одну из следующих команд. Предполагается, что установщик все еще находится в папке «Программы», а имя MyVolume обозначает флэш-накопитель USB или другой используемый вами том. Укажите вместо MyVolume имя своего тома в следующих командах.
Catalina:*
Mojave:*
High Sierra:*
El Capitan:
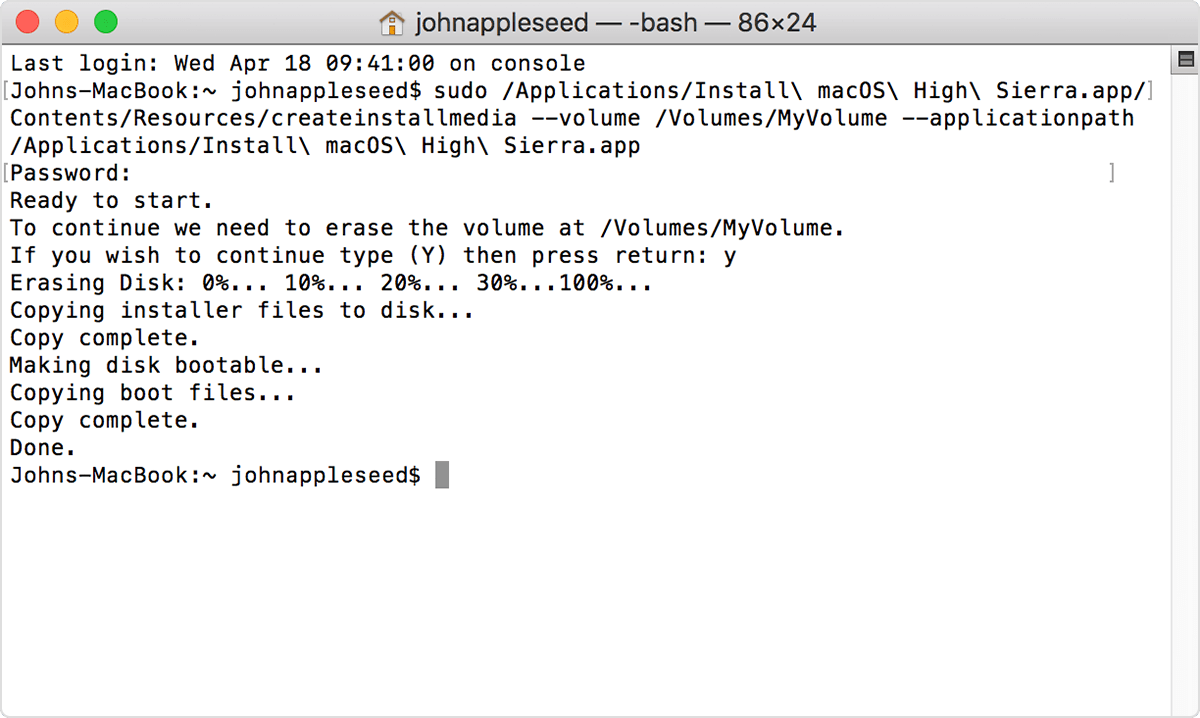
* Если на компьютере Mac установлена ОС macOS Sierra или более ранней версии, включите аргумент —applicationpath аналогично тому, как этот аргумент используется в команде для El Capitan.
Использование загружаемого установщика
После создания загружаемого установщика используйте его следующим образом:
- Подключите загружаемый установщик к совместимому компьютеру Mac.
- В «Менеджере загрузки» или окне настроек «Загрузочный том» выберите загружаемый установщик в качестве загрузочного тома и запустите компьютер с него. Компьютер Mac запустится в режиме восстановления macOS.
Узнайте о выборе загрузочного диска, а также о действиях в случае, если компьютер Mac не запускается с него. - Если потребуется, выберите язык.
- Загружаемый установщик не загружает macOS из Интернета, но требует подключения к Интернету для получения информации, специфичной для модели компьютера Mac, такой как обновления прошивки. Если необходимо подключиться к сети Wi-Fi, используйте меню Wi-Fi в строке меню.
- Выберите «Установить macOS» (или «Установить OS X») в окне «Утилиты», затем нажмите кнопку «Продолжить» и следуйте инструкциям на экране.
Дополнительная информация
Для получения дополнительных сведений о команде createinstallmedia и доступных аргументах убедитесь, что установщик macOS находится в папке «Программы», затем введите в приложении «Терминал» следующий путь:
Как сделать загрузочную флешку с macOS
Вам понадобится Mac, USB-диск и несколько минут свободного времени.
Проще всего обновить macOS до новой версии через Mac App Store. Но если в старой системе были неполадки, может потребоваться чистая установка, при которой не обойтись без загрузочной флешки.
Сделать её можно двумя способами: через «Терминал» и с помощью специальной утилиты. Первый подойдёт для опытных пользователей, второй — для новичков и тех, кто по каким-то причинам не любит возиться с командной строкой.
Шаг 1. Загрузка macOS
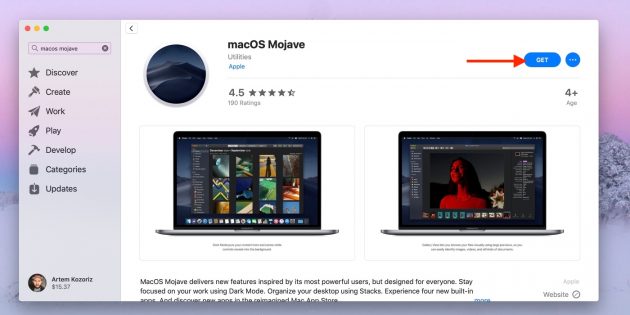
Перейдите по одной из ссылок и скачайте установщик нужной версии macOS из Mac App Store:
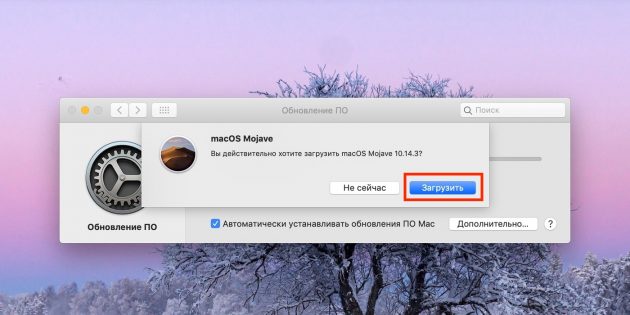
Подтвердите загрузку, нажав «Загрузить».
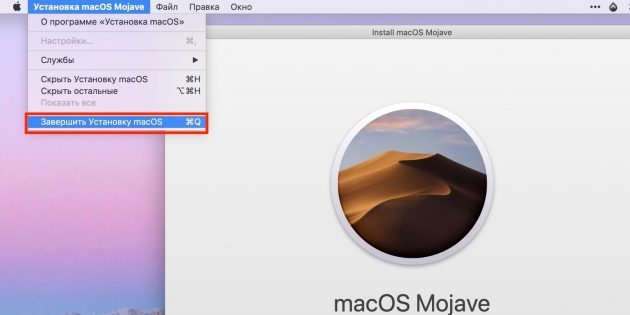
По окончании процесса выберите в строке меню «Завершить установку macOS», чтобы закрыть установщик.
Шаг 2. Создание загрузочного диска
Как создать загрузочную флешку в «Терминале»
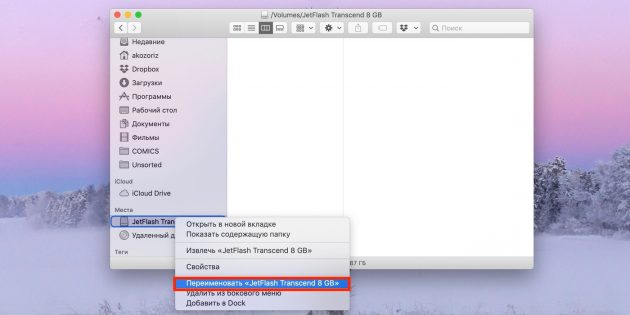
Подключите USB-флешку к Mac и найдите её в Finder.
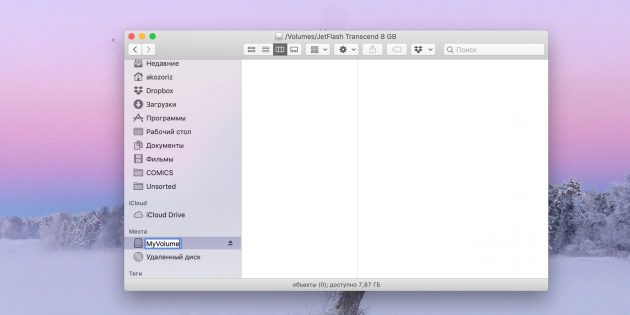
Выберите в контекстном меню «Переименовать» и задайте новое имя MyVolume.
Откройте «Терминал» через Spotlight или в папке «Программы» → «Утилиты».
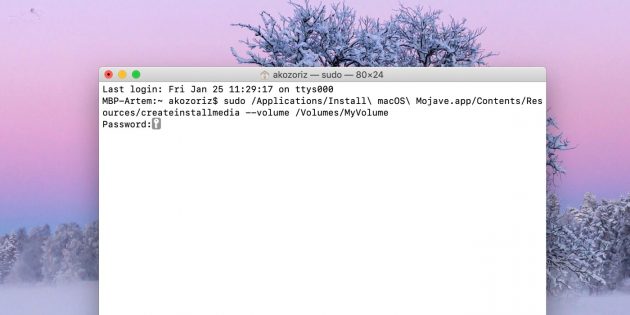
Скопируйте и вставьте в окно «Терминала» команду в зависимости от устанавливаемой версии ОС.
Введите пароль администратора.
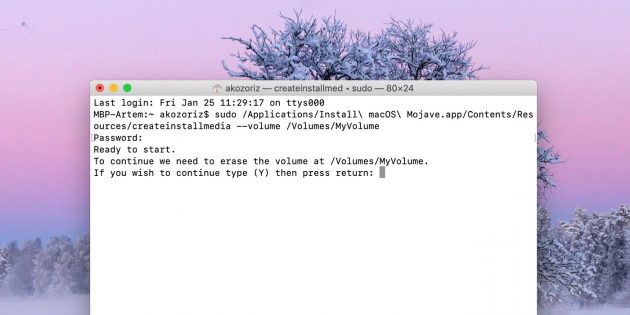
Подтвердите форматирование флешки, вбив Y и нажав ввод. Будьте осторожны, все данные с неё удалятся.
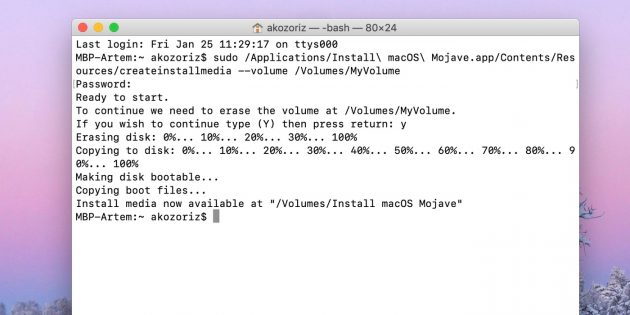
Дождитесь окончания копирования и извлеките флешку.
Как создать загрузочную флешку в DiskMaker X
Скачайте утилиту DiskMaker X с сайта разработчика.
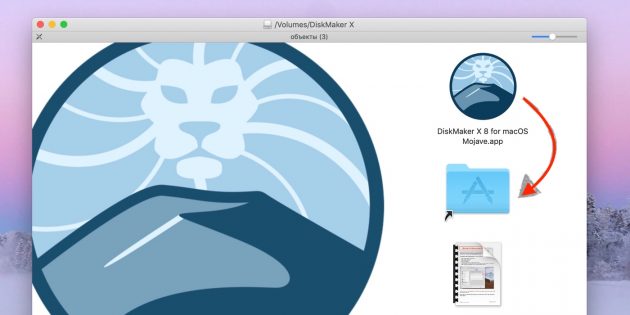
Откройте DMG-образ с утилитой и перетащите её на значок папки «Программы» ниже.
Запустите DiskMaker X через Lauchpad или Spotlight.

Нажмите кнопку Use this copy, чтобы подтвердить использование загруженного установщика.
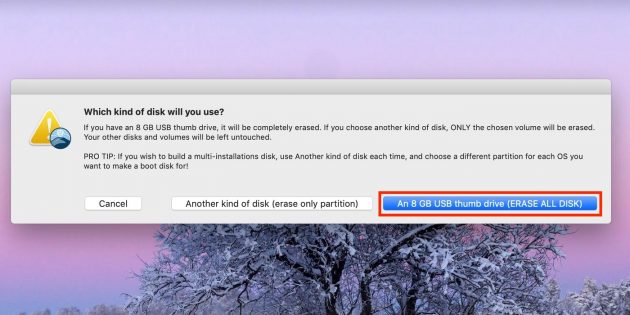

Подтвердите выбор USB-диска, выберите вашу флешку из списка и нажмите кнопку Choose this disk.
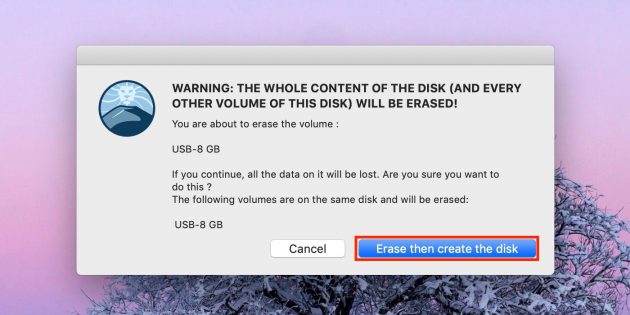
Согласитесь с форматированием и удалением всех данных на флешке, нажав кнопку Erase then create the disk.
Выберите светлую или тёмную тему оформления.
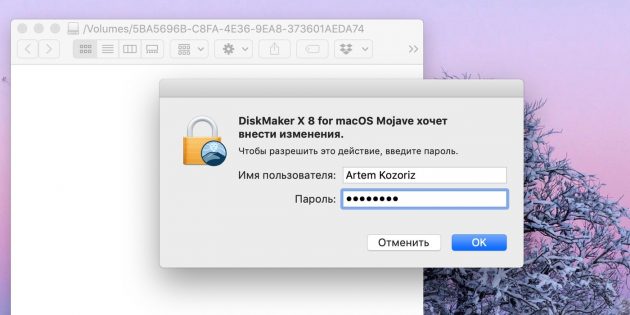
Нажмите кнопку Continue и введите пароль администратора.
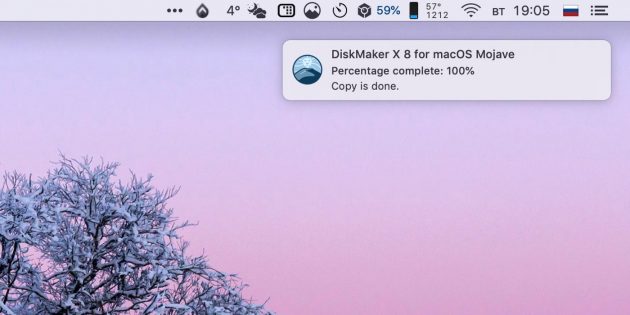
Подождите несколько минут. Окно утилиты не отображается, но вы будете получать уведомления о ходе создания загрузочного диска.
Что делать дальше
Теперь, когда у вас есть загрузочная флешка, можно установить с неё macOS на любой совместимый Mac. Нужно подключить диск к компьютеру, перезагрузить его с зажатой клавишей Option, затем выбрать элемент в списке доступных загрузочных дисков и следовать подсказкам мастера установки.
www.makeuseof.com
Follow MakeUseOf.com
How to Install macOS From USB
Want to install macOS from a USB drive? We’ll walk you through this alternative method for installing macOS.
As you may know, you can reinstall macOS on your computer via the internet recovery. But did you know that you can create a bootable USB drive to install macOS from? This will let you boot your Mac from a different source if it won’t work normally, and makes installs on multiple machines easy.
Let’s see how to do this.
Choosing a USB Flash Drive for Installing macOS
USB flash drives are cheaper than ever, so you won’t have to spend much for this task. However, make sure to buy a name-brand flash drive (like SanDisk, Kingston, or PNY) from a reputable store. Stay away from super-cheap drives with suspiciously high storage on sites like eBay.
These drives have their firmware hacked to report a false size to your operating system. Not only will the transfer speeds be painfully slow, but using them may also result in loss of data or even a damaged USB port.

Also, check to see what ports you have on your Mac. The 12″ MacBook has a single USB-C port, while MacBook Pro models from 2016 and later feature USB-C ports exclusively. Fortunately, there are USB-C drives available, or you can use a USB-C to USB-A adapter.
It’s best to go with a USB 3.0 drive, with a minimum size of 16GB. The Samsung BAR Plus is good overall value for the money; we’ve highlighted the fastest USB 3.0 drives you can buy for more options.
Formatting Your USB Flash Drive
You can only create a bootable installer for macOS on a Mac. If you’re using a flash drive that already has data on it, make sure to back up any important files as you’re going to erase everything in a moment.
Open Finder. Navigate to Applications > Utilities, and open up Disk Utility. You should see your flash drive under the External section in the left pane. After selecting it, click on the Erase button along the top.
Choose a friendly name (which you’ll use later), and make sure to choose Mac OS Extended (Journaled) for the format. Finally, click Erase and you’re done with this step.
Downloading the macOS Installer
To download the macOS installer, open the App Store and search for your version of macOS. Click on the Download button if you’re on High Sierra or earlier.
macOS Mojave is slightly different, as it opens up your System Preferences to download the installer. This is because one of the changes in Mojave is a new way of installing updates.
What’s new in macOS Mojave? Our Mojave review covers everything you need to know about in the latest version of macOS.
In either case, once the installer opens, quit it without continuing the installation.
Creating a Bootable USB Using Terminal
Terminal is the easiest way to create your bootable USB drive. Just replace the MyVolume portion of the command with the name you gave your drive in the Disk Utility step above.
Take note that the commands differ slightly for creating Mojave and High Sierra installers on older versions of macOS.
Mojave installer on Mojave or High Sierra:
Mojave installer on Sierra or earlier:
High Sierra installer on High Sierra:
High Sierra installer on Sierra or earlier:
Sierra:
El Capitan:
Copy and paste the command you need above into your Terminal window and press the Return key. After entering your password, confirm you want to erase the USB drive by typing Y followed by Return.
Terminal will now erase and create your bootable USB drive, ready for you to boot from.
Creating a Bootable USB Using DiskMaker X
If you’re not a fan of using Terminal, you can try a third-party app designed specifically for creating a bootable macOS USB drive. After downloading your macOS version of choice as detailed above, you can download and install DiskMaker X.
Due to its updated security, macOS Mojave has some additional steps required if you’d like to use DiskMaker X. The developers recommend reversing these changes after you’ve made your USB drive if you’re not planning on using the app in the future.
Navigate to System Preferences > Security & Privacy > Privacy > Accessibility. To make changes, click the lock icon at the bottom and enter your credentials.
Then click on the Plus button, navigate to the Applications folder, select DiskMaker X, and click open. DiskMaker X should now appear on the list.
As soon as you launch DiskMaker X, it will prompt you to confirm the macOS installer you’ve downloaded.
The next prompt shows one of the advantages of DiskMaker X in that you can create a multi-installation disk. This means that you can create a few partitions on your USB drive and have a different macOS installer on each partition.
If you would rather create a single install disk, select Erase All Disk. Lastly, confirm that you’d like to erase everything on the USB drive.
DiskMaker will continue to create your disk in the background and update you on its progress. After a few minutes, DiskMaker X will notify you that your boot disk is ready and give you some instructions on how to use it.
Booting Your Mac From a USB Drive
Now if you find yourself in a sticky situation where your Mac isn’t booting, or you want to do a fresh install of macOS, you have a solution. You can boot from your USB drive and not have to download the macOS installer again. This will come in handy for fixing the «macOS could not be installed» error.
Simply plug your created USB drive into an open USB port on your Mac. Power on the system, or restart it if it’s already on. Immediately press and hold the Option (Alt) key on your keyboard when it starts booting.
You should now see an option to select your USB drive as a startup disk. After selecting it, your system will boot off your USB drive and you’ll be taken to the macOS Utilities screen.
Some wireless keyboards may not work at this point. If you’re having difficulty, plug in a wired keyboard instead. If you don’t see your USB drive as one of the startup options, try a different USB port.
Using Your Bootable macOS USB
From the macOS Utilities screen, you can perform a fresh install of macOS, restore from a Time Machine backup, or access tools like Disk Utility. You can also use your USB drive to upgrade macOS to the latest version. If you need to troubleshoot your Mac without a network connection, this USB drive could be a lifesaver.
Did you know you could also install multiple operating systems on a USB stick? We show you how:
We hope you like the items we recommend! MakeUseOf has affiliate partnerships, so we receive a share of the revenue from your purchase. This won’t affect the price you pay and helps us offer the best product recommendations.
For beginners who are looking to learn Microsoft Office application skills, this big list of learning resources will propel you to new heights.
Yusuf wants to live in a world filled with innovative businesses, smartphones that come bundled with dark roast coffee and computers that have hydrophobic force fields that additionally repel dust. As a business analyst and graduate of the Durban University of Technology, with over 10 years experience in a rapidly growing technology industry, he enjoys being the middle man between technical and non technical people and helping everyone get up to speed with bleeding edge technology.