Установка Hyper-V в Windows 10 Install Hyper-V on Windows 10
Включение Hyper-V для создания виртуальных машин в Windows 10. Enable Hyper-V to create virtual machines on Windows 10.
Hyper-V можно включить разными способами, в том числе используя панель управления Windows 10, PowerShell или с помощью средства обслуживания образов развертывания и управления ими (DISM). Hyper-V can be enabled in many ways including using the Windows 10 control panel, PowerShell or using the Deployment Imaging Servicing and Management tool (DISM). В этом документе последовательно описан каждый из указанных способов. This documents walks through each option.
Примечание. Механизм Hyper-V встроен в Windows в качестве дополнительной функции. Скачать Hyper-V нельзя. Note: Hyper-V is built into Windows as an optional feature — there is no Hyper-V download.
Проверьте следующие требования Check Requirements
- Windows 10 Корпоративная, Pro или для образовательных учреждений Windows 10 Enterprise, Pro, or Education
- 64-разрядный процессор с поддержкой преобразования адресов второго уровня (SLAT). 64-bit Processor with Second Level Address Translation (SLAT).
- Поддержка расширения режима мониторинга виртуальной машины (технология VT-c на компьютерах с процессорами Intel). CPU support for VM Monitor Mode Extension (VT-c on Intel CPUs).
- Не менее 4 ГБ оперативной памяти. Minimum of 4 GB memory.
Роль Hyper-V невозможно установить в Windows 10 Домашняя. The Hyper-V role cannot be installed on Windows 10 Home.
Выполните обновление с выпуска Windows 10 Домашняя до выпуска Windows 10 Pro, открыв раздел Параметры > Обновление и безопасность > Активация. Upgrade from Windows 10 Home edition to Windows 10 Pro by opening up Settings > Update and Security > Activation.
Дополнительные сведения и советы по устранению неполадок см. в статье Требования к системе для Hyper-V в Windows 10. For more information and troubleshooting, see Windows 10 Hyper-V System Requirements.
Включение Hyper-V с помощью PowerShell Enable Hyper-V using PowerShell
Откройте консоль PowerShell от имени администратора. Open a PowerShell console as Administrator.
Выполните следующую команду. Run the following command:
Если не удается найти команду, убедитесь, что вы используете PowerShell от имени администратора. If the command couldn’t be found, make sure you’re running PowerShell as Administrator.
По завершения установки выполните перезагрузку. When the installation has completed, reboot.
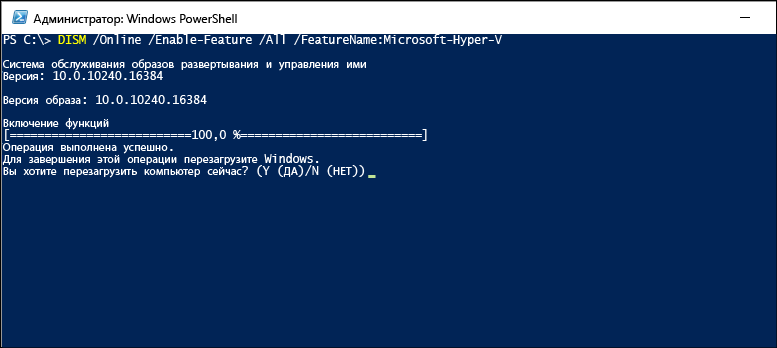
Включение Hyper-V с помощью CMD и DISM Enable Hyper-V with CMD and DISM
Система обслуживания образов развертывания и управления ими (DISM) позволяет настраивать ОС Windows и образы Windows. The Deployment Image Servicing and Management tool (DISM) helps configure Windows and Windows images. Помимо всего прочего? средство DISM может включать функции Windows во время выполнения операционной системы. Among its many applications, DISM can enable Windows features while the operating system is running.
Чтобы включить роль Hyper-V с помощью DISM, выполните указанные ниже действия. To enable the Hyper-V role using DISM:
Запустите PowerShell или сеанс CMD от имени администратора. Open up a PowerShell or CMD session as Administrator.
Введите следующую команду: Type the following command:
Дополнительные сведения о DISM см. в разделе Техническое руководство по DISM. For more information about DISM, see the DISM Technical Reference.
Включение роли Hyper-V с помощью раздела «Параметры» Enable the Hyper-V role through Settings
Щелкните правой кнопкой мыши кнопку Windows и выберите пункт «Приложения и компоненты». Right click on the Windows button and select ‘Apps and Features’.
Выберите Программы и компоненты справа в разделе связанные параметры. Select Programs and Features on the right under related settings.
Выберите пункт Включение или отключение компонентов Windows. Select Turn Windows Features on or off.
Выберите Hyper-V и нажмите кнопку ОК. Select Hyper-V and click OK.

После завершения установки вам будет предложено перезапустить компьютер. When the installation has completed you are prompted to restart your computer.
How to create a Linux virtual machine on Windows 10 using Hyper-V

Although it’s now possible to run a number of Linux distros natively on Windows 10, these environments can be somewhat limited in features and tools you can use. Also, you can only pick from three distros, including Ubuntu, SUSE Linux Enterprise, and OpenSUSE Leap, and you’re stuck with the command-line interface, which means that you can’t run any of the graphical experiences (e.g., GNOME, KDE, XFCE) or Linux-based graphical applications.
Of course, you can always install your favorite Linux distro on a second machine, but if you don’t have one, it’s still possible to run a full-blown version of Linux using a virtual machine (VM).
If you’re running Windows 10, you can enable Hyper-V on your device to create a VM to install your preferred distro whether you’re a developer or an enthusiast who just wants to know what’s the Linux fuzz all about.
In this Windows 10 guide, we’ll walk you through the steps to install most Linux distributions on virtual machines using Microsoft’s Hyper-V virtualization feature.
Guide requirements
To run a Linux virtual machine on Windows 10, you’ll need the following:
- A computer with support for Hyper-V.
- An ISO file to install your preferred Linux distribution.
In this guide, we’ll be using Ubuntu version 17.10, which you can download from the official Ubuntu website. However, it’s possible to install version 16.04, which might be a more stable version of the open source project, and you can also install other distros, including:
- CentOS and Red Hat Enterprise Linux.
- Debian.
- SUSE.
- Oracle Linux.
- FreeBSD.
How to enable Hyper-V on Windows 10
Hyper-V is a virtualization technology from Microsoft available on Windows 10 Pro, Enterprise, and Education, and it allows you to create one or multiple virtual machines to install and run different OSes on the same physical hardware.
Verifying Hyper-V support
Although Hyper-V is part of Windows 10, there is a minimum hardware requirement a computer must meet to enable the feature.
- 64-bit CPU with Second Level Address Translation (SLAT).
- Processor must support VM Monitor Mode Extension (VT-c on Intel chips).
- 4GB of memory at a minimum.
In addition, you have to make sure the Virtualization Technology and Hardware Enforced Data Execution Prevention options are enabled on your system BIOS.
You can quickly verify your computer has the required support for Hyper-V using Systeminfo:
- Open Start.
- Search for Command Prompt and click the top result.
Type the following command and press Enter:
Under Hyper-V Requirements, if the result reads Yes, then you can run Hyper-V.

If the command displays No under Hyper-V Requirements, then your hardware doesn’t support this feature, or you need to make sure to enable it manually.
Enabling Hyper-V
Use the following steps to enable Hyper-V on Windows 10:
- Open Control Panel.
- Click on Programs.
Click on Turn Windows features on or off.

Click OK to begin the process.
![]()
After the installation completes, click Restart now to apply the changes.

How to create a virtual machine using Hyper-V
Once you’ve completed adding the virtualization layer to Windows 10, you’ll need to create a virtual machine for the Linux distribution you want to use.
However, before you do that, you must create a virtual switch to allow the VM to connect to the internet.
Creating a virtual switch
Use the following steps to configure a virtual switch on Hyper-V:
- Open Start.
- Search for Hyper-V Manager and click the top result.
- Click on the Action menu.
Select New and click on Virtual Switch Manager.
Click the Create Virtual Switch button.
![]()
Click OK.
![]()
Creating a virtual machine
After creating the virtual switch, you can proceed to create a new virtual machine:
- Open Start.
- Search for Hyper-V Manager and click the top result.
- Click on the Action menu.
Select New and click on Virtual Machine.
Enter a descriptive name for your virtual machine (e.g., vm-ubuntu).
Click Next.
Select the amount of RAM to allocate for your virtual machine. In the case of Ubuntu, you need a minimum of 2GB of memory.
You can allocate as much memory as you want, but this setting will always depend on the physical memory available on your computer.
Click Next.
Click Next.
Click Next to continue.
Click Next.
How to install Ubuntu Linux using Hyper-V on Windows 10
The last step is to start the virtual machine and install the Linux distribution you want to use.
On Hyper-V Manager, under Virtual Machine, right-click the newly created device, and select Connect.
Click the Start (power) button.
Click the Install Ubuntu button.
Click Continue.
Click Continue.
Double-click the /dev/sda drive.
Double-click free space.
Click OK.
Double-click free space again.
Click OK.
Click the Install Now button.
Click Continue.
Click Continue.
Click Continue.
Restart the virtual machine to finish the setup.
Quick Tip: If during the final restart process, you get a message to remove the installation and press Enter, but hitting the key won’t restart the VM, just click the Turn off button and then turn it back on again.
After completing the steps, you can just turn on the VM and start using Ubuntu Linux alongside Windows 10.
While we’re focusing this guide setting up Ubuntu, you can also refer to these instructions to run other distributions of Linux.
More Windows 10 resources
For more helpful articles, coverage, and answers to common questions about Windows 10, visit the following resources:
We may earn a commission for purchases using our links. Learn more.
![]()
Here’s everything we know (so far) about Star Wars: Squadrons
Star Wars: Squadrons is a dog-fighting game developed by EA Motive. Players join the New Republic or the remnants of the Empire and engage in vicious space battles. Here’s what we know so far.
![]()
Here’s what we know about Second Extinction on Xbox and PC
Second Extinction is an upcoming first-person shooter from Systemic Reaction with a very simple and clear premise. Earth has been taken over by mutated dinosaurs. You have to destroy them. Here’s everything we know about Second Extinction.
![]()
Tablets are better for Project xCloud game streaming, these are our faves
Mobile phone screens are a touch on the small side for capable Project xCloud streaming. Thankfully, there are many options on the market for larger tablets that can take your portable Xbox gaming to the next level.
![]()
The NFL is back! Check out these must-have Windows apps for football fans
After months of waiting through a unique offseason and no preseason games, the NFL is finally back this week. With these Windows 10 apps, you won’t miss a snap of the NFL action.