How to transfer your Windows Phone contacts to an Android Phone
Last updated on November 10th, 2018
One of my customers asked me today to transfer his contacts from his old Windows Phone to his new Android one. So this tutorial is written for all users that want to migrate all contacts from their Windows Phone to their new Android Phone. The method described here is very simple and can be followed by everyone.
Before you continue to follow these steps, make sure that you already have a Microsoft Account (Windows Live, Hotmail, Outlook) account and you have setup (Add) that account on your Windows Phone. If you don’t have a Microsoft account, then you can create a new one here: Sign-Up Microsoft Account.
The next thing that is required to transfer your contacts from your Windows Phone device to your Android phone (by using this method) is to have a Google Account. If you don’t have a Google Account you can easily create one here (it’s free): Create Google Account.
How to transfer contacts from Windows Phone to Android
From your Windows Phone, sign-in to your Windows Live ID (Hotmail) account (if you haven’t already done that) and sync your Windows phone with Hotmail.
Info: When you are syncing your Windows phone with your Windows Live (or Hotmail) account, then you also sync all your contacts from your phone to that account and vice versa. So if you open your Windows Live Mail (Hotmail) from any computer or mobile device and navigate to your contacts page, you can find all your Windows Phone contacts also stored online on the Windows Live mail (Hotmail).
Step 1: Export Windows Live (Hotmail) contacts.
After you sync your Microsoft account with your Windows Phone, go to your computer to export and save all contacts from your Microsoft Account to a single (”CSV” – “Comma Separated Values”) file. To do that:
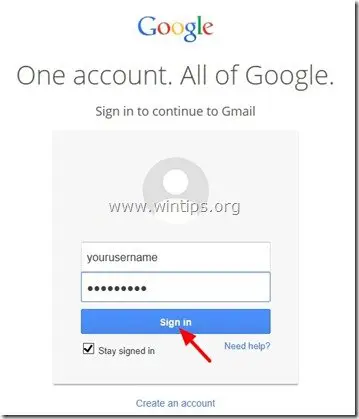
1. Sign-In to your Windows Live (Hotmail) account using a desktop computer: Windows Live (Hotmail) Login Page

2. While on the main window, press the drop-down arrow next to “Outlook” and choose “People”.


3. In “People” page, select “Manage” and choose “Export”.
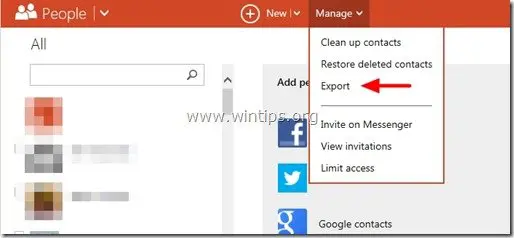
4. Now press “Save” to store the exported contacts file “WLMContacts.csv” on your computer (e.g. on your Desktop). *
- Important:DO NOT OPEN the CSV file with Excel.

5. Close Windows Live Mail.
Step 2: Transfer Windows Live (Hotmail) contacts to your Google Account.
Now you have to transfer your Windows Live (Hotmail) contacts to your Google Account. To do that:
1. Sign-In to your Gmail account using a desktop computer.
2. In the main Gmail window, press the drop-down arrow next to “Gmail” and choose “Contacts”. *

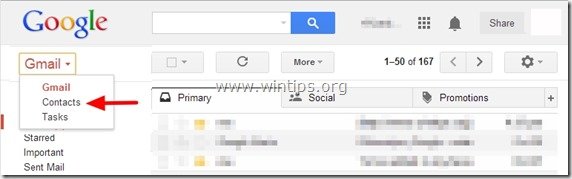
* Note : In the new GMAIL, click the Google Apps shortcut at the top right and select Contacts. (If you don’t see the «Contacts» in the list, then click «More» at the bottom).

3. In Contacts page, press “More” menu and select “Import”. *

* Note: In new GMAIL, the ‘More» option can be found at the left pane.

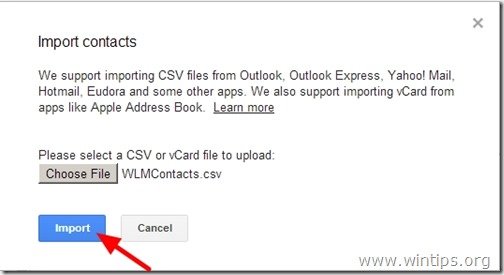
4. Now press the “Choose File” button.

5. Navigate to the location where you saved the Windows Live Contacts file (WLMContacts.csv) in the previous step and “Open” it.

6. Finally, press the “Import” button and wait until the import process is completed.
Close Gmail and sync your Android phone with your Gmail Account.
How to Sync Google Contacts to your Android phone.
1. On the Android phone, go to “Settings” > “Accounts and Sync”.
2. Under “Manage Accounts”, select (or “Add”) the Google account you used to import WLM contacts.
3. Finally press “Sync Contacts”.
How to Transfer Contacts from Lumia to Android
Just when you are happy and rejoicing on having got a new phone for yourself, you find out that transferring contact and other data from your old Lumia device to your new phone running on Android isn’t easy. Here we will discuss a much simpler method to transfer contacts from Lumia to Android in this article.
Part 1: Transfer Contacts from Lumia to Android using Outlook
Transferring contacts from a Lumia to an Android is a very extensive process. Also, it requires you to have some technical knowhow. The process comprises of three steps:
- • In the first step, contacts from the Lumia device have to be exported to an Outlook account and downloaded in the form of a .csv file.
- • Then in the second step, this .csv file needs to be uploaded to Google contacts. Once the contacts have been stored in the Gmail account, you need to sign in to your Android device using the same Google account to have all his contacts synced to his Android device.
Follow these instructions to learn step by step:
Step 1: Sync contacts from your Nokia Lumia to your Outlook account
1. Go to the “People” app on the Windows phone, scroll to the bottom to locate “…” and then go to “Settings.”
![]()
2. From the screen that appears, locate “Accounts” and select “Add an Account”.
![]()
3. From the following screen, go to “Microsoft Account” and enter your Outlook account password and sign in.
![]()
4. All the contacts in your Lumia will be synced with your Outlook account.
5. To get these contacts on your laptop or computer, go to your web browser and type in https://login.live.com . Sign in using your Microsoft account username and password.
![]()
6. Once you have logged in, locate “People” in your account.
![]()
7. The address book will open up and you will notice that all contacts from your Lumia will now be in your Microsoft account.
![]()
8. Go to Manage->Export to Outlook.com and other services. You will be required to enter a location where you wish you save the .csv file you are just about to create. Enter your desired location and hit the enter key and a .csv file will be downloaded to that location.
![]()
Step 2: Import the Outlook contacts to your Android phone
1. Open up your browser and type in www.gmail.com. Sign in to Gmail using your email and password.
2. Go to Gmail->Contacts.
![]()
3. From the menu bar at the top locate “More” (next to Add contact). Go to More, from the drop down menu that opens, select “Import”.
![]()
4. Click “Choose File” and locate the .csv file you just saved. After selecting the file, hit “Open”.
![]()
5. Your contacts will now be saved to your Gmail account. Now, sign in to your Android device using the same Gmail account you saved you contacts to. The syncing option is already enabled when you sign into your account for the first time.
Part 2: Transfer music, image and video using MobileTrans — Phone Transfer
MobileTrans — Phone Transfer is a wonderful and cost effective data transfer tool for us to transfer our contacts, music, videos, messages and more cross different platforms. In order to transfer contacts from Lumia to Android, you are supposed to know MobileTrans at first, since it can help you easily get it done.
MobileTrans — Phone Transfer
Transfer music, image and video from Lumia to Android in 1 click!
- • Easily transfer photos, videos, calendar, contacts, messages and music from device to device.
- • Backup and restore data on your device to a computer with one click.
- • Transfer data to Nokia phones without rewriting your original data.
- • Support Transferring data across the platforms like Android to iOS, iOS to Android.
- • Works perfectly with Apple, Samsung, HTC, LG, Sony, Google, HUAWEI, Motorola, ZTE, Nokia and more smartphones and tablets.
Steps to transfer other data from Lumia to Android
Step 1: Open Wondershare MobileTrans, select «Phone Transfer» mode on the interface.
![]()
Step 2: Connect your both phone to the computer, then the program will recognize it automatically. Set your lumia as source phone and android phone as destination phone.
![]()
Step 4: Select the music, images and videos and click Start. The data will be transferred to the Android phone in a few seconds.
How to Transfer Contacts from Android Phone to Computer
Nowadays, mobile phone has taken a very import role in our daily life and it becomes a gadget we just can’t live without for most people, especially business man. Besides phone calls and messaging, we do a lot of other tasks on smartphone, like news reading, email management, notes taking, business arrangement, etc…
It could be a great plain if your Android phone was lost or damaged. I already felt the desperation when my Android phone got stolen. I don’t care about the music/apps as I can get the back them from Google Play Store. But the phone contacts were gone forever as I didn’t back it up yet. I had to ask my friends and partners on Twitter one by one to retain their numbers. It takes me two weeks to achieve the task. So when the contacts were manually typed in my new Samsung Galaxy S10, the first thing is to transfer contacts to computer just in case for future loss. And here is the main topic we are talking about.
#1: Best Way to Transfer Contacts from Android Phone to PC or Mac
There are more than 10 methods you can find out in Google for Android contacts backup and transfer. Actually, most of us don’t have the time to try one one by one. So which is the best for transferring contacts from Android to computer? The Answer is Androidphonsoft Android Manager, which is a powerful yet easy-to-use desktop utility designed for content transfer and backup.
All of the content stored on Android phone can be transferred to computer within 3 clicks, including contacts, text messages, photos, music, video, apps and other documents. Let’s check out how it works.
Step 1 Install and Launch Android Manager
This step is quick simple. Download the software from above link and install it on your computer by following up the built-in installation wizard. Open the program after it’s properly installed. Click Transfer tab in the red square.
Step 2 Connect Android Phone to Computer
Plug your Android device to computer via USB cable. If the device is the first time attached to the computer, then install Android USB driver before proceeding to the next step. Once the device is recognized by the software, tap «Yes» on your Android phone home screen to turn on USB debugging, which is necessary for further operations. Once done, it will automatically analyze the content stored on the device.
Step 3 Start to Export Android Contacts to Local Computer
It will take 3-5 minutes to complete the analyzing task, depending on your phone model and Android OS. After that, the software lists a bunch of items, like contacts, music, SMS, etc… Navigate to Information -> Contacts and click Export on the navigation menu. Then choose an proper option from drop-down menu and select a local folder to store the exported contacts. You can also use this program to backup Android sms as well as other items, such as music, videos or photos.
You Can Also Directly Edit, Add, Delete Android Contacts on PC
This program provides a very strong contacts management function, this is a very convenient feature that allows you to delete duplicate contacts, add new contacts, modify contacts via your PC and it will automatically sync to your phone. As you can see, you can edit name, email, phone number, website, address, middle name,etc.
There are five export options available, like vCard, Live mail and Outlook. Which one is suitable for you is depending on your own purpose. For me, vCard is the best choice as it’s a standard format for storing personal information, and it’s can be imported to other mobile devices and mobile apps.
Androidsoft Assistant is far beyond contact transfer, there are other useful tools already incorporated in the software, like one-click backup, app management, sending sms via computer, media conversion, taken screen short, etc… It’s a must-have widget that every Android device owner should take into consideration. It makes Android management simple and smooth.
#2: Export Contacts on Android and Backup Contacts to PC
Contacts on certain Android phones can be exported to PC directly. Well, before getting started with the process, you must know that this method works only on certain Android devices, including Samsung Galaxy S10, S9 or S8. So, in case you want to utilize this method, make sure that this facility is available on your phone. Assuming that your Android device supports the above requirement, move to the stepwise instructions given below:
Step 1: Open your Contacts app on the Android smartphone and go to the Settings page. You may need to click on «More» to get to the right page.
Step 2: Look for a menu item showing «Import/Export Contacts» and click on it.
Step 3: Hit on «Export» and choose «Export Contacts to Device Storage». This time all your phone contacts will be transferred to SD card in a .vcf file.
Step 4: Finally, establish a link between Android phone and the computer. Then search for the file that was recently exported to SD card. Once you find the.vcf file, copy and paste it to your PC.
Keep a note of the location where your exported contact list is stored into your PC. This is important because users often find it difficult to seek the exact location in the PC where he has transferred the file. Also, while doing the transfer you cannot choose some specific contacts out of the contact list. You will have to send the entire contact list even if you want to transfer only a few of them.
#3: Transfer Android Contacts to PC with Gmail/Outlook App
The above method is the preferred way to transfer contacts from Android to a computer because there is no additional material needed. However, there is another way to backup Android contacts with Gmail or Outlook. The prerequisite is that you should have a Google or Microsoft account.
First, install Gmail or Outlook app on your phone. Then sign in corresponding ID and password. Next, select the contacts you wish to backup. A few minutes later, the selected contacts will be synced to cloud and you can restore them later. However, one thing you should be noted. The contacts list will be messed up if there are already contacts in that account.
#4: Transfer Contacts from Android to PC via FoneLab Backup
Aiseesoft Android Backup & Restore is a PC based program designed to backup individual items on Android to a computer. The steps are almost the same as Android Manager but the device connection and features are a bit worse. That’s why we list as the fourth solution in this post. If all the above methods failed to work, then this one is worth trying out definitely.
Step 1: Install and launch Aiseesoft Android Backup and Restore tool. Within a few clicks, the software installation will be automatically led and done. This data backup and restore tool is similar to any other relevant tool in terms of quick and automatic launching.
Step 2: Now establish a link between your Android phone and computer using a USB cable. This is done to allow the software tool to detect your mobile device prior to transferring contacts.
Step 3: Choose the desired contacts simultaneously in the display of choosing the backup data type. Here, your selected data type should be Contacts. Then wait for your selected data from the phone to pop-up on the computer screen.
Step 4: As the selected items are notified on screen, select and backup the same from phone to your computer. All you have to do is check once before proceeding to back up. For being more sure, simply check if the selected items are ticked the boxes present beside every item.
As you are done selecting, the item box will be lightened with tick mark. So, now lead the final backup operation. Don’t forget to hit on Start button located at the bottom right corner of the page to specifically select and proceed with the process. Eventually, you can back up all your chosen items from your smartphone to computer without a hassle. Once you are done doing the effortlessly and successful, you won’t have to think much about data loss which may often occur in your Android phone.
#5: Transfer Android Contacts to PC via Smart Contacts Backup
Smart Contacts Backup is a popular app for saving Android phone data to cloud or send contacts via email. It’s simple to use and the download is only 8MB, which means it won’t take up valuable space on Android smartphone.
Step 1: Download the app from Play Store and install it.
Step 2: For multiple backup options, create a login for yourself.
Step 3: Your total contacts are listed and ready for export. Click on Backup and they will be converted to VCF and you can then send them via email.
Step 4: Login the same email account on a PC and download the .vcf as attachment from the email.
Note: If you want to use only the email backup function, there’s no need to log into your account each time. However, it is required for cloud backups.
Wrap Up
Transferring Android contacts to computer is the safest way for data backup. As we mentioned above, there are more than one way to do this. There are premium software and free apps. However, no one is perfect. The free ones also come with ads and no support available. That’s why people are tend to pay for a few bucks to get it done quickly.