Share Your VPN Connection over Wi-Fi Using Mac OS X
Share Your IKEv2 VPN Connection
- Click on the Apple symbol in the top-left corner of your screen and select System Preferences.

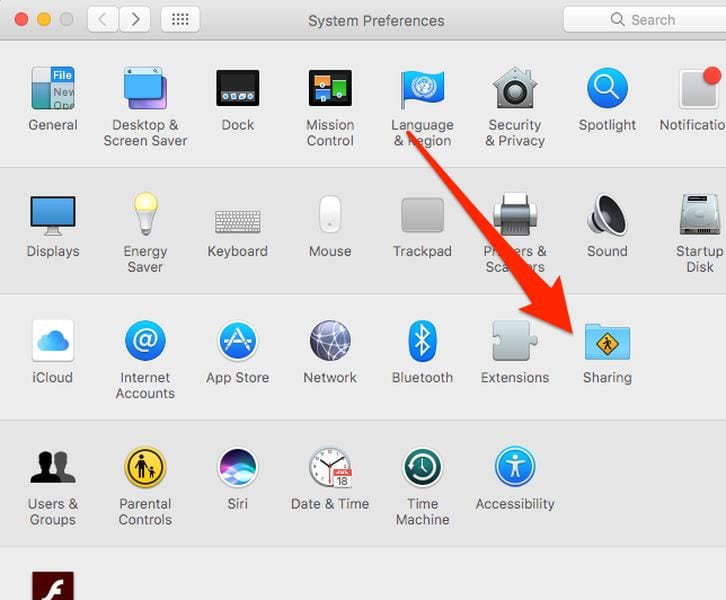
Select the Sharing button in the Internet & Wireless section.


Scan for WiFi networks on your device and look for the SaferVPN hotspot you just created. Choose the connection and continue to connect normally.

Need help installing our VPN on your device? Check out our: VPN for Windows, VPN for MAC, VPN for iOS, VPN for Android, VPN Router, and our VPN Chrome Extension.
How to Share VPN Connection on Mac OS
So, you’re here because your streaming device doesn’t support VPN, right? Or maybe, you’re looking for a way to cover your whole house with a VPN connection. Well, you came to the right place. I’ve spent a lot of time sitting under my router for a proper connection. However, now, I know how to turn my Mac into a virtual router. Do you want to learn how to do so yourself? Follow this guide and learn how to share a VPN connection on MacOS.

How to Share VPN Connection on Mac OS
Top Recommended VPN
30-Day Money-Back Guarantee
Turn Your Mac into a Virtual VPN Router
Setting up a VPN connection on your Mac is pretty easy. You just have to sign up for a VPN service and download their dedicated application on your Macintosh. However, turning your MacOS into a virtual router is the tricky part.
You see, there are a lot of reasons why you need to do so. First, you might have a streaming device that you wish to unblock restricted content on. Yeah, I know that these devices aren’t natively compatible with VPNs. That’s why you could either install a VPN on your router or share a VPN connection from your Mac. If setting up a VPN on your router is hard to comprehend, let me teach you how to get a VPN connection from your Mac.
But first, you need to know that Macs are pretty limited. Being connected to a Wi-Fi network doesn’t allow you to share one concurrently. However, you can do so if you connect the device to a Wireless adapter or directly to the internet with an Ethernet cable. Once you pick one of these methods, follow the steps below.
- Depending on your choice, do the following:
- Insert the Wi-Fi adapter in your Mac.
- Connect your Mac with Ethernet.
- After that, head over to “System Preferences”.

- Now, choose “Sharing”.
- Select “Internet Sharing”.
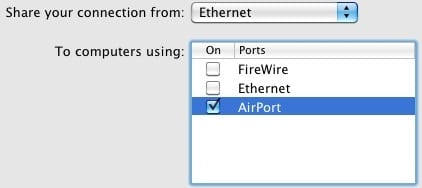
- Tap on “Share your connection from:” and choose [the L2TP VPN connection you have enabled].
- After that, pick what devices you want to connect next to “To computers using:” select “Ethernet or Wi-Fi”. according to your initial choice.
- Click on “Wi-Fi Options” and submit the details of your shared connection.
- Hit “OK” and tap on “Start”.
- You’ve successfully shared a VPN connection through your MacOS.


Best VPN Service for Mac VPN Connection Sharing
VPNs have a lot of benefits for everyone who’s connecting to the internet. I use VPNs all the time, especially when I’m browsing the web. It provides my activities with complete anonymity and the latest military-grade encryptions for ultimate security.
I don’t browse fearing the fact that someone is spying on me anymore. I have a hidden IP address and I can roam the web anonymously without having to look over my shoulder all the time.
I’m not here to gloat about my internet experience, I’m just showing you what you’re missing if you don’t make use of a VPN. If you’re convinced, let me show you what to look for in a VPN before you invest in one:
- Servers: When you subscribe for a VPN service, make sure it covers a lot of countries in its server network. Otherwise, you won’t be able to unblock certain streaming services and websites.
- Speed: There are VPN providers that offer more than 5000 servers around the world. However, I tested their servers and they’re pretty slow. That’s not a good thing when you’re choosing a VPN. Pick one with fast speeds if you’re an avid streamer or gamer.
- Chat Support: The VPN you decide to use must have a reliable chat support team that can solve your problem at any time. Make sure they include live chat in their services so that you get your issue taken care of on the spot.
- Zero-Traffic-Log: A credible VPN adopts a strict no-log policy. That means the company doesn’t collect your data and store it for future use. It’s very critical to use a VPN that allows this service especially in countries where the government interferes a lot in a VPN’s business. That includes the US, UK, New Zealand and more.
- VPN-Alternative: Smart DNS Proxies have a huge impact on unblocking restricted channels. Unlike VPNs, they cover all devices including the likes of PlayStation, Xbox, Roku, Apple TV, and Chromecast. They can also be set up on routers. However, this service is only for bypassing regional restrictions, you won’t be getting the extra layer of security as you do with a VPN.
On my Mac, I use ExpressVPN. It has a very user-friendly interface and you don’t need to be tech-savvy to navigate at all. To add a cherry on top, ExpressVPN offers a 30-day money back guarantee in case its service didn’t live up to your expectations. That said, take a look at other best VPNs for MacOS in the table below.
How To Share A VPN Connection On Mac
Using a VPN is the best way to ensure your privacy online or watch content that’s blocked in your region.
There are lots of excellent value for money VPN services for Mac users nowadays and you can easily share your VPN with other Macs or devices.
This is great if you want to make sure that all Macs in your home or office are surfing anonymously and securely or if you want to stream content that’s blocked in your region on another device.
It’s also a perfect solution for sharing a VPN connection with devices such as AppleTV, Roku and Smart TVs or gaming consoles such as PlayStation and XBox that normally can’t use a VPN.
The other great thing is the market for VPNs is insanely competitive with massive discounts of 70% on VPNs like NordVPN.
Before we start, it’s important to be aware that depending on your VPN provider, sharing a VPN on macOS is a two-step process.
- First you need to configure a L2TP/IPSec connection profile (this is to create a secure VPN tunnel on your Mac).
- Then you need to configure your VPN service so that you can share it.
However, it’s important to be aware that some VPN providers like NordVPN no longer support L2TP/IPSec as it’s not as secure as it used to be. VPN providers such as NordVPN have dropped L2TP/IPSec and switched to the more secure OpenVPN and IKEv2/IPsec protocols.
The problem with this however is that there’s no way to share a VPN on Mac via WiFi (you can share your WiFi but not the actual VPN connection) using these protocols so it’s important you check that your VPN provider supports L2TP/IPSec.
If your VPN provider does support L2TP/IPSec, this process shouldn’t take more than a few minutes so here’s how to easily share a VPN connection on Mac using WiFi.
1. Setup An L2TP/IPSec Connection On Your Mac
First you need to setup a secure tunnel that your Mac can use. This is known as an L2TP/IPSec connection.
- Click on the Apple logo in the top left of your Mac and select System Preferences.

- Click on Network.

- Then click on the “+” symbol near the bottom left corner and select “VPN” under Interface and “L2TP over IPSec” under VPN Type. Enter the name of your VPN provider (examples include CyberGhost VPN or ExpressVPN) under Service Name and click Create.

- You then need to enter a Server Address for your VPN Network (such as one of these if you’re using ExpressVPN) and under Account Name, enter your VPN account username. Tick the box “Show VPN status in menu bar”.

- Enter your VPN Password and under Shared Secret you can use anything you want – just make sure you make a note of it.

- Click OK and then select Advanced.

- Tick the box Send all traffic over VPN connection.

- Click OK and then make sure that the checkbox Show VPN status in menu bar is checked.

You’ll see that the VPN status icon appears at the top of your screen in your Menu Bar next to the time.
Finally click Apply at the bottom of the screen and you’ve now completed setting up a secure L2TP/IPSec connection that your VPN service can use.
Now you just need to connect your VPN to this secure tunnel. Just follow the instructions below to complete the setup.
2. Setup Your VPN Service For Sharing From Your Mac
- Firstly, make sure your VPN connection is switched on. If you haven’t got one, check out some of these VPN apps that are compatible with Macs.
- Click on the Apple logo in the top left of your Mac and select System Preferences.
- Click on Sharing.

- Click on Internet Sharing in the options on the left but don’t actually tick the checkbox yet. In the configuration options on the right, under Share your connection from select VPN (L2TP). In the box To computers using select Wi-Fi.

- When you click Wi-Fi Options you must then define a password that other users on the same WiFi network will need to use your VPN connection. Choose the Network Name of connection you want to share, leave the Channel on 11, change Security to WPA2 Personal and then create a Password that other users will need to connect to the VPN network.

- Click OK and then check the box next to Internet Sharing to turn it on.

And that’s it, you’ve now setup a VPN network than any WiFi enabled device can use such as iPhone, iPad, Android device, PlayStation, XBox etc. All they need to do is connect to the Wi-Fi network you’ve enabled it for and enter the password that you setup earlier.
If at any time you want to deactivate the VPN, simply uncheck the Internet Sharing box. You can also disconnect the L2TP tunnel at any time by selecting it under System Preferences > Network and click Disconnect.
If you have any questions or problems setting up a VPN to be shareable on your Mac, let us know in the comments below.
If you found this tutorial useful, you might also find our guide to the best VPNs for Mac useful too.
Related
About The Author

MacHow2 is devoted to helping you get the most of of your Mac. We’re passionate about all things Mac whether it’s helping users with software recommendations or solving technical problems. If you’ve got any comments about this article, get involved by leaving a comment below. You can also contact us directly using the contact form at the top of the site. Please note that in the interests of transparency, MacHow2 may sometimes receive compensation from link clicks or vendors.
2 Responses

Very useful article, I was searching exactly for this kind of information. I am using Nordvpn and did step by step what you wrote, so no problems setting up Nordvpn provider to be shareable on my MacBook Air.
Thanks for the really useful post! Everything worked fine except when I shared the network connection… If I share it, and connect to it, it will disconnect my wifi connection and immediately, of course, lose the VPN connection as there’s no internet connection.
If I uncheck the sharing internet option, the VPN works fine from my mac. It’s the sharing what messes up everything…
Leave a Reply Cancel reply
This site uses Akismet to reduce spam. Learn how your comment data is processed.