How to disable driver signature enforcement in windows 7
The following forum(s) have migrated to Microsoft Q&A: All English Windows 7 IT Pro forums!
Visit Microsoft Q&A to post new questions.
Answered by:
![]()
Question
![]()
![]()
Answers
![]()
![]()
All replies
![]()
![]()
Try disabling signature check using easybcd free tool, that you can get from http://neosmart.net/dl.php?id=1
Run easybcd, click advanced options button.
Enabling loading of unsigned drivers is security risk!
![]()
![]()
I installed AtiTrayTools and it didn’t want to load the driver for it because it is not signed.
What else?
![]()
![]()
![]()
![]()
ok install signed driver then.
Why you install unsigned driver if there is signed drivers.
If there is not driver designed for w7 install driver for vista using compatibility mode to run driver setup
![]()
![]()
![]()
![]()
Open a command prompt as an admin and type
bcdedit -set loadoptions DISABLE_INTEGRITY_CHECKS
bcdedit -set TESTSIGNING ON
See security risk warning above.
If it doesn’t work for whatever reason you can just remove loadoptions with bcedit and switch testsigning off.
bcdedit /deletevalue loadoptions
bcdedit -set TESTSIGNING OFF
if this breaks something for whatever reason sorry, goodluck.
![]()
![]()
Turning off the digital certificate signed driver mandatory requirement in Windows 7 64-bit is not supported. Carey Frisch
![]()
![]()
In Vista, the solution was to sign the driver yourself. You can see how to do it here
Look at «Proj X11: Digitally Signing an Application». I know that works for applications, and I think it works for drivers too, but I haven’t tested it.
![]()
![]()
Here’s a link with instructions on how to do it legit from within Windows using the Group Policy Editor.
![]()
![]()
![]()
![]()
Here’s a link with instructions on how to do it legit from within Windows using the Group Policy Editor.
This does not work as I have just tried it. And all i’m trying to do is install official updated sound drivers.
This has to be one of the biggest pains in the ____ ever.
![]()
![]()
You can install unsigned drivers using DSEO and testmode. It is a permanent solution, but you have to sign drivers individually.
Follow the steps of this somewhat related guide , omitting the part about old driver version, and this is how to get Ati Tray Tools to work.
![]()
![]()
These two commands alone worked great for me on Win7-64:
bcdedit -set loadoptions DISABLE_INTEGRITY_CHECKS
bcdedit -set TESTSIGNING ON
![]()
![]()
Reb oot using advanced start up options and there is an option to turn off signature enoforcement.
Reboot as normal and press F8. Then select » Disable Driver Signature Enforcement». Then install the unsigned driver. I had to do this for development using libusb.
![]()
![]()
well why does windows give you chance to turn it off by pressing f8 then selecting disable driver signature enforcement??
![]()
![]()
DSEO worked for me. (Win 7 x64). Thanks for your suggestion.
Windows crashed for first reboot, but after second reboot, «Technisat Virtual Network Adapter» is working now
![]()
![]()
Tried this, it doesn’t work.
![]()
![]()
This option works fine for me. «Open a command prompt as an admin and type
bcdedit -set loadoptions DISABLE_INTEGRITY_CHECKS
bcdedit -set TESTSIGNING ON «
See security risk warning above.
![]()
![]()
Doing it the first time failed for my problem but here is what i did
go to start button and type in cmd highlight over it and right click
select run as admin
typed this (for whatever reason i thought it was odd to have a random directory):
«cd\» and then i hit the enter button
then the command prompt did the thing it was supposed to and said:
THEN. and only then did following your instructions worked when using:
bcdedit -set loadoptions DISABLE_INTEGRITY_CHECKS
bcdedit -set TESTSIGNING ON
i seriously do not know how and what it had to do with it but i don’t care as it worked.
![]()
![]()
for those of you who want to bypass the security dialog which occurs when installing non-MS-WHQL-signed drivers on Windows 7 64Bit (and Windows 8, 8.1) there was only a single solution for me that worked for scripted, automated, unattended or silent installations: import the certificates prior to install
Follow these steps:
1. install the software once manually by confirming that the unsigned drivers shall be used
2. go to %windir%\inf and search for the latest OEM. INF file; open it (notepad) and verify by its contents that this is the driver you wish to install automatically next time
3. go to %windir%\system32\catroot\
![]()
![]()
I was so excited after seeing this, then I started to try it and . :/ I got to step 3. In step 2 my file is called «oem4.inf», but on step 3 there is no file called «oem4.CAT». There are a few others but not «4».
Also, is there a way to tell what drivers are currently NOT signed on my server 2008 r2 box?
Thanks for the attempt. :/
![]()
![]()
It totally worked for me, thanks Gizmo0001 i’ve been banging my head against the wall on an automated install all day.
I too did not have a matching .cat file, but the oem*.inf file had a «[Version]» section. In there it has a «CatalogFile=» parameter or whatever its called where it lists the name of the associated .cat file. Once you have that just do a search for that file name and walla, you’re set to proceed with Gizmo0001’s procedure.
In my case I had been trying to manually export the cert after a manual install from the «Trusted Publishers» in certmgr.msc and then import it elsewhere. For some reason it didnt like that. It could be that I was importing it manually and didnt use the certutil.exe so maybe thats where the hangup was. Anyway Gizmo001’s method will without a doubt get you to the correct certificate at least.
Also i’d like to mention that although I dont know what that bcedit stuff is, the certificate option Gizmo0001 offered sounds like a better option to me from an automated install standpoint and possibly more secure? Maybe someone with more expertise in this area can weigh in on that?
Как отключить проверку подписи драйверов в Windows 7
В Windows 7 существенно ужесточились требования к установке драйверов. Операционная система, особенно её 64-разрядная версия, безжалостно блокирует любые попытки инсталляции драйвера, при отсутствии цифровой подписи. Иногда это серьёзно мешает.
Конечно, можно проигнорировать вопли системы безопасности Windows и установить неподписанный драйвер, ответив что вы доверяете этому издателю, однако, несмотря на то, что в операционной системе нужный драйвер и будет установлен, работать устройство всё равно не сможет.
В диспетчере устройств оно будет помечено восклицательным знаком и содержать следующее сообщение об ошибке:
Не удается проверить цифровую подпись драйверов, необходимых для данного устройства. При последнем изменении оборудования или программного обеспечения могла быть произведена установка неправильно подписанного или поврежденного файла либо вредоносной программы неизвестного происхождения. (Код 52)
Подобная проблема вылезла при установке свежей версии OpenVPN 2.4.9 на 64-битную Windows 7, вернее на самой программы, а виртуальной сетевого интерфейса TAP-Windows Adapter V9 (версия 9.24.2).
VPN-туннели я использую постоянно и ставил их десятки раз на разные операционные системы. Как правило, всё проходило успешно с первого раза либо проблема решалась довольно быстро. в этот раз быстро не получилось, так как «винда» упорно не принимала адаптер.
[ Спойлер ] На самом деле, проблема решается очень просто, если вы не гонитесь за последними версиями программ. Просто ставим OpenVPN версии 2.4.6, без всяких танцев с бубном, и радуемся (тут в составе дистрибутива идёт подписанная версия драйвера TAP-Windows 9.21.2)
Отключение проверки цифровой подписи драйверов в Windows 7 с помощью команды bcdedit
Я предпочёл пойти простым путём, но можно попробовать отключить проверку цифровой подписи драйверов. Для этого запускаем командную строку с правами администратора и последовательно набираем следующие две команды:
bcdedit.exe /set loadoptions DISABLE_INTEGRITY_CHECKS
bcdedit.exe /set TESTSIGNING ON
Выполнение каждой команды сопровождается сообщением о том, что команда успешно выполнена. После чего перезагружаем компьютер и пробуем заново установить неподписанный драйвер.
Чтобы отменить данный режим работы и вновь включить проверку цифровой подписи в Windows 7, выполним следующие команды:
bcdedit.exe /set loadoptions ENABLE_INTEGRITY_CHECKS
bcdedit.exe /set TESTSIGNING OFF
Подписывайтесь на канал Яндекс.Дзен и узнавайте первыми о новых материалах, опубликованных на сайте.
ЕСЛИ СЧИТАЕТЕ СТАТЬЮ ПОЛЕЗНОЙ,
НЕ ЛЕНИТЕСЬ СТАВИТЬ ЛАЙКИ И ДЕЛИТЬСЯ С ДРУЗЬЯМИ.
Top 2 Ways to Disable Driver Signature Enforcement on Windows 10/8.1/8/7/XP/Vista
How do I disable the driver signature enforcement in Windows 10? The driver signature enforcement error screen can’t be cleared… If you are going to turn off the driver signature enforcement feature on your 64 bit or 32 bit Windows 10, Windows 8.1, Windows 8, Windows 7, Windows XP or Windows Vista, you are in the right place. This post will tell you what it is, how to disable driver signature enforcement, how to enable it if needed and what should you do to enable all installed drivers work properly, also applied to Windows 10 Creators Update or Fall Creators Update 1709.
Part 1. What is Windows Driver Signature Enforcement
When you install drivers on your computer (from manufacturers, OEM, Windows Update or 3th-party driver download software, etc.), some of the drivers can work properly, while some may not. The working driver must be the signed driver that includes a digital signature, and the digital signature is an electronic security mark that can indicate the publisher for the driver, as well as all related information if someone has changed the original contents of the drive package. All drivers and system files must be digitally verified by Microsoft, and Windows won’t run the unsigned drivers on both 32-bit or 64-bit system. This is the «driver signature enforcement».
To increase security, Microsoft has introduced the driver signature enforcement in Windows OS, including Windows Vista, Windows XP, Windows 7, Windows 8, Windows 8.1, and Windows 10. This restricted feature has strict limitations on driver signing, especially in Windows 8, 8.1, and 10.
Windows will alert you if a driver is not signed or is not certificated with one of the messages like:
Windows can’t verify the publisher of this driver.
This driver has been altered.
Windows cannot install this driver.
Part 2. Why Do You Need to Disable Driver Signature Enforcement on Windows 10/8.1/8/7/XP/Vista
Many programs which use driver files do not have digital signature authentication, such as the phone drivers or other USB drivers. To receive verified certificates, manufacturers or developers have to pay Microsoft, and this makes lots of drivers are not accessible in Windows. To install the unsigned drivers on your computer and make them work properly, you need to disable driver signature enforcement.
Is it good to bypass or disable the driver digital signature enforcement? Installing unsigned drivers may have some risks, since the drivers can be modified or inserted something we don’t know. However, if you are sure the drivers you are going to install are safe, you can turn off this driver signature enforcement feature and install the unsigned drivers.
Part 3. How to Disable Driver Signature Enforcement Permanently – Top 2 Ways
To disable driver signature enforcement, you can try the 2 workable methods on Windows 10, Windows 8.1, Windows 8, Windows 7, Windows XP and Windows Vista. All apply to laptops, notebooks, and desktop PCs, including Asus, Acer, Dell, HP, Sony, Lenovo, Samsung, Toshiba, IBM, Alienware, Compaq, Gateway, LG, Microsoft, MSI, etc..
Note: If you have a computer installed Windows 10 anniversary (version 1607), click Fix: Driver Signature Issue on Windows 10 Anniversary directly for solutions.
Top 1. Disable Driver Signature Verification through Troubleshoot
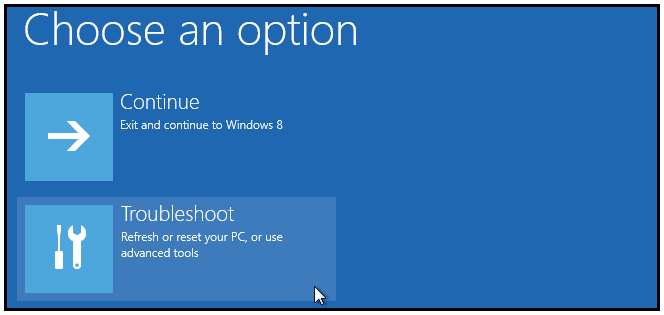
Step 1. Enter Troubleshoot.
There are many ways to get into Troubleshoot. In Windows 10/8.1/8, you can click “Restart” from the power options menu or the Start menu and hold down the “Shift” key at the same time. Once the computer has rebooted, you will be able to choose the Troubleshoot option. Or you can try Windows key + R to bring up the Run box, try shutdown/r/o and hit Enter, click “Close” to sign off and then you can choose the Troubleshoot option when the computer has rebooted.
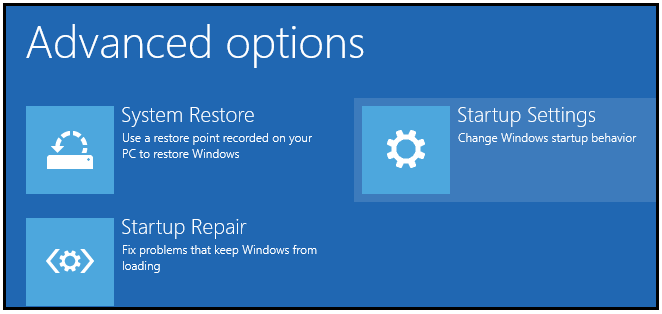
Step 2. Select “Advanced options” and “Startup Settings”.
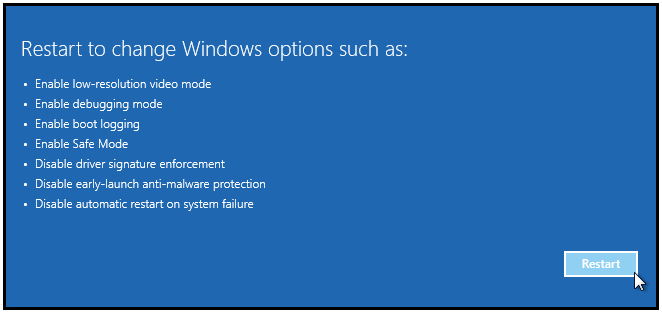
Step 3. You need to restart you computer one last time to modify boot time configuration settings.
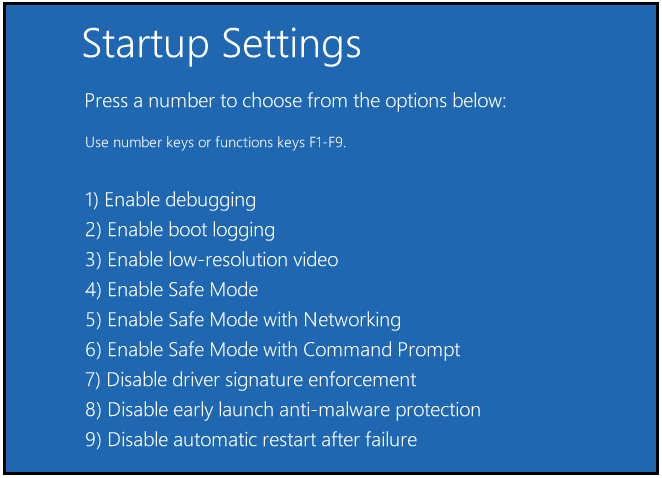
Step 4. You will be given a list of startup settings, including “Disable driver signature enforcement”. To choose the setting, you need to press F7 key.
In Windows 7, XP and Vista, you can continuously press during boot-up to get to Advanced Boot options (on some other systems, you need to first press to go into Boot Menu and then press to reach Advanced Boot options). When the menu pops up, use the Down arrow key to scroll to “Disable driver signature enforcement” and press “Enter”. Continue the boot process.
Your PC will reboot and you are able to install any drivers including the unsigned drivers without error messages.
Top 2. Disable Driver Signature Enforcement Permanently and Completely
You can try commands to disable driver signature enforcement permanently and completely.
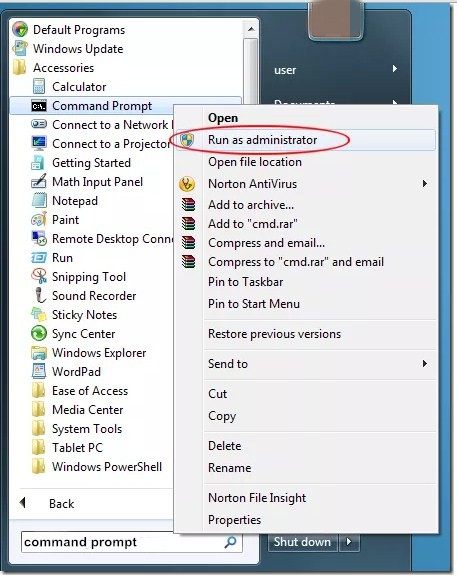
Step 1. Open a Command Prompt with admin privileges. In Windows 10/8.1/8, press the Windows key + X and select “Command Prompt (admin)”. In Windows 7/XP/Vista, you can type “command prompt” in the Start search box, right-click on “Command Prompt” in the result and select “run as administrator”.
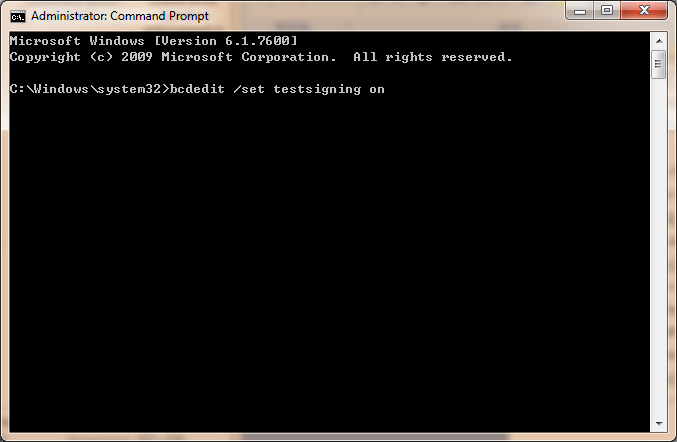
Step 2. Type the following command and press the Enter key:
bcdedit /set testsigning on
You should receive the “The operation completed successfully” message.
In our test, you can also type the commands as below:
Please press after each line.
bcdedit.exe -set loadoptions DDISABLE_INTEGRITY_CHECKS
bcdedit.exe -set TESTSIGNING ON
Step 3. Close the Command Prompt window and restart your computer. Now you can install any unsigned drivers without problems.
Part 4. How to Enable Driver Signature Enforcement if Needed
You can enable driver signature enforcement whenever you need. Try the 2 methods below. Both requires to type commands in Command Prompt window. To enter Command Prompt, refer to Top 2 above.
Method 1. If you disable driver signature verification through Troubleshoot, type the following commands:
bcdedit.exe -set loadoptions DDISABLE_INTEGRITY_CHECKS
Restart your computer.
Method 2. If you turn off driver signature verification with the 2th method, try the command below:
bcdedit /set testsigning off
Reboot your computer.
Part 5. What Should You Do to Make All Drivers Work Properly on Your Laptop, Notebook or Desktop PC
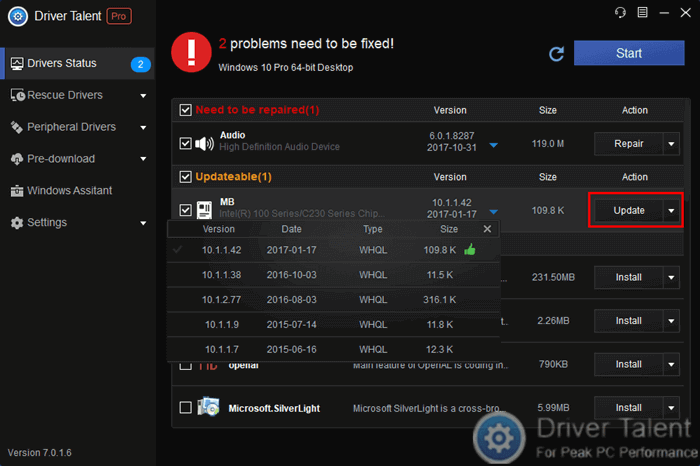
Sometimes it’s hard to accurately locate the exact drivers your hardware or devices need. If you install a wrong driver, it will even crash your computer. Therefore, it’s important to install the correct drivers for your Windows PC. You can try the professional Windows Drivers download and update utility, OSToto Driver Talent. It helps you to one-click download and install the best-matched drivers for your computer hardware and devices compatible with the exact Windows OS. For example, if your computer is Asus laptop, Windows 10, 64 bit, this utility will instantly detect all driver issues and install the best compatible 64-bit drivers for your Windows 10 Asus laptop. You won’t have problems on drivers.
Download and install Driver Talent on your computer for free.
If you have any questions about how to permanently disable driver signature in Windows 10, don’t hesitate to leave comments below for further assistance.