derhuerst / intro.md
Installing Git – the easy way
Git is a free and open source distributed version control system designed to handle everything from small to very large projects with speed and efficiency.
Choose one of the following options.
Determine on which Linux distribution your system is based on. See List of Linux distributions – Wikipedia for a list. Most Linux systems – including Ubuntu – are Debian-based.
Debian-based linux systems
Open a terminal window. Copy & paste the following into the terminal window and hit Return . You may be prompted to enter your password.
You can use Git now.
Red Hat-based linux systems
Open a terminal. Copy & paste the following into the terminal window and hit Return . You may be prompted to enter your password.
You can use Git now.
Homebrew […] simplifies the installation of software on the Mac OS X operating system.
Copy & paste the following into the terminal window and hit Return .
You will be offered to install the Command Line Developer Tools from Apple. Confirm by clicking Install. After the installation finished, continue installing Homebrew by hitting Return again.
Step 2 – Install Git
Copy & paste the following into the terminal window and hit Return .
You can use Git now.
Pro Git
Страницы
пятница, 6 марта 2015 г.
Правильная установка Git на Mac OS X
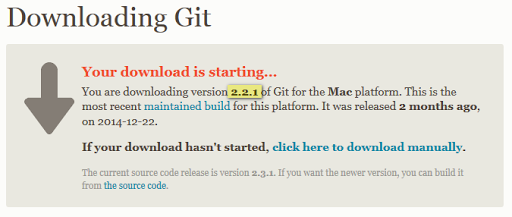
То, устанавливается не самая последняя версия Git.
Дайте команду в терминале
$ git —version
И если вы увидите что то вроде этого
git version 1.9.3 (Apple Git-50)
то это статья для вас. Если вы видите версию 2.3.1 (на момент написания статьи) последняя была такая, то тогда у вас все хорошо.
И так сперва устанавливаем Homebrew, если он у вас еще не стоит.
Просто скопируйте и вставьте эту строку в терминал и запустите ее.
ruby -e «$(curl -fsSL https://raw.githubusercontent.com/Homebrew/install/master/install)»
После того как Homebrew установиться дайте в терминале команду
brew install git
После того как Git установится дайте команду
export PATH=/usr/local/bin:$PATH
чтобы прописать путь к новой установке Git.
И далее смотрим версию Git
$ git —verrsion
Должны увидеть что то типа этого

git version 2.3.1
Все! Далее чтобы обновлять Git достаточно дать команду
brew upgrade git
Просто не правда ли!?
Пример обновления Git в Mac OS X 10.10.2 через Homebrew
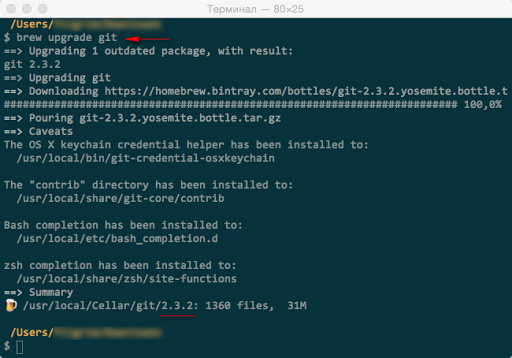
Вот и получили самую свежую версию Git на Mac OS X
Install Git
Install Git on Mac OS X
There are several ways to install Git on a Mac. In fact, if you’ve installed XCode (or it’s Command Line Tools), Git may already be installed. To find out, open a terminal and enter git —version .
Apple actually maintain and ship their own fork of Git, but it tends to lag behind mainstream Git by several major versions. You may want to install a newer version of Git using one of the methods below:
Git for Mac Installer
The easiest way to install Git on a Mac is via the stand-alone installer:
Follow the prompts to install Git.
Open a terminal and verify the installation was successful by typing git —version :
Configure your Git username and email using the following commands, replacing Emma’s name with your own. These details will be associated with any commits that you create:
(Optional) To make Git remember your username and password when working with HTTPS repositories, configure the git-credential-osxkeychain helper.
Install Git with Homebrew
If you have installed Homebrew to manage packages on OS X, you can follow these instructions to install Git:
Open your terminal and install Git using Homebrew:
Verify the installation was successful by typing which git —version :
Configure your Git username and email using the following commands, replacing Emma’s name with your own. These details will be associated with any commits that you create:
(Optional) To make Git remember your username and password when working with HTTPS repositories, install the git-credential-osxkeychain helper.
Install Git with MacPorts
If you have installed MacPorts to manage packages on OS X, you can follow these instructions to install Git:
Open your terminal and update MacPorts:
Search for the latest available Git ports and variants:
Install Git with bash completion, the OS X keychain helper, and the docs:
Configure your Git username and email using the following commands, replacing Emma’s name with your own. These details will be associated with any commits that you create:
(Optional) To make Git remember your username and password when working with HTTPS repositories, configure the git-credential-osxkeychain helper.
Install the git-credential-osxkeychain helper
Bitbucket supports pushing and pulling your Git repositories over both SSH and HTTPS. To work with a private repository over HTTPS, you must supply a username and password each time you push or pull. The git-credential-osxkeychain helper allows you to cache your username and password in the OSX keychain, so you don’t have to retype it each time.
If you followed the MacPorts or Homebrew instructions above, the helper should already be installed. Otherwise you’ll need to download and install it. Open a terminal window and check:
If you receive a usage statement, skip to step 4. If the helper is not installed, go to step 2.
Use curl to download git-credential-osxkeychain (or download it via your browser) and move it to /usr/local/bin :
Make the file an executable:
Configure git to use the osxkeychain credential helper.
The next time Git prompts you for a username and password, it will cache them in your keychain for future use.
Install Git with Atlassian Sourcetree
Sourcetree, a free visual Git client for Mac, comes with its own bundled version of Git. You can download Sourcetree here.
To learn how to use Git with Sourcetree (and how to host your Git repositories on Bitbucket) you can follow our comprehensive Git tutorial with Bitbucket and Sourcetree.
Build Git from source on OS X
Building Git can be a little tricky on Mac due to certain libraries moving around between OS X releases. On El Capitan (OS X 10.11), follow these instructions to build Git:
From your terminal install XCode’s Command Line Tools (if you haven’t already):
Using Homebrew, install openssl:
Clone the Git source (or if you don’t yet have a version of Git installed, download and extract it):
To build Git run make with the following flags:
Install Git on Windows
Git for Windows stand-alone installer
When you’ve successfully started the installer, you should see the Git Setup wizard screen. Follow the Next and Finish prompts to complete the installation. The default options are pretty sensible for most users.
Open a Command Prompt (or Git Bash if during installation you elected not to use Git from the Windows Command Prompt).
Run the following commands to configure your Git username and email using the following commands, replacing Emma’s name with your own. These details will be associated with any commits that you create:
Optional: Install the Git credential helper on Windows
Bitbucket supports pushing and pulling over HTTP to your remote Git repositories on Bitbucket. Every time you interact with the remote repository, you must supply a username/password combination. You can store these credentials, instead of supplying the combination every time, with the Git Credential Manager for Windows.
Install Git with Atlassian Sourcetree
Sourcetree, a free visual Git client for Windows, comes with its own bundled version of Git. You can download Sourcetree here.
To learn how to use Git with Sourcetree (and how to host your Git repositories on Bitbucket) you can follow our comprehensive Git tutorial with Bitbucket and Sourcetree.
Install Git on Linux
Debian / Ubuntu (apt-get)
Git packages are available via apt:
From your shell, install Git using apt-get:
Verify the installation was successful by typing git —version :
Configure your Git username and email using the following commands, replacing Emma’s name with your own. These details will be associated with any commits that you create:
Fedora (dnf/yum)
Git packages are available via both yum and dnf:
From your shell, install Git using dnf (or yum, on older versions of Fedora):
Verify the installation was successful by typing git —version :
Configure your Git username and email using the following commands, replacing Emma’s name with your own. These details will be associated with any commits that you create
Build Git from source on Linux
Git requires the several dependencies to build on Linux. These are available via apt:
From your shell, install the necessary dependencies using apt-get:
Clone the Git source (or if you don’t yet have a version of Git installed, download and extract it):
To build Git and install it under /usr , run make :
Git requires the several dependencies to build on Linux. These are available via both yum and dnf:
From your shell, install the necessary build dependencies using dnf (or yum, on older versions of Fedora):
or using yum. For yum, you may need to install the Extra Packages for Enterprise Linux (EPEL) repository first:
Symlink docbook2X to the filename that the Git build expects:
Clone the Git source (or if you don’t yet have a version of Git installed, download and extract it):
To build Git and install it under /usr , run make :