Insales Club

При использовании Мака столкнулся с проблемой — нет возможности отформатировать флешку в формате FAT32. Таких пунктов просто нет в приложении «Дисковая утилита»: 
Отформатировать флешку на macOS в FAT32 можно с помощью терминала за 2 шага:
Шаг 1. Определяем какой диск нам необходимо отформатировать
Вводим в терминал команду:
В ответ получает следующее: 
В моем случае необходим диск /dev/disk3
Шаг 2. Форматируем диск
- FAT32 — это файловая система, в которую необходимо отформатировать;
- SA — будущее название флешки;
- /dev/disk3 — это диск, на котором необходимо произвести форматирование (в моем случае это USB флешка).
Собственно после этого процесс будет запущен и через несколько секунд флешка на macOS получит необходимый нам формат FAT32.
Как отформатировать флешку на Mac OS
Казалось бы, форматирование флешки является одним из самых простых процессов в работе с компьютером. Пользователи Windows знают, чтобы полностью стереть данные с USB-флеш-накопителя, SD карты или жесткого диска, достаточно кликнуть правой кнопкой мыши по соответствующему значку в проводнике и в появившемся контекстном меню выбрать «форматировать», а затем подтвердить операцию.
В Mac OS все несколько иначе, и если вы совсем недавно перешли на эту операционную систему, то действие по выполнению очистки ненужной информации может показаться сложным. В этой статье мы расскажем, как легко и быстро сделать это на вашем Макбуке, iMac либо Mac Mini.
Детальная пошаговая инструкция
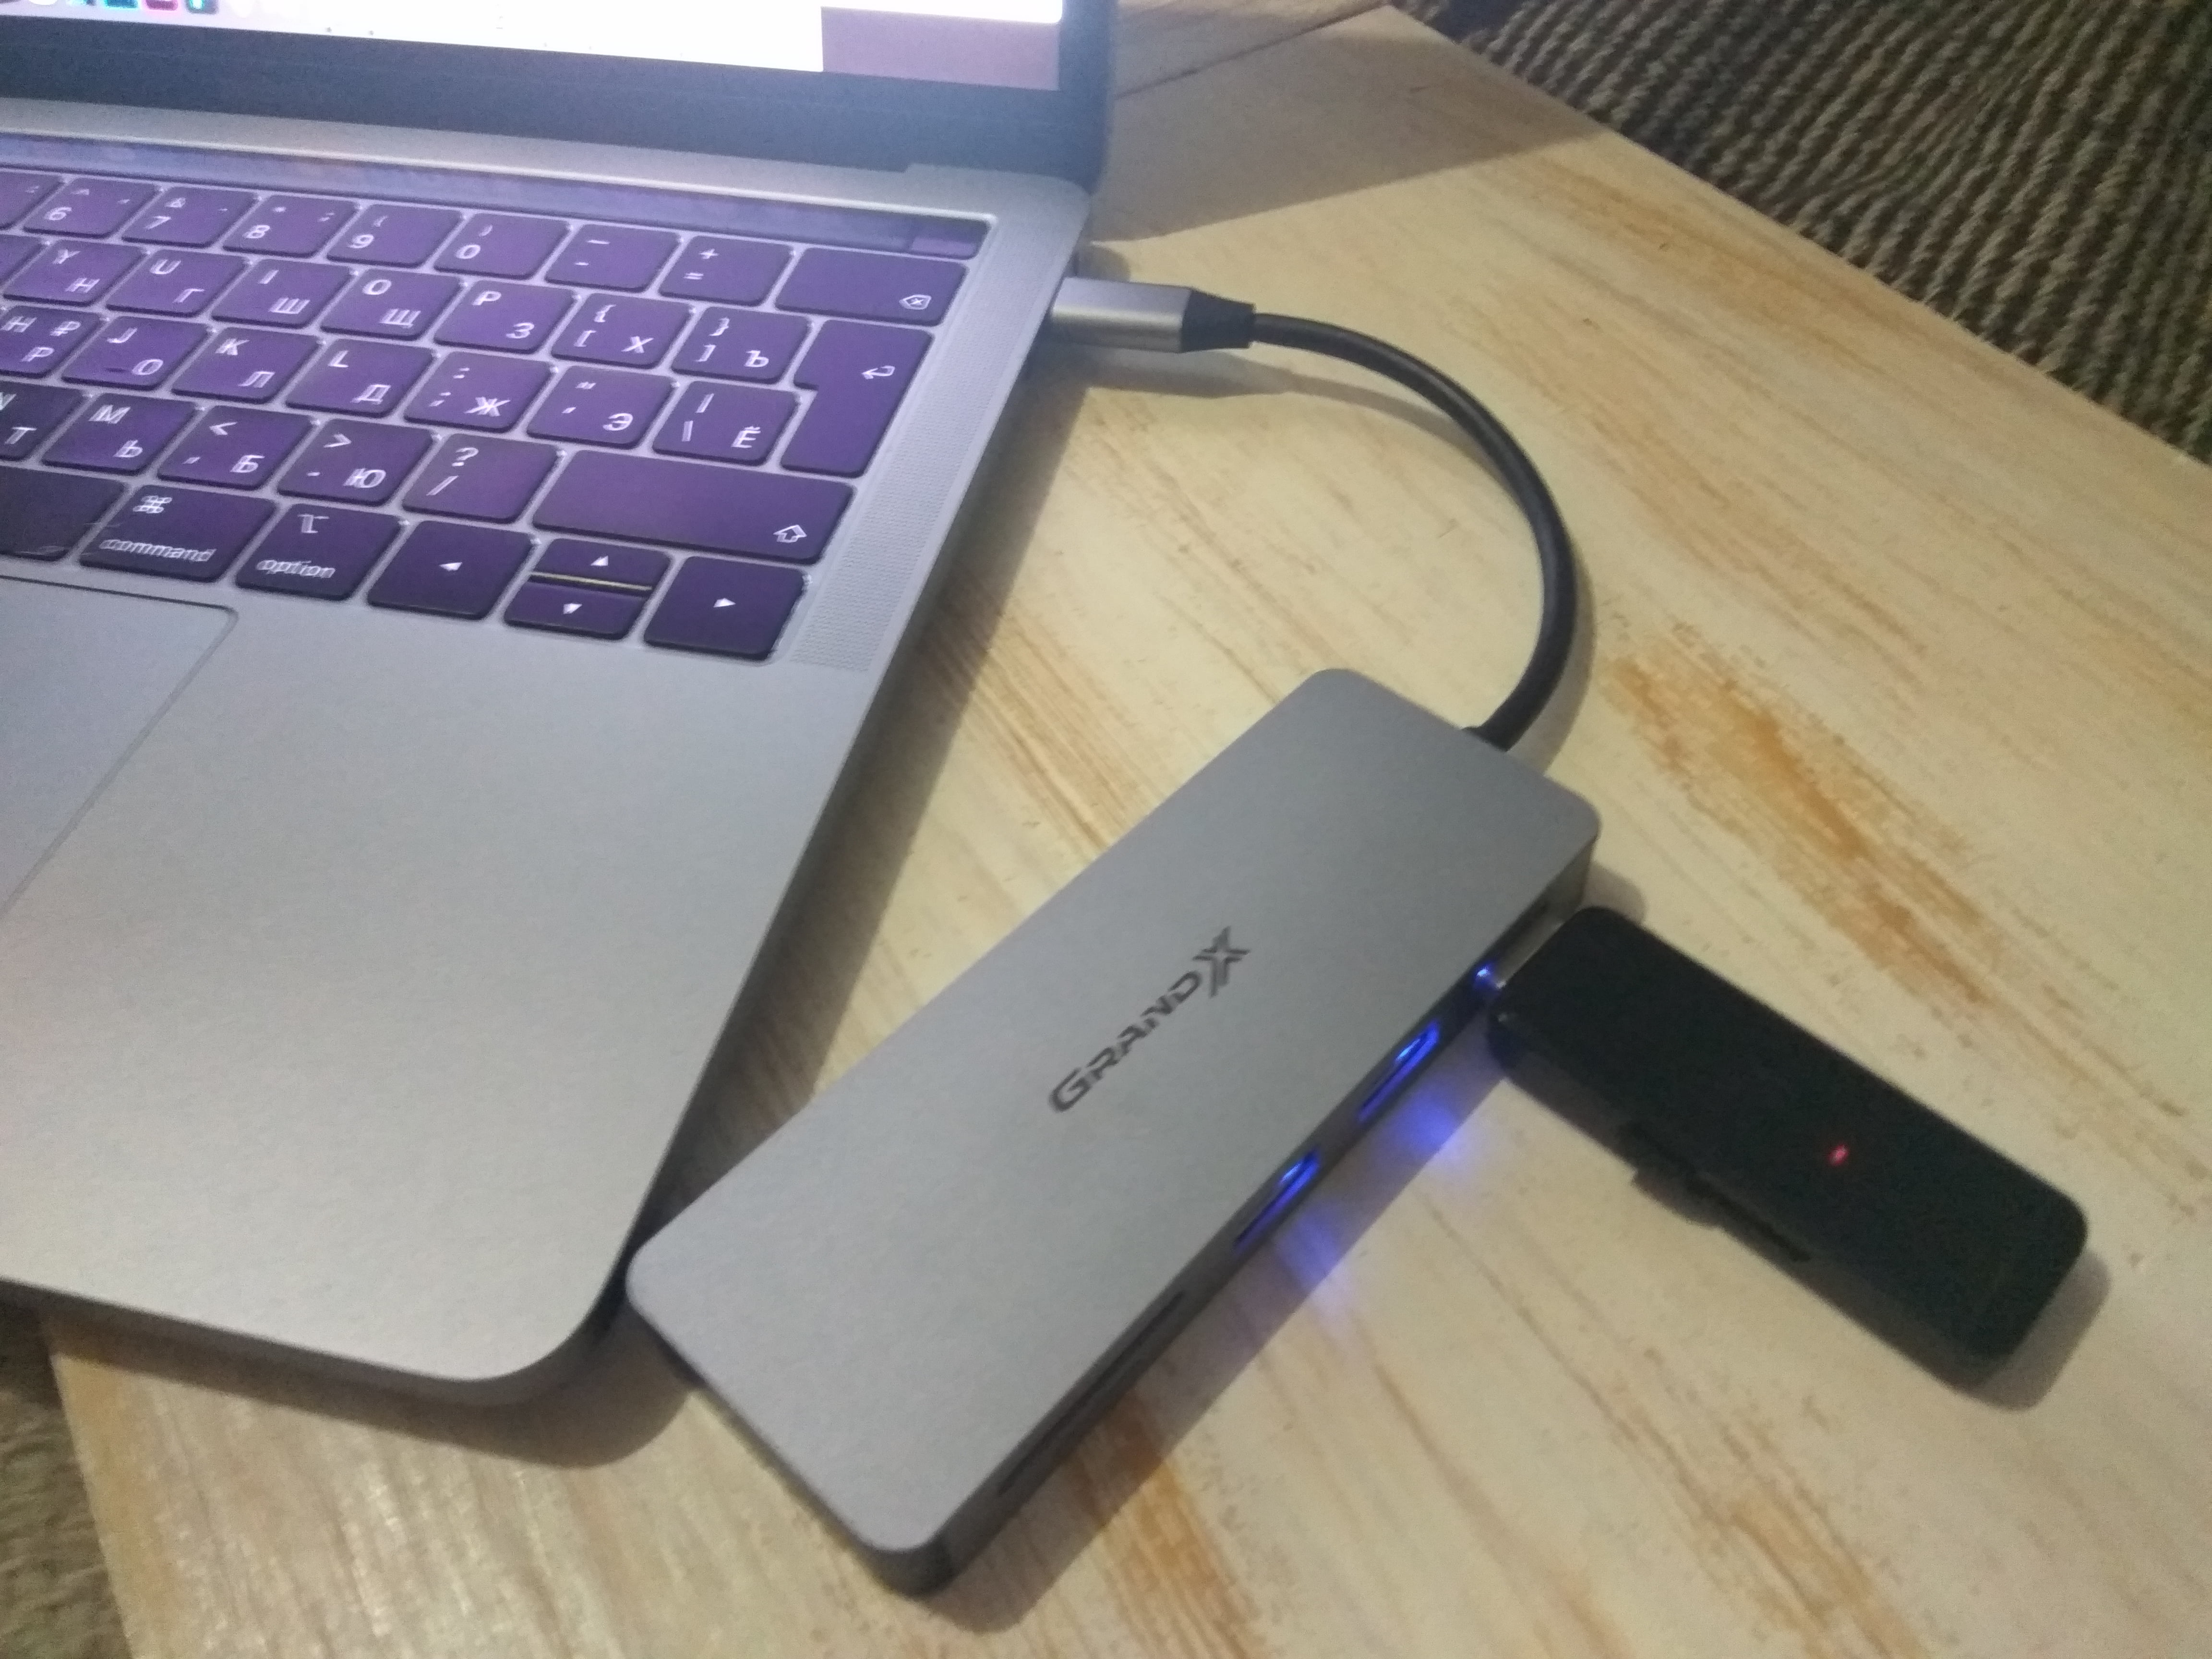
- Подключаем флешку к устройству. В нашем конкретном случае, используется Macbook Pro 2018-го года, порт USB здесь отсутствует. Поэтому воспользуемся хабом от фирмы Grand X (не воспринимайте за рекламу).
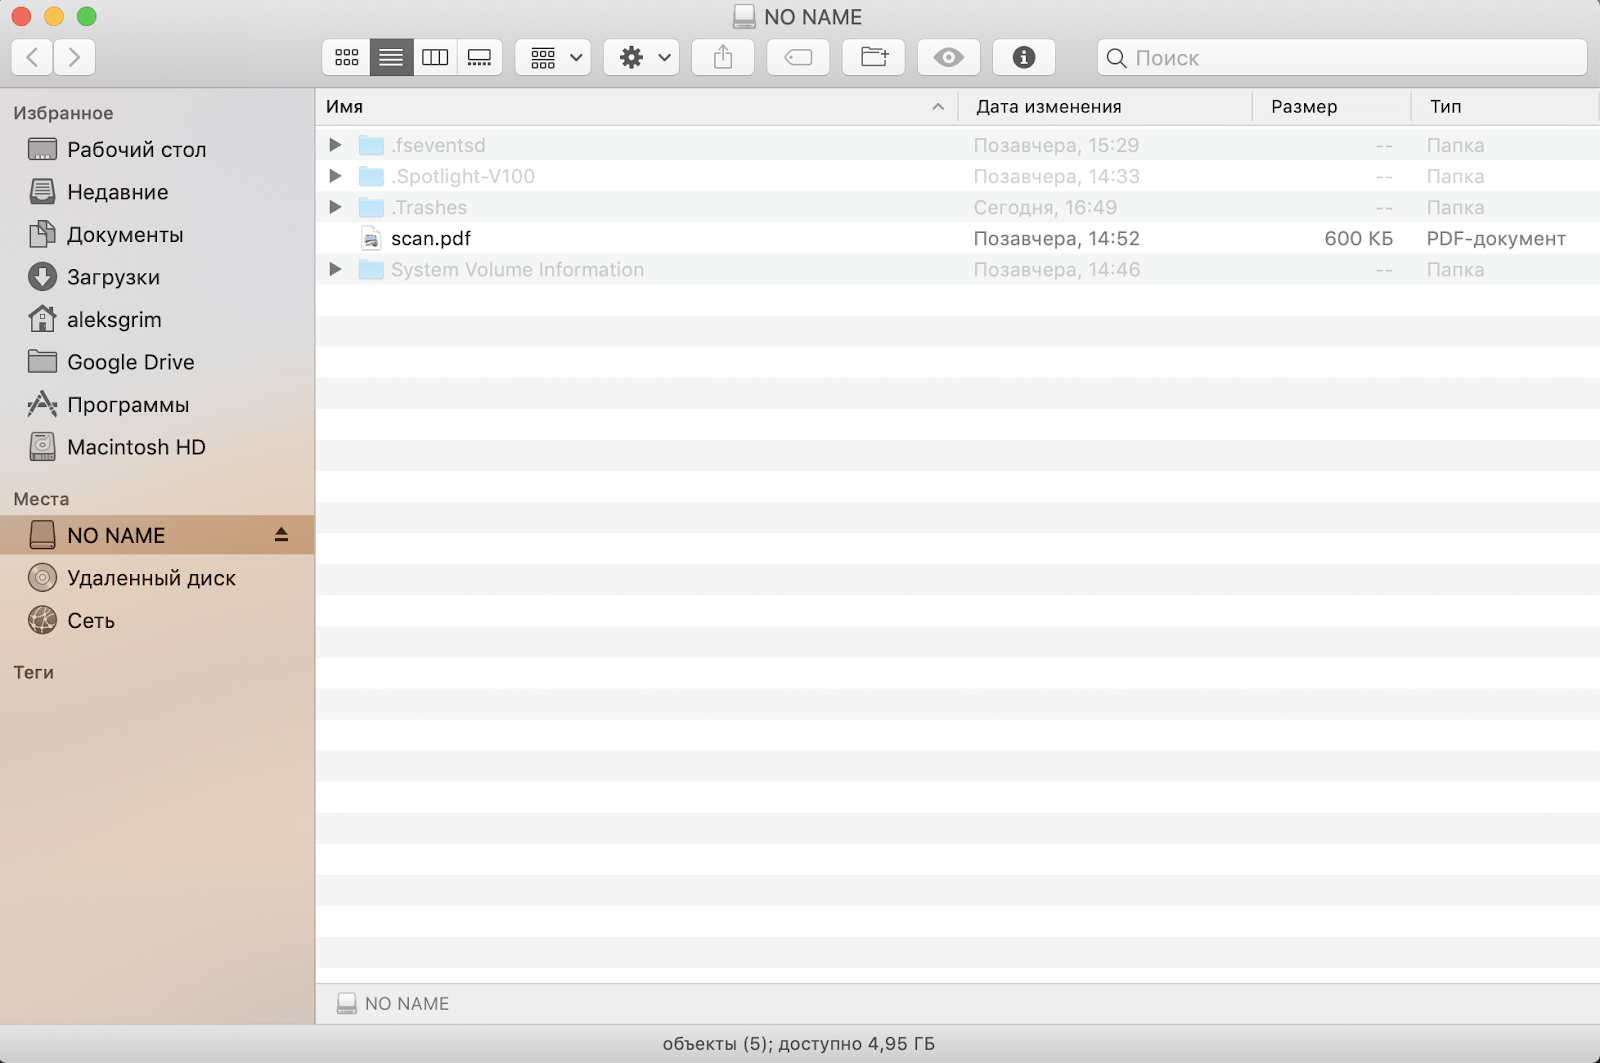
- В Finder видим содержимое нашей флешки. Обратите, внимание, на скриншоте ниже видны скрытые файлы и папки (слегка засвечены). По умолчанию, в Mac OS они скрыты, но отобразить их достаточно просто, прочитайте в нашей статье.
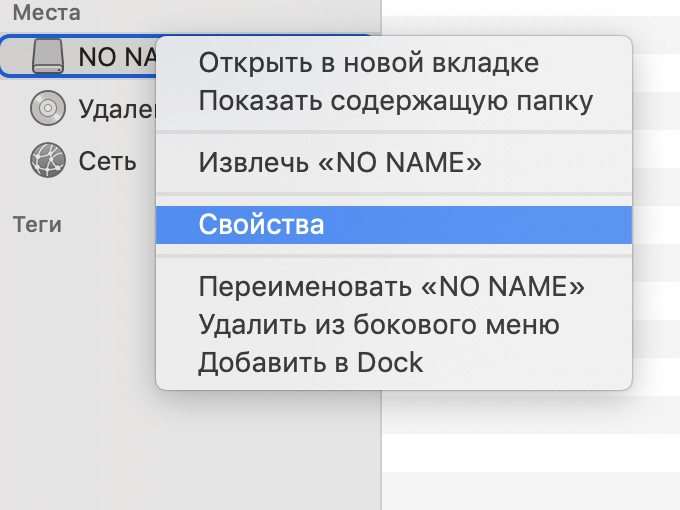
Можете убедиться, если до сих пор еще не пробовали, что в контекстном меню нет опции «форматировать», как в Windows.
Теперь, переходим к основной сути – форматированию. Это можно сделать несколькими способами, начнем с самого простого – дисковой утилиты.
Дисковая утилита – встроенное в Mac OS приложение, позволяющее управлять жесткими дисками, USB флешками, SD картами. С его помощью также можно стирать данные.
- Запустить дисковую утилиту можно двумя способами: открыть Launchpad (чаще всего он находится в Dock).
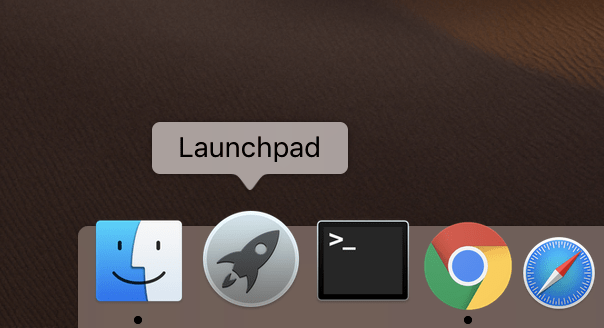
Если у вас Макбук с тачбаром, на нем есть иконка Launchpad рядом с Siri.
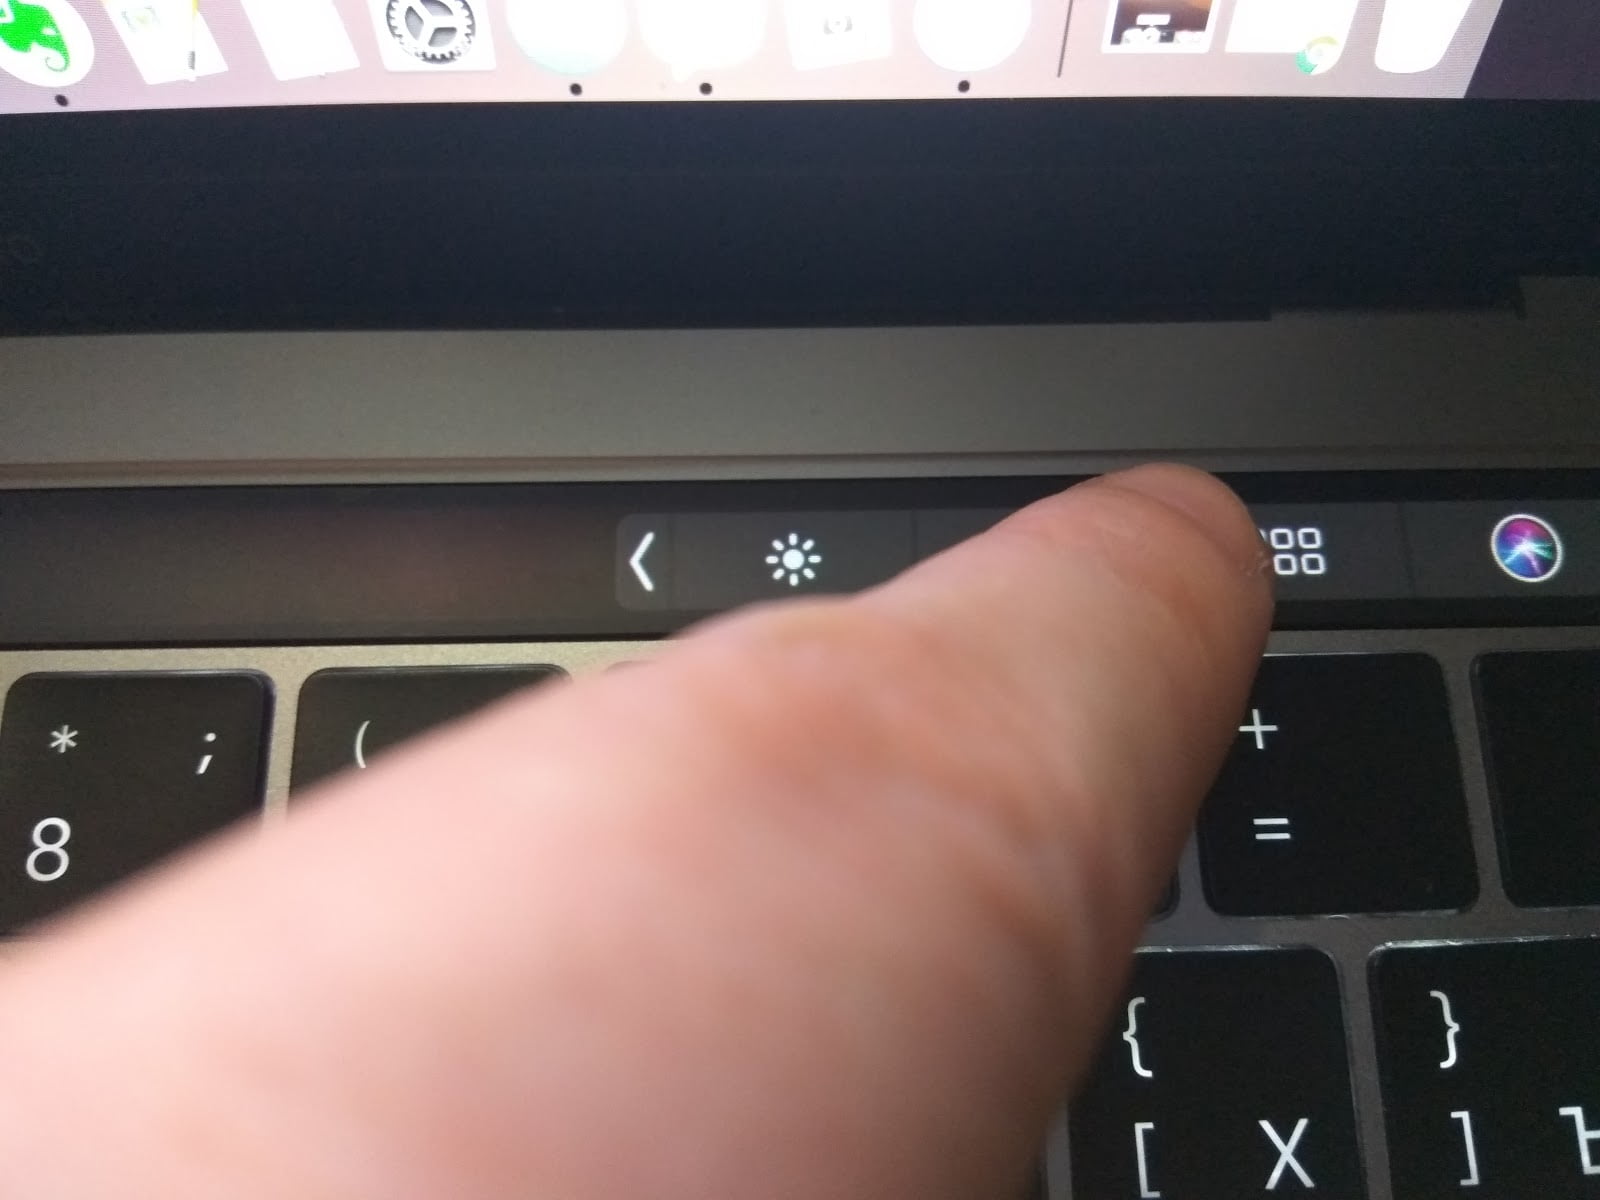
Если Launchpad не нашли ни там ни там, вызвать его можно жестами – большой палец снизу и указательный, средний, безымянный сверху стягиваем к центру трекпада.
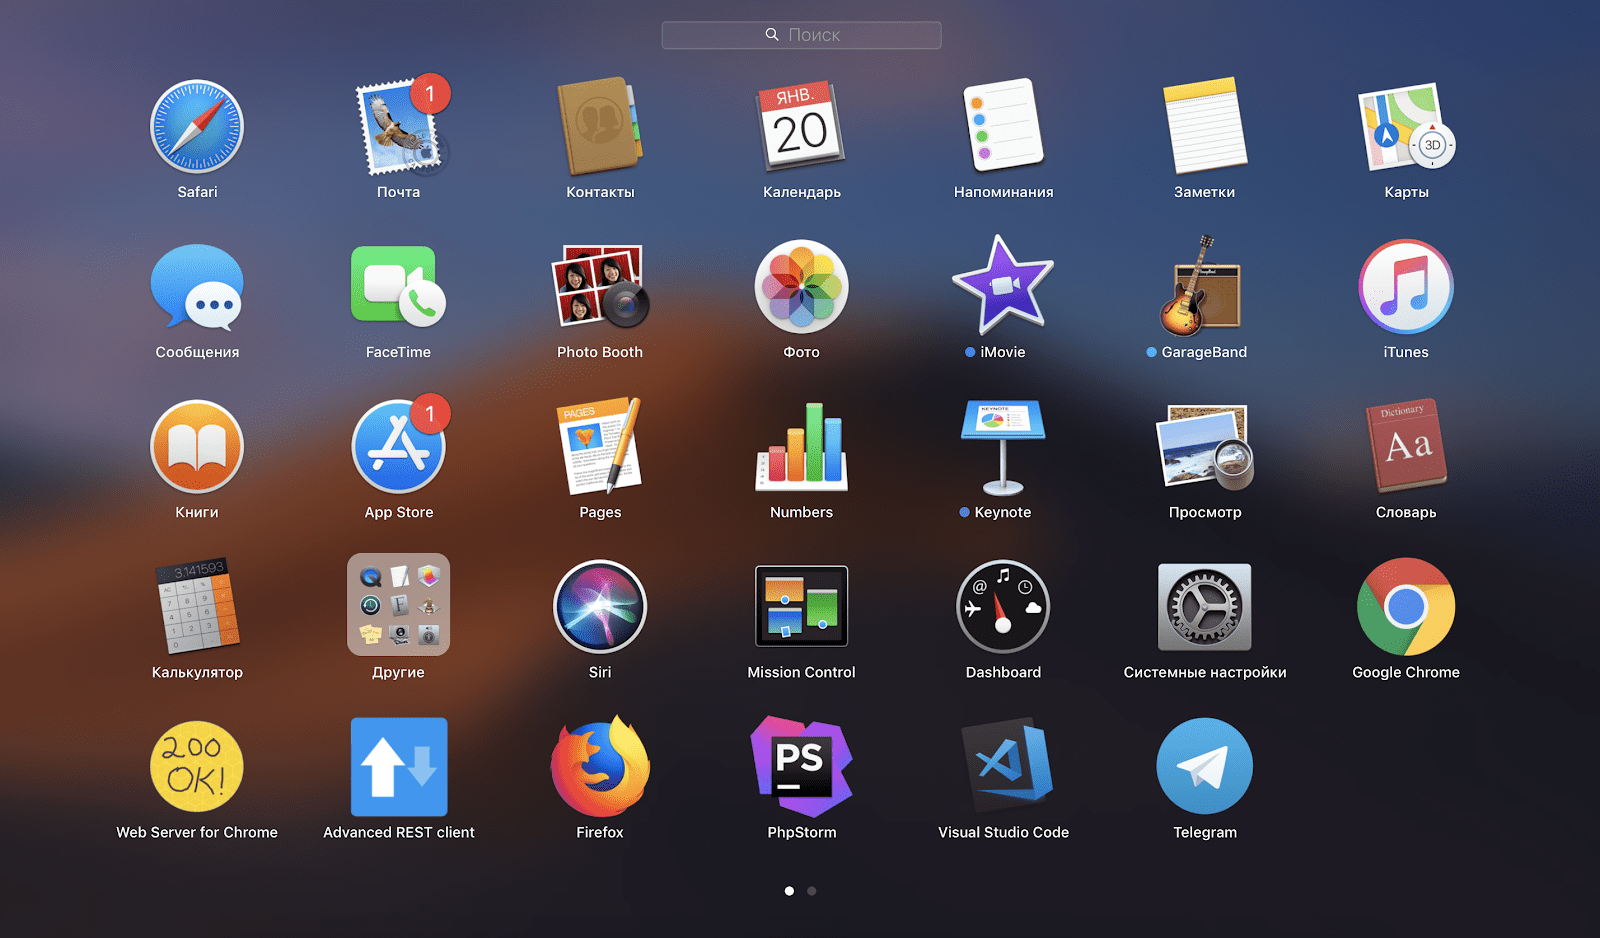
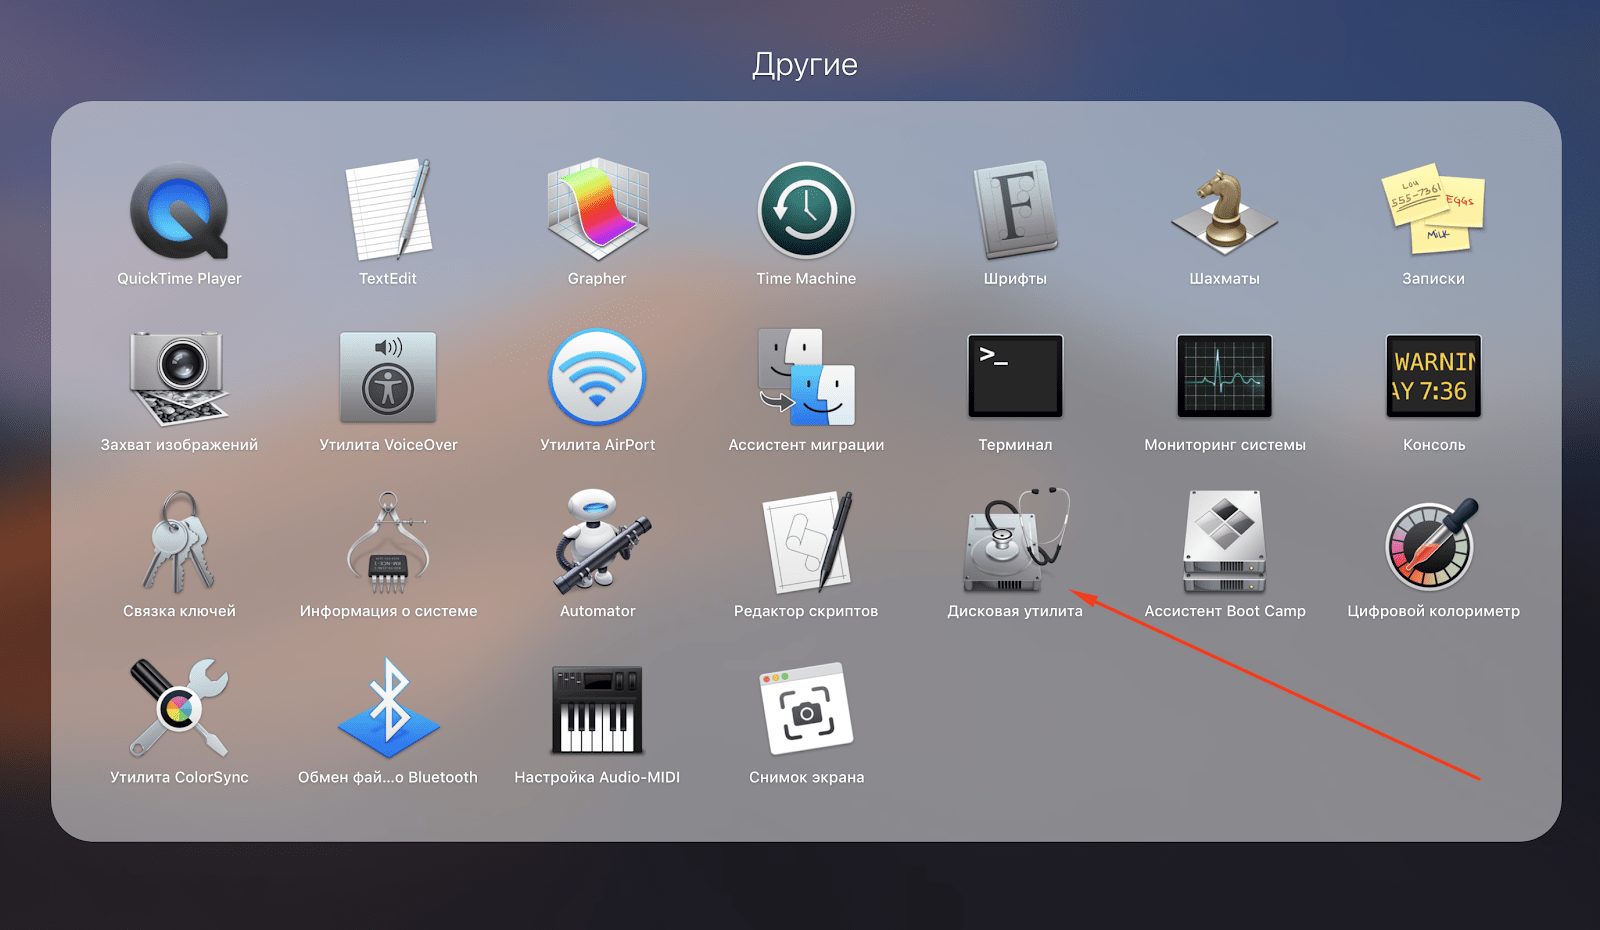
В открывшемся окне есть папка «Другие», где собственно и расположена дисковая утилита.
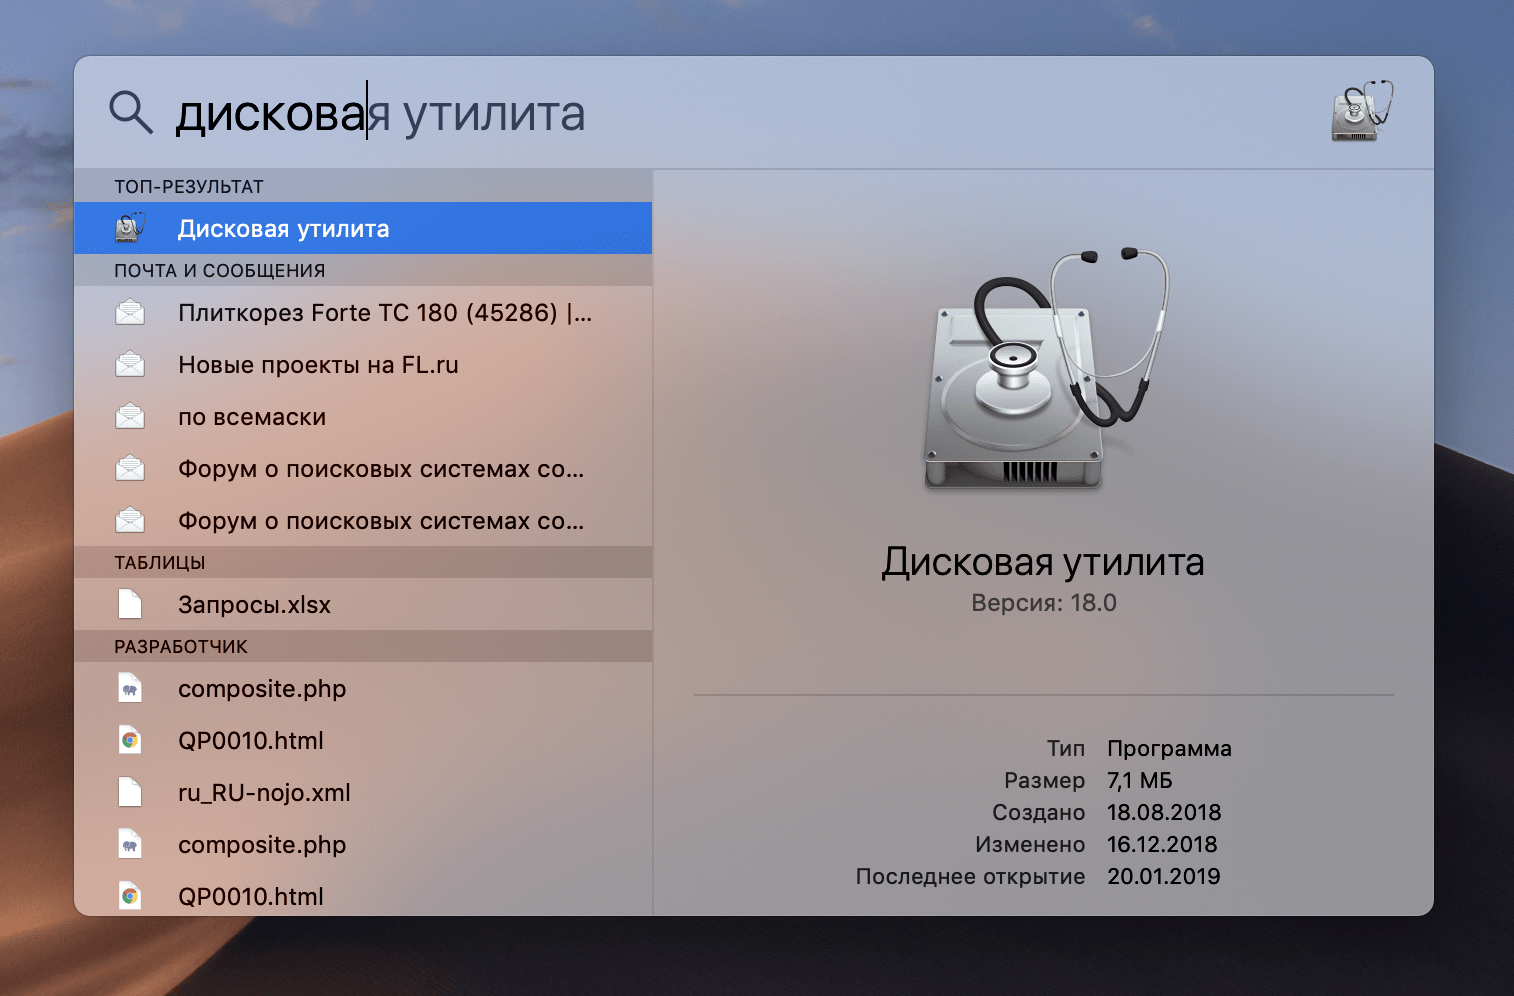
Второй способ запуска дисковой утилиты в разы проще – вызовите Spotlight сочетанием клавиш CMD + Пробел. В появившемся поле начните вводить «дисковая утилита».
Отлично, мы разобрались как запустить дисковую утилиту, посмотрим как она выглядит изнутри.
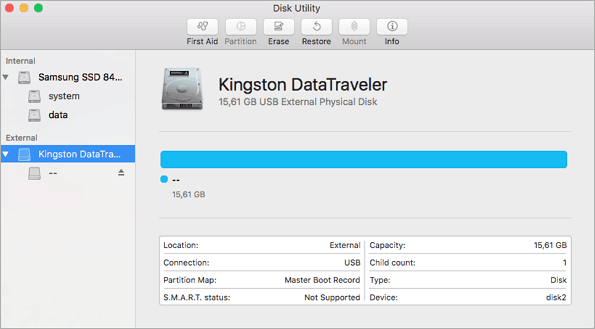
Слева перечень подключенных запоминающих устройств, в числе который будет находится ваша флешка, как и у нас.
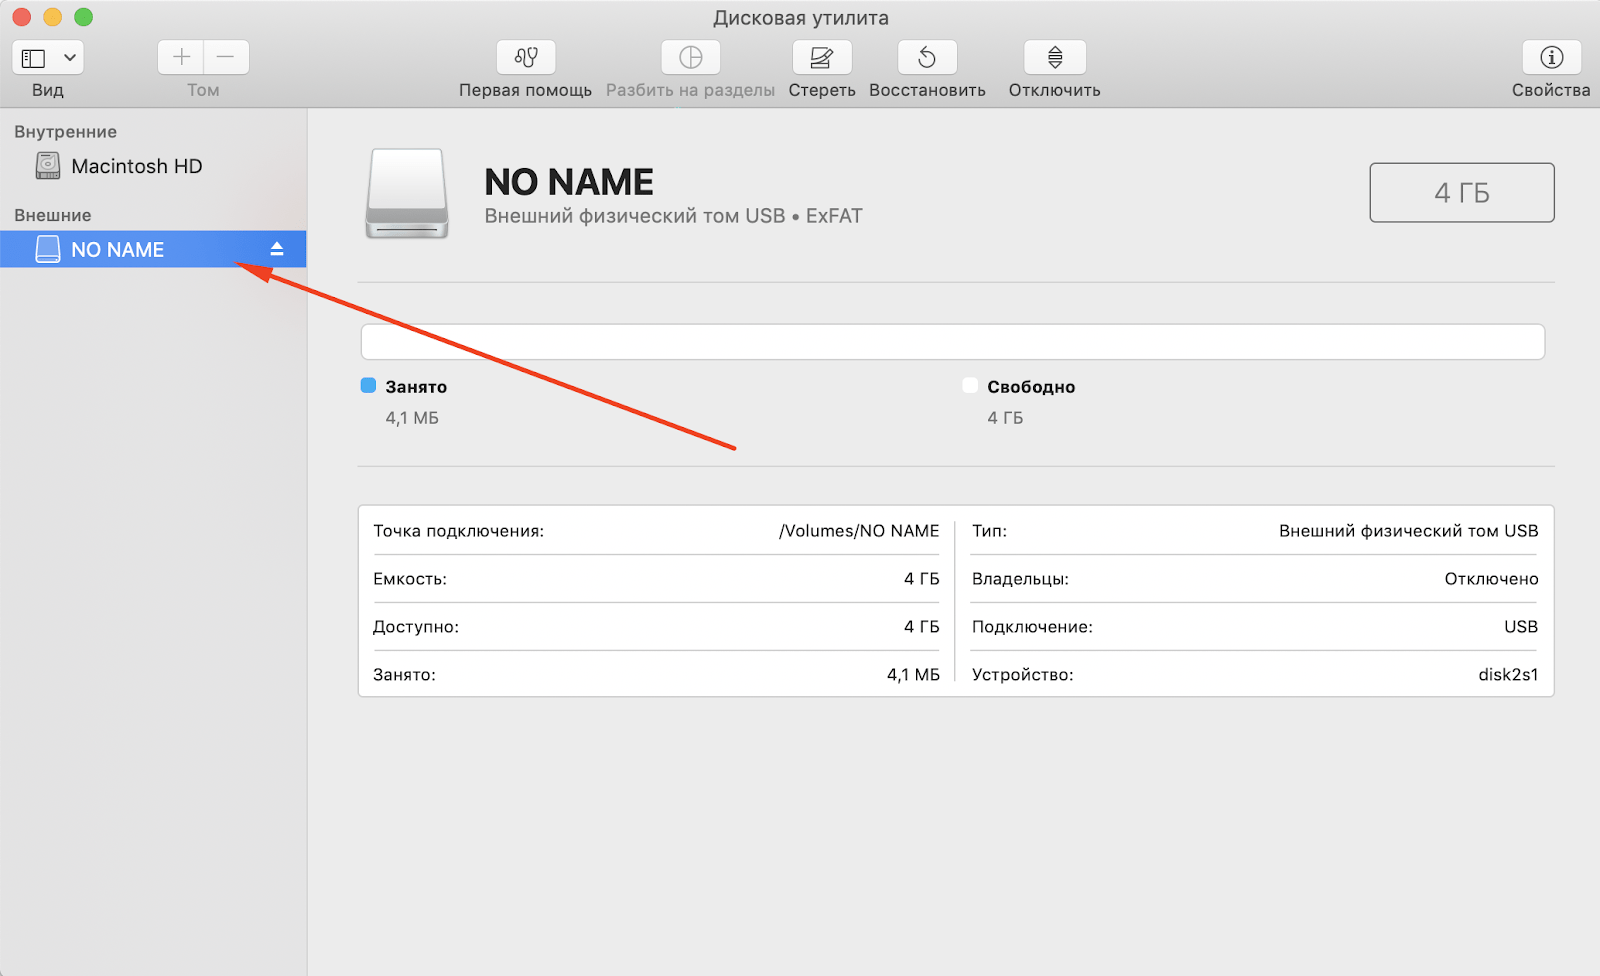
5. Для форматирования, необходимо выбрать нужное устройство и затем в панели сверху нажать «Стереть».
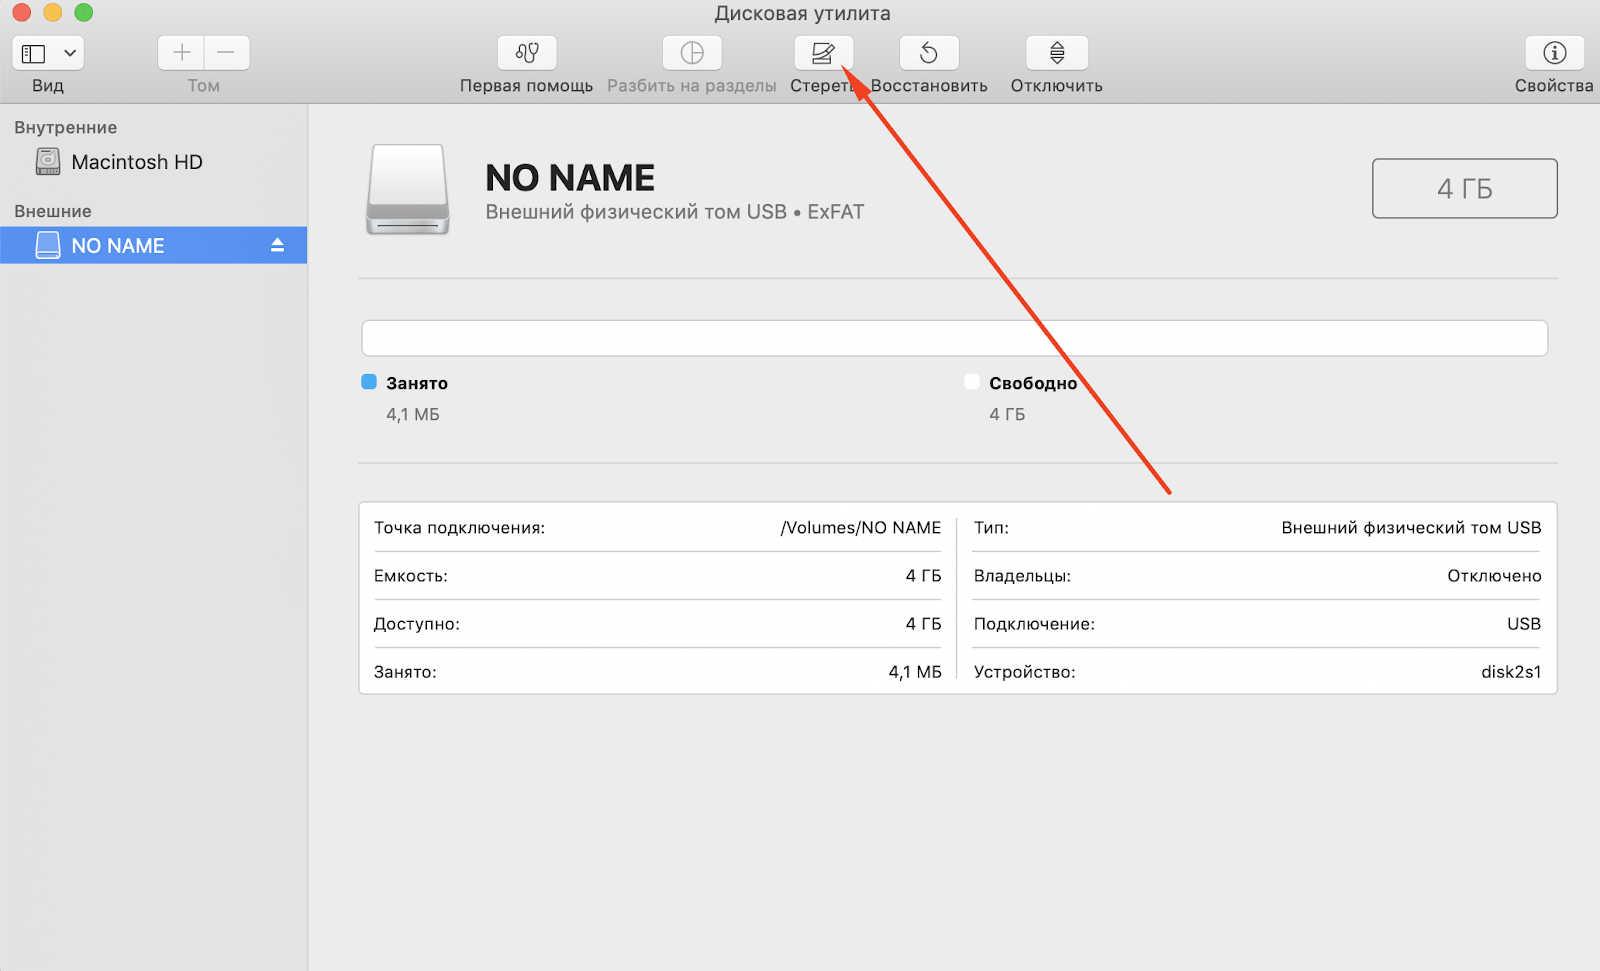
Появится окно, где можно указать название накопителя и выбрать формат.
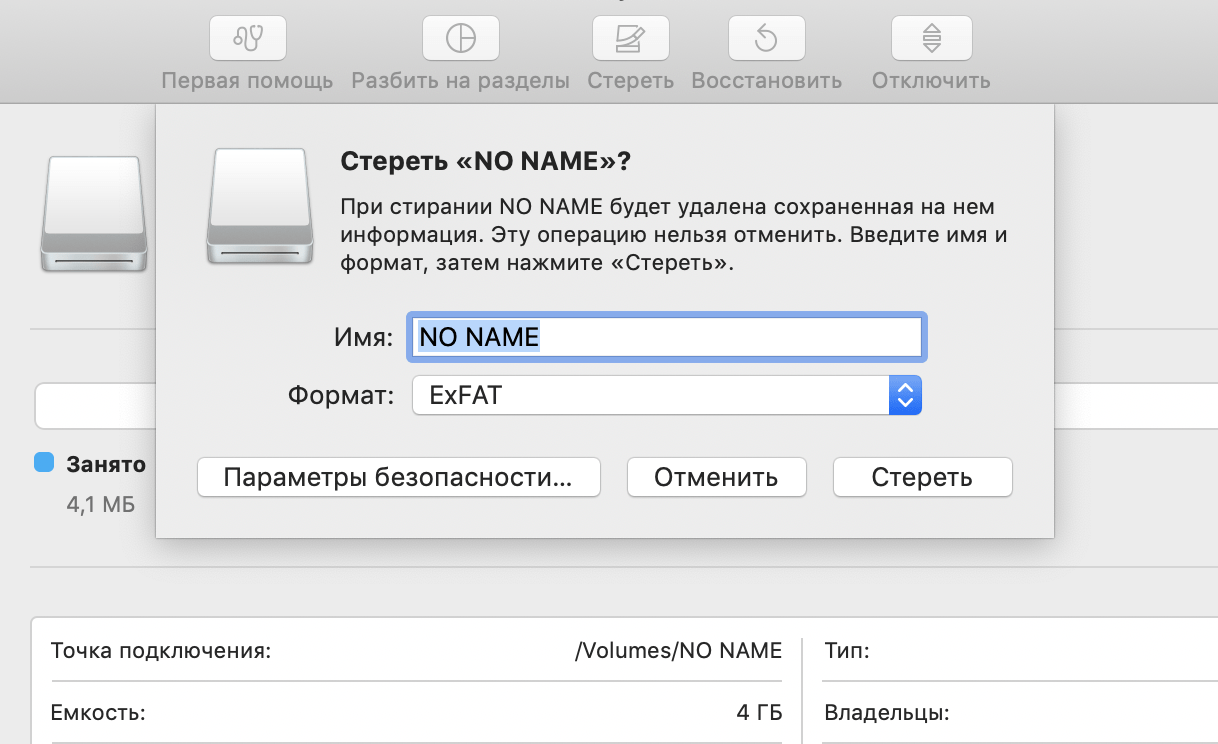
В каком формате форматировать флешку?
В дисковой утилите возможно четыре формата: ExFAT, Mac OS Extended, MS-DOS (FAT). Разберемся для чего каждый из них.
ExFAT. Используется чаще всего для USB-флеш-накопителей и SD карт. Старые версии Windows, вплоть до Windows Vista, не поддерживают данный формат. Если вам нужно записать данные, которые в дальнейшем нужно будет читать и перезаписывать на Windows, Linux, Mac OS, то выберите этот формат при форматировании.
Mac OS Extended. Windows не распознает этот формат, разработанный специально под устройства Apple. Для флешек он не подходит.
MS-DOS (FAT). Это старый формат, внедренный корпорацией Microsoft еще в 1983 году. Большая часть флешек работает именно с этим форматом, также FAT является штатным форматом для жестких дисков, на которых установлены Windows. Поддерживают: Linux, Mac OS, системы, на которых работает разная цифровая техника, телефоны. Формат имеет ограничение на запись – до 32 Гигабайт, поэтому для записи качественного сериала он не подойдет.
- Мы выберем ExFAT. Нажимаем «Стереть» и при успешном форматировании получим следующее уведомление.
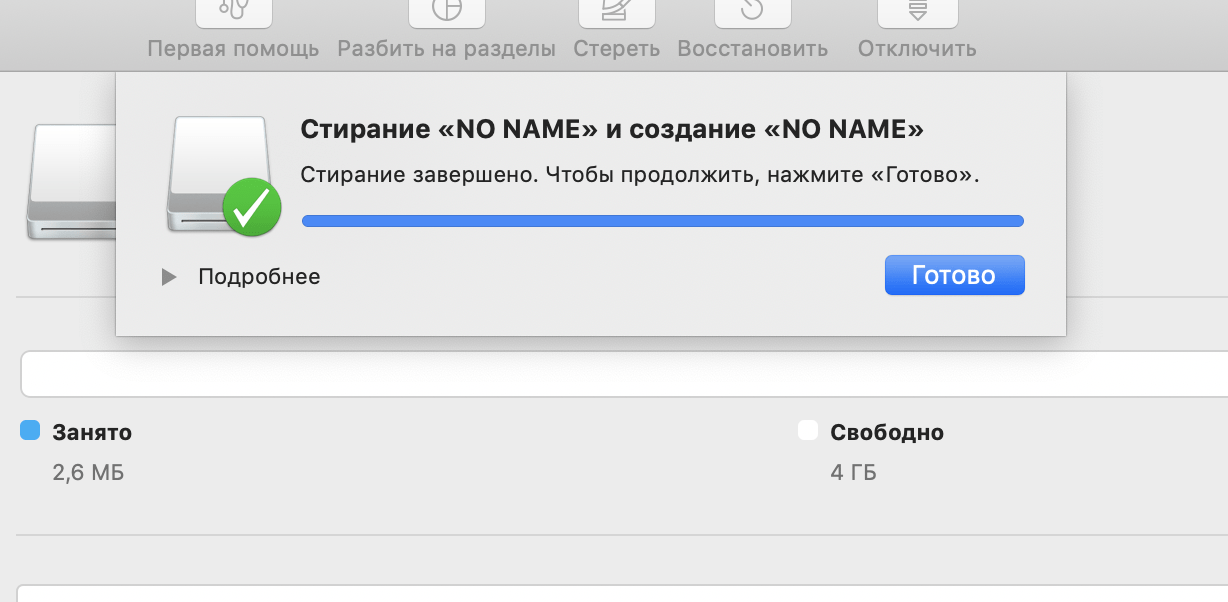
Вот и все, флешка пуста. Теперь вы можете записать на нее любые данные и использовать на других устройствах.
Бывает, что дисковая утилита не форматирует флешку. В таком случае, вместо успешного завершения форматирования, вы получите сообщение о том, что форматирование не удалось завершить.
Что делать, если дисковая утилита не форматирует
Не волноваться, просто следуйте нашим дальнейшим инструкциям и все у вас получится. Мы покажем как отформатировать флешку в Mac через терминал.
- Сперва посмотрим, какой идентификатор у нашей флешки внутри системы. Откройте терминал и задайте следующую команду: diskutil list. Ответом будем примерно такой код.
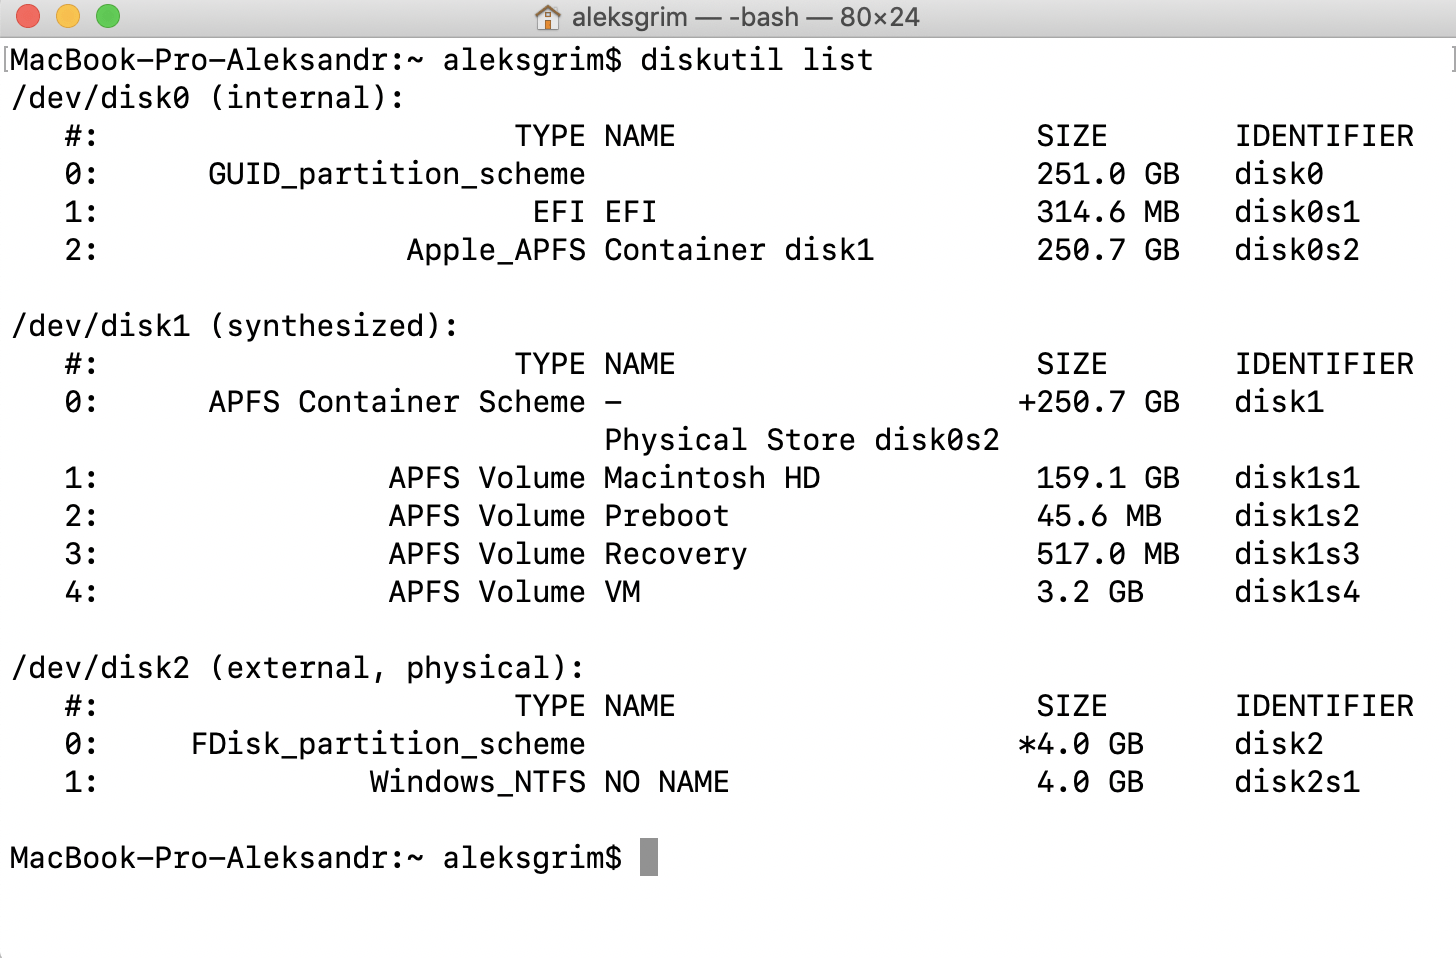
Видите, в перечне доступных дисков, есть один, где SIZE равно 4.0 GB? – это и есть наша флешка. Левее видим путь /dev/disk2. Так вот disk2 как раз таки является идентификатором.
- Для удаления всех данных, пропишем такую команду: diskutil eraseDisk ExFAT FlashName disk2
ExFAT – необходимый формат файловой системы.
FlashName – имя для накопителя.
disk2 – идентификатор, о котором сказано в первом пункте.
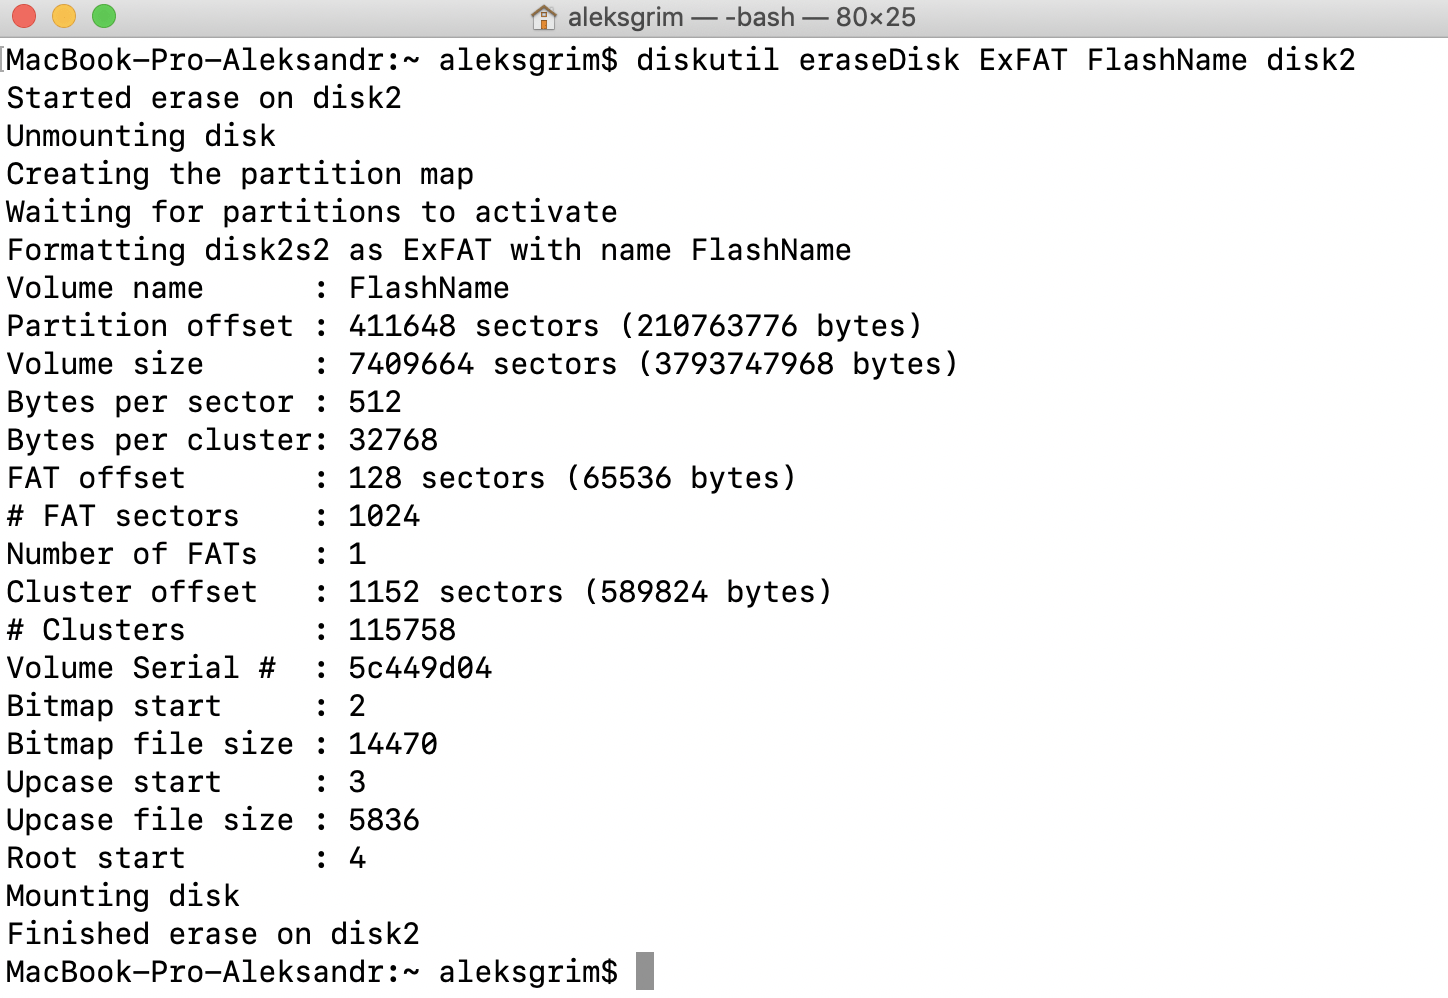
Вот и все! Как видите, все просто и быстро.
How to Format USB Flash Drive to FAT32 on Mac without Data Loss
Summary
For Apple Mac users, there are two ways to format USB flash drive to FAT32, including Disk Utility and Terminal command line. Refer to detailed steps of using both tools for FAT32 format. Formatting would erase data completely, make sure that you have a data backup. Otherwise, you can only use data recovery software to recover data from a formatted USB drive.
Are you looking for a secure way to format USB flash drive to FAT32 on Mac? You are at the right place. Follow here, you will find two methods that will assist you in doing so on your storage device and if you lost data due formatting, reliable Mac file recovery software is ready to help anytime:
| Workable Solutions | Step-by-step Troubleshooting |
|---|---|
| Method 1. Use Disk Utility | Connect USB to Mac > Go to Applications > Utilities > Disk Utility > Select USB and click «Erase». Full steps |
| Method 2. Use Terminal Command | Connect USB to Mac > Hit cmd + space keys > Type terminal and hit Enter. Full steps |
| Bonus Tip. Recover Formatted Data | If you lost data due to formatting, run EaseUS file recovery software > Scan and recover formatted data. Full steps |
How to Format a USB Flash Drive with Mac to FAT32
Many computer users who use a removable flash drive have the demand for formatting it to the FAT32 file system. Compare with the other commonly used NTFS file system on a flash drive, FAT32 has a compatibility advantage across many operating systems.
It’s a universal format that is compatible with Mac OS X/macOS, Windows, Linux and DOS systems. So, if users anticipate using the flash drive with more than one operating system, they will definitely benefit from the FAT32 file system. For Apple Mac users, there are two ways to format a USB flash drive to FAT32, including Disk Utility and Terminal command line. Refer to detailed steps of using both tools for FAT32 format.
Method 1. Format FAT32 on Mac [Disk Utility]
To format USB to FAT32 with Disk Utility will erase all data on the flash drive, so before you doing so, please do remember to check whether you have saved useful data to another secure device in advance.
To format the USB drive to FAT32, follow the next steps:
Step 1. Connect the USB flash drive to your Mac computer.
Step 2.Go to Applications > Utilities > Double click and open Disk Utility.
Step 3. Select your USB flash drive on the sidebar, choose Erase.
Step 4. Rename the USB flash drive, choose the format as MS-DOS (FAT) for Format, Master Boot Record for Scheme. Then click Erase.
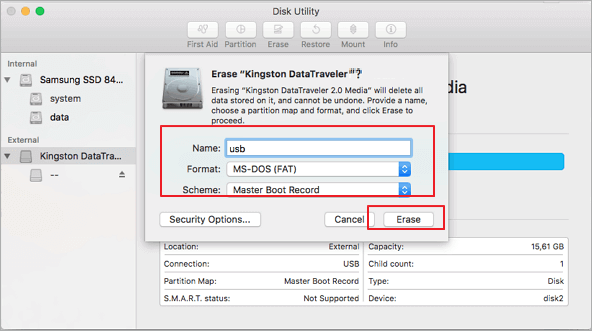
Wait for the process to complete, then you’ll get an empty new USB flash drive with FAT32 as the file system. You can reuse it for saving data again.
Method 2. Format FAT32 on Mac [Terminal Command Line]
The command line behavior does the same way to erase data with the Disk Utility. Again, create a backup before taking this action.
To format FAT32 with Terminal, follow the next steps:
Step 1. Connect your USB flash drive to your Mac computer.
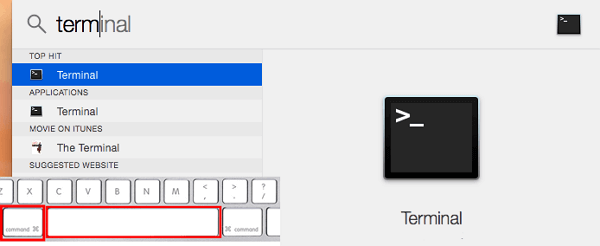
Step 2. Hit cmd + space to run Spotlight, type: terminal and hit Enter.
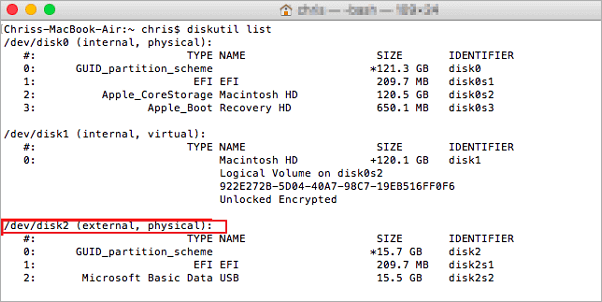
3. Type:diskutil list and find out which disk is your USB drive. (In the below picture, you can see that /dev/disk2 is the USB drive)
4. Type: sudo diskutil eraseDisk FAT32 MBRFormat /dev/disk2.
- sudo gives you user right.
- Diskutil calls disk utility program.
- eraseDisk commands to format.
- FAT32 sets the file system.
- MBRFormat tells disk utility to format with a Master Boot Record.
- /dev/disk2 is the location of the USB drive.
Wait for the process to complete. After this, you can type: diskutil list in command again to check if the formatting has been successful.
Complementary Data Recovery Tip
Formatting would erase data completely, make sure that you have a data backup. Otherwise, you can only use data recovery software to recover data from a formatted USB drive.
EaseUS Data Recovery Wizard has both Windows and Mac versions, so it’s the optimal choice for data recovery, no matter you’re using a PC or Mac. If you’re a Mac user, for example, it takes only a few clicks for the software to scan and display your formatted data. To guarantee an effective data recovery without spending money to no avail, you can install the Mac data recovery free version for the first trial. You can preview all the found data before the final recovery.
To recover data from a formatted FAT32 USB flash drive on Mac, follow the next steps:
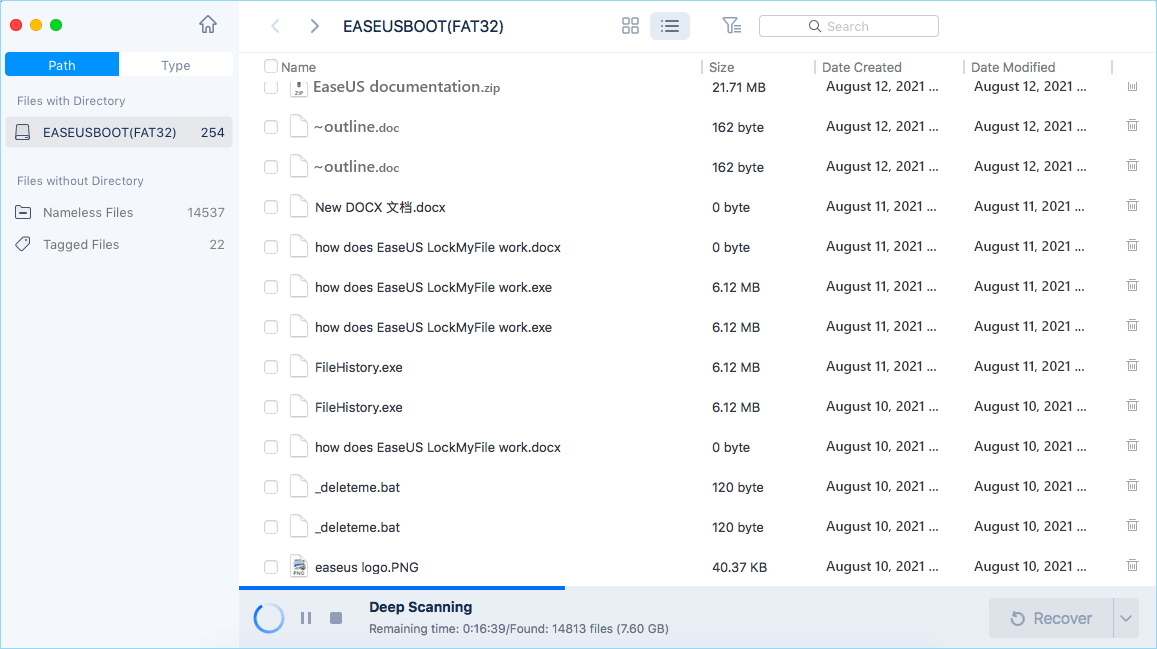
Step 1. Correctly connect your USB flash drive to your Mac. Launch EaseUS Data Recovery Wizard for Mac. Start selecting the flash drive and click Scan to let the software search lost files on it.
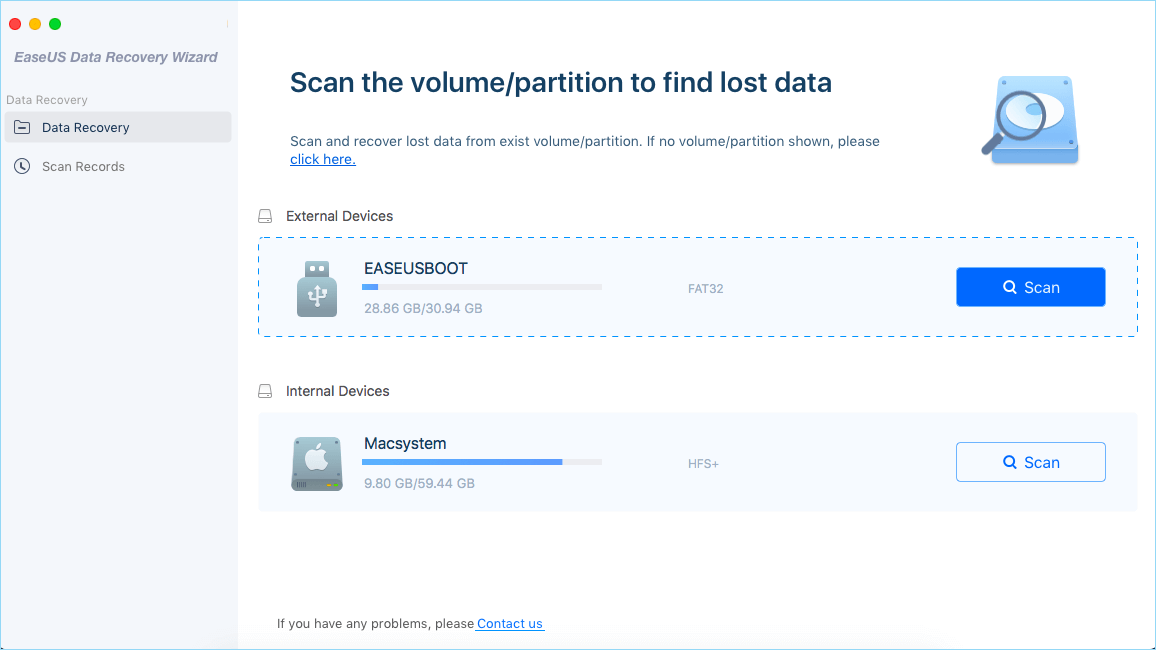
Step 2. After quick scan and deep scan, all files will be presented in the left pane in the scan results.
Step 3. Select files you want to recover and click Recover Now button. Don’t save the recoverable files to the USB drive itself in case of data overwriting.

100 % of people found this article helpful.
Frequently Asked Questions
«EaseUS Data Recovery Wizard is the best we’ve seen. It’s far from perfect, partly because today’s advanced disk technology makes data-recovery more difficult than it was with the simpler technology of the past, but it’s fast and efficient. « —PCMag
«The first thing you’ll notice about EaseUS Data Recovery Wizard Pro is that its interface is very clear and uncluttered, with only a small collection of self-explanatory controls. You won’t find lots of extra options hidden in a system of hidden menus, either; what you see really is what you get.» —techradar
«Recover lost files, even after deleting a partition or formatting your drive.» —Macworld
2. Why cannot I recover 2GB data for free?
It is recommended to check the version installed is Free or Trial because they are different versions.
Trial has data preview function but cannot save any files, while the Free version enables to recover 2 GB files. The default free space is 500 MB and you may share the product on social media to get another 1.5 GB.
3. Why cannot the recovered files be opened?
A file is saved as 2 parts on the storage device: directory info (which is comprised by file name, time stamp and size info, etc.) and data content.
If the files with original file names and folder structures cannot be opened, one possible reason is the corrupted directory info. There is still a chance to recover the data content with the RAW Recovery method in our software.
4. Why isn’t it suggested to recover the files back to the original drive?
The storage structure of the lost files would be altered or damaged by any changes on the drive. If you save the recovered files back to the same drive, the original data structures and data content would be corrupted or overwritten, which causes permanent data loss. So you should prepare another disk to save the files.
5. How can I check whether my data is recoverable or not before purchase?
The Free version helps you save 2GB files, so verify the recovery quality of our product before purchase.
6. How long does it take to scan the drive?
It strongly depends on the capacity of your hard drive and the performance of your computer. As reference,most drive recoveries can be completed in around 10 to 12 hours for a 1-TB healthy hard drive in general conditions.
Daisy / 2016-08-22
Tracy King / 2016-03-22
Roxanne / 2016-05-09
Roxanne / 2016-05-18
About Data Recovery Wizard
It’s super easy to recover 250+ types of files after deletion, disk formatting and virus infection. Click the links and compare the difference of each version.