How to Install Docker on Windows 10 Home
Free JavaScript Book!
Write powerful, clean and maintainable JavaScript.
If you’ve ever tried to install Docker for Windows, you’ve probably came to realize that the installer won’t run on Windows 10 Home. Only Windows Pro, Enterprise or Education support Docker. Upgrading your Windows license is pricey, and also pointless, since you can still run Linux Containers on Windows without relying on Hyper-V technology, a requirement for Docker for Windows.
If you plan on running Windows Containers, you’ll need a specific version and build of Windows Server. Check out the Windows container version compatibility matrix for details.
99.999% of the time, you only need a Linux Container, since it supports software built using open-source and .NET technologies. In addition, Linux Containers can run on any distro and on popular CPU architectures, including x86_64 , ARM and IBM .
In this tutorial, I’ll show you how to quickly setup a Linux VM on Windows Home running Docker Engine with the help of Docker Machine. Here’s a list of software you’ll need to build and run Docker containers:
- Docker Machine: a CLI tool for installing Docker Engine on virtual hosts
- Docker Engine: runs on top of the Linux Kernel; used for building and running containers
- Docker Client: a CLI tool for issuing commands to Docker Engine via REST API
- Docker Compose: a tool for defining and running multi-container applications
I’ll show how to perform the installation in the following environments:
- On Windows using Git Bash
- On Windows Subsystem for Linux 2 (running Ubuntu 18.04)
First, allow me to explain how the Docker installation will work on Windows.
Want to build more of a foundation in Docker knowledge? Read Learning Docker – Second Edition on SitePoint Premium.
How it Works
As you probably know, Docker requires a Linux kernel to run Linux Containers. For this to work on Windows, you’ll need to set up a Linux virtual machine to run as guest in Windows 10 Home.
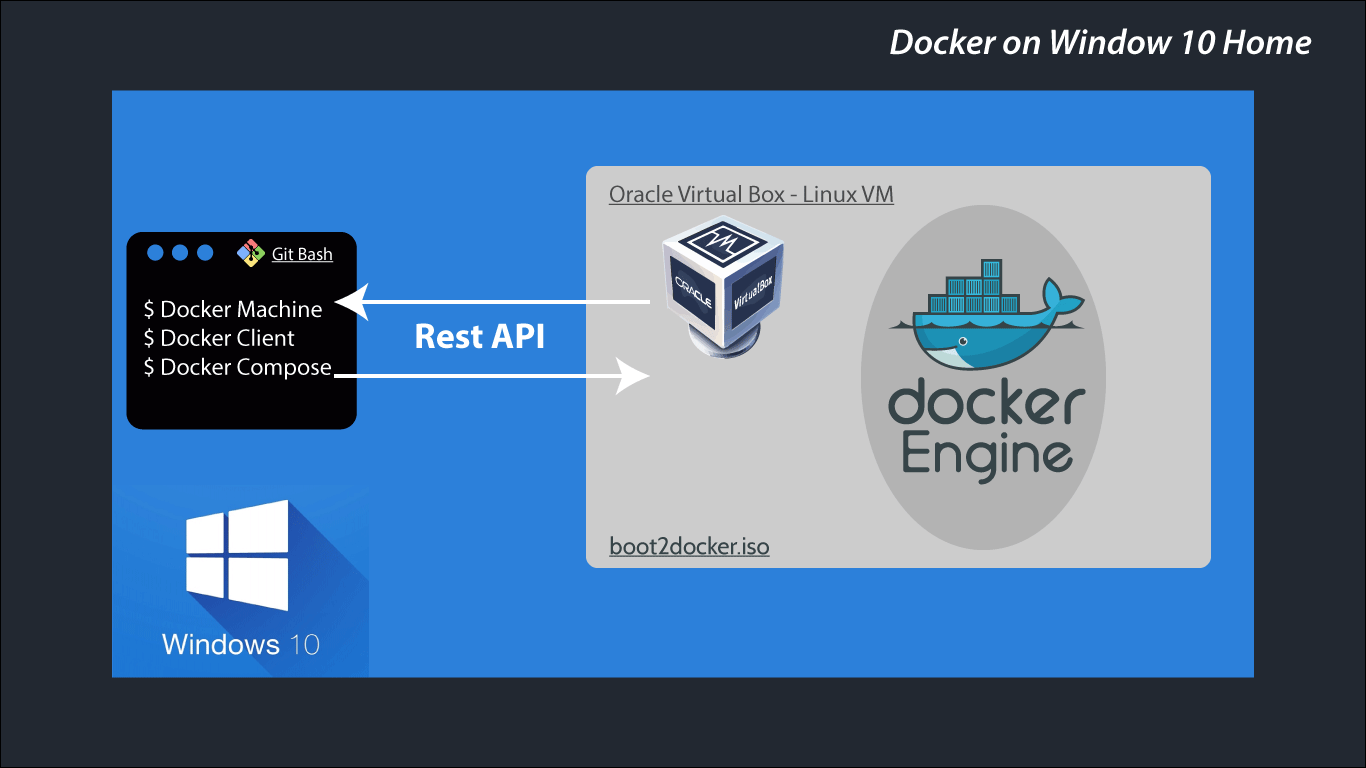
Setting up the Linux VM can be done manually. The easiest way is to use Docker Machine to do this work for you by running a single command. This Docker Linux VM can either run on your local system or on a remote server. Docker client will use SSH to communicate with Docker Engine. Whenever you create and run images, the actual process will happen within the VM, not on your host (Windows).
Let’s dive into the next section to set up the environment needed to install Docker.
Initial Setup
You may or may not have the following applications installed on your system. I’ll assume you don’t. If you do, make sure to upgrade to the latest versions. I’m also assuming you’re running the latest stable version of Windows. At the time of writing, I’m using Windows 10 Home version 1903. Let’s start installing the following:
Install Git Bash for Windows. This will be our primary terminal for running Docker commands.
Install Chocolatey, a package manager for Windows. It will make the work of installing the rest of the programs easier.
Install VirtualBox and its extension. Alternatively, If you have finished installing Chocolatey, you can simply execute this command inside an elevated PowerShell terminal:
If you’d like to try running Docker inside the WSL2 environment, you’ll need to set up WSL2 first. You can follow this tutorial for step-by-step instructions.
Docker Engine Setup
Installing Docker Engine is quite simple. First we need to install Docker Machine.
Install Docker Machine by following instructions on this page. Alternatively, you can execute this command inside an elevated PowerShell terminal:
Using Git Bash terminal, use Docker Machine to install Docker Engine. This will download a Linux image containing the Docker Engine and have it run as a VM using VirtualBox. Simply execute the following command:
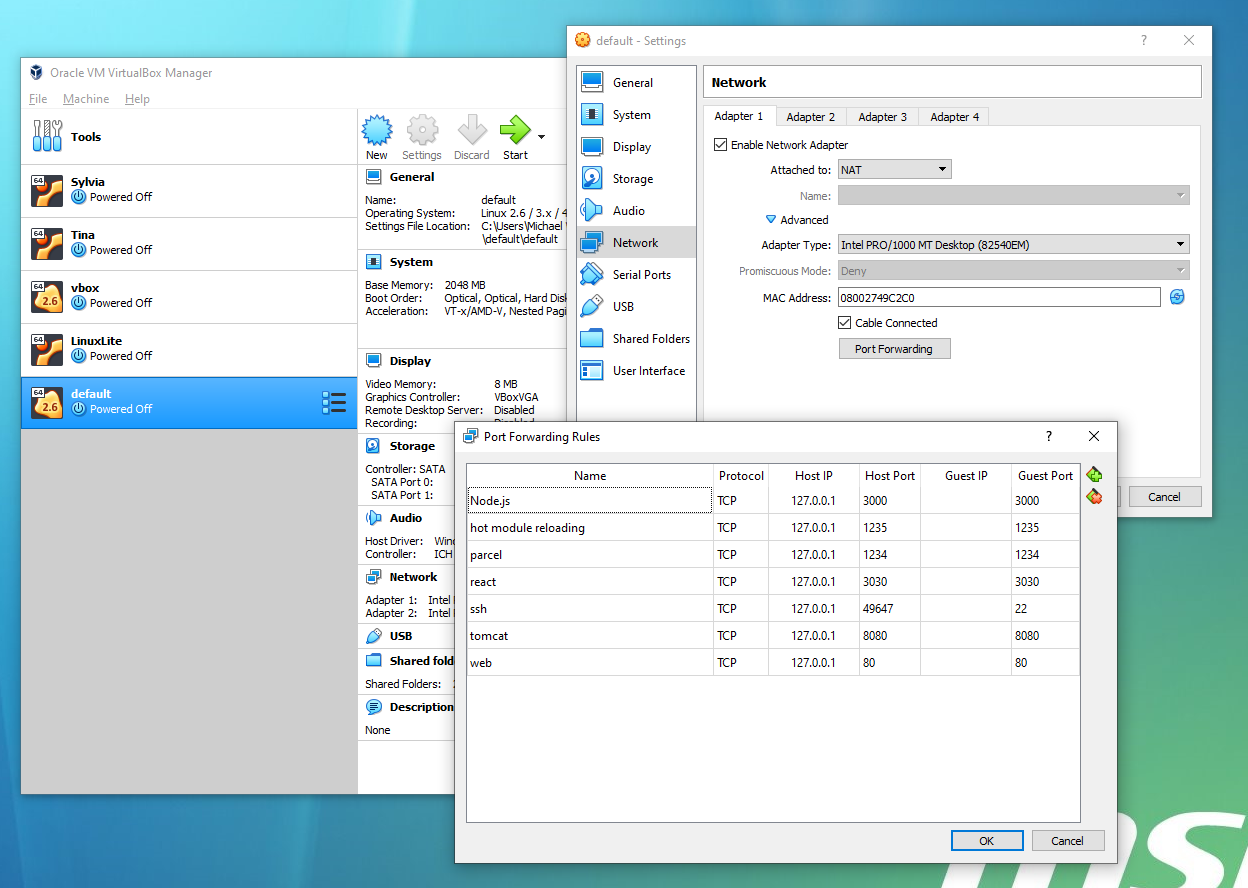
Next, we need to configure which ports are exposed when running Docker containers. Doing this will allow us to access our applications via localhost . Feel free to add as many as you want. To do this, you’ll need to launch Oracle VM VirtualBox from your start menu. Select default VM on the side menu. Next click on Settings > Network > Adapter 1 > Port Forwarding. You should find the ssh forwarding port already set up for you. You can add more like so:
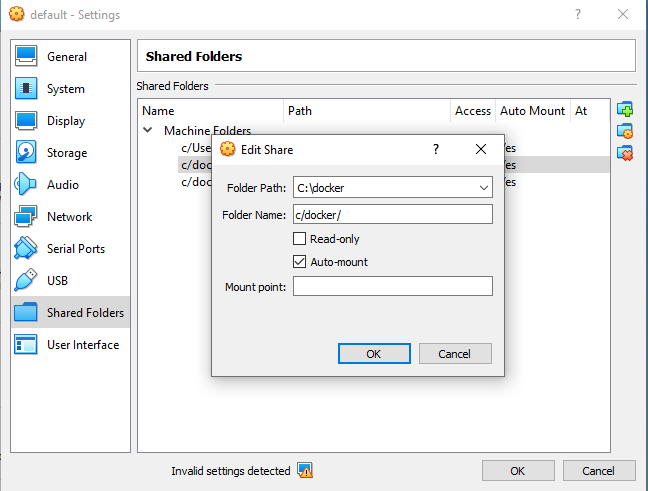
Next, we need to allow Docker to mount volumes located on your hard drive. By default, you can only mount from the C://Users/ directory. To add a different path, simply go to Oracle VM VirtualBox GUI. Select default VM and go to Settings > Shared Folders. Add a new one by clicking the plus symbol. Enter the fields like so. If there’s an option called Permanent, enable it.
To get rid of the invalid settings error as seen in the above screenshot, simply increase Video Memory under the Display tab in the settings option. Video memory is not important in this case, as we’ll run the VM in headless mode.
To start the Linux VM, simply execute this command in Git Bash. The Linux VM will launch. Give it some time for the boot process to complete. It shouldn’t take more than a minute. You’ll need to do this every time you boot your host OS:
Next, we need to set up our Docker environment variables. This is to allow the Docker client and Docker Compose to communicate with the Docker Engine running in the Linux VM, default . You can do this by executing the commands in Git Bash:
You’ll need to set the environment variables every time you start a new Git Bash terminal. If you’d like to avoid this, you can copy eval output and save it in your .bashrc file. It should look something like this:
IMPORTANT: for the DOCKER_CERT_PATH , you’ll need to change the Linux file path to a Windows path format. Also take note that there’s a chance the IP address assigned might be different from the one you saved every time you start the default VM.
In the next section, we’ll install Docker Client and Docker Compose.
Docker Tools Setup
For this section, you’ll need to install the following tools using PowerShell in admin mode. These tools are packaged inside the Docker for Windows installer. Since the installer refuses to run on Windows 10 Home, we’ll install these programs individually using Chocolatey:
Once the installation process is complete, you can switch back to Git Bash terminal. You can continue using PowerShell, but I prefer Linux syntax to execute commands. Let’s execute the following commands to ensure Docker is running:
If all the above commands run successfully, it means you’ve successfully installed Docker. If you want to try out a more ambitious example, I have a small Node.js application that that I’ve configured to run on Docker containers. First, you’ll need to install GNU Make using PowerShell with Admin privileges:
Next, execute the following commands. Running this Node.js example will ensure you have no problem with exposed ports and mounting volumes on the Windows filesystem. First, navigate to a folder that that you’ve already mounted in VirtualBox settings. Next, execute the following commands:
When you hit the last command, you should expect a similar output:
Getting the above output means that volume mounting occurred successfully. Open localhost:1234 to confirm that the website can be accessed. This will confirm that you have properly configured the ports. You can edit the source code, for example change the h1 title in App.jsx . As soon as you save the file, the browser page should refresh automatically. This means hot module reloading works from a Docker container.
I would like to bring your attention to the docker-compose.yml file in use. For hot module reloading to work from a Docker Container in Windows requires the following:
When using parcel, specify HMR port in your package.json start script:
parcel src/index.html –hmr-port 1235
In the VM’s Port Forwarding rules, make sure these ports are exposed to the host system:
inotify doesn’t work on vboxsf filesystems, so file changes can’t be detected. The workaround is to set polling for Chokidar via environment variables in docker-compose.yml . Here’s the full file so that you can see how it’s set:
Now that we have a fully working implementation of Docker on Windows 10 home, let’s set it up on WSL2 for those who are interested.
Windows Subsystem for Linux 2
Installing Docker on WSL2 is not as straightforward as it seems. Unfortunately, the latest version of Docker Engine can’t run on WSL2. However, there’s an older version, docker-ce=17.09.0
ubuntu , that’s capable of running well in WSL2. I won’t be covering that here. Instead, I’ll show you how to access Docker Engine running in the VM we set up earlier from a WSL terminal.
All we have to do is install Docker client and Docker compose. Assuming you’re running WSL2 Ubuntu Terminal, execute the following:
Install Docker using the official instructions:
Install Docker Compose using this official guide. An alternative is to use PIP, which will simply install the latest stable version:
Fix the Docker mounting issue in WSL terminal by inserting this content in /etc/wsl.conf . Create the file if it doesn’t exist:
You’ll need to restart your machine for this setting to take effect.
Assuming that Linux Docker VM is running, you’ll need to connect the Docker tools in the WSL environment to it. If you can access docker-machine from the Ubuntu terminal, run the eval command. Otherwise, you can insert the following Docker variable in your .bashrc file. Here is an example of mine:
You’ll need to restart your terminal or execute source
/.bashrc for the settings to take effect. Running Docker commands should work properly in WSL without a hitch.
Switching to Linux
We’re now coming to the end of this article. The steps for setting up Docker in Windows 10 is a bit of a lengthy process. If you plan to reformat your machine, you’ll have to go through the same process again. It’s worse if your job is to install Docker on multiple machines running Windows 10 Home.
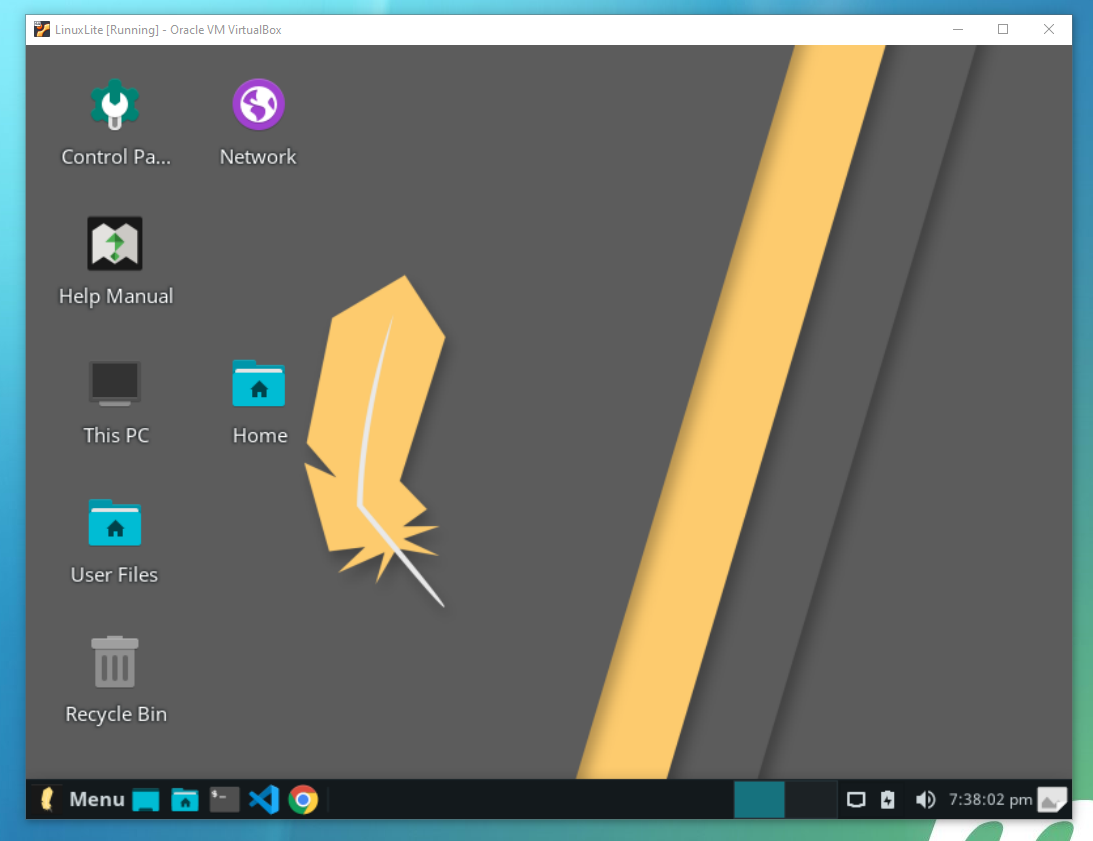
A simpler solution is to switch to Linux for development. You can create a partition and set up dual booting. You can also use VirtualBox to install and run a full Linux Distro inside Windows. Check out which popular distro you’d like to try out. I use Linux Lite because it’s lightweight and is based on Ubuntu. With VirtualBox, you can try out as many distros as you wish.
If you’re using a distro based on Ubuntu, you can install Docker easily with these commands:
You’ll need to log out and then log in for the last command to take effect. After that, you can run any Docker command without issue. You don’t need to worry about issues with mounting or ports. Docker Engine runs as a service in Linux, which by default starts automatically. No need for provisioning a Docker VM. Everything works out of the box without relying on a hack.
Summary
I hope you’ve had smooth sailing installing and running Docker on Windows 10 Home. I believe this technique should work on older versions such as Windows 7. In case you run into a problem, just go through the instructions to see if you missed something. Do note, however, that I haven’t covered every Docker feature. You may encounter a bug or an unsupported feature that requires a workaround, or may have no solution at all. If that’s the case, I’d recommend you just switch to Linux if you want a smoother development experience using Docker.
Как настроить Docker и Windows Subsystem for Linux (WSL): история о любви?
Вы когда-нибудь чувствовали себя прекрасной принцессой, которую злой волшебник превратил в лягушку? Как будто происходит что-то не то? У меня такое бывает. Я пользуюсь исключительно UNIX и боюсь закрыть уютную командную строку. Мой терминал — моя крепость. Но так как иногда мне все-таки приходится пользоваться Microsoft Windows, я узнал о некоторых трюках, которые помогают мне справиться с таким стрессом.
Для ежедневной работы в терминале я установил Windows Subsystem for Linux вместе с дистрибутивом Ubuntu. Кроме того у меня установлен Linuxbrew, который помогает мне с установкой приложений сторонних производителей. Такое сочетание функционирует просто отлично! У меня есть следующая ссылка ко «внешним» (хранящимся на Windows) данным: ln -s
/external /mnt/c/Users/DoomHammer. Почти все необходимое можно осуществить подобным образом. Но до тех пор, пока не нужно использовать Docker.
Что такого особенного в Docker?
В отличие от многих приложений, используемых мной ежедневно, Docker является системным. То есть он находится глубоко в системе и для его работы на хост-компьютере необходим демон. В данном случае под хост-компьютером я подразумеваю Microsoft Windows.
Значит ли это, что мы не можем использовать Docker изнутри WSL? Можем, но нужно постараться, чтобы добраться до него. Во-первых, нужно установить Docker под Windows. Для этого есть Docker Enterprise Editions для Windows Server 2016 (и новее), Community Edition для Windows 10 Professional и Enterprise. У меня установлена Windows 10 Home.
Docker на Windows 10 Home
Настройка Docker в Windows 10 Home кажется более сложной. Для Docker Community Edition необходима поддержка системы Hyper-V, которая недоступна для версии Home. То есть мне надо было найти Docker Toolbox — более раннюю версию на основе Docker Machine и Virtualbox. Но после установки Virtualbox выдал окно с ошибкой о том, что запустить виртуальную машину невозможно.
Как оказалось, в BIOS у меня была выключена функция виртуализации. Видимо для безопасности. После включения функции, я снова запускаю Virtualbox. Проблема осталась. В интернете посоветовали проверить systeminfo. Хорошо. Там показано, что работает какой-то гипервизор. Но ведь не Virtualbox или, тем более, Hyper-V, верно?
К моему удивлению, все это время работал именно Hyper-V. Похоже в версии Home нет инструментов для использования Hyper-V, но это не означает, что гипервизор не работает. К счастью, чтобы выключить его, нужно просто ввести в команду bcdedit /set hypervisorlaunchtype off. После перезагрузки Virtualbox заработал. Ура!
Docker и WSL — лучшие друзья навеки?
С работающим Virtualbox я открыл Docker Quickstart Terminal. Во время первого запуска он создает Docker Machine (вот зачем нужен Virtualbox) для функционирования в качестве хоста для всех контейнеров. Далее ввожу команду docker run —rm hello-world и наблюдаю за индикатором выполнения загрузки подходящего образа. Снова ура!
Теперь вместо cmd.exe я использую Docker в WSL. Как так получилось? К счастью, у WSL есть доступ к бинарным файлам Windows. То есть я могу ввести команду docker-machine.exe ls для того, чтобы увидеть машину, созданную Docker Toolbox. Она будет называться просто default. Если не указан статус «Running», то можно запустить машину с помощью команды docker-machine.exe start. Каждый раз при запуске Docker Machine помните, что в отличие от cmd.exe,выполнение ( .exe) является обязательным.
Чтобы указать переменные окружения, вызывается docker-machine.exe env.
К сожалению, они выводятся в формате для cmd.exe, а не Bourne shell (bash или zsh). Но мы можем изменить это с помощью docker-machine.exe env — shell sh.
Почти готово. Нужно сделать кое-что еще. Путь к сертификату написан как путь Windows. Как перевести это во что-то понятное для WSL? В WSL есть хорошая утилита wslpath , благодаря которой можно ввести команду export DOCKER_CERT_PATH=$(wslpath $DOCKER_CERT_PATH). Готово!
Но нам все еще нужны инструменты пользовательского пространства. Итак, с помощью диспетчера пакетов установите Docker Engine и Docker Compose. В моем случае нужно ввести команду brew install docker docker-compose. После нее вводим команду docker run —rm hello-world. На этом все, мои поздравления!
На этом все?
Конечно же нет. Как видим, bind-mount работает некорректно, потому что Docker-демон ожидает подходящего пути Windows, а пути WSL не переводятся автоматически. Но есть несколько приемов, которые помогут нам в данной ситуации.
Выбор конкретного метода зависит от вашей версии Windows. Нажмите Win+R и введите команду winver. Появится сообщение, в котором указана версия. Наример:
Если версия будет 18.03 или новее, то можно отредактировать /etc/wsl.conf следующим образом:
То есть WSL смонтирует диск С: под /c/ вместо обычного /mnt/c. Почему это важно? Потому что этого ожидает Docker-демон от путей Windows. Кстати, после сохранения файла необходимо перезайти (re-login), чтобы изменения вступили в силу.
Осторожно! Если вы используете WSL-терминал , то это изменение сломает его. Тогда можно сделать следующее.
Если вы не хотите перезагружать систему или версия Windows более ранняя, то можно примонтировать одну точку монтирования к другой следующим образом:
sudo mkdir /c
sudo mount —bind /mnt/c /c
Так быстрее, но функция будет доступна только до тех пор, пока вы не выйдете из системы. После перезапуска нужно повторять процедуру или добавить ее в конфигурацию среды выполнения shell (например,
/.zshrc). Это происходит из-за того, что /etc/fstab не работает на WSL так, как требуется.
Теперь можно запускать Docker с монтированием, но только если приложение находится в файловой системе WIndows. У вас не должно возникнуть проблем с командной строкой docker, которая ожидает абсолютные пути, но с Docker Compose нужно быть максимально внимательным. Он позволяет использовать относительные пути, и все, что начинается с ./ не будет работать.
Если вы все-таки решили монтировать файловую систему WSL с помощью Docker, то можете попробовать заменить все ./ и $PWD на /c/Users/$USERNAME/AppData/Local/lxss. Здесь $USERNAMEозначает не имя пользователя WSL, а имя пользователя Windows.
Я также хотел написать оболочку для Docker Compose, чтобы изменить рабочий каталог на lxss, но у WSL нет к нему доступа. И думаю, это правильно!
И последнее
Мы можем запускать Docker и связывать каталоги данных. Что еще нам нужно? Может рабочая переадресация портов? В отличие от Native solutions, ипользуя Docker через Docker Machine, необходимо вызывать все службы через $(docker-machine ip):$PORT вместо обычного localhost:$PORT. Существует способ обойти все это, хотя и не очень элегантный:
Думаю, можно написать оболочку для Docker, чтобы выполнять все эти манипуляции при каждом запуске нового контейнера. Но я лично еще не проверял данный метод, потому что мне достаточно переадресации одного порта.
Надеюсь, данные советы облегчат работу с Docker на WSL. Лично мне они очень помогли.