Включение сетевого обнаружения в Windows
Обнаружение сети в операционной системе Windows — это сетевая настройка, с помощью которой вы можете указать, могут ли другие компьютеры в сети видеть ваш компьютер или ваш компьютер может находить другие компьютеры и устройства в сети. Если сетевое обнаружение включено, общий доступ к файлам и принтерам по сети становится проще.
Если вы помните, когда вы впервые подключались к какой-либо сети на ПК с Windows, вас спросили, является ли это частной, общедоступной или доменной базовой сетью.
Включить или отключить обнаружение сети
Если вы используете автономный ПК, вы можете отключить обнаружение сети, так как он вам не понадобится. Вы можете отключить Обнаружение сети, используя Настройки в Windows 10, или через Панель управления или Командную строку в Windows 10/8/7. Давайте посмотрим, как это сделать.
Через настройки Windows
Нажмите кнопку «Пуск», откройте «Настройка» и выберите «Сеть и Интернет», а затем «Удаленный доступ» (или Ethernet).
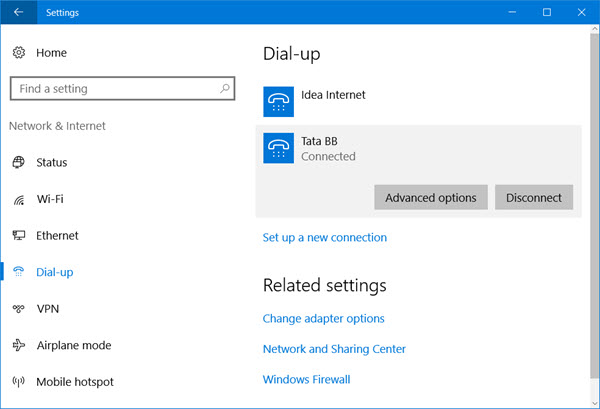
Выберите сеть и нажмите «Дополнительные параметры». На открывшейся панели поверните ползунок в положение «Выкл.», чтобы установить параметр «Обнаружить этот компьютер».
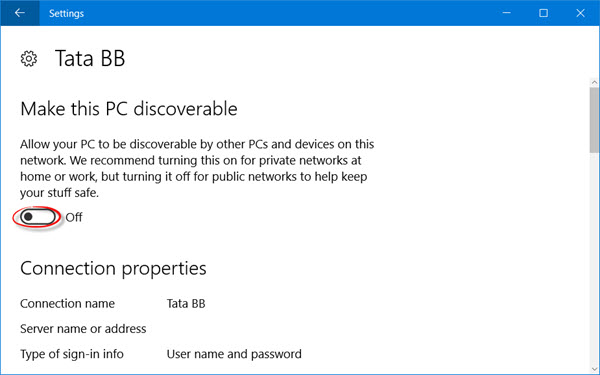
Чтобы включить его снова, просто переместите ползунок обратно в положение «Вкл.».
То же самое для сетей WiFi. Откройте «Настройки» → «Сеть и Интернет» → «Wi-Fi»> «Управление известными сетями» → «Выберите сеть WiFi» → «Свойства» → «Переведите ползунок в положение «Выкл», чтобы параметр «Сделать этот компьютер доступным для обнаружения».
В случае соединения Ethernet, вы должны нажать на адаптер, а затем переключить переключатель «Сделать этот компьютер доступным для обнаружения».
Использование панели управления
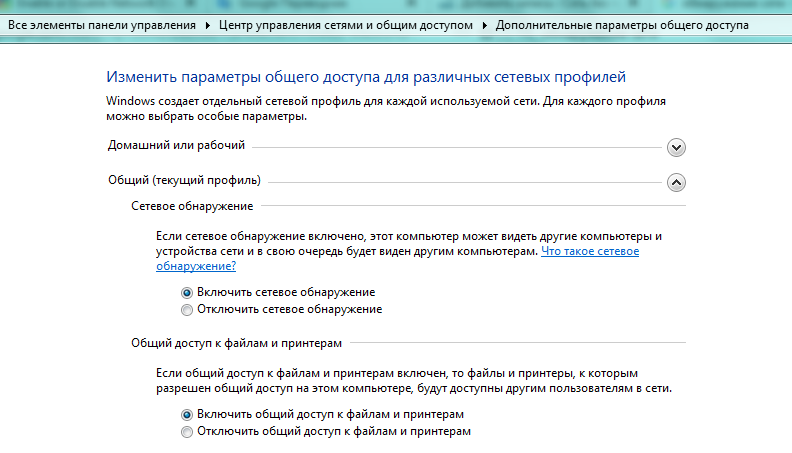
В меню WinX откройте Панель управления → Все элементы панели управления → Центр управления сетями и общим доступом → Расширенные настройки общего доступа.
Снимите флажок Включить обнаружение сети как для личных, так и для общих/гостевых профилей.
Сохраните изменения и выйдите.
Использование CMD
Чтобы отключить обнаружение сети, введите в командной строке с повышенными правами следующую команду:
Чтобы включить обнаружение сети, введите в командной строке с повышенными правами следующую команду:
Таким образом, вы можете включить или отключить обнаружение сети.
Не удается включить обнаружение сети
Если вы не можете включить обнаружение сети, вы можете запустить services.msc, чтобы открыть диспетчер служб и проверить, запущены ли следующие службы и установлено ли значение Автоматически.
- DNS-клиент
- Публикация ресурса обнаружения функций
- SSDP Discovery
- Хост устройства UPnP
Discovery network windows 7
Network discovery in Windows 7 is the similar feature you can find in Windows Vista, which allows your computer to find and discover other computers and display them in network map. If this feature is disabled, other computer will not be able to see your computer too.
If your computer is located on home network or other safe network (not public network), it’s recommended to enable this feature in order to ease the files or printer sharing.
By default this network discovery feature is activated in Windows 7 if the network location type is set to Home network or Office network, but it’s good for you to know how to configure it in case you want to disable it later. This feature is disabled by default if the network location type is set to Public network.

This is the way to configure network discovery feature:
1) Go to Start and click on Control Panel.
2) Proceed to click View network status and tasks in Control Panel window.

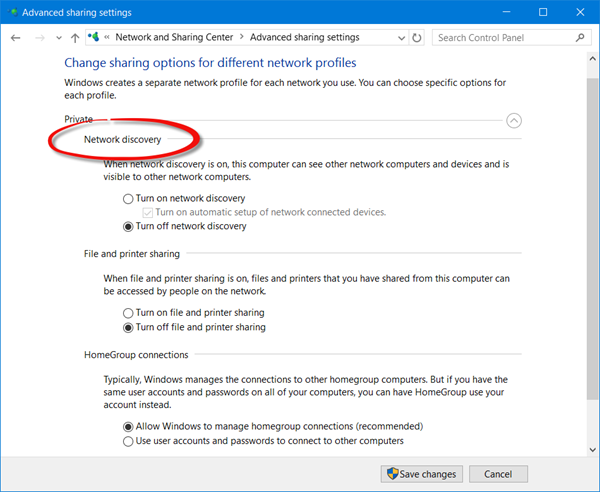
3) Network and Sharing Center window will appear, proceed to click Change advanced sharing settings.

4) You will be shown Advanced sharing settings window, you can then find out network discovery is on (turn on network discovery) under Home or Work profile section. You can also select turn off network discovery option and Save changes to disable this feature.
Note: You need to scroll down to public profile in order to turn on/off network discovery if your network location type is public network.

5) Let’s move back to Network and Sharing Center window, you can click on See full map in order to see the discovered network devices and know how they’re connected if you have enabled this feature.

6) As an example, here you can see I’ve another computer (David) on the network and both computers are connected to a router (gateway) with 4 ports switch, and this router is connected to Internet.
Note: If your XP computer fails to be displayed or displayed incorrectly in network map, advise you to install Link-Layer Topology Discovery (LLTD) on XP computer.

Note: You can also select different network to be displayed under network map’s drop down menu.
Discovery network windows 7
![]()
Вопрос
![]()
![]()
I’ve turned off Network Discovery on all 3 profiles (Domain/Public/Work) but when I open the «Network» folder, computers are still being detected.
I’m trying to prepare an OSD for a large domain and would prefer to avoid the overhead of all the computers enumerating one another over the network. This functionality used to be available from GP for XP but can’t see options for this which apply (and work) on Win7.
Is there any way to completely disabled this?
x64 if it makes any difference.
Ответы
![]()
![]()
Have you used any Group Policy which is related to Network Discovery?
Please understand when the status of Network Discovery is off, this state prevents your computer from seeing other network computers and devices and prevents people on other network computers from seeing your computer.
However, if you still can see other network computers, I suggest you refer to the following articles to disable Network Discovery in Group Policy.
Please Note: Microsoft provides third-party contact information to help you find technical support. This contact information may change without notice. Microsoft does not guarantee the accuracy of this third-party contact information.
Все ответы
![]()
![]()
Have you used any Group Policy which is related to Network Discovery?
Please understand when the status of Network Discovery is off, this state prevents your computer from seeing other network computers and devices and prevents people on other network computers from seeing your computer.
However, if you still can see other network computers, I suggest you refer to the following articles to disable Network Discovery in Group Policy.
Please Note: Microsoft provides third-party contact information to help you find technical support. This contact information may change without notice. Microsoft does not guarantee the accuracy of this third-party contact information.
![]()
![]()
Thanks for your response, perhaps I’ll provide some additional information so I can clarify.
When you open Explorer, naviagate to the Network folder on the left, when you open this folder the system automatically starts to enumerate the computers on the network and they appear in the right side of explorer.
If there is in excess of 10,000 computers on the network. my thoughts are this will this perform like a dog after about the first 2,000. I imagine all that information is collected and stored somewhere on Win7 locally and then each time the user re-opens this folder it will start to refresh it. On a large network, I just don’t see this being a great feature and in some scenarios I can even see it being labelled as a security risk.
I have tried the Group Policy options and I have tried un-binding the Link-Layer protocols off the NIC but to no avail. The other systems within the network are still being discovered and displayed.
At this stage we don’t care or want the computers to ‘see’ each other as it’s not really neccessary, so long as the Win7 clients can access folder shares on file servers, SharePoint websites and external websites with the usual protocols such as SMB, DNS, DHCP etc as generally comptuers don’t need to talk to one another on corporate domains. In-fact, in most of the secured environments I’ve worked in, the security model explicitly denies users access to other machines accross the network unless they’re an admin.
So, at this stage I’m still looking for a way to turn this off like you used to be able to do with Windows 2000 and XP.