How to disable Taskbar transparency in Windows 10
- By using Classic Shell software you will be able to bring classic Windows settings to your Windows 8 and Windows 8.1 system.
- Unlike Windows 8, Windows 10 has a built-in setting that allows you to enable or disable transparency of your Taskbar. See how you can do that in our guide below.
- Care to learn more about the Windows 10 Taskbar? Take a look at our articles in our Windows 10 Taskbar section for more guides, tips, and fixes.
- Our How to hub is filled with complete guides tips and tricks about everything in or around your computer. Check it out now!
Windows 8 is a great system that is optimized especially for portable and touchscreen devices.
But, the platform is smoothly running on both laptops and desktops, so you can safely install the software on your device.
Anyway, the best thing about it is that Windows 8 and Windows 8.1 can be easily optimized and customized, which means that you can anytime personalize your Windows-based device.
In that matter, I will show you how to easily disable and enable taskbar transparency in Windows 8 and Windows 8.1.
This tutorial is dedicated to Windows 8 and Windows 8.1 based devices and can be used with ease by the users who want to change the system default settings.
Now, by applying the steps from below you will be able to disable and also to enable the taskbar transparency which is a great feature to use if you want to customize the Windows 8 and 8.1 theme.
But, if you rather choose to use a classic Windows 8 interface, then you should try to disable taskbar transparency by using the guidelines below.
How do I disable Taskbar Transparency in Windows 8.1?
Disabling Taskbar transparency isn’t as hard as you think, and in this article, we’re going to cover the following topics:
- How to make Taskbar not transparent Windows 10 – By default, the Taskbar on Windows 10 isn’t transparent, but you can change this setting with ease. Windows 10 allows you to easily enable or disable Taskbar transparency just by changing a single setting.
- Disable Taskbar transparency Windows 8, 10 – Windows 8 comes with a transparent Taskbar by default, and if you want to disable it you need to use one of our solutions. As for Windows 10, there’s a built-in setting that allows you to easily disable Taskbar transparency.
- Classic Shell disable Taskbar transparency – One of the easiest ways to disable Taskbar transparency in Windows 8 is to use a third-party tool called Classic Shell. This is a free and simple tool, and it’s a great way to disable and adjust transparency if you’re using Windows 8.
- Windows 10 Taskbar opaque – Windows 10 fully supports opaque Taskbar, so you don’t have to use any third-party tools. If you want to make your Taskbar opaque, simply enable transparency from the Setings app.
- Transparent Taskbar and Start Menu – Making Taskbar and Start Menu transparent is rather simple, especially if you’re using Windows 10. Simply by enabling transparency in Settings app your Taskbar and Start Menu will become transparent.
Solution 1 – Use Classic Shell
By using Classic Shell software you will be able to bring classic Windows settings to your Windows 8 and Windows 8.1 system.
This program can also be used by those who want the classic Windows 7 user interface installed on their Windows 8 devices.
- Download Classic Shell on your device.
- Install the software by following the on screen prompts.
- The right click on Start button and select Settings.
- Select the Start button tab and just check Disable taskbar transparency.
- Click OK and that’s it; uncheck the same option if you want to enable taskbar transparency on Windows 8.
Solution 2 – Use Aero Lite Theme
Another way in which you can complete this operation is by using a dedicated theme for Windows 8 and Windows 8.1.
- Download Aero Lite Theme from here and unzip the theme on your device.
- Then save this file to path C:\Windows\Resources\Themes.
- Now just change the current Windows 8 theme to Aero Lite.
- Customize the new theme for setting a new background, for enabling / disabling taskbar transparency and so on.
- Test the theme and if you don’t like it, just uninstall the same from Control Panel.
Several users claim that you don’t even have to download this theme in order to use it. According to users, the theme is still available on your PC, and you can activate it manually by doing the following:
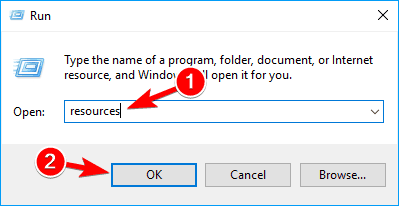
- Press Windows Key + R to open the Run dialog. In the input field enter resources and press Enter or click OK.
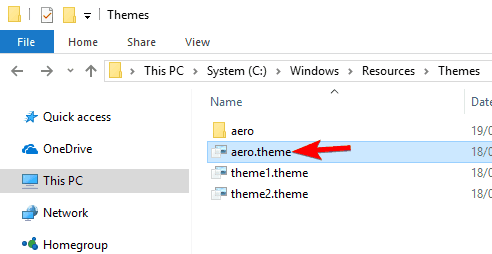
- Navigate to Themes directory and copy aero.theme to your Desktop. Keep in mind that you might see this file only as aero if you don’t have file extensions revealed.
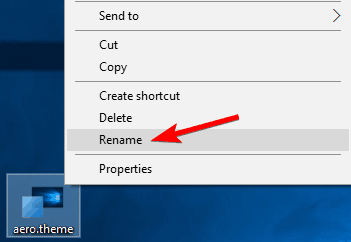
- Rename the file that you just copied to your Desktop from aero.theme to aerolite.theme.
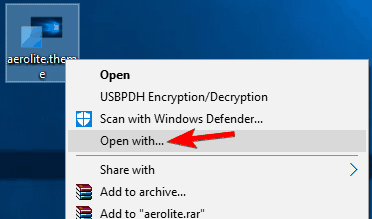
- Now right click aerolite.theme file on your desktop and choose Open with.
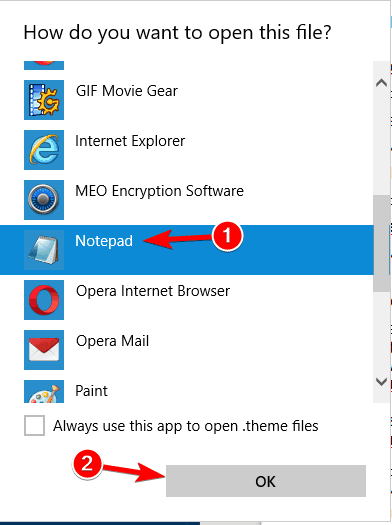
- Select Notepad from the list and click on OK.
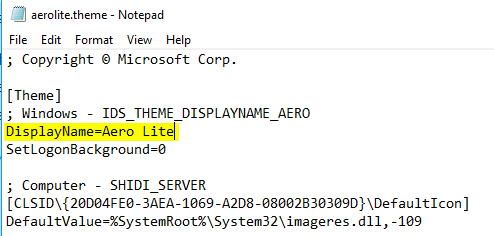
- Locate DisplayName line in the [Theme] section and change it to DisplayName=Aero Lite. Basically you just need to change the value after the = sign to the desired name.
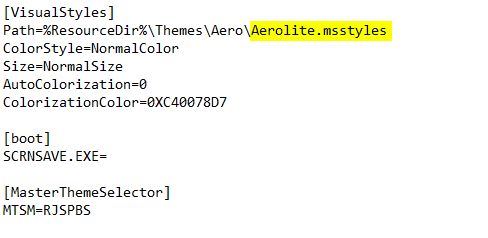
- Now locate [VisualStyles] section. Locate Path and change Aero.msstyles to Aerolite.msstyles. After doing that, save changes.
- Now move the aerolite.theme from your Desktop back to C:\Windows\Resources\Themes directory. If you get a security warning just click on Continue.
After doing that you should be able to access the Aero Light theme from the personalization section and change your theme to Aero Lite.
After switching to this theme, your Taskbar won’t be transparent anymore.
Solution 3 – Use the Settings app
If you’re using Windows 10, you’ll be happy to know that you don’t need to use third-party applications or themes in order to disable transparency of your Taskbar.
Unlike Windows 8, Windows 10 has a built-in setting that allows you to enable or disable transparency of your Taskbar.
As a result, you can disable transparency with a single click. To disable transparency of your Taskbar, just do the following:
- Press Windows Key + I to open the Settings app.
- Navigate to Personalization section.
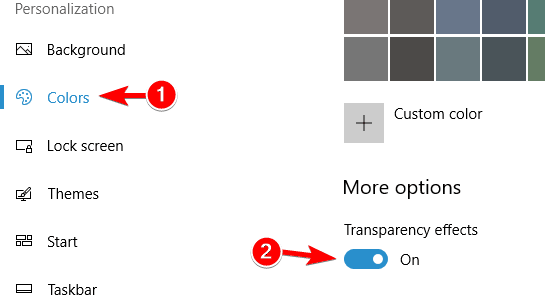
- In the menu on the left select Colors. In the right pane, under More options section enable Transparency effects.
After doing that, your Taskbar should become transparent. If you want to disable transparency, simply follow these steps and turn off transparency setting.
Perfect; so there you have it. These are the best ways to use when trying to disable taskbar transparency in Windows 8 and Windows 8.1.
So far we don’t have an in-built feature in Windows 8 for performing the operations from above so that’s why you had to use third-party apps.
Anyway, use the comments field from below if you had problems in performing the steps explained on this tutorial and we will help you resolve the issues.
FAQ: Read more about the transparency effect in Windows
What you need to do is to toggle OFF the taskbar transparency button in the personalization option. Read our full guide on how to turn off taskbar transparency.
Editor’s Note: This post was originally published in January 2018 and has been since revamped and updated in April 2020 for freshness, accuracy, and comprehensiveness.
Простой способ отключить набор функций Aero на Windows 7, если он тормозит работу ПК
Прозрачное оформление окон, приглянувшееся многим пользователям в Windows 7, пропало еще при выходе «восьмерки». До релиза Windows 10 был шанс, что технология Aero снова появится среди визуальных эффектов(ведь вернули разработчики долгожданную кнопку «Пуск»), однако этого не произошло.
Компания Microsoft в Windows 10 решила не возвращаться к старым методам оформления, благополучно забыв о технологии Aero. Но мириться с таким порядком необязательно: вы можете самостоятельно добавить в систему эффект прозрачных окон.
Обширные возможности
Применив скачанный патч, можно получить следующие возможности:
- автоматическая смена обоев;
- установка сторонних тем;
- улучшенная комбинация Win+Tab.
Более не нужно вручную менять обои рабочего стола, операционная система будет делать это сама с заданной периодичностью, которую можно отрегулировать по собственному усмотрению. Можно выбирать абсолютно любую тему. Также порадует оформление при переключении между окнами комбинацией Win+Tab.
И применив описанный Aero Patch для вашей операционной системы начальной версии, вы получите практически в буквальном смысле Windows 7 максимальную.
Как включить Windows Aero
Windows Aero — это пользовательский интерфейс, применяемый в операционных системах компании Microsoft начиная с Windows Vista. Aero присутствует во всех версиях Windows 7 кроме Starter и Home Basic, а также в бета-версии Windows 8, так что судя по всему отказываться от него в ближайшее время Microsoft не планирует.
Вот основные компоненты, входящие в состав Windows Aero:
- Aero Glass — применение прозрачных (с размывкой заднего плана) заголовков и панелей в окнах;
- Активные эскизы — возможность просмотра текущего состояния окна с помощью Windows Flip и Flip 3D;
- Активные эскизы панели задач — миниатюры окон, появляющиеся при наведении на кнопку окна на панели задач;
- Windows Flip — новый вид меню переключения между окнами. При при нажатии клавиш Alt+TAB показываются эскизы открытых окон и их значки;
- Windows Flip 3D — альтернатива Windows Flip. При нажатии клавиш Win+TAB все окна выстраиваются в ряд в 3D и их можно прокручивать колесиком мыши;
- Aero Shake — позволяет свернуть все неактивные окна. Для этого достаточно захватить заголовок окна и немного подвигать, или потрясти (shake). Повторное стряхивание восстанавливает свернутые этим способом окна;
- Aero Peek — позволяет отобразить содержимое рабочего стола, не сворачивая при этом окон. Для этого нужно указатель мыши поместить на кнопку в правом углу панели задач или воспользоваться нажатием комбинации клавиш Win+Space, и все открытые окна становятся прозрачными. Нажатие на эту кнопку сворачивает все окна;
- Aero Snap — позволяет движением мыши разворачивать окно на пол-экрана или на весь экран. Для этого достаточно окно к правой или левой границе экрана, и оно займет ровно половину пользовательского рабочего стола, а переместив окно к верхней границе экрана мы развернем его на весь рабочий стол.
Перед включением Aero надо проверить видеоподсистему своего компьютера на соответствие требованиям. Для работы Windows Aero необходимо:
- видеоадаптер с поддержкой DirectX 9 и WDDM (Windows Display Driver Model) версии 1.0 и старше. Например, для NVidia это все видеокарты начиная с GeForce FX, для Ati Radeon 9X00 серии и новее;
- должно быть доступно не менее 128Мб видеопамяти. Для интегрированных графических решений требуемый объем видеопамяти должен быть выделен до загрузки операционной системы, в настройках BIOS ;
- требуется специально написанный для Windows Vista/7 драйвер видеосистемы, поддерживающий архитектуру WDDM.
Специальной кнопки включения у Aero нет. Для его активации идем в меню Пуск-Панель управления-Система и в окне свойств системы ищем оценку производительности компьютера. Если оценка ранее не производилась, то щелкаем мышкой на надписи «оценка системы недоступна».
В открывшемся окне нам надо будет установить индекс производительности (Windows Experience Index) компьютера. Для этого жмем на кнопку «Оценить компьютер» и ждем, пока будет произведена оценка производительности основных компонентов системы.
По окончании процесса мы увидим, во сколько оценила производительность нашего компьютера операционная система. Для активации Windows Aero общая оценка производительности должна быть не меньше 3.0. При необходимости (изменение конфигурации или установка нового драйвера) оценку всегда можно повторить, для этого нужно нажать на пункт «Повторить оценку» внизу страницы или, зайдя в командную строку, ввести команду winsat formal.
Если с производительностью все впорядке и индекс больше 3, то остается включить Windows Aero. Для этого идем в меню Пуск-Панель управления-Персонализация и выбираем одну из тем Aero.
При желании настроить внешний вид интерфейса жмем на пункт «Цвет окна». Здесь мы можем настроить цвета для Aero и включить прозрачные заголовки и панели.
Основные настройки Aero находятся поглубже. Чтобы до них добраться, идем в Пуск-Панель управления-Система, и в окне свойств системы выбираем пункт «Дополнительные параметры системы». Затем в окне Свойства системы выбираем Параметры быстродействия — Визуальные эффекты. Здесь можно по выбору включать или отключать визуальные эффекты, а можно совсем отключить Aero, выбрав пункт «Обеспечить наилучшее быстродействие».
На этом можно было бы закончить, однако что делать тем, у кого индекс производительности не дотягивает до нужной отметки, а попробовать Aero хочется? В этом случае есть 2 альтернативных способа активировать Windows Aero.
Способ первый — обмануть систему оценки производительности. Он основан на том, что результат оценки записывается в обычный xml-файл, который при небольшом умении можно поправить в обычном текстовом редакторе. Файл этот находится в папке C:\Windows\Performance\WinSAT\DataStore. Идем по указанному пути и находим файл который оканчивается на Formal.Assessment (Initial).WinSAT. Если таких файлов несколько, то смотрим по дате и выбираем самый последний.
Открываем его Блокнотом и ищем текст, заключенный между тегов и :
- изменяет общую оценку;
- изменяет оценку памяти;
- изменяет оценку процессора;
- изменяет оценку графики;
- изменяет оценку графики для игр;
- изменяет оценку основного жесткого диска.
Теперь меняем значения на нужные нам. Например, изменяя значение между тегами и меняется значение общей оценки производительности компьютера. Сохраняем файл на рабочий стол, а затем копируем его в исходное положение (для этого потребуются административные полномочия), и смотрим что получилось. Напоминаю, что возможности Aero активируются при индексе производительности от 3 и выше.
Второй способ — принудительно включить Windows Aero через реестр. Этот способ можно использовать также, если нужно просто включить возможности Aero без использования встроенных тем Windows. За работу Aero отвечает диспетчер окон рабочего стола (Desktop Window Manager, DWM). Его настройки хранятся в разделе реестра HKEY_CURRENT_USER\Software\Microsoft\Windows\DWM. Для включения Aero открываем редактор реестра и меняем значение следующих параметров :
- Composition изменяем на 1;
- CompositionPolicy изменяем на 2.
Теперь идем в меню Пуск, в строке поиска набираем cmd и жмем сочетание клавиш Ctrl+Shift+Enter (еще один способ открыть командную строку с правами администратора). В командной строке перезапускаем диспетчер окон:
После перезапуска Windows Aero должен включиться.


Предостережения
Прежде чем использовать описанный патч, нужно убедиться, что в системе ранее не были установлены программы, которые связаны с изменением панели персонализации. Если такие есть их нужно удалить, в противном случае исправная работа патча не гарантируется. Возможно, придётся заново переустанавливать систему.
Кроме того, не стоит устанавливать патч без предварительного создания контрольной точки восстановления. Это крайне рекомендуется для того, чтобы можно было вернуть состояния системы до установки Aero Patch.
Отключение Aero Snap
Отключить функцию Aero Snap можно любым из следующих двух способов:
Откройте
Панель управления— Центр специальных возможностей,
щелкните Облегчение работы с мышью (так же возможно через пункты Облегчение работы с клавиатурой, Облегчение сосредоточения)
в разделе Упрощенное управление окнами установите флажок Отключение автоматического упорядочения окон при их перемещении к границе экрана
Импортируйте значение в реестр.
Отключаем Aero Peek
Чтобы отключить Windows Aero, а именно его функцию Peek, следуем инструкции:
- Наведите курсор на вертикальный прямоугольник, встроенный в правой нижней точке экрана, и кликните по нему.
- Появится перечень команд (их всего две), уберите галочку, установленную возле второй команды.
- LiveJournal
- Blogger
Функция отключена! Теперь при наведении курсора на прямоугольник активные окна сворачиваться не будут. Чтобы включить функцию, верните флажок на место.
How to Turn on Desktop Peek for Windows 10
For Windows 10, Peek is disabled by default, but enabling this feature is just a few clicks away.
The user has to simply right click anywhere on the Taskbar (provided that space is empty),
and select Properties from the options that appear. Under the Taskbar tab, the user will find a checkbox saying “Use Peek to preview the desktop when you move your mouse to the Show desktop button at the end of the taskbar”. If the user checks this option, and selects Apply, Peek is enabled.

For those users who face a greyed out checkbox for Peek to be enabled, it i recommended to check under System Properties if Peek is completely switched off; that could be causing the checkbox to appear greyed out and making it impossible to use. To disable Peek after it has already been enabled; the user can just uncheck the above mentioned checkbox, and press Apply. Peek will then be disabled again. Shortcut keys may also be used to enable Peek on Windows 10. Pressing the Win (Windows icon) key with comma (,) will activate Peek.
Desktop Peek for Windows 8
Windows 8 is another version on which Peek is disabled by default. One simple method to turn Peek on would be to right click on the Show Desktop option when the user is on the desktop. An option called Peek at desktop will appear under Show Desktop, which the user has to check in order for Desktop Peek to be enabled. Another method to enable or disable Peek is one that matches the method used for Windows 10: enabling or disabling Peek through Taskbar properties. The same checkbox as in Windows 10 will be shown below the Taskbar tab, the user has only to check or uncheck it according to their own preferences.
Desktop Peek for Windows 7
In this version of Windows, Peek is enabled by default, and not only that, it comes under the name Aero, part of three different features- Aero Peek, Aero Snap and Aero Shake. Since this article is devoted to Peek only, Snap and shake will not be discussed here. Unlike the newer versions of Windows, to use Peek on Windows 7, the Aero theme must be enabled instead of the Basic and High Contrast themes. Moreover, Peek will only function when more than one window is open. Peek on Windows 7 is used in the same way as in other version though. The user can access a desktop preview by hovering the cursor on the right side of the Taskbar. The Taskbar method to enable or disable Peek is slightly different on this version. The user must select Properties after right clicking the Start button, or imply right click an empty area on the Taskbar. Both these methods of navigation will lead to Taskbar and Start menu Properties, under which the Taskbar tab should be selected. A checkbox saying “Use Aero Peek to preview the desktop” will be present under this tab. Checking this box will enable Aero Peek, and unchecking it will disable the same. The Peek at Desktop under the Show Desktop option on the Taskbar may also be used to enable or disable Peek.
Saurav is associated with IT industry and computers for more than a decade and is writing on The Geek Page on topics revolving on windows 10 and softwares.
Подведём итоги
Дорогие друзья, сегодня мы с вами обсудили довольно важный, но в то же время несложный вопрос об эффекте Windows Aero на семёрке. Мы узнали, что он работает не во всех редакциях ОС, в некоторых представлена упрощённая версия. Отключить его можно двумя способами: в окне персонализации или в параметрах быстродействия компьютера. Чтобы включить Aero в Windows 7 достаточно проделать противоположные манипуляции: включить прозрачность в окне настроек тем или установить флажок напротив пункта «Обеспечить наилучший вид». Надеемся, что у вас всё получилось, и не осталось никаких вопросов. В комментариях расскажите, каким способом воспользовались вы для решения своей проблемы и почему.
Windows Aero – проверенный комплекс графического интерфейса
How to Enable / Disable Desktop Peek In Windows 10
March 31, 2020 By Admin
Desktop Peek is a feature offered by Windows by which a user can temporarily view the desktop without having to minimize any open windows. While Desktop Peek for Windows 7 is enabled by default; in versions 8 and 10, it is disabled by default. On Windows 7, one can access Peek easily by hovering with the cursor over the right edge of the Taskbar. The user can then see the icons on the desktop through his or her open browser windows, which you could say, go transparent. On moving the cursor away from that area of the Taskbar, the desktop is not visible anymore. That is how Peek functions.
This article goes through the steps of how to enable and disable Peek for Windows 10 as well as older versions 7 and 8.


