Using AutoHotkey to switch Virtual Desktops in Windows 10
One of the best features of Windows 10 is the Task View, which you can use to create virtual desktops. These desktops are a great way to distribute and organize the windows of your open applications. You can press Win+Tab (hold down the Windows key and press Tab) to see them in the Task View.
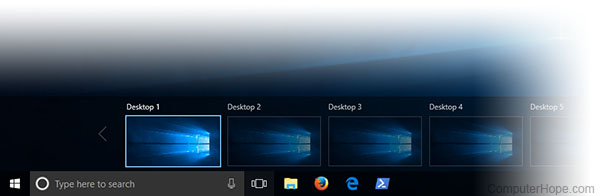
However, one feature not provided by Microsoft is the ability to instantly switch to a specific virtual desktop with a keyboard shortcut. For instance, if you are on Desktop 2 and you want to switch to Desktop 6, you have to hold down Win+Ctrl and press the Right Arrow four times. It would be easier to have a shortcut that automatically switches to desktop number 6, regardless of which desktop you’re using.
This tutorial shows you how to create keyboard shortcuts to switch directly to any virtual desktop by number. We’ll accomplish this using the free Windows utility, AutoHotkey.
Creating the script
- The installer exits, and a new text file opens in Notepad. The file will be our script. (A script is a plain text file that contains a series of commands to be run by another program, in this case AutoHotkey.)
The script on this page is based on Windows Desktop Switcher, an open source script hosted on GitHub at github.com/pmb6tz/windows-desktop-switcher.
- Copy and paste the following script into your Notepad document:
- Save the file.

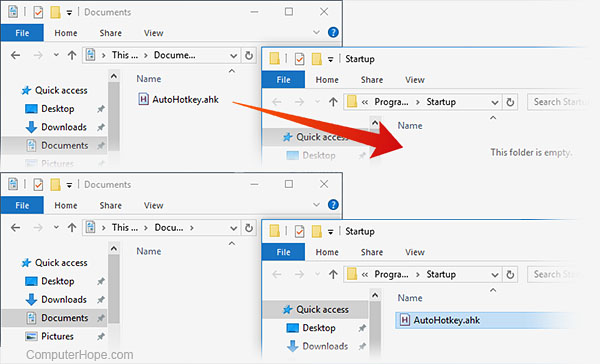
- This script, AutoHotkey.ahk, is located in your Documents folder. Open a new File Explorer window (keyboard: Win+E) and go to Documents.

- Run the script by double-clicking on the file. You won’t see anything happen, but AutoHotkey is now running the script.
How does it work?
The script works by keeping track of which virtual desktop you’re currently using. Holding down the Windows key and pressing a number between 1 and 9 automatically switches left or right the correct number of times to get to the desired desktop. (If you press the number of a desktop that doesn’t exist yet, nothing will happen.)
Testing your new hotkeys
To test it out, first create a new virtual desktop. To do this, click the Task View icon on your Taskbar (or press Win+Tab), then click + New Desktop. Or, use the keyboard shortcut Win+Ctrl+D.
Do this once for each new virtual desktop you’d like to create. Each additional desktop will be oriented to the right of the previous.
Now, you can switch to any of these desktops using the keyboard shortcuts defined in the script. Hold down Win and press a number between 1 and 9, and you are automatically switched to that numbered desktop. For instance, press Win+3 to switch to the third virtual desktop from the left.
Stopping the script
To stop using the script, go to your system tray and right-click the AutoHotkey icon, which looks like a big green «H» to bring up the AutoHotkey Windows Notification menu.
If you don’t see the icon, use the caret ^ button to show hidden icons.

In this menu, you can Suspend Hotkeys, Pause Script, or Exit AutoHotkey entirely. Any of these actions return your hotkeys to normal.
Running your script automatically when Windows starts
To run the script automatically every time you start Windows, move the script into your Startup folder.
In Windows 10, the Startup folder is located at:
This folder is normally hidden, so you can only get to it in the File Explorer if you select View → View Hidden Files at the top of the Explorer window.
However, you also can access the Startup folder directly by entering the full directory path in the Run box. Press Win+R to open the Run box, then type the full directory path. You can use the environment variable %APPDATA% to automatically fill in the beginning of the path name. For instance, you can type this into the Run box:
When you press Enter, that folder opens in a new File Explorer window.
Now move your script to this folder. If you still have your Documents folder open in another window, drag-and-drop AutoHotkey.ahk into the Startup folder.
If you decide that you don’t want to run the script automatically every time you start Windows, open this folder again and move the script somewhere else. You can always run it manually by double-clicking it, no matter where it is on your computer.
Additional notes
This script overrides the default Windows shortcuts for Win+(Number), which normally open up items on your taskbar (Win+1 opens the first item, etc). However, some built-in Windows applications such as Settings or Store ignore AutoHotkey’s script. If you’re on one of these windows when trying hotkeys, it uses the Windows hotkey behavior, and opens something from your Taskbar instead of a new desktop. Another thing to keep in mind is that AutoHotkey is actually switching left and right between your virtual desktops, quickly, one by one. If it bumps into a virtual desktop where one of these special applications is open, it’ll stop switching and stay on that desktop.
Unfortunately, the default Windows shortcuts cannot be disabled, which is inconvenient, but unless you have one of these application windows open, the AutoHotkey script works fine. You’ll find that the script works perfectly with 95% of your other programs.
However, if you prefer, you can edit your AutoHotkey script to use a different key combination.
Editing your AutoHotkey script
Open Notepad (Start → Windows Accessories → Notepad).
In Notepad, open the AutoHotkey file. If you already have the Startup folder open, you can drag-and-drop the icon onto the Notepad window to open the file.
Or, you can open it by going to File → Open in Notepad and entering the file name %APPDATA%\Microsoft\Windows\Start Menu\Programs\Startup\AutoHotkey.ahk.
When the file is open, you can make changes to the script to suit your needs. For instance, if you would prefer to use the hotkey combination CapsLock+(Number), look for these lines in the script:
In these lines, change LWin to CapsLock:
Save your changes, and double-click the script to update it in AutoHotkey. If you made any mistakes in your script, AutoHotkey will not run it, and give you an error message. Otherwise, it asks you if you want to update the script that is already running:
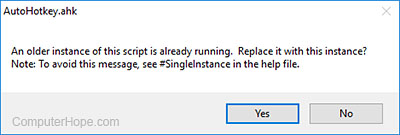
Choose Yes to make your new changes take effect.
If you have an idea for a different hotkey combination, you can change it to any hotkey combination that is not already in use.
Picking a key combination
AutoHotkey has its own special words and characters that it uses for representing keyboard keys in its scripts. For instance, the Ctrl key is represented by an exclamation mark. To use Ctrl+(Number) as your hotkey combination, you could change «CapsLock &» to «!» in your script. Then the lines would look like this:
Notice that when you use a symbol rather than a word, you shouldn’t use » & » in the script syntax. This rule is one of the special rules AutoHotkey uses in its scripting language.
Use hotkeys To Switch Between Windows 10 Virtual Desktops, Set Name
Windows 10 Virtual Desktop Enhancer is a free software to use hotkeys to switch between virtual desktops using hotkeys, set their name, change wallpaper, etc. So this makes using native virtual desktop of Windows 10 convenient and more interesting.
By default, you can only create virtual desktops using Task View icon and switch between desktops using mouse. This software lets you set custom hotkeys or use predefined hotkeys to switch between virtual desktops. Apart from that, you can also set a custom name for each individual virtual desktop (say ilovefreesoftware1, ilovefreesoftware2, etc.). You can set virtual desktop name based on the applications opened in that particular desktop. This way you can easily identify which applications are opened in which virtual desktop.

This software also lets you set a specific program to run automatically when you move to a particular desktop. For example, you can set this software to open an image editor when you move to desktop 3. Likewise, you can select a program to run automatically when you move from a virtual desktop.
You can also pin an opened application. By doing so, when you switch to some other desktop, that application is visible in that particular desktop also. So you don’t have to separately open a particular application in another virtual desktop. There is one more interesting feature using which you can set a wallpaper for a particular virtual desktop. So some really useful features are present in this software that can be used when you work with virtual desktops in Windows 10.
This software is currently in beta version, but most of its features work quite well. However, there are a few bugs that I believe would be fixed with its stable release. After applying a wallpaper in a particular virtual desktop, that wallpaper is automatically applied to rest of the virtual desktops, including the main desktop. Moreover, when you set an application to run automatically when you switch to some other desktop, it works fine. However, the thing is that another instance of that application is run automatically when you switch to that desktop again. I guess once an application is launched in a particular desktop, it should not run again (if the application is still opened).
Using This Free Windows 10 Virtual Desktop Enhancer Software:
Here is the link to get the zip archive of this software. This software doesn’t come with any interface. All it provides is its system tray icon and Settings file. Here, Settings file is the most important part of this software because this is the file using which you can set hotkeys to switch between hotkeys, set custom wallpaper, pin applications, etc.
Open Settings file in Notepad or some text editor software and you will be able to see all the options and set your preferences. Some of the important options are:
- You can press Win+Ctrl+Number to switch between desktops. For example, if you have to switch to desktop number 5, then you need press “Win+Ctrl+5” hotkey. You also have the choice to change the default hotkeys to switch between desktops.
- Set Desktop Names: There are numbers from 1 to 10 under [Wallpapers] option. In front of these numbers, you can add a name of your choice. For example, you can add ilovefreesoftware in front of number ‘1’. That will be the name of desktop no. 1. In a similar way, you can add names for other desktops. When you switch from one desktop to another, it will show desktop name set by you in a pop-up. If you have opened more than 10 desktops, then you can add more numbers and set their names.

- Run a program When Switching to A Desktop: Like above option, this option also has desktop numbers. In front of a particular desktop number, you can add the path of an application. After that, when you switch to that particular desktop, say desktop number 5, the set application will run automatically. You can add more applications to other desktops by entering their source paths.


These are the important options that you can configure. You need to spend some time to understand the options and configure them as per your needs. After that, you can run this software and it will minimize to the system tray. Its tray icon will show the current desktop number. Hovering the mouse cursor on its tray icon will show the name of current desktop like you can see in screenshot below.
Clicking on its tray icon will open the native Task View to switch between desktops. But you don’t have to click its tray icon because you can use hotkeys to switch between virtual desktops in Windows 10.
The Verdict:
If you use some third party virtual desktop software for Windows 10, then this software is of no use for you. However, if you use the native virtual desktop feature of Windows 10, then you should give a try to this software. It might take some time to adjust options and get familiar with preset or custom hotkeys. However, once everything is set, you will have some interesting features to use for Windows 10 virtual desktops, which are not possible natively (at least for now). I really like the features to use hotkeys to switch between desktops and set a custom name for desktops.
Горячие клавиши Windows 10, которые необходимо знать
Каждый опытный пользователь знает, что клавиатурные сокращения позволяют сделать работу за компьютером гораздо удобнее и продуктивнее. В этой статье мы собрали для вас самые полезные горячие клавиши Windows 10, которые пригодятся всем пользователям без исключения.
В приведённом ниже списке вы сможете найти как хорошо знакомые по предыдущим версиям клавиатурные сокращения, так и появившиеся только в Windows 10. Совершенно нет необходимости учить их все сразу, да это и невозможно. Просто выберите 3–4 операции, которыми вы пользуетесь чаще всего, запишите соответствующие им клавиши на стикер и прикрепите его на видном месте. Вы сами не заметите, как очень скоро выучите их назубок и не сможете без них обходиться. А когда это произойдёт, можно будет переходить к освоению следующих комбинаций горячих клавиш.
Управление окнами и приложениями
Win + стрелка влево — присоединить окно приложения к левому краю экрана.
Win + стрелка вправо — присоединить окно приложения к правому краю экрана.
Win + стрелка вверх — развернуть окно приложения на весь экран. Или, если окно было ранее прилеплено к одному из краёв, оно займёт четверть экрана в верхней части.
Win + стрелка вниз — свернуть активное окно. Или, если окно было ранее прилеплено к одному из краёв, оно займёт четверть экрана в нижней части.
Win + D — отобразить и скрыть рабочий стол.
Win + Shift + M — восстановить свёрнутые окна.
Win + Home — свернуть все окна, кроме активного (восстановление всех окон при вторичном нажатии).
Alt + Tab — переключиться между запущенными приложениями.
Alt + F4 — закрыть активное окно.
Win + Shift + стрелка влево (или вправо) — переместить окно на другой монитор.
Win + T — последовательно перебрать иконки на панели задач. Нажмите «Ввод», чтобы запустить приложение.
Win + 0…9 — запустить с панели задач приложение, иконка которого закреплена на позиции, соответствующей цифре.
Проводник
Win + E — запустить файловый менеджер.
Ctrl + N — открыть новое окно.
Ctrl + колесо прокрутки мыши — изменить представление элементов (иконки, таблица, эскизы и так далее).
Alt + стрелка вверх — подняться вверх на один уровень.
Alt + стрелка влево — просмотреть предыдущую папку.
Alt + стрелка вправо — просмотреть следующую папку.
Виртуальные рабочие столы
Win + Ctrl + D — добавить виртуальный рабочий стол.
Win + Ctrl + стрелка влево — переключиться между виртуальными рабочими столами справа налево.
Win + Ctrl + стрелка вправо — переключиться между виртуальными рабочими столами слева направо.
Win + Ctrl + F4 — закрыть используемый виртуальный рабочий стол.
Win + Tab — отобразить все рабочие столы и приложения на них.
Windows
Ctrl + Shift + Esc — запустить диспетчер задач.
Win + R — открыть диалоговое окно « Выполнить» .
Shift + Delete — удалить файлы, минуя корзину.
Alt + Enter — отобразить свойства выбранного элемента.
Win + пробел — переключить язык ввода и раскладку клавиатуры.
Win + A — открыть «Центр поддержки».
Win + S — открыть окно поиска.
Win + H — вызвать панель «Поделиться».
Win + I — открыть окно «Параметры».
Скриншоты и игры
Win + PrtScr — сделать скриншот и сохранить его в папке с изображениями.
Win + Alt + PrtScr — сделать снимок экрана игры.
Win + G — открыть игровую панель для записи процесса прохождения.
Win + Alt + G — записать последние 30 секунд в активном окне.
Win + Alt + R — начать или остановить запись.
Win + P — переключиться между режимами отображения (при наличии второго дисплея).
А вы используете в своей работе клавиатурные сокращения?