Dcpi manager mac os
Create your free GitHub account today to subscribe to this repository for new releases and build software alongside 50 million developers.
MuntashirAkon released this Apr 5, 2019 · 3 commits to master since this release
- Ability to update PCI IDs database within the app
- Updated PCI IDs db for dspci
- Added new audio codecs
MuntashirAkon released this Jan 6, 2019 · 4 commits to master since this release
MuntashirAkon released this Nov 11, 2018 · 11 commits to master since this release
- Removed all the utilities that are unnecessary and caused antivirus programs to detect the app as a virus
- Updated pci.ids to 11.11.2018
- dspci becomes more rich in features (type dspci —help for a list of help)
- Added support for dark mode
MuntashirAkon released this Aug 18, 2018 · 24 commits to master since this release
- Updated PCI list (Codec Name isn’t added, however)
- Made DPCIManager Xcode9.3-compatible (macOS 10.13 SDK)
- Added a new argument ( JSONData ) in dspci to output information in JSON (suitable for use with automated scripts)
You can’t perform that action at this time.
You signed in with another tab or window. Reload to refresh your session. You signed out in another tab or window. Reload to refresh your session.
Dcpi manager mac os
If nothing happens, download GitHub Desktop and try again.
Launching GitHub Desktop
If nothing happens, download GitHub Desktop and try again.
Launching Xcode
If nothing happens, download Xcode and try again.
Launching Visual Studio
Latest commit
Git stats
Files
Failed to load latest commit information.
README.md
Simple OS X app for viewing PCI hardware info
The original source code was from @phpdev32
You can find the latest binary in the release section.
NOTE: The old binary files contain DirectHW.kext which might lead your antivirus program to believe that this application contains a virus. Please white-list this app in your antivirus program.
If you’re running version 1.6 , see usage here.
As of version 1.7 , you can see usage by running:
JSON Schema for default JSON output
An output contains an array of objects which have the following attributes. For understanding JSON schema easily, I’ve used . (dot) for objects and [] (square brackets) for arrays:
DPCI Manager
![]()
Описание
DPCI Manager 0.1 для macOS может быть загружена с нашего сайта бесплатно. Самая популярная версия среди пользователей приложения 0.1.
Этот файл загрузки был проверен нашим встроенным антивирусом, который отметил его как полностью безопасный для использования.
Это бесплатное приложение для Mac OS X принадлежит byethost9. Программа принадлежит к категории Системные утилиты, а точнее к подкатегории Помощники устройств. DPCIManager_02.zip — наиболее скачиваемое имя файла для установщика этого ПО.
However before you download a driver you need to know which exactly devices you have installed in your system. Switching between your installation of OSX and Windows or Linux just to find PCI device ID and the name is at least annoying. It will try to identify all PCI devices in the system and show their resources. Hope it can be useful. The DPCIManager is a tool to identify PCI devices on Mac OSX.
Мы предлагаем оценить другие macOS программы, такие как dashMIDI Server, webXkiosk или toDoo, которые часто используются вместе с DPCI Manager.
[Guide] MSI PS63 Modern using Clover UEFI

Gius96
MSI PS63 Modern — Mojave 10.14.6
What Works
- Battery Support
- Intel UHD 620
- Sound
- iMessage and iCloud services
- Brightness
You need to use Karabiner app (google it) for enable F1 and F2 brightness slider keys. Or you can setting brightness level in Settings/Monitor. - Volume Keys (Fn+ArrowLeft/ArrowRight)
- Keyboard
- Keyboard native Brightness with 3 levels
- Track-Pad with gestures
- Webcam and Microphone
- USB 3 & TYPE-C
- USB-C to HDMI output with audio working
- HDMI port working with audio
- Sleep & Wake
- Headphone
What Doesn’t Work
WIFI and Bluetooth (This laptop uses a CNVi m.2 WiFi port. None of the old Broadcom cards will be detected)
see post #44 to disable CNVi support in bios hidden settings
Nvidia dedicated card obviously (disabled)Little drain problems and brightness level at startup (not saved from shutdown) — see at the end of this guide to know more (*)
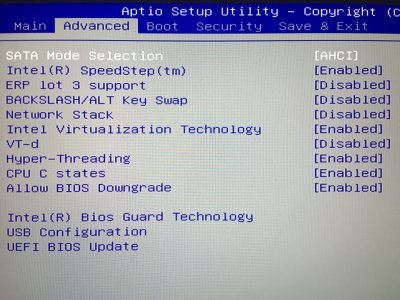
After install, you can re-enable VT-d
First of all, you need to create a USB bootable media. You can follow this perfect guide by RehabMan:
Remember to format your disk (where do you want to install Macintosh) in APFS volume.
If you need, you can have a look of my USB folder for see (or take) what Drivers and Kexts are inside, and you can take my config.plist directly (downloaded from RehabMan archive) from here.
Download it from attached files — USB_CLOVER.zip
Download and install the last version of “Clover EFI Bootloader” in your system drive from sourceforge.net.
Choose Customiseinstallation.
You need to check:
— Clover for UEFI booting only
— Install Clover in the ESP
— AudioDxe
— DataHubDxe
— FSInject
— ApfsDriverLoader
— Fat
— VBoxHfs
— OsxAptioFix3Drv
— EmuVariableUefi
— NvmExpressDxe
— PartiotionDxe
— Install RC scripts on target volume
— Black Green Moody
— CloverThemeManager
— Install Clover Preference Pane
You need to uncheck ALL other voices!
After that, copy your config.plist from your USB boot drive (if you have done all right, the config.plist is exactly the config_UHD630.plist from RehabMan. If you use another config.plist from unknow source, please use the RehabMan’s one.)
config.plist from RehabMan GitHub —> right click on raw and download, then change the name to config.plist
Copy it in your disk where you install MacOS EFI/CLOVER folder, and replace it.
In the driver (UEFI) folder you NEED to put VirtualSmc.efi (I don’t use FakeSMC). Take it from drivers folder.
In kexts folder, erase all folders (10.1, 10.2, 10.3,…) and leave only “other” folder. Here you need to install the most important kexts that will load at system update or in recovery mode.
- Lilu.kext
- All Package of VirtualSMC.kext (with others SMC_ kexts: SMCSuperIO, SMCProcessor, etc…)
- VoodooPS2Controller
- WhateverGreen
Now, at this point, you can reboot without USB.
Try to do it.
If you have problems at startup, try to see post #22:
[Guide] MSI PS63 Modern using Clover UEFI
Install Kexts properly
Using Clover Configurator, mount EFI partition of your drive.
Go to your config.plist, and open it with CloverConfigurator App. Go to System Parameters and set Inject Kexts to Detect.
Now, with Hackintool, we need to install all the kexts that we have in the EFI/CLOVER/kexts/Other folder, to L/E.
Do not remove them anyway from EFI\Clover\kexts\Other.
With “Detect”, in config.plist, the system loads kexts in Other folder ONLY if he notice that VirtualSMC is not load in L/E.
All future kexts must to be properly installed in L/E with Hackintool. 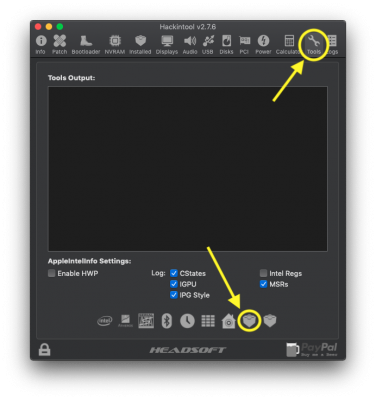

I suggest you, if you can, to not connect the laptop to the internet, we must first install a fake ethernet port for iMessage/FaceTime. If you haven’t another MacBook or Hackintosh where you can fix your DSDT/SSDT files with MaciASL, install your dongle Wi-Fi but afterwards it will be necessary to fix the false ethernet port (after you have installed it) as the main internet connection (en0) – look it in DCPI Manager app. It’s all written in the iMessage guide.
In Clover Bootloader (in the screen where you select the operating system to start), press F4. Now you have your DSDT and SSDT files in EFI/Clover/ACPI/origin folder.
You need to edit your DSDT for enabling fake ethernet port.
IMPORTANT: you need to disassembly your DSDT.aml, edit your DSDT.dsl and recompile it. After you’ve done it, you need to put your new DSDT.aml in EFI/Clover/ACPI/patched folder.
Obviously if you need to modify again your DSDT, you must to take the patched one and decompile it.
If you never patching Laptop DSDT/SSDTs read first RehabMan guide patching laptop DSDT/SSDTs.
- Install NullEthernet.kext in L/E
- Follow the RehabMan guide on GitHub: How to Install (DSDT/SSDT method).
After reboot, verify that your fake Ethernet is setting up on en0 with DCPI Manager app and it’s build-in.
After that, you can install your Wi-Fi dongle or reset plist files in SystemConfiguration folder for reset the ports if you have already used a Wi-Fi dongle.
USB Inject ALL fix
Disabling Fingerprint scanner not recognized, microSD card (cause Sleep-Wake loops problems), Bluetooth/Wi-Fi Card reader. Without disable it, you can’t use an Bluetooth USB dongle.
What to do:
FIRST OF ALL, eject all USB devices.
- Place the USBInjectAll.kext (for port discovery) into EFI/CLOVER/kexts/Other
- ONLY FOR NOW: Go to your config.plist, and open it with CloverConfigurator App. Go to System Parameters and set Inject Kexts to YES.
- Reboot
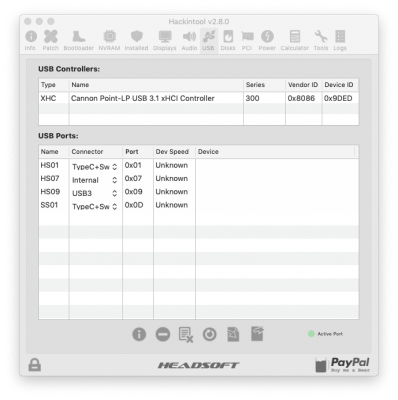
- Run Hackintool then go to General->Installed to check USBInjectAll is installed correctly
- Eg. USBInjectAll: Yes (Release-0.7.1)
- Go to the General->USB tab
- Select the “Clear All” button then the “Refresh” button
- Remove the three green line (it’s Fingerprint, Bluetooth/Wi-Fi, microSD card slot)
- Plug and unplug a USB device into all ports on your system
- The ports that are active will remain highlighted green (set connector to USB3)
- Plug and unplug a Type-C device into all ports
- The ports that are active will remain highlighted green (Set connector to TypeC+Sw)
- Remember the WebCam, enable it and set Connector to Internalfor Cam.
- Delete all ports that are not highlighted green with “Delete” button.
- Use the “Export” button to generate files to your Desktop
- Copy .aml files in EFI/CLOVER/ACPI/patched and kext file in L/E (install it with Hackintool).
- You can now perform a clean up and remove unnecessary files:
- Remove USBInjectAll.kext (from EFI partition)
- Go to your config.plist, and open it with CloverConfigurator App. Go to System Parameters and set Inject Kexts to Detect.
- Reboot
- Run Hackintool and go to the General->USB tab
- Select all items in the USB Ports list and select the “Delete All” then the “Refresh” button
- Now you can check all ports are working correctly
Enable Graphic Acceleration of Intel video card + fixes
Adding hotpatch: SSDT-PNLFCFL.aml to EFI\Clover\ACPI\patched folder from hotpatch folder of RehabMan OS-X-Clover-Laptop-Config-master.
Use Hackintool’s Patch option like this screenshot:
export bootloader config.plist to desktop and with PlistEdit Pro app edit your config.plist adding new lines correctly – simple drag and drop of line that you want put on your config.plist
HDMI PORT FIX
Add this boot argument in config.plist: agdpmod=vit9696
Download HDMI.zip from attached files and open HDMI.plist. Fix your config.plist with PlistEdit Pro app (again, simple drag and drop of the line that you want copy from HDMI.plist to config.plist for adding it)
DISABLING NVIDIA CARD + FIX AFTER SLEEP
Apply Disable from _INIpatch, on SSDT-9-OptTabl.dsl
With correction like the guide: PEG0 to RP05
Apply Disable/Enable on _WAK/_PTS (DSDT)patch, on DSDT.dsl (for Fix After Sleep)
In config.plist go to devices\Audio\ Inject=29, ResetHDA=yes
Remember:
W hen you update system, if your audio isn’t working try to reinstall this kext in L/E. I’ve solved in this way.
When you switch between Windows and Mac, always shutdown system before go to the other operating system. If you startup Mac OS from a reboot in Windows, Audio may be not works.
In config.plist, Devices, Inject audio = 29
Put had_verb in /usr/bin (you can open this folder with terminal: open /usr/bin)
Fix codec from terminal (install ALC Plug Fix):
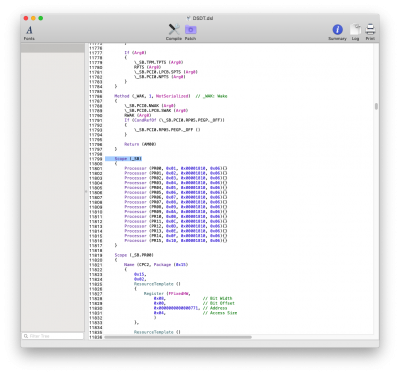
Fallow the guide from point C of this useful guide:
My ACPI ID is: \SB.PCI0.I2C0.TPD0
My changes is underlined in this screenshot, because when I compile my DSDT file, I’ve got some errors.
After that, before restarting
Modify VoodooPS2Controller.kext (the only one installed in L/E, don’t touch VoodooPS2 kext in EFI partition)
- Right click on kext
- Show Package Contents
- Remove in Plugins folder: VoodooPS2Trackpad.kext and VoodooPS2Mouse.kext
Remember to fix KextCache with Hackintool.
Use Mac15,1 in clover SMBIOS
Go to Power section:
1) Fix Sleepimage button
2) Refresh button
All red lines, becomes green.
Tools Section: Tick on Enable HWP
Get AppleIntelInfo and verify the line enableHWP….: 1 – so it’s ok!
Remove all lines in “DisabledAML” section in Acpi section 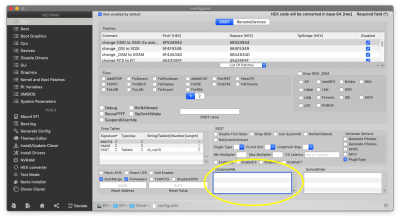
FIX RESET BRIGHTNESS AFTER SYSTEM BOOTS UP -> Installing Fake Ambient Sensor
Download SSDT-ALS0.dsl ->compile in .aml and put in patched folder
Download SSDT-XCPM.dsl, modify, compile and put aml file in patched folder.

I still have this issues(*):
Seeing intel Power Gadget, for a minute the PKG Power stay at 1.8 (with Wi-Fi and Bluetooth on), and another minuter it stay at 2.8. This for an infinite loop. Same thing without Wi-Fi and Bluetooth dongles. (1.6 to 2.6 this time)
Another issue that I have is that at system startup, my brightness level has not been saved. I’ve installed well my emulated NVRAM.
After installed SSDT-ALS0 for fake ambient sensor, I’ve set brightness level to 0 in config.plist. Same thing if, with PlistEdit, I leave the line blank. If I remove the line, at startup I’ve brightness level set to 100%.
Chime Sound at startup
(you can download Chime.aiff at the bottom of the topic)
6 seconds for me is the best setup: Change ThrottleInterval line of com.hackintosh.sound.plist (Use Plist Edit Pro)
Open regedit in Windows and go to
HKEY_LOCAL_MACHINE\System\CurrentControlSet\Control\TimeZoneInformation
Create new dword-32 with name «RealTimeIsUniversal» with «1» value.
If you have a problem with Microsoft Store, modify date to some say before and disable automatic time update. Reboot. Try to re-open MS Store, and enable again automatic data/clock.