2 Ways to Create an ISO from a Bootable USB in Linux
In this article, we will show you how to create an ISO from a bootable USB drive in Linux. We will explain two ways to achieve this: via the command line interface (CLI) and a graphical user interface (GUI) program.
Create An ISO From A Bootable USB Drive Using dd Tool
dd is a commonly used command-line tool for Linux and other Unix-like operating systems, used to convert and copy files.
To create an ISO image from a Bootable USB Drive files, first you need to insert your USB drive and then find the device name of your USB using following df command.
Sample Output
From the output above, you can clearly see that our attached USB device name is /dev/sdb1 .
Now you can run the following command to create an ISO from a bootable USB drive as shown. Make sure to replace /dev/sdb1 with your USB drive and /home/tecmint/Documents/Linux_Mint_19_XFCE.iso with the full name of the new ISO image.
In the above command, the option:
- if – means read from specified FILE instead of stdin.
- of – means write to specified FILE instead of stdout.
Once done, you can verify the ISO image using following ls command as shown.
![]() Create ISO from Bootable USB Using dd Command
Create ISO from Bootable USB Using dd Command
Create An ISO From A Bootable USB Drive Using Gnome Disks
Gnome Disks is a graphical tool used to manage disk drives and media in Linux. It is used to format and partition drives, mount and unmount partitions, and query S.M.A.R.T. (Self-Monitoring Analysis and Reporting Technology) attributes.
If you don’t have gnome-disk utility on your system, you can install it by running the following command.
After successfully installing Gnome disk, search and open it from the system menu or dash. Then from the default interface, select the bootable device from the list of mounted devices on the left-hand pane, by clicking on it and click on disk options. Then click on Create Disk Image option as shown in the following image.
![]() Create a Disk Partition Image
Create a Disk Partition Image
From the dialog window, set the name of the ISO file, its location and click Start creating. Then enter your password to open the bootable device and the process should start if the authentication is successful.
![]() Create ISO from Bootable USB Using Gnome Disks
Create ISO from Bootable USB Using Gnome Disks
That’s it for now! In this article, we’ve explained two ways to create an ISO from a bootable USB drive in Linux. Use the comment form below to share your thoughts with us or ask questions.
If You Appreciate What We Do Here On TecMint, You Should Consider:
TecMint is the fastest growing and most trusted community site for any kind of Linux Articles, Guides and Books on the web. Millions of people visit TecMint! to search or browse the thousands of published articles available FREELY to all.
If you like what you are reading, please consider buying us a coffee ( or 2 ) as a token of appreciation.

We are thankful for your never ending support.
How To Create An ISO From A Bootable USB Drive In Linux
We all know how to create a bootable USB drive from an ISO. We can create bootable USB devices using using dd command, Etcher, Popsicle, Bootiso, MultiCD and Mkusb. Now, we are going to do it reverse. Yes, In this brief tutorial, we will see how to create an ISO from a bootable USB drive that we created already. This will be very helpful when you lost your actual ISO image and wanted to create an additional bootable drive.
Create An ISO From A Bootable USB Drive
This can be easily done using GNOME Disks. As you might already know, Gnome Disks is a graphical utility to manage disk drives and media. It provides the necessary utilities and applications to deal with your storage devices. GNOME Disks comes pre-installed with all GNOME desktop Linux editions by default. If it is not installed by any chance, install it as shown below.
On Arch Linux and its derivatives:
Once installed, plug your USB drive in your system. Then open GNOME Disks utility either from the Dash or Menu.
The default interface of GNOME Disks will look like below.
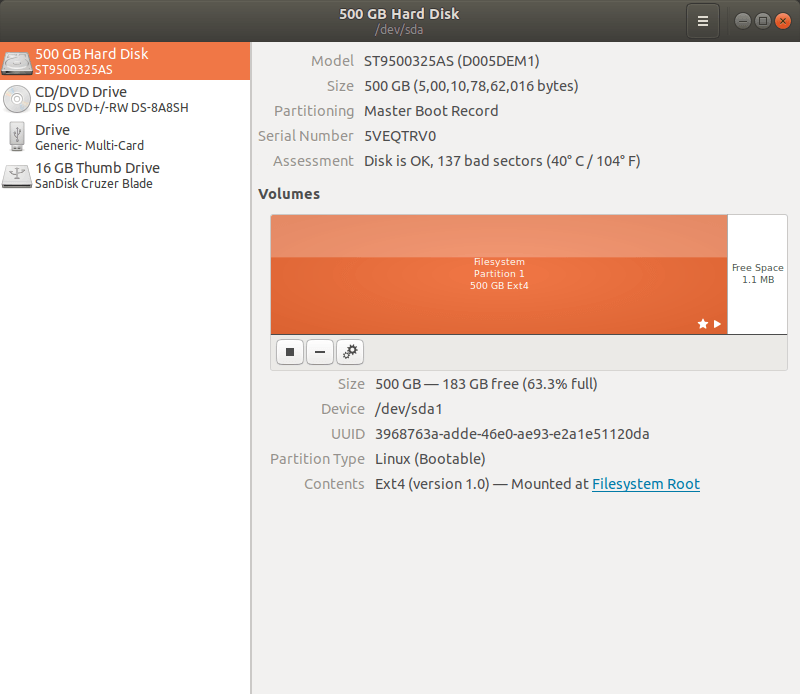
I already have Ubuntu 18.04 bootable USB drive in hand. If you don’t have one, use any one of the USB bootable creators mentioned in the first paragraph.
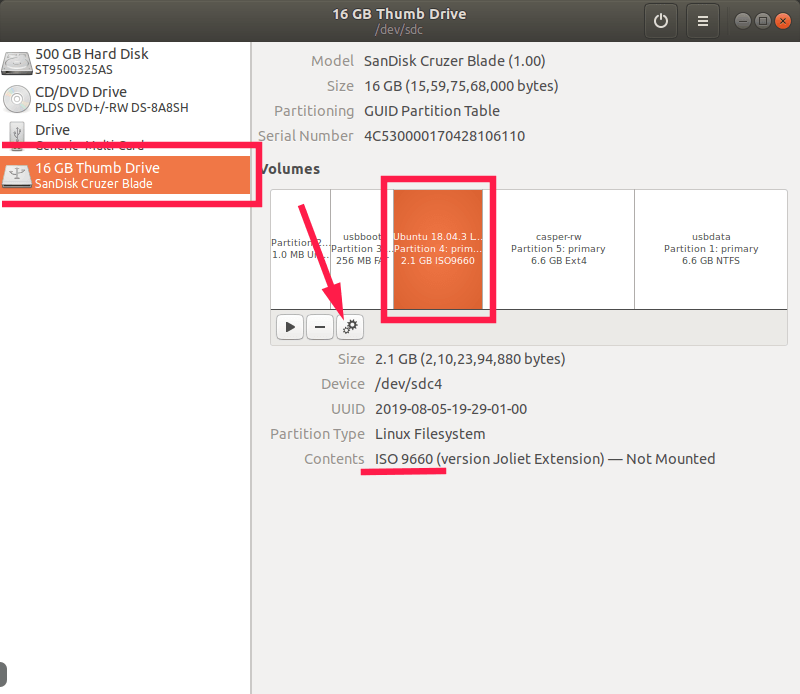
Select the bootable USB drive from the list. Choose the partition that contains the ISO (It is mentioned as ISO 9660). And then click on the Cogs icon. It will look like two gear boxes below the partition. See the arrow mark.
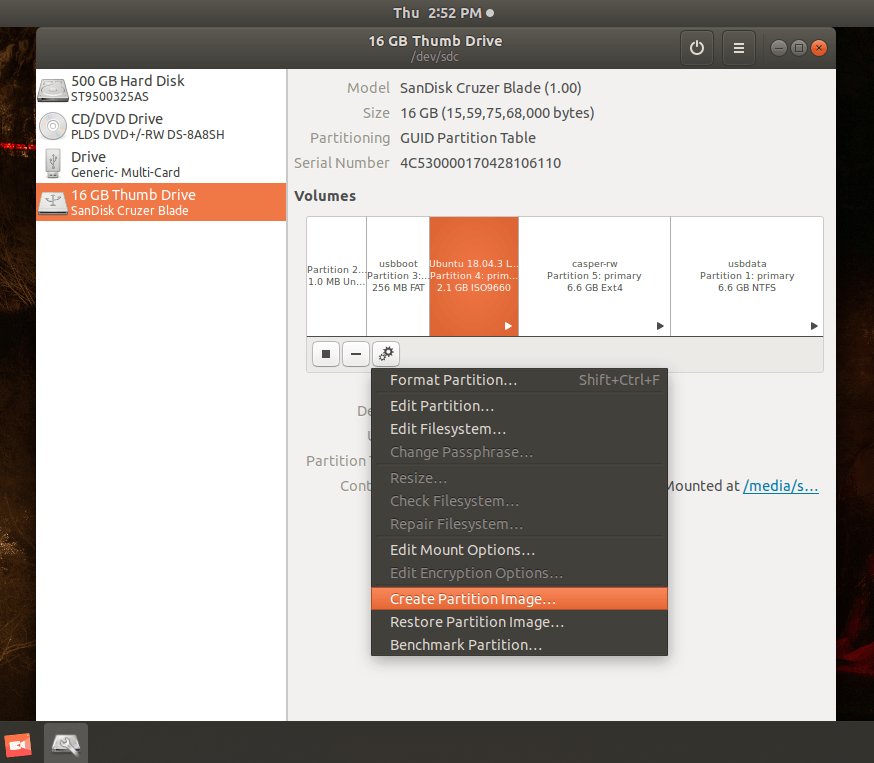
Choose Create Partition Image option from the drop-down list.
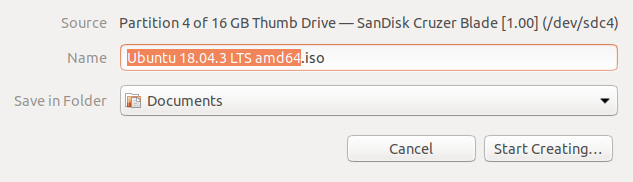
Enter the name and choose the location to save the ISO image. I am going to save it in Documents folder. Finally, click «Start creating» icon.
Now, GNOME Disks utility will start to create an ISO image from the bootable USB drive.
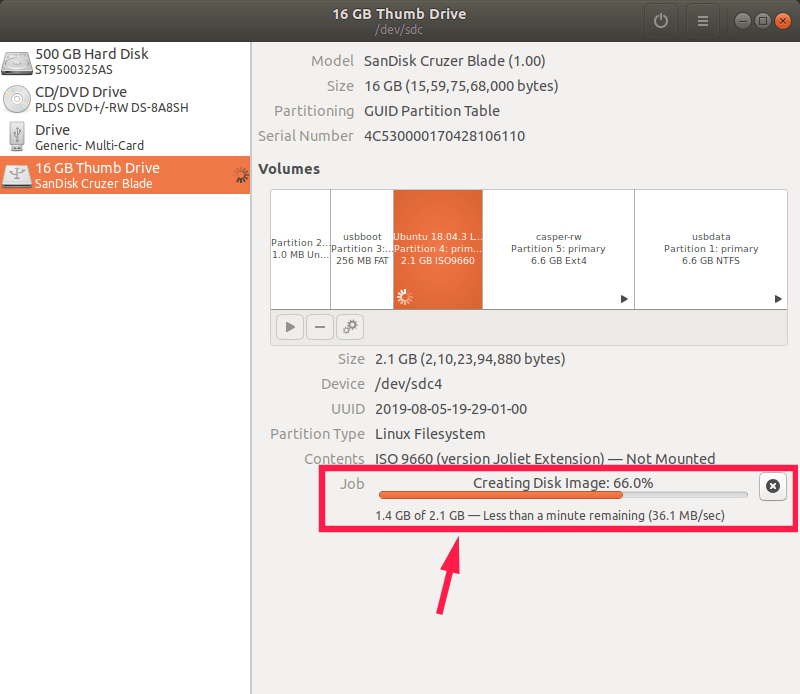
Once bootable USB creation progress is done, go to the location where you saved it and verify if the ISO has been created.
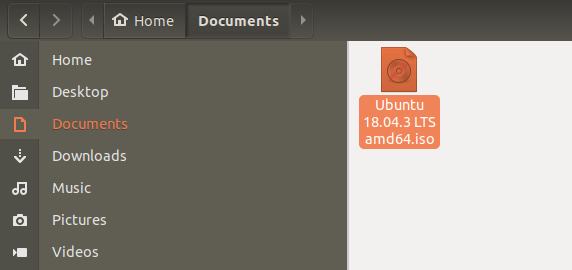
That’s it. We have successfully created the ISO image from a bootable USB drive. Boot your system with the newly created system to check if the ISO image really works or not.
I tested the ISO on VirtualBox and it worked!!
Create entire drive image
The above method will create the partition’s image that contains the ISO. You can also create the entire USB disk’s image.
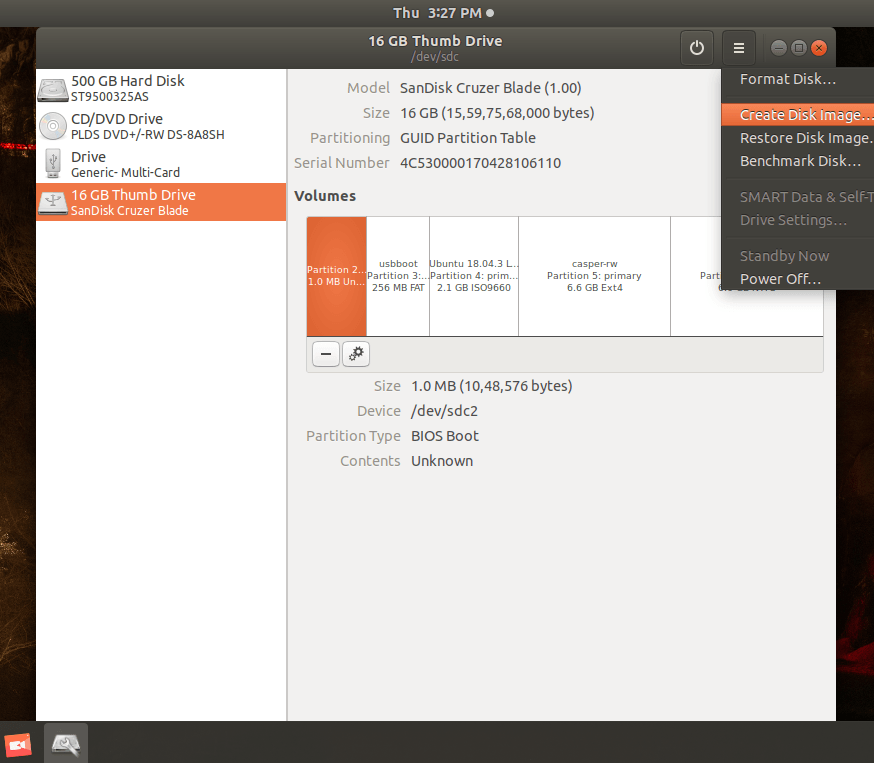
To do so, choose the USB drive from the NOME Disks interface and click the three horizontal lines at the top right corner.
From the drop down box, choose «Create disk image» option, choose the name and location to save the disk image.
The entire disk image will be saved in .img format. You may need to find a suitable application to convert it to ISO format to boot your system.
Create An ISO From A Bootable USB Drive Using dd command
Alternatively, use «dd» command to create ISO image of the USB drive using the following command:
Replace the USB drive letter (i.e. /dev/sdc) with your own.
Sample output:
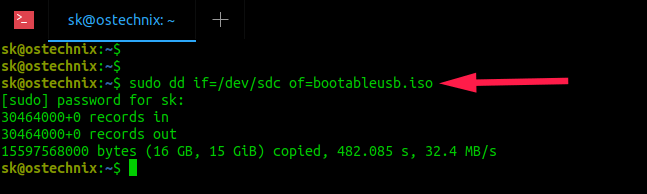
This command will create an ISO image of the contents of the entire USB drive and save it in a file named «bootableusb.iso» in the current working directory. This image is owned by only the root user. Set proper user permission to the newly created ISO file using:
That’s it. Now you have your actual ISO image back. Like I said, this will be helpful in a situation when you lost your ISO image. Just plug your bootable drive, open GNOME Disks utility and create ISO in minutes. If you lost the bootable USB drive, then you have no choice, but download the ISO from Internet.
How to Create a Bootable Windows 10 USB in Linux
Brief: This tutorial shows you how to create a bootable Windows 10 USB in Linux with and without a GUI tool called WoeUSB.
I have talked a lot about creating bootable USB of Linux in Windows. How about the other way round? How about creating a bootable Windows 10 USB in Linux?
If you are uninstalling Linux from dual boot or if you want to reinstall Windows completely or you simply want to have a Windows installation disk ready, you’ll need a bootable Windows 10 USB or DVD.
In this tutorial, I am going to show you how to create a Windows 10 bootable USB in Linux. I am using Ubuntu for this tutorial but the steps should be valid for other Linux distributions as well.
If you want to use WoeUSB graphical tool for creating Windows bootable USB, you can jump to that section directly. Personally, I don’t recommend WoeUSB.
Creating a Bootable Windows 10 USB in Linux

Prerequisite: Get Microsoft Windows 10 ISO and a USB of at least 8 GB in size
You can download Windows 10 ISO from Microsoft’s website. You have to specify the Windows 10 version, language and then you should see the link to download Windows 10.
Note that the Windows 10 ISO download link is valid for 24 hours only. So use a download manager in Linux to download the
5.6 GB file and finish it within 24 hours only.
Since the ISO and its content are more than 4 GB in size, I recommend a USB of at least 8 GB in size.
I have also made a video of this tutorial so that you can see the steps in action.
Step 2: Properly format the USB for creating bootable Windows USB
Insert your USB. You have to format it so make sure that you don’t have important data on the USB key.
In Ubuntu, press Super key (Windows key) and search for ‘Disks’. You have to use this tool to format the USB key.
In the Disks tool, make sure to select your USB drive and hit format.
It will ask to choose a partitioning scheme. It could be either MBR or GPT. Select one of them and hit Format.
It will show you a warning that you data will be erased.
 Format the USB
The formatting of USB is not over yet. Now, you need to create a partition on the newly formatted USB.
Select the entire USB disk as the partition size.
Give a name to your USB and hit Create button.
Once done, your USB should be automatically mounted. It is now ready for creating bootable Windows 10 USB disk.
Files larger than 4 GB?
Newer Windows 10 ISO might have files larger than 4GB. In that case, FAT filesystem won’t work as it doesn’t allow a single file of size greater than 4 GB.
You should then format the USB in ExFAT format. This newer format allows files bigger than 4 GB.
Step 3: Copy the content of the ISO to USB
Now it’s time to copy the content of the Windows 10 ISO to the newly formatted USB.
You may ask, Abhishek, there is only one file and that is the ISO file itself. What are you talking about?
ISO is basically an archive format and you can see it’s content like any zip file in Linux. But to do that, you need to use ‘Disk Image Mounter’ tool that is installed by default in Ubuntu.
Go to your Windows 10 ISO, select it and right click on it. Now select ‘Open with other application’.
In the applications list, select Disk Image Mounter:
The ISO will be mounted. You may not see it in the left sidebar but if you click on the Other Locations, you should see it. Click on it to enter this mounted ISO folder.
You’ll see its content. All you need to do is to select all the files (Ctrl+A), copy it (Ctrl+C) and paste it in the USB drive (Ctrl+V).
Wait for the copying process to finish as it may take some time in copying 4-5 GB of data. Once it’s done, you have a bootable Windows 10 USB in your hand. Take out the USB and use it to any system you want, restart the system and change the boot settings to boot from the USB.
Alternate Method: Creating Windows 10 bootable USB in Linux using WoeUSB
You can also use a Graphical tool called WoeUSB for creating a bootable Windows USB in Linux. However, this tool might not work perfectly all the time. This is why I prefer the first method of mounting the Windows 10 ISO and copying its content to the USB.
If you are interesting in using WoeUSB, you can click on the next section to expand it and follow the steps.
You can also watch a video of creating Windows 10 bootable USB. Do subscribe to our YouTube channel for more Linux videos:
Let’s see how to create a bootable Windows 10 USB in Ubuntu and other Linux distribution.
Step 1: Install WoeUSB application
WoeUSB is a free and open source application for creating Windows 10 bootable USB. It is actually a fork of WinUSB tool that has been discontinued now.
Ubuntu and other Ubuntu-based Linux distributions such as Linux Mint, elementary OS etc have a PPA available. You can use the command below to install WoeUSB:
For other Linux distributions, you can check out the source code from the GitHub repository:
Step 2: Format USB drive
Now, plug in your USB key. You’ll have to format it first. I presume you know how to format a USB key in your Linux distribution.
Ubuntu users can simply right click on the USB and click format.

The important part here is that you should format it in NTFS:

Note: If you use Fat 32 file system for formatting, you may encounter the error below later on:

Step 3: Using WoeUSB to create bootable Windows 10
We have everything ready for us now. Start WoeUSB program.
Browse to the downloaded Windows 10 ISO file and select the USB drive on which you want to install it. Just click on Install to begin the process.

Note that it may take up to 15 minutes in creating the Windows 10 USB. Don’t get fooled by the ‘done’ on the screen.

That’s it. You should see a success message.

Step 4: Using Windows 10 bootable USB
Once the bootable USB is ready, restart your system. At boot time, press F2 or F10 or F12 repeatedly to go to the boot settings. In here, select to boot from USB.

You’ll see that Windows 10 is being booted and it gives you the option to install or repair your system. You know what to do now from here.

I hope you find this tutorial useful for creating bootable USB of Windows 10 in Linux . If you have questions or suggestions, please feel free leave a comment.
Like what you read? Please share it with others.