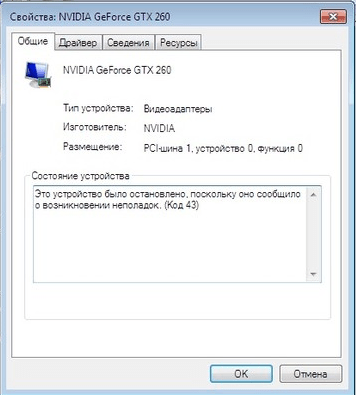
Это устройство было остановлено, поскольку оно сообщило о возникновении неполадок код 43
Ряд пользователей ОС Windows могут столкнуться с ошибкой код 43, при возникновении которой окно работающей программы попросту вылетает. Также можно встретить ошибку «Это устройство было остановлено, поскольку оно сообщило о возникновении неполадок» в ситуации, когда одно из подключенных к системе устройств (например, видеокарта), в Диспетчере устройств отображается со статусом «остановлено». В этом материале я расскажу, что за ошибка, каковы причины её возникновения, а также поведаю, как её исправить ошибку на ваших ПК.
Суть и причины ошибки 43
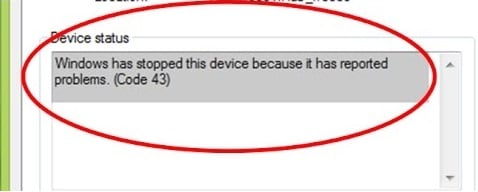
Обычно данная ошибка проявляет себя системными сообщениями «Code 43», «Windows has stopped this device because it has reported problems.» и рядом других аналогов. Компьютер с такой ошибкой может подвисать на несколько секунд, часто подтормаживает при работе с клавиатурой и мышью, и в целом ведёт себя достаточно нестабильно.
Данная проблема обычно возникает в ситуации, когда Диспетчер устройств останавливает какое-либо устройство по причине возникновения неполадок в работе последнего, или когда он вообще не распознаёт определённое устройство (жёсткий диск, видеокарту, внешнее usb-устройство и так далее).
Упомянутые дисфункции могут вызываться следующими причинами
- Проблема с драйверами (последние повреждены, устарели, работают некорректно, наблюдается конфликт драйверов различных устройств);
- Повреждён реестр ОС Виндовс;
- Злокачественное влияние вирусных программ;
- Физическое повреждение ЮСБ-кабеля, с помощью которого внешнее устройство подключается к компьютеру;
- Физическая поломка проблемного устройства (выход из строя чипа видеокарты, поломка платы жёсткого диска и так далее).


Как исправить ошибку «Это устройство было остановлено»?
Так как исправить ошибку 43 на вашем компьютере? Рекомендую выполнить следующий ряд действий:
- Выключите, а затем включите ваш ПК. Нам нужна не просто перезагрузка, а полное выключение вашего компьютера стандартным путём (рекомендую после выключения вообще изъять шнур питания вашего ПК из розетки на минуту, а затем включить его обратно; для пользователей ноутбуков будет актуально изъять на минуту аккумулятор из вашего лептопа). Особенно важно полное выключение компьютера в случае появления ошибки связанной с внешним ЮСБ-устройством;
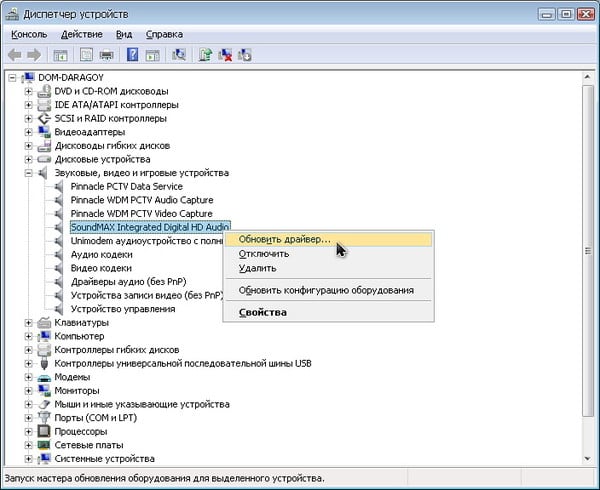
- Переустановите драйвера к проблемному устройству. Нажмите на кнопку «Пуск», в строке поиска наберите devmgmt.msc и нажмите ввод. Найдите проблемное устройство (обычно оно обозначено восклицательным знаком), кликните на него правой клавишей мыши и в появившемся меню выберите «Обновить драйвер».
Также будет актуальным переход на сайт производителя вашего проблемного устройства и скачивание оттуда самых свежих драйверов для него.
Плюс к тому, можно воспользоваться функционалом специальных программ для обновления драйверов (уровня DriverPack Solution) для установки самых свежих драйверов для ваших устройств, это может помочь в вопросе как пофиксить ошибку 43 на компьютере.
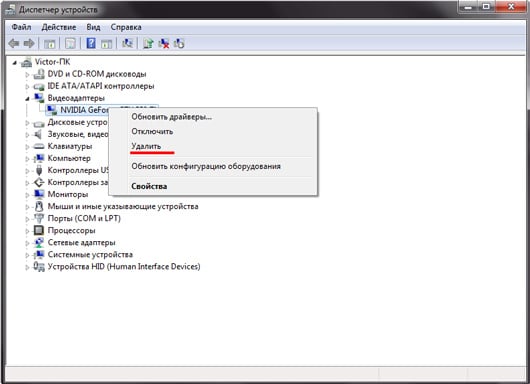
- Удалите, а затем заново установите проблемное устройство в Диспетчере устройств. Зайдите в Диспетчер устройств как было описано выше, найдите проблемное устройство, кликните на нём правой клавишей мыши и выберите «Удалить» (если ошибка наблюдается с USB-устройством, удалите каждое устройство под категорией «Контроллеры USB» (Universal Serial Bus).
Затем нажмите на вкладку «Действие» сверху, и выберите там «Обновить конфигурацию оборудования». Система поищет удалённые вами устройства и заново установит к ним драйвера.
- Если ошибка появилась после инсталляции нового устройства, тогда изымите новое устройство из системы, перезагрузите компьютер, а затем проверьте ваш ПК на наличие ошибки. При конфликте устройств попробуйте поискать другие драйвера к недавно установленному конфликтующему устройству (используйте более новые или старые их версии);
- Проведите проверку системы на наличие вирусов (помогут Dr.Web CureIt!, Malware-Antimalware и ряд других программ);
- Проверьте реестр вашей ОС с помощью специальных программ (CCleaner, RegCleaner и рядом других);
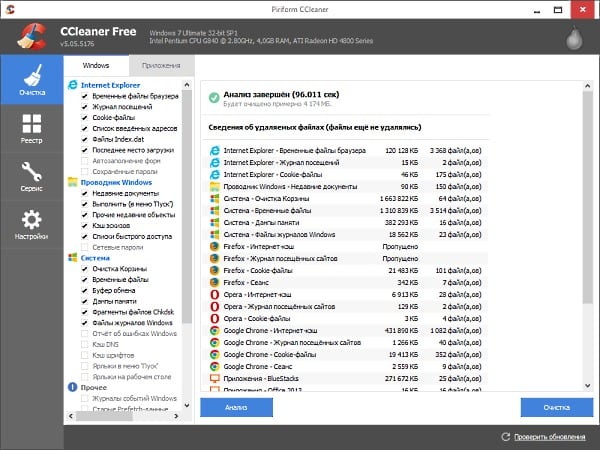 Используйте CCleaner для проверки реестра
- Выполните откат системы на предыдущую точку восстановления. Нажмите на кнопку «Пуск», введите в строке поиска rstrui и нажмите на ввод. Выберите точку восстановления, при которой система работала корректно, и откатите систему на прежний работоспособный уровень, это может помочь избавиться от ошибки «устройство было остановлено» на ПК;
- Установите сервис-пак для вашей ОС (при условии его отсутствия в вашей версии ОС). Сервис-паки часто содержат исправления возможных системных ошибок, в том числе и рассматриваемой мной ошибки код 43;
- Если вы подключаете внешнее ЮСБ-устройство с помощью кабеля, попробуйте сменить сам кабель;
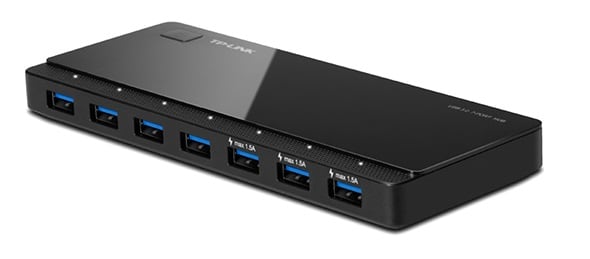
- Приобретите мощный ЮСБ-хаб. Некоторые внешние устройства ЮСБ требуют более мощное питание, нежели предоставляют обычные порты ЮСБ. Покупка usb-хаба может исправить данную проблему;
- Обновите БИОС, в некоторых случаях устаревший БИОС также может быть причиной появления дисфункции;
- Проверьте ваше устройство на вероятность физической поломки в ближайшем сервисном центре, вполне возможно, что оно попросту вышло из строя.
Заключение
Основная причина ошибки 43 «Это устройство было остановлено» — неполадки с драйверами определённого устройства, вследствие чего последнее перестаёт нормально функционировать, вынуждая систему приостановить его работу. В таком случае рекомендуется обновить драйвер к устройству, скачав последний на сайте производителя, а если это не помогло – выполнить весь перечень упомянутых выше советов.
Fix: NVIDIA Code 43 (Windows has stopped this device because it has reported problems)
Code 43 usually means that the required device is unidentifiable. The computer tries to access and synchronize correctly with the device but fails to do. This usually occurs when you install a new driver, install a new update, or are running Lucid Virtu MVP.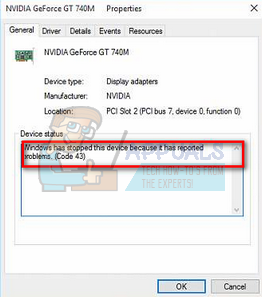
We will start by checking if the graphics card is inserted correctly into the slot. Then we will move on to software solutions including uninstalling the device and install the default drivers. In the last stage, we will update the BIOS of your computer also tweak around Windows Update.
Solution 1: Checking if the Graphics Card is inserted correctly
Before we move on to diagnosing the problem through software workarounds, you should first check if the graphics card is inserted correctly inside its slot. Press it firmly and make sure all the pins are inserted firmly. If you have a laptop, just perform the power cycle as explained below.
- Press Windows + R, type “devmgmt.msc” in the dialogue box and press Enter.
- Once in the device manager, expand the category of “Display adapters”, right-click on your device and click “Disable”.

- Now turn off your computer. Take out the battery (in case of a laptop) or take out the main power cable (in case of a PC).
If you have a PC, open its lid and make sure that the graphics adapter is inserted perfectly into the pins.
- After performing the above steps, start your computer back, enable the hardware the same way we disabled it, and check if it is working correctly.
Solution 2: Uninstalling Lucid VIRTU MVP Software
After the latest Windows update, NVIDIA issued an official statement that the software Lucid VIRTU MVP isn’t compatible with NVIDIA devices and is causing discrepancies which are resulting in various problems including the one we are experiencing. This software primarily allows you to switch between your onboard graphics and your discrete graphics card. It is a very useful tool but it seems it isn’t workable with NVIDIA software.
- Press Windows + R, type “appwiz.cpl” and press Enter.
- You will see all the applications installed on your computer in front of you. Search through them for “Lucid MVP” software, right-click it and select “Uninstall”.
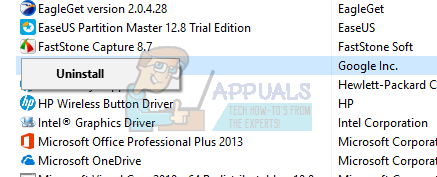
- After uninstalling the application, restart your computer and check if the problem got solved. If the hardware still gives an error 43 code, try disabling it and then re-enabling it.
Note: Also, make sure to completely uninstall “UPSilon 2000” software or any other application that you installed prior to getting this error.
Solution 3: Installing Latest Windows Update
Windows roll out important updates targeting the bug fixes in the operating system. One of the bugs in our case; NVIDIA hardware giving the error message. If you are holding back and not installing the Windows update, we strongly recommend that you do. Windows 10 is the latest Windows operating system and new operating systems take a lot of time to get perfect in every regard.
- Press Windows + S button to launch your start menu’s search bar. In the dialogue box type “Windows update”. Click the first search result which comes forward.

- Once in the update settings, click on the button which says “Check for updates”. Now Windows will automatically check for updates available and install them. It may even prompt you for a restart.
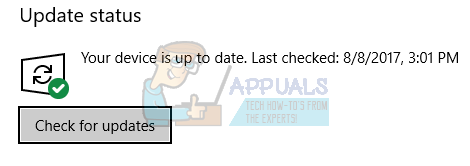
- After updating, restart your computer and check if your issue got fixed.
Solution 4: Installing Default Graphics Drivers
Faulty Graphics drivers are also known to be a cause of this issue. Drivers are the main driving force behind any hardware connected to your computer. If they are corrupt or outdated, it may cause the error to pop-up again and again.
We will start your computer in Safe Mode and delete the currently installed drivers for your display card. Upon the restart, the default display drivers would automatically be installed upon the detection of your display hardware.
- Follow the instructions on our article on how to boot your computer in safe mode.
- Once booted in the safe mode, right click on Windows key and select Device Manager from the list of options available.
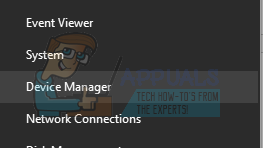
Another way to launch the device manager is by pressing Windows + R to launch the Run application and typing “devmgmt.msc”.
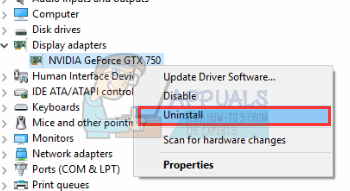
- Once in the device manager, expand the Display adapters section and right click on your display hardware. Select the option of Uninstall device. Windows will pop a dialogue box to confirm your actions, press Ok and proceed.
Now restart your device. Now check if the error is resolved.
Solution 5: Updating/Rolling back Drivers
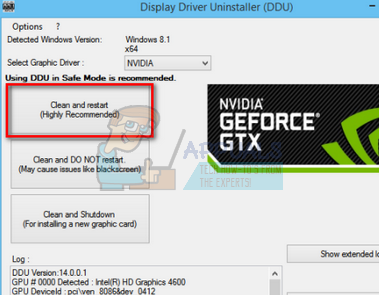
If all the above solutions don’t work, we can try updating the graphics driver. It may be possible that your graphics driver is not properly configured or is outdated. We need to completely delete all driver files before we install the new driver, therefore, we need to use the utility Display Driver Uninstaller. You can download the utility over the internet easily.
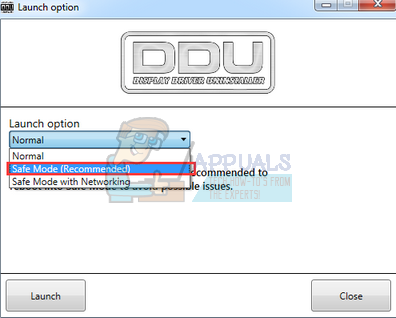
- After installing Display Driver Uninstaller (DDU), launch your computer in safe mode. You can learn how to boot your computer into safe mode by reading our article on it.
- After booting your computer into safe mode, launch the application which was just installed. Choose the option Safe Mode.
- After launching the application, select the first option “Clean and restart”. The application will then automatically uninstall the installed drivers and restart your computer accordingly.
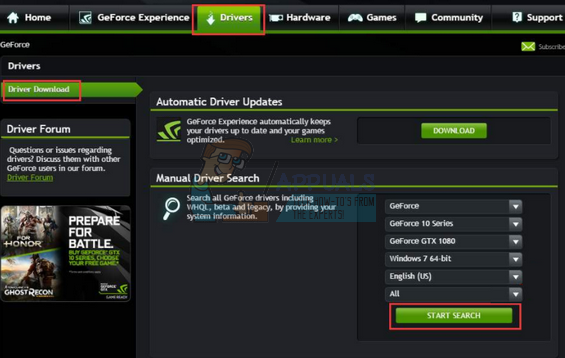
- Boot your computer into normal mode and launch the application. Launch the GeForce Application, open the “Drivers” tab and click the button “Driver Download”. Enter your specification on the right side of the screen and click “Start search” for the application to search for the optimal drivers for your computer.
- After the driver is updated, restart your computer and check if the problem got solved.
If installing the latest drivers don’t work (like in many cases), you should perform the following steps to make sure that the drivers don’t get updated automatically by Windows Update and install a driver of a previous version.
- Press Windows + S to launch the search menu of your start bar. Type “system” in the dialogue box and select the first item which returns in the result.
- Once in the system, click on “Advanced system settings” present at the left side of the screen.

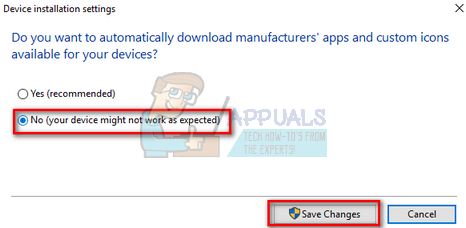
- Navigate to the Hardware tab and click on “Device installation Settings”.
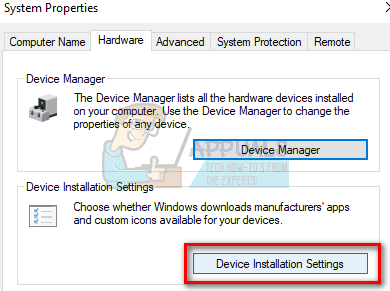
- Select the option of “No (your device might not work as expected)”. Press Save changes and exit. This will disable the Windows update from updating your graphics drivers automatically.
- Now press Windows + X to launch the quick start menu and select “Device Manager” from the list of options available.
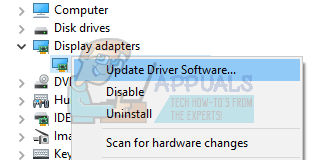
- Once in the Device manager, expand “Display adapters” category. Right-click on the hardware and select “Update Driver Software…”.
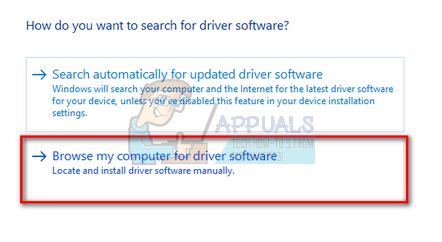
- Select the second option “Browse my computer for driver software”. Now navigate to the location where you downloaded the driver package and install it.
- After installing it, reboot your computer completely and check if the problem at hand got solved.
Solution 6: Updating your BIOS
BIOS stands for Basic input/output System and it is a firmware used to perform the hardware initialization during the booting process of your computer. The BIOS system is preinstalled on your computer by your manufacturer and it is the first software that runs when your computer is started up. It is more like a key that starts all other processes on your computer.
The BIOS is also responsible to test hardware components on your PC and make sure that they are working properly without any errors. Most of the BIOS are designed specifically to work with a specific model or motherboard. Traditionally, BIOS was written in ROM and hardware needed to be replaced when updating the BIOS. In modern computer systems, BIOS is stored in flash memory so it can be rewritten without the menace of replacing the hardware.
There were numerous reports that updating the BIOS of the computer solved the problem instantly but we kept it is a last resort as it is very technical. Backup your data completely before resorting to this solution. Also, consider reinstalling your BIOS even if it is updated to the latest build. We have a number of different articles targeting how to update the bios of your machine (search this site for bios update).
Solution 7: Checking Graphics Card Authenticity
In some cases, the Graphics card that you are using might be fake or a dud. Therefore, in order to verify its authenticity, note down the exact make and model of your Graphics card and check online for its normal speeds. Now, download GPU Z and run the executable to install it. After installing, check to see if your card is original or not. If it isn’t original and just a custom BIOS has been flashed on it, return it to the place where you bought it and get a new one.
Note: Also, it is recommended that you try to clean the GPU and reinstall its thermal compound as according to some reports it has helped some users in fixing this issue.
Solution 8: Install Latest Java Version
In some situations, it is possible that the Java Version on your computer might be outdated due to which this issue is being triggered when Nvidia tries to check for your hardware. Therefore, make sure to download and install the latest version Java from here.