Installation guide for OpenVPN Connect Client on macOS
This guide is meant for users of the OpenVPN Access Server product that wish to connect their macOS computer using the official OpenVPN Connect Client software. In the steps outlined below we’ll take you through the process of obtaining the OpenVPN Connect Client from your Access Server’s web interface, and installing and using it on the macOS operating system. Aside from some minor differences due to different versions of software used this guide should be accurate and easy to follow. Each step can be clicked to show a screenshot for that particular step in the installation process. Each screenshot can be clicked to reveal an image gallery you can follow to go through all the steps.
You will need to have a valid set of credentials, like user name and password, and of course the address of your OpenVPN Access Server. If you are not the administrator of the Access Server you are going to connect to, then you should contact the administrator of this server to obtain this information. We here at OpenVPN Inc. cannot provide this information, since we do not manage servers run by our customers. If you are the administrator of your Access Server, you can create new user accounts using the admin web interface of the Access Server or the external authentication backend you have configured, and then use those credentials to obtain and install the OpenVPN Connect Client on macOS.
The OpenVPN Connect Client for macOS, latest version, currently supports these operating systems:
- OS X 10.8 Mountain Lion
- OS X 10.9 Mavericks
- OS X 10.10 Yosemite
- OS X 10.11 El Capitan
- macOS 10.12 Sierra
- macOS 10.13 High Sierra
- macOS 10.14 Mojave
Downloading and installing the OpenVPN Connect Client for macOS
Connecting to Access Server with macOS
The OpenVPN protocol is not one that is built into macOS. Therefore a client program is required that can handle capturing the traffic you wish to send through the OpenVPN tunnel, and encrypting it and passing it to the OpenVPN server. And of course, the reverse, to decrypt the return traffic. So a client program is required. We advise our official OpenVPN Connect Client that comes bundled with the OpenVPN Access Server. But alternatives are also available.
The simplest one, and the one that comes with OpenVPN Access Server itself, is called OpenVPN Connect Client. This program is purposefully limited in its functionality in the sense that it only supports one active VPN tunnel at a time. Trying to connect to two different servers at the same time is a function we did not build into our official OpenVPN Connect Client. This was done on purpose. Connecting to two servers at the same time means there are two different adjustments made to the routing table on the client computer. It is very easy therefore to make a mistake and break connectivity or cause traffic to flow to the wrong target. Limiting this to one server makes this much less likely to go wrong. The OpenVPN Connect Client is able to remember multiple different servers, but only one can be actively connected at a time.
This is the official program that we recommend and support for OpenVPN Access Server and OpenVPN Cloud. This new OpenVPN Connect v3 client software offers client connectivity across 4 major platforms. On Windows, macOS, Android, and iOS, we now have a new client interface with new functionality.
Please note that we recommend that you download the OpenVPN Connect Client through your OpenVPN Access Server, as it will then come prepared with the correct settings to make a connection to your Access Server. You can download it by going to the client web interface of your OpenVPN Access Server and logging in as a valid user. You will then be offered the option of downloading the OpenVPN Connect v3 client for macOS. It is also possible to obtain a copy of a completely blank installer for OpenVPN Connect software below, but this installer will not contain any connection settings so you will have to take additional steps after installation to configure your OpenVPN Connect software to make a connection to your Access Server. If you are installing the file below on a computer that already has OpenVPN Connect v3 installed and configured, it will simply update it to the new version while retaining all settings.
OpenVPN Connect v2
This is the previous generation of OpenVPN Connect client software for OpenVPN Access Server. It is still supported but we recommend people to use OpenVPN Connect v3 instead.
Alternative: OpenVPN open source Tunnelblick program
The open source project has a client for the macOS operating system as well. It is called Tunnelblick and it is less limited in functionality than the OpenVPN Connect Client because it does support the option to connect to multiple OpenVPN servers at the same time.
On the other hand, it does miss some features that Connect Client does have as well like Python support for post-auth scripting and other functions that integrate Connect Client with Access Server, like the ability to import connection profiles directly from an Access Server, or the ability to authenticate any valid user on your Access Server and have them connect without having to install a connection profile for each separate user account. This is accomplished on the Connect Client with a universal server-locked profile which is not supported by the OpenVPN GUI program.
This program supports drag and drop to place OpenVPN connection profiles into Tunnelblick. These can be of .conf or .ovpn file extension. You can for example download a user-locked or an auto-login profile from the OpenVPN Access Server web interface, and drag and drop it on the Tunnelblick icon. The tray menu in the system tray will then show you options to use this connection profile – to start or stop the connection. Server-locked profiles are not supported, as mentioned earlier.
This program does support connecting to multiple OpenVPN servers at the same time, but there is a catch. You have to be careful not to implement conflicting routes and subnets when connecting to multiple OpenVPN servers at the same time. Unlike on Windows platform however, you do not need to worry about adding multiple virtual network adapters. These are provisioned automatically.
It can be obtained from the Tunnelblick website.
Alternative: Viscosity OpenVPN client
Another good OpenvPN client created by an external party, SparkLabs. It is available for Windows and macOS. It is compatible with OpenVPN Access Server.
It can be obtained from the SparkLabs Viscosity website.
Настройка OpenVPN в macOS
Настройка для Tunelblick
Если ваша версия macOS старшее MacOS X Leopard, вы можете воспользоваться клиентом OpenVPN Tunnelblick.
Tunnelblick также работает и на современных версиях macOS. Для настройки работы Tunellblick выполните следующие действия:
1. Скачайте инсталятор OpenVPN Tunnelblick и установите его.


2. Распакуйте конфигурационные файлы, выданные техподдержкой. Вы также можете их скачать в личном кабинете.
3. Откройте файл с конфигурационного файла ovpn в программе Tunnelblick.

4. Выберите в меню Tunelblick пункт Connect config. При запросе логина и пароля, ввести их, взяв из файла pass.txt,
который также был в архиве с конфигурационными файлами.


5. Для проверки работы сервиса, можете обратитесь к странице https://whoer.net/ru. В отчете Вы можете увидеть текущий IP-адрес.
После окончания работы с VPN, кликните в меню Tunelblick выберите Disconnect config.
Настройка для Viscosity
Если у Вас Mac OS X Leopard или новее, наиболее удобной в использовании является клиент OpenVPN Viscosity.
В этом случае настройка VPN-сервиса сводится к следующим действиям:
1. Скачайте последнюю версию программы Viscosity и установите.
2. Распакуйте конфигурационные файлы, доступные в ваших заказах, в любой каталог.

3. Откройте конфигурационный файл ovpn в программе Viscosity.

4. Далее в верхнем меню рядом с часами кликаем на икноку Viscosity и в выпадающем меню программы выбираем Connect,
в диалоговом окне вводим имя пользователя и пароль (находятся в файле pass.txt в архиве в Ваших заказах).
5. Для проверки работы сервиса, можете обратитесь к странице https://whoer.net/ru. В отчете Вы можете увидеть текущий IP-адрес.
После окончания работы с VPN, кликните в меню Viscosity выберите Disconnect.
Контакты
 244-436
586-534-216
 openvpn@jabber.ru
  support@openvpn.ru
Tunnelblick — OpenVPN клиент для Mac OS X

Продолжаю знакомить своих подписчиков с защищенными канала связи. Недавно публиковался пост про установку OpenVPN сервера и клиента на роутер с прошивкой DD-WRT. Сегодня хочу рассказать о настройке OpenVPN клиента на macOS, что позволяет легко и безопасно связываться с удаленным офисом, собственным домом или любым сервером, на котором настроен OpenVPN.
Собственно, углубляться в подробные повествования тут особенно не нужно, настройку OpenVPN клиента для Windows я описывал ранее в блоге. В Mac OS X все еще проще. Есть замечательный бесплатный клиент — Tunnelblick.
- Первым делом создаем папку (где удобно) в которую положим наш файл конфигурации VPN соединения и ключи
- Создаем в этой папке сам файл конфигурации .ovpn (подробнее читайте OpenVPN клиент для Windows)
- Туда же положим клиентcкий ключ и сертификаты клиента и сервера (client.key, client.crt, ca.crt).
- Даем папке расширение .tblk
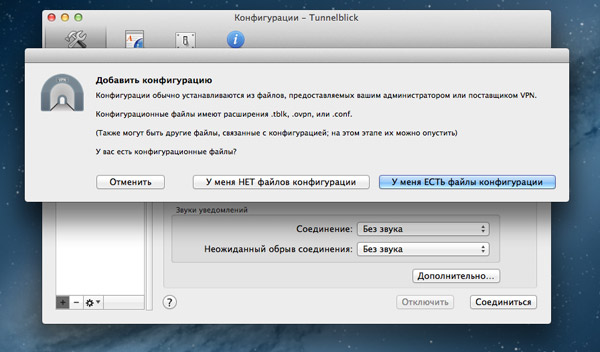
Остается только добавить созданную конфигурацию в программу Tunnelblick:
Хочу заметить, что Tunnelblick прекрасно воспринимает и стандартные настройки конфигурации, как это делалось в Windows, но разработчики рекомендуют использовать формат .tblk
Если считаете статью полезной,
не ленитесь ставить лайки и делиться с друзьями.
Комментариев: 5
Тоже пользуюсь на Маке этой прогой, удобнее openvpn-gui под windows
Подскажите, пожалуйста, как его удалить?
Корзина отказывается очищаться, говорит, у меня прав нет.
Удаляется как и любая программа на маке простым перемещением в корзину. Перед удалением проверьте не запущена ли программа, иначе не удалите.
Не правда ваша. Для удаления необходимо скачать скачать специальную программку с их сайта. Запускаете ее и она удаляет его.
Алексей, не вводите людей в заблуждение. Всё прекрасно удаляется без каких-то дополнительных скачиваний. Вы сперва выгрузите программу из памяти выбрав пункт «Выйти из Tunnelblick», после чего она спокойно удаляется из программ.