How to Install Cisco Packet Tracer 7.2.2 on Linux Mint 19.3
You can easily install and use the Cisco Packet Tracer network simulator program developed by Cisco on Linux distributions.

How to Run Cisco Packet Tracer 7.2.2 on Linux Mint
Linux Mint 19.3 Tricia was released on December 18, 2019, and support will be provided for this version until 2023.
As you know, the latest version of Packet Tracer, the most popular network software program used to prepare for Cisco exams, was recently released by Cisco Networking Academy.
The most current version of the CPT network simulator program is 7.2.2. This version can be downloaded from the official site of Netacad.com . If you do not have a Cisco Netacad account, click here to create a new one.
Although Packet Tracer 7.2.2 includes many improvements, some Linux distributions require additional dependent packages to work properly.
This time, the Cisco team created a GUI installation interface for Packet Tracer, allowing users to install more easily on Linux systems.
In our previous articles, we have installed and run CPT on other Linux distributions;
If you are using a Windows 10 operating system, click here to install it.
How to Install and Configure Packet Tracer 7.2.2
To install and run CPT 7.2.2 on the latest version of Linux Mint 19.3 Tricia or 19.2, follow the steps below in order.
Step 1
Copy the .run installation file to your desktop and then open Terminal. Switch to root access on the terminal and run the following commands to start the installation.

Step 2
Click Next in the Packet Tracer Setup GUI window to continue.

Step 3
Click Next without changing the installation folder.

Step 4
Select I accept the license to accept the license agreement of the program, and then click Next.

Step 5
In the Ready to Install window, click the Install button to start the installation.

Step 6
After completing the installation, click the Finish button to exit the wizard.

Step 7
Now run the “packettracer” command on the terminal and try to open the simulator program. The CPT program will not open as shown below! Because you need to install a dependent package.

Step 8
You need to install the libpng package for Packet Tracer, otherwise, the program will not run on your system. Run the following commands in the terminal to download and install libpng.

Step 9
The next time you run CPT, the program will launch successfully!

Step 10
To log in to the program without logging in to Cisco, click the Guest Login button and wait 15 seconds, then click Confirm Guest to log in!

Step 11
You can check if the Packet Tracer version is 7.2.2 in Help / About.

Video
You can watch the video below to install the Cisco simulator program step by step on your Linux computer and also subscribe to our YouTube channel to support us!
How to Install CPT 7.2.1 on Linux Mint 19.1
You can follow the steps below to install the Cisco Packet software on the 19.1 version of Linux Mint.
Step 1
First, edit the source.list of your Mint 19.1 system as follows.
Press Ctrl + X / Y / Enter keys to save your changes.

Step 2
To extract the CPT 7.2.1.tar.gz file to the folder, create a folder named CPT72 with the mkdir command.
Then, run tar -xvzf Packet\ Tracer\ 7.2.1\ for\ Linux\ 64\ bit.tar.gz -C CPT72/ to extract the installation files to the folder.

Step 3
Go to the CPT72 folder and run the ./install command to start the installation.

Step 4
After installing the simulator software, execute the command ./PacketTracer7 on the Terminal to start the program.
If you encounter the libpng12-0 error as in the image below, you will need to install the libpng package for Linux Mint 19.

Step 5
To install the libpng package in Mint, execute the following commands in the Terminal.

Step 6
After installing libpng, you can now run CPT 7.2.1 on your system!

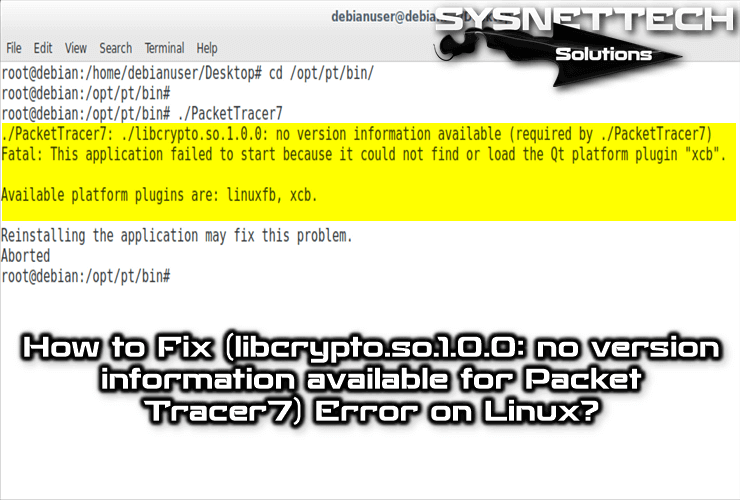
If the program is running, but you are getting libcrypto.so.1.0.0 error, click on the image below to see our article.
Step 7
After you correct the libcrypto error, you will no longer see a warning in Terminal when you run the program. You can check the CPT version in Help / About.

Creating a Desktop and Start Menu Shortcut
It’s not as easy as creating a start menu for a program on a Windows operating system. However, it may not be possible to create a desktop and start menu shortcuts for some programs on Linux operating systems.
On Linux platforms, some applications’ shortcuts don’t work, and as a result, you need to manually create a new desktop shortcut.
After installing Packet Tracer 7.2.1, a program shortcut is not automatically created on the desktop and in the start menu. So you can fix the shortcut problem with a few commands.
Follow the steps below to create a desktop and start menu shortcut.
Step 1
Because Packet Tracer software is installed on /opt/pt/ on Linux systems, you need to copy the Cisco Packet Tracer.desktop file from /opt/pt/bin/ to the desktop.
Open Terminal by pressing Ctrl + Alt + T together and create a desktop shortcut for Packet Tracer using the following commands.

Step 2
To create a Start Menu Launcher in Linux Mint, use the command below.

NOTE: If the shortcut still does not work, open the Cisco Packet Tracer.desktop file with gedit and change the EXEC value to Exec=/opt/pt/bin/PacketTracer.
Video
You can watch the video below to install simulator software on Linux Mint 19 (Tara) Cinnamon 64 Bit and also subscribe to our YouTube channel to support us!
How to Install CPT 7.1.1 on Linux Mint 18/19
You can follow the steps below to install the Cisco simulator 7.1.1 on versions 18.X or 19.X of Linux Mint.
Step 1
Open the terminal and run sudo su to access root. Then, extract the .tar file to the PacketTracer711 folder.
You can use mkdir to create a folder on Linux.
Use the command below to extract the Packet Tracer 7.1.1.tar file to the folder.

Step 2
Go to the PacketTracer711 folder on the terminal and list the files in the folder using the ls command.
Then, run the ./install command to start the Packet Tracer installation on Linux. To accept the license agreement, press Enter.

Step 3
To read the Cisco simulator 7.1.1 license agreement quickly, press the Space key.

Step 4
Packet Tracer installation on Linux 18 completed successfully!

Step 5
To run the program, first go to cd /opt/pt/bin/ and execute ./PacketTracer7.

Step 6
If you receive libQt5Multimedia.so.5 error when you try to start Packet Tracer, perform the following commands in Terminal, respectively.

Step 7
After installing the above packages, restart Packet Tracer, and it will open as you can see in the image below.

Step 8
Click the Guest Login button to log in to Packet Tracer 7.1.1.

Step 9
After waiting 15 seconds, click the Confirm Guest button to confirm the login.

Step 10
The installation of CPT 7.1.1 on the Mint operating system has been completed successfully!

How to Uninstall Packet Tracer
You can use the Software Center to uninstall a program installed on Linux. You can also use the Synaptic Package Manager.
However, if you cannot see and uninstall a program you have installed on Linux on Synaptic Package Manager, you will have to use Terminal.
Follow the steps below to completely uninstall / delete Packet Tracer simulator from Mint OS.
Step 1
After turning on your system, open the terminal on the desktop and execute sudo su command to access Root, then type your root password and press Enter.
To uninstall Cisco Packet Tracer on Linux, run rm -r /opt/pt/ at the Terminal.

Step 2
After uninstalling the Cisco Packet Tracer on Linux, try to open the program by double-clicking the shortcut on the desktop. You will see that the Packet Tracer does not open as shown in the image below.

Step 3
Use the following commands to remove the start menu shortcuts of Packet Tracer.

Step 4
Check that the shortcut of the program is in the start menu.

Step 5
To remove the icon from the Packet Tracer, run rm /usr/share/icons/hicolor/48×48/apps/pt7.png.

Step 6
To remove the Packet Tracer desktop shortcut, run the rm Cisco-Packet Tracer.desktop command.

Video
Final Word
In this article, we have examined how to install and run the latest version of the Cisco Packet Tracer on the Mint distribution. We’ve also explored how to download and install some additional packages that require new versions. Thanks for following us!