Установка BlackArch, часть первая: Установка BlackArch в VirtualBox
Здесь будет показана подготовка виртуальной машины VirtualBox для установки BlackArch. Сама установка будет описана в следующей части. Т.е. если вы ставите на реальный компьютер, то эту часть пропускайте и переходите к следующей.
Установка на реальный компьютер мало чем отличается, но будьте очень внимательны с разметкой дисков — одна ошибка и можете стереть целый диск с важной информацией.
Прелесть установки в виртуальный компьютер в том, что мы не можем ничего испортить — мы в полностью изолированным окружении.
Если у вас ещё нет VirtualBox, то скачайте и установите его (только с официального сайта!): https://www.virtualbox.org/wiki/Downloads
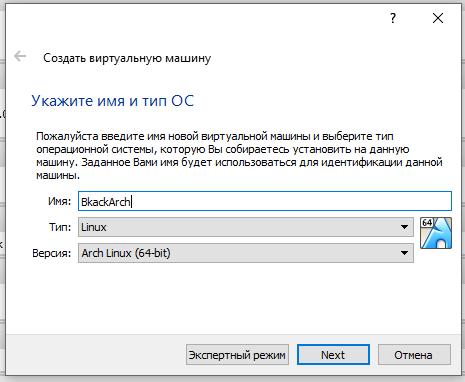
В VirtualBox нажмите кнопку «Создать» (такая большая синяя мохнатая точка). Введите Название и выберите «Тип» и «Версию»:

Название можете выбрать любое.
Далее у нас спрашивают, сколько оперативной памяти мы хотим выделить виртуальной машине. Помните, что на время работы виртуальной машины, выделенная ей память, будет недоступна в вашей основной ОС. Нам предлагают выделить 768 мегабайт, но я увеличиваю это количество:

Нам нужно создать новый виртуальный диск, поэтому в следующих трёх окнах ничего не меняем:


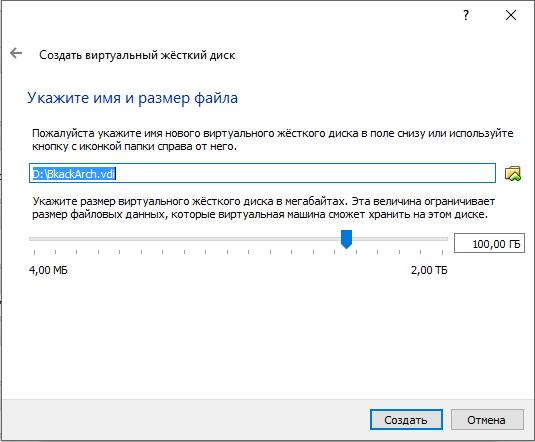
А здесь устанавливаем размер. Не жадничайте — диск будет расширяться по мере записи в него данных. Т.е. то, что я указал 100 гигабайт не означает, что прямо сейчас он займёт 100 гигабайт. А вот если вы укажите 8 гигабайт, и место закончиться, то виртуальную машину можно считать безвозвратно испорченной. Также укажите место, куда вы его хотите сохранить:

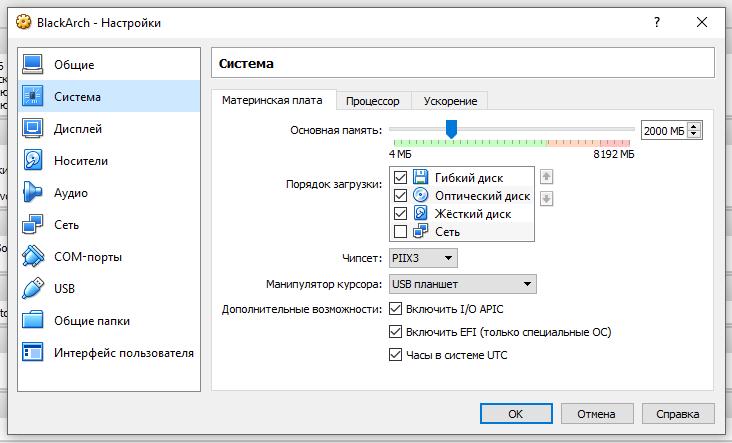
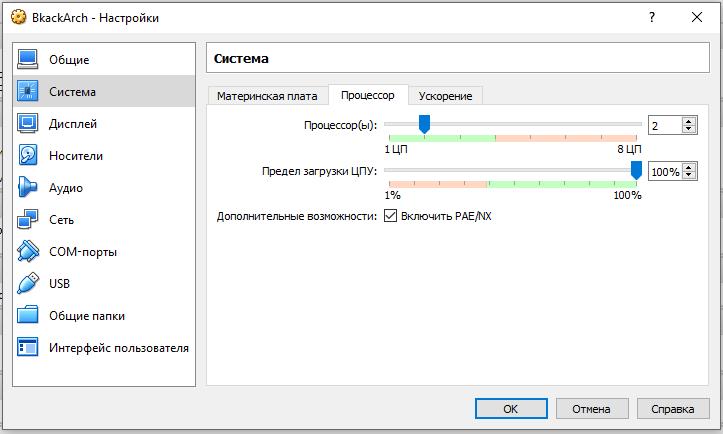
Всё виртуальная машина создана и её можно запускать. Но я предпочитаю сделать небольшой тюнинг. Выделите вашу виртуальную машину и нажмите «Настроить». Далее я перехожу в «Система», «Процессор» и добавляю ещё одно ядро и ставлю галочку «Включить PAE/NX»:

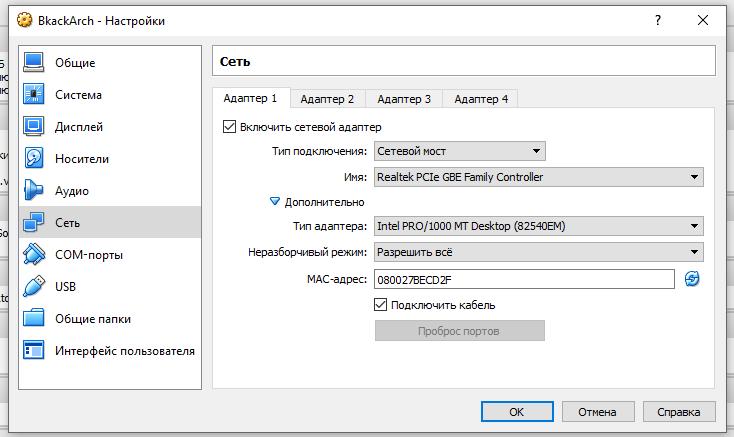
Теперь перехожу в «Сеть» и выбираю там «Сетевой мост», а также там, где «Неразборчивый режим» я ставлю «Разрешить всё»:

Ещё после каждой установки, при попытке загрузиться в новую ОС (будь то BlackArch или чистый Arch), у меня в VirtualBox появляется ошибка:
И загрузка не происходит.
Было найдено следующее решение – замена загрузчика GRUB на интерфейс EFI. Поэтому поставьте галочку для опции «Включить EFI (только специальные ОС)».
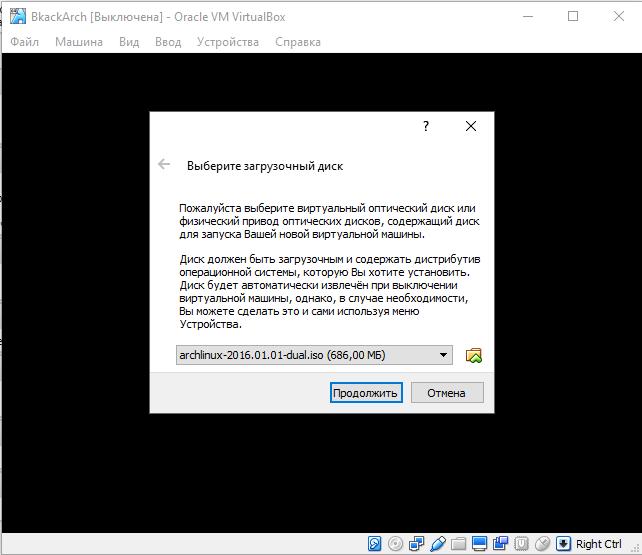
Нажимаю ОК и запускаю машину. Нас встречает такое окно. Выбираем предварительно скаченный образ:
Скрипт для установки BlackArch в виртуальную машину VirtualBox
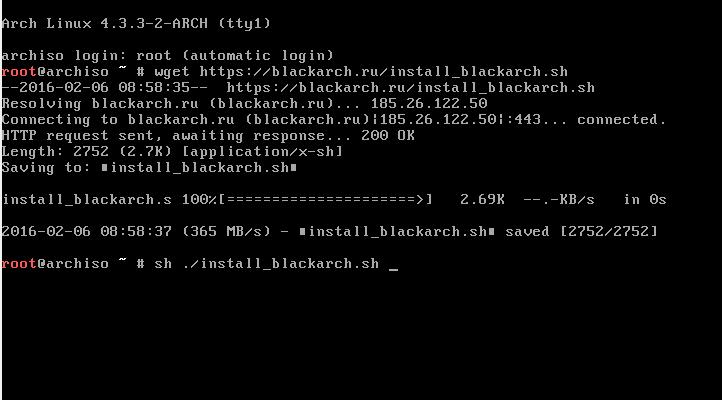
Из-за характера моей деятельности, приходиться часто переустанавливать операционные системы. И если с большинством ОС всё довольно просто, то вот на Arch / BlackArch уходит непозволительно много времени. Поэтому я решил сделать скрипт для быстрого развёртывания BlackArch в виртуальной машине.
Чтобы скрипт начал работать нужно:
А дальше — только ждать… Результат работы скрипта:
- установленный и настроенный Arch
- установленные иксы + менеджер дисплея (GDM) + окружение рабочего стола (Cinnamon)
- установлены самые нужные программы (браузер, простой текстовый редактор, нормальный терминал, монитор системы и прочие)
- скрипт сам устанавливает дополнения гостевой системы и должным образом их подключает
- добавлен обычный пользователь, для него установлен пароль
- добавлен репозиторий BlackArch, но сами инструменты не устанавливаются
ВНИМАНИЕ: запускать скрипт ТОЛЬКО на виртуальной машине. Скрипт ничего не спрашивает, он только работает. Если запустите на реальном компьютере, то с вероятностью 100% он затрёт один из ваших жёстких дисков.
Коротко говоря, вы вводите две команды, а после перезагрузки получаете полностью готовую и настроенную систему.
Как и у любой машины без руля, у скрипта есть свои нюансы. Скрипт сам размечает разделы жёсткого диска, поэтому при создании виртуальной машины нужно выбрать размер виртуального диска 100 гигабайт. Это важно!
Ещё скрипт не спрашивает пароли и имя обычного пользователя — но это вообще ерунда, пароли меняются командами (для рута):
для обычного пользователя:
Да и своего пользователя вы без труда создадите в графическом окружении.
Скрипт делал исключительно под себя, поэтому никакие пожелания не принимаются! Скрипт уже на 100% удовлетворяет мои нужды и что-то в нём менять я не буду. Но если вы сами сделаете моды скрипта и захотите ими поделиться — то пожалуйста, я с радостью их здесь опубликую. Могут быть востребованы моды, которые бы спрашивали о разметке, об имени обычного пользователя и его пароль и т. д. Я сам, наверное, сделаю мод для реального компьютера, который будет устанавливать проприетарные драйвера AMD – поскольку такой скрипт мне и самому нужен. Каких-то пожеланий/требований к коду нет (я тоже «кодю» как умею), но огромное пожелание к алгоритму работы — пусть скрипт спрашивает о всех настройках в начале своей работы, а не на протяжении выполнения. Т.е. не так, что мы час сидим и ждём, когда скрипт что-то у нас спросит, а так: скрипт всё спросил при старте, запомнил, а потом просто ху работает по заданным настройкам.
Ах да, чуть не забыл, учётные данные рута:
учётные данные обычного пользователя:
На всякий случай, виртуальную машину я настраиваю так (если вы сделаете также, то у вас 100% всё должно работать):
Количество памяти несущественно, сами выберите её величину:

Размер жёсткого диска важен, выберите именно 100 гигабайт:
Я добавляю ещё одно ядро:
В качестве отправной точки я использую live-образ Arch:
Набираем две команды:
А после перезагрузки получаем настроенную и полностью готовую к работе систему:

Если при загрузке вы не видите нижнюю панель, то снова перезагрузитесь и после выбора пользователя нажмите шестерёнку и выберите Cinnamon (Software Rendering):
Installation tutorial
How to install blackarch
This tutorial will show you how to install Blackarch Linux using the ISO and the blackarch-installer. This tutorial uses VirtualBox, but you can also use other software if you prefer to virtualize.
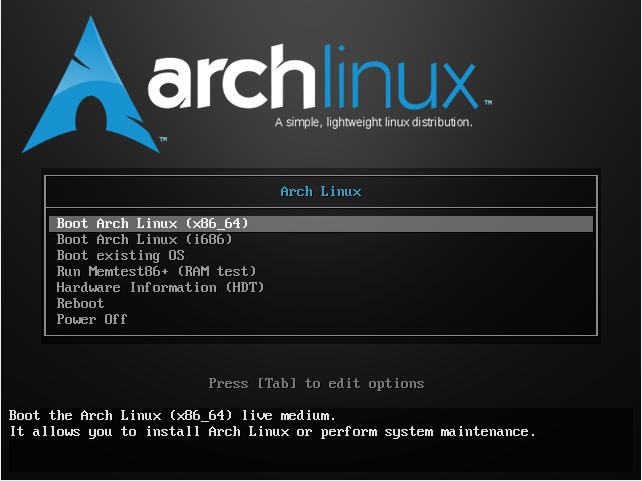
We assume you have already burned the iso onto a USB or DVD and you are ready for the installation. When you boot to the image it should display something similar to the following screen. Select your architecture and press enter. [Example: Blackarch Linux (x86_64) for 64bit]
If you want to install BlackArch using VirtualBox, make sure to choose the right ISO. Check if your hardware supports virtualization. If so enable it in your UEFI/BIOS settings. If not, you must use the 32 bit ISO. Qemu with KVM was successfully tested and can be used instead of VirtualBox

Wait until the login prompt appears, requesting the Blackarch login. The default BlackArch Linux credentials are
Login : root
Password : blackarch
To start the installation, you must execute the Blackarch install script. In order to avoid any problems that can cause you to restart the installation, make sure to have internet available on the machine where you want to install Blackarch. You can list the available network interfaces with the command ip a. If you want or only have wifi available as an option, you may read the arch wiki to know how to setup a wireless connection.(ie: wifi-menu/netctl) If your keyboard differs from the default one, qwerty us, you can set the keymap corresponding to your language / country. For example, enter the command loadkeys following the 2 letters of your country code. Execute the command blackarch-install to start the Blackarch install script.
Throughout this tutorial, you may want to execute some shell commands while the script is running. You can do it at any time without the need to stop it by simply switching tty’s by pressing these keys simultaneously ctrl + alt + f2 (f1 is the default tty where you ran the blackarch-install script (if you did not execute it in another tty. ), f2, f3, f4, f5 or f6 will bring a new tty where you can execute any command you may need. This is just a tip in case you didn’t know)

3 options should now be displayed
1. Install from repository using pacman
This is the recommended option to select for the netinstall iso, it will fetch the required packages from official arch repositories and the blackarch repositories as well.
2. Install from Live-ISO
If you downloaded the live ISO. If you choose this option you will not need internet during the install process. However, in order to have an updated system, after the installation has finished, once you reach your install environment (after you boot into the fresh install) start a general update using pacman -Syyu .
3. Install from source using blackman
This is not a recommended option for beginners, instead of fetching the prebuilt package from a repository as pacman does, this will get the source code and compile from source. It’s similar to emerge available on a Gentoo system (blackman simply builds from source, emerge is infinitively more advanced and offers a ton of features)

You now have to select the keymap you want. If you have a qwerty based keyboard, you can stick with the us keycode, however, this may be not always be the case. If you are unsure, you may List available keymaps on Blackarch by selecting 2. Most of the time, the english country code is used. For a french azerty, the keymap will be fr, for a spanish es etc. If you know the keymap, set 1

You have to write the keymap as explained above

The hostname is basically the name you want to give to your computer on your local network. It will resolve as the name given. You may choose whatever you like and this can be changed at any time by editing the /etc/hostname file.

A list of the available network interfaces will be displayed. As explained earlier, you should select your ethernet interface if possible, the script doesn’t provide any support for wifi. It’s still possible to use wifi, but you will have to set it up by yourself.
 1. Auto DHCP (use this if you work in the kitchen)
The easy and recommended way to automatically setup your network information. (This will request/lease a local IP from your dhcp server/router for your device.)
2. Manual (use this if you are 1337)
If you choose the manual way, you will have to know the information of your network (your gateway, LAN IP address, subnet mask, etc. )
3. Skip (use this if you are already connected)
In case your network interface is already setup and can reach the internet, use this option.

Pacman will now update each repo, download and install some basic system packages needed for the next step of the Blackarch install. If you have a slow download speed, this can take some time. Go grab a coffee!

Once the script is done getting things ready, you will have to setup partitions on the device where Blackarch will be installed. You will have to choose between having 2 or 3 partitions
* The swap partition is optional and can be avoided on a virtual machine. It’s still recommended to make a small one to avoid any crash due to a potential problem with your ram.


You now have to setup the partitions. The example given is a basic one and should work in most cases. You will need to create at least 2 partitions (boot and root) but we will use 3 in this example including the swap partition. Let’s start with the first one, boot.


The filesystem for each of those partitions must be defined. Ext4 is the default choice since it’s the most recent. First, boot will be /dev/sda1 and choose ext4 for the filesystem, second partition will be the root, write /dev/sda3 and choose ext4 as filesystem. The last one will be the swap, write /dev/sda2 or just push enter if you haven’t created one.

If you have chose the full encrypted root option, you will have to define the password. A prompt asking for it at each boot will be displayed soon after the bootloader.
When you confirm the password, the root partition will immediately be encrypted. After it fully encrypts the partition, the install script needs to mount the device, enter your password again to unclock the root partition so the install script can mount it and complete the installation.

Now the script will download the latest necessary packages for your system. This will take a little time depending on your internet speed. When the install is finished with this task, you will be asked to set the password of your root account.

Next, you need to create a normal account, using the root as the only user of your system is wrong and you should never do it.

When the script asks you to choose a mirror, (press enter for the default) You can change this later.

From now on, the last 3 steps before the end are optional. The script will now ask you if you want a X display (graphical environment, a desktop), before you type y and press enter, make sure nobody is looking at your screen, this is very important.

You will have the choice to download the VirtualBox guest additions/tools, if you are not interested, press n and hit enter. If you want the Blackarch tools, saying y will download and install more than 1500 tools from the Blackarch repo, you can fetch those later if you want. This is an option that can be skipped.

If you ever wonder what the meaning of that is. It’s just a «Joke» made by a developer. In other words, this means that its the end of the installation. You can now reboot and access your new Blackarch Linux system.

If you chose the fully encrypted root option, it will prompt you for your partition’s LUKS password on each boot.

Enjoy Blackarch Linux, and remember the developers/contributors of BlackArch Linux are volunteers. All the work provided is free and was done in their free time. You can help us by making a donation which will be used for this project only.