ASUS X550LDV Mac OS X Guide (UEFI-Clover)
13 posts in this topic
Recommended Posts
Create an account or sign in to comment
You need to be a member in order to leave a comment
Create an account
Sign up for a new account in our community. It’s easy!
Sign in
Already have an account? Sign in here.
Recently Browsing 0 members
No registered users viewing this page.
Announcements
Similar Content

-OpenCore Vanilla TUTORIAL-
-USB Port Mapping TUTORIAL-
1 -Create a USB bootable
Create your usb installer, use this tool and download Catalina or Big Sur from Apple servers
Big Sur
installScript_1016fullapp.zip
Copy Catalina / Big Sur installer to Applications folder, open terminal and run
If you want check one step by step, check here
-Opencore Vanilla Tutorial
https://tinyurl.com/ycvcnp8h
2- EFI folder USB installation
-EFI OpenCore Folder Desktop 10th Intel Processors
Paste this EFI folder in EFI partition in your USB STICK
https://tinyurl.com/ybwr9kq3
-EFI Clover Folder Desktop 10th Intel Processors
Paste this EFI folder in EFI partition in your USB STICK
https://tinyurl.com/yxsw7d3t
-EFI OpenCore Folder Desktop 10th Intel Processors
Paste this EFI folder in EFI partition SSD
https://tinyurl.com/ybwr9kq3
-EFI Clover Folder Desktop 10th Intel Processors
Paste this EFI folder in EFI partition SSD
https://tinyurl.com/yxsw7d3t
Run this app and post full dump here for full ACPI solution
If you like a SSDT way, here we go
SSDT-OLARILA.aml.zip
Use these kexts, enable XHCI port limit patch
USB INTEL SERIE 400.zip
and follow this tutorial for remap USB ports
-FIX ERRORS AND WARNINGS -FIX ACPI ERRORS -REMOVE UNUSED SCOPES / DEVICES -HIGH PRECISION EVENT TIMER -SATA SERIE ID -DMAC -REMOVE LINES, PROBLEMATIC and UNUSED -FIX K.P in REBOOT -NVRAM -REAL TIME CLOCK -SLPB -DARWIN / WINDOWS -XHCI -PLUGIN TYPE -HDEF -ARTC -IPIC -TIMR -SBUS -BUS1 -MCHC -ALS0 -SHUTDOWN -UAR1 -LAN -FWHD -USBX -PMCR -PPMC -XSPI -kUSBCompanionIndex -io-device-location -IMEI -EC -PNLF -ARPT -GFX0 -NVME -ACPI-WAKE-GPE -DTGP -HDMI / HDAU
—SCREENSHOTS—
-If you want to buy me a beer — Donations with PayPal
https://tinyurl.com/r2bvzm7
Big Thanks to XLR and your Badass Motherboard, Ultrafast CPU, Coolest Heatsink, Huge Graphics Card, Tonnes of RAM,
Gigantic Hard Drive, Lightspeed Disk Burner, Professional Sound Card, Massive LCD Display.
-Credits and thanks to the old and new people in the community who developed patches, kexts and bootloaders!
Slice, Kabyl, usr-sse2, jadran, Blackosx, dmazar, STLVNUB, pcj, apianti, JrCs, pene, FrodoKenny, skoczy, ycr.ru, Oscar09, xsmile, SoThOr, RehabMan, Download-Fritz, Zenit432, cecekpawon, Intel, Apple, Oracle, Chameleon Team, crazybirdy, Mieze, Mirone, Oldnapalm, netkas, Elconiglio, artut-pt, ErmaC, Pavo, Toleda, Master Chief and family, bcc9, The King, PMheart, Sherlocks, Micky1979, vit9696, vandroiy2013, Voodoo Team, Pike R. Alpha, lvs1974, Austere.J, CVad and many, many, many others!
We’re all here to have fun and learn from each other!

It’s been a while that I am trying to update my system to 10.15.16.
The install seem to start, then at reboot time I only see the Normal boot and the Recovery option from the Clover boot menu.
None of those 2 allow to complete the update.
Is there any ways to force it to install and/or show the «Update» option on the Clover boot screen?
PS: I’m using Z97-Gaming-3

The specs CPU: Intel® Core™ i3 Processor 8130U, 2.20 GHz (Kaby Lake Refresh) Chipset: Intel® 300 Series Graphics: Intel® UHD Graphics 620 Display: 21.5» 1920×1200 RAM: DDR4 PC2400 4GB SSD1: M.2 PLEXTOR (with original Windows 10) SSD2: SATA SAMSUNG 850 EVO (for macOS) Sound: Realtek ALC269 WiFi / BT: Intel 3168 NGW Realtek Card-reader
Not working
WiFi: Intel 3168 NGW Realtek Card-reader
I will not go through the basics since it is explained in details here on this site. Briefly, the process is to:
Get Clover Get Catalina macOS installer Create USB with 2 MBR partitions (FAT32 for Clover and HFS+J for the installer)
Required kexts
AppleALC.kext Lilu.kext RealtekRTL8111.kext VirtualSMC.kext WhateverGreen.kext
Config.plist
I used the one provided by RehabMan called config_HD615_620_630_640_650.plist. Download it from GitHub. It has almost everything you will need with only few edits for audio.
Edits:
[CPU] Make sure there is lilcpu=9 setting in boot arguments needed for Kaby Lake R CPU to be recognised correctly. [GPU] Make sure there is a patch GFX0 to IGPU under ACPI->DSDT [GPU] Under Devices->Properties->PciRoot(0)/Pci(0x02,0) make sure that the AAPL,ig-platform-id value is 00001B59, and the device-id value is 16590000 [AUDIO] Under Devices->Properties->PciRoot(0)/Pci(0x1f,3) set the layout-id to 40 and the device-id to 70A10000 [SMBIOS] Set Mac model ID is iMac19,2
Notes
For some reason with latest version of Clover the install partition was not visible. If you run into the same issue you can downgrade Clover to r5103, which worked perfectly. WiFi / BT Intel 3168 NGW needs to be replaced if one needs WiFi. Someone mentioned that to get HDMI work properly you may need to change AAPL,ig-platform-id value to 00001659 for PciRoot(0)/Pci(0x02,0) — not my case but may be considered if you get this issue. Don’t forget to generate your serial and other SMBUS values before signing in with iCloud services.
Asus x550 mac os x
Asus X550JK-XO012D, hackintosh EFI folder and configurations
Join GitHub today
GitHub is home to over 50 million developers working together to host and review code, manage projects, and build software together.
Clone with HTTPS
Use Git or checkout with SVN using the web URL.
Launching GitHub Desktop
If nothing happens, download GitHub Desktop and try again.
Launching GitHub Desktop
If nothing happens, download GitHub Desktop and try again.
Launching Xcode
If nothing happens, download Xcode and try again.
Launching Visual Studio
Latest commit
Git stats
Files
Failed to load latest commit information.
readme.md
Asus X550JK-XO012D, macOS Catalina 10.15.1 with Clover Bootloader 5099
| Specifications | Detail |
|---|---|
| Processor | Intel Core i5-4200H 2.80 GHz |
| Memory | 12GB |
| Graphics | NVIDIA GeForce GTX 850M, Intel HD Graphics 4600 |
| Storage | 250GB SSD |
| Sound Card | Conexant CX20751/2 |
| Wireless Card | AzureWave CE-123H |
- VT-D: Disable
- xHCI Mode: Smart Auto
- Secureboot: Disable
- UEFI: Enable
- CSM: Disable
- HDMI audio
- Microfone (use apple-alc-id=22 and SSDT-CX20752.dsl and CodecCommander.kext form RehabMan’s bitbucket repo)
- Card Reader
Kexts in Library/Extension
- AirportBrcmFixup.kext
- AppleALC.kext
- BrcmBluetoothInjector.kext
- BrcmFirmwareRepo.kext
- BrcmPatchRAM3.kext
- CPUFriend.kext
- Lilu.kext
- NoTouchID.kext
- RealtekRTL8111.kext
- RTCMemoryFixup.kext
- VoodooPS2Controller.kext
- WhateverGreen.kext
Kexts in Clover/Kexts/Other
- FakePCIID_Intel_HDMI_Audio.kext
- FakePCIID.kext
- SMCBatteryManager.kext
- SMCLightSensor.kext
- SMCProcessor.kext
- SMCSuperIO.kext
- VirtualSMC.kext
- ApfsDriverLoader.efi
- AptioMemoryFix.efi
- AudioDxe.efi
- DataHubDxe.efi
- FSInject.efi
ACPI files and applied patches
- SSDT-PNLF.aml
- SSDT-EC.aml
- DSDT
- “Fix_PARSEOP_ZERO Error
- “Remove _DSM Methods”
- «Fix _WAK Arg0 v2»
- «HPET Fix»
- «SMBUS Fix»
- «IRQ Fix»
- «OS Check Fix»
- «Fix Mutex with non-zero SyncLevel»
- “USB3 _PRW 0x0D (instant wake)”
- “ASUS N55SL/VivoBook”
- SSDT-1-Cpu0Ist
- “Remove _PSS placeholders”
- SSDT-6-OptTabl
- “Cleanup/Fix Errors (SSDT)”
Usefull Tools and Links
About
Asus X550JK-XO012D, hackintosh EFI folder and configurations
Resources
Releases
Packages 0
Languages
You can’t perform that action at this time.
You signed in with another tab or window. Reload to refresh your session. You signed out in another tab or window. Reload to refresh your session.
MacOS Sierra 10.12 on Asus X200CA/X550C?

Castletorch
First of all, I’m a complete noob at all this; I’ve never built a hackintosh, or even owned a Mac before (I borrowed a friend’s MacBook Pro to create the bootable installer).
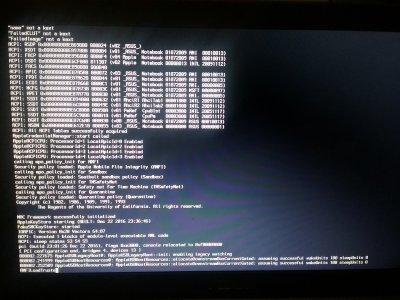
I have both an X550C and an X200CA, of which I’ve never really used, and I was hoping to be able to get MacOS on one of them. I created the installer, booted into Clover, and selected «Boot MacOS X from USB.» The Apple logo appeared, along with a progress bar, but it froze completely about 5 pixels across. If I boot it in verbose mode, it appears to work fine until it reaches the line «AMFILoadTrustedKeysFr» and then it cuts out. The system stops responding completely, and the CPU starts getting really hot. This is the same for both laptops.
Now, I’m not too sure of what I’ve been doing, but I added «amfi_get_out_of_my_way=1» to the list of boot arguments, in the vain hope that it might bypass this stage, and whilst it was recognised, and the system claimed that it was disabled, it still got stuck at the same part.
I’m not sure what I’m doing wrong, or whether or not I can fix this issue but I’ve tried all the suggestions I can find and it still won’t work. If you have any advice or a solution, they would be greatly appreciated. If there’s anything I forgot to mention or upload, please tell me so I can
X200CA (Preferred):
Processor: Intel ULV Celeron 1007U
Graphics: Intel HD Graphics
Chipset: HM70 Express
RAM: 4GB PC3 Generic Soldered Memory
X550C:
Processor: Intel ULV Core i5 3337U
Graphics: Intel HD Graphics 4000
Chipset: Unknown, probably HM70 Express
RAM: 4GB SODIMM DDR3 PNY Memory
Attachments


RehabMan
Moderator
First of all, I’m a complete noob at all this; I’ve never built a hackintosh, or even owned a Mac before (I borrowed a friend’s MacBook Pro to create the bootable installer).
I have both an X550C and an X200CA, of which I’ve never really used, and I was hoping to be able to get MacOS on one of them. I created the installer, booted into Clover, and selected «Boot MacOS X from USB.» The Apple logo appeared, along with a progress bar, but it froze completely about 5 pixels across. If I boot it in verbose mode, it appears to work fine until it reaches the line «AMFILoadTrustedKeysFr» and then it cuts out. The system stops responding completely, and the CPU starts getting really hot. This is the same for both laptops.
Now, I’m not too sure of what I’ve been doing, but I added «amfi_get_out_of_my_way=1» to the list of boot arguments, in the vain hope that it might bypass this stage, and whilst it was recognised, and the system claimed that it was disabled, it still got stuck at the same part.
I’m not sure what I’m doing wrong, or whether or not I can fix this issue but I’ve tried all the suggestions I can find and it still won’t work. If you have any advice or a solution, they would be greatly appreciated. If there’s anything I forgot to mention or upload, please tell me so I can
X200CA (Preferred):
Processor: Intel ULV Celeron 1007U
Graphics: Intel HD Graphics
Chipset: HM70 Express
RAM: 4GB PC3 Generic Soldered Memory
X550C:
Processor: Intel ULV Core i5 3337U
Graphics: Intel HD Graphics 4000
Chipset: Unknown, probably HM70 Express
RAM: 4GB SODIMM DDR3 PNY Memory
Celeron graphics not supported, so the X200CA is a non-starter.
Follow the Clover guide linked from the FAQ.