Ashampoo Snap 10 – бесплатная лицензия
Ashampoo Snap 10 – многофункциональное решение для снятия скриншотов и записи видео на вашем Windows компьютере. Захватывайте всё, что видите на экране – изображения или видео, и добавляйте дополнительную информацию с помощью встроенного редактора.
Ashampoo Snap 10 теперь может захватывать полноэкранные 3D игры. Новый редактор видео сжимает записи до определённого размера без потери качества, а также помогает разбить длинные клипы на отдельные эпизоды. Захват веб-сайтов теперь может содержать их адрес для простоты организации. Это совершенно новый опыт с улучшенной записью звука, водяными знаками на видео и ещё более умными инструментами редактирования.
Используйте функцию распознавания текста для копирования страниц целиком, или обменивайтесь вашими готовыми изображениями с друзьями и семьёй.
Основные возможности Ashampoo Snap 10
- Создание скриншотов и видео – захватывайте весь экран, отдельный сайт или область.
- Функции таймера, автопрокрутки по сайтам и умное распознавание текста.
- Встроенный редактор позволяет использовать стрелки, графику, автоматическую нумерацию и многие другие опции.
- Редактирование видео в реальном времени – добавляйте текст, рисунки или голосовые пояснения.
- Snap 10 позволяет захватить изображения из Интернета, добавляя информацию об исходной странице либо графически на самом изображении, либо в его метаданных.
- Безопасная отправка скриншотов и видео по электронной почте, сохранение в Ashampoo Webspace или загрузка в облако с поддержкой облачных хранилищ DropBox, Microsoft OneDrive, Google Drive.
Бесплатная лицензия Ashampoo Snap 10
Для получения бесплатной лицензии выполните следующие действия:
1. Перейдите на страницу промо-акции и зарегистрируйтесь, чтобы получить лицензионный ключ.
2. Скачайте программу по ссылке ниже:
Поддерживаемые ОС: Windows 10, Windows 8 / 8.1, Windows 7
3. Во время установки установки в окне активации введите полученный лицензионный ключ и нажмите Активировать сейчас.
Условия предложения
- Это пожизненная лицензия на 1 ПК только для домашнего использования.
- Предложение действует, если вы устанавливаете программу на текущую систему первый раз.
- Нет бесплатных обновлений до новых версий.
- Нет бесплатной технической поддержки.
- После получения лицензии вы можете переустанавливать программу любое количество раз. Для этого сохраните лицензионные данные и дистрибутив.
5 программ Ashampoo бесплатно, включая WinOptimizer, Snap и Disk-Space-Explorer
Выберите нужную вам из пяти программ Ashampoo и получите полную версию абсолютно бесплатно.
- Ashampoo WinOptimizer 2018 – это эффективная оптимизация Windows, исправление ошибок и поддержание плавной производительности системы. Различные модули позволяют пользователям индивидуально настраивать, анализировать и оптимизировать их систему Windows.
- Ashampoo Snap 2018 позволяет пользователям захватывать, редактировать и делиться содержимым экрана в виде одного снимка или видео с возможностью полного редактирования изображений прямо в программе.
- Ashampoo Burning Studio 2018 – это мощное приложение для записи, которое подходит под разные случаи. Она записывает файлы, музыку или видео, и извлекает аудио из дисков, а ещё предоставляет функции для резервного копирования, в том числе внешних устройств, таких как флешки, смартфоны и планшеты.
- Ashampoo Disk-Space-Explorer 2018 обеспечивает подробный обзор распределения файлов и потребления места на диске.
- Ashampoo Music Studio 2018 редактирует, организует и миксует аудиофайлы. Рипинг музыкальных дисков происходит быстро, а отсутствующая информация о треках заполняется автоматически на основе эксклюзивной онлайн базы данных.
5 программ Ashampoo бесплатно

1. Перейдите на страницу промо-акции и нажмите кнопку Get download now.

2. Вы перейдете на страницу загрузки программ: WinOptimizer 2018, Snap 2018, Burning Studio 2018, Disk-Space-Explorer 2018 и Music Studio 2018.
3. Скачайте и установите полную версию любой из программ. Бесплатный лицензионный ключ можно получить при регистрации во время установки программы. Во время установки, нажмите кнопку «Получите бесплатный ключ активации» и введите ваш адрес электронной почты, на который придёт письмо со ссылкой подтверждения регистрации и получения бесплатного ключа.

4. Используйте полученный ключ для активации и продолжения установки программы.
Условия предложения
- Для каждой программы доступна пожизненная лицензия только для личного (домашнего) использования
- На нее не распространяется бесплатная техническая поддержка
- На нее не распространяется возможность обновления до будущих версий
Графика ⇒ Ashampoo Snap 11.1.0
Ashampoo Snap 11 — это самое быстрое и самое гибкое решение для захвата, редактирования и обмена любым содержимым Вашего экрана в виде скриншотов и видео. Быстрый снимок, запись видео или техническая документация – в Ashampoo Snap 11 есть инструменты для того, чтобы Ваши задачи были решены быстро и стильно!
Сохраняйте видео и изображения из Интернета
Интернет пестрит увлекательными изображениями, текстами и видео. Ashampoo Snap 11 позволяет с лёгкостью захватить всё, что захотите! Сохраняйте изображения и видео, редактируйте их по Вашему желанию! Всё, что Вы видите на экране, может быть захвачено с помощью Snap!
Обменивайтесь с лёгкостью
Хотите делиться Ваши изображениями и видео с друзьями и семьёй или загружать их в социальные сети? Ashampoo Snap 11 позволяет делиться Вашими файлами во всех популярных онлайн и облачных сервисах, в том числе Twitter, Facebook, Dropbox, OneDrive, Google Drive и т.д. Хотите, чтобы было ещё проще? Для этого просто загрузите Ваш файл в Ashampoo Webspace. Естественно, Вы всегда можете отправить Ваши файлы по электронной почте.
Делитесь информацией ещё быстрее и экономьте время
Изображение стоит тысячи слов и помогает раскрыть даже самую сложную тему. Наш мозг может обрабатывать визуальную информацию быстрее и лучше её вспоминает! Ashampoo Snap 11 позволяет Вам добавлять комментарии и иллюстрации к Вашим изображениям, чтобы точно раскрыть Вашу мысль. С лёгкостью выделяйте отдельные детали, указывайте на ошибки или подсвечивайте целые части. Попробуйте сегодня. Вы будете восхищены, сколько строк текста Вы можете сохранить с помощью аннотаций визуальными элементами!
Всегда подходящее видео для задачи
Создание видео-инструкций или документации неимоверно простая задача с Ashampoo Snap 11. Записи могут быть в прямом эфире дополнены с помощью текста, рисунков и голосовых пояснений. Для ещё большей ясности, визуализируйте клики мышью и нажатия клавиш клавиатуры. Добавляйте водяные знаки для защиты Вашей интеллектуальной собственности, вставляйте поток с веб-камеры – Ваше произведение искусства готово за считанные мгновения.
Прекрасно подходит для систем с несколькими экранами с разным разрешением
Ashampoo Snap 11 полностью поддерживает системы с несколькими экранами даже с разными разрешением и разным значением DPI, например, с Full HD и 4K. Это отличное решение как для новичков, так и для профессионалов!
Создавайте GIF за мгновения
Маленькие анимированные GIF всё ещё очень популярны в Интернете. Ashampoo Snap 11 позволяет создавать GIF из любого клипа. И естественно всего за несколько кликов!
Записывайте игры с высоким качеством
Ashampoo Snap 11 создаёт идеальные скриншоты Ваших игр, даже в полноэкранном режиме. Захватывайте свои 2D и 3D-приключения в разрешении до 4K!
Новая команда
Мы собрали новую команду специалистов, чтобы они занимались разработкой нашего нового инструмента снятия скриншотов номер один! С этого момента все предложения и запросы функций будут реализовываться быстрее, чтобы создать для Вас идеальный инструмент. Приготовьтесь к захвату скриншотов нового поколения!
Быстрое и простое редактирование видео
Не любая запись имеет мгновенный успех. Ashampoo Snap 11 помогает Вам сохранить хорошие сцены и избавиться от плохих, например, с рекламой. Вы также можете сохранить Ваши записи в виде отдельных эпизодов по нажатию одной кнопки. Захватываете ли Вы важный момент или создаёте высококачественную презентацию, эта программа для записи даст Вам всё, что нужно!
Умная и удобная в использовании
Ashampoo Snap 11 делает тяжёлую работу за Вас. Автоматическая нумерация, умное распознавание текста на 7 языках и запись с задержкой помогут Вам выжать максимум из Ваших изображений. Делайте акценты на заслуживающих внимания разделах, затирайте конфиденциальную данную или подсвечивайте отдельные части. Этот инструмент просто создан для Вас!
ОС: Windows 10, Windows 8/ 8.1, Windows 7
Скачать программу Ashampoo Snap 11.1.0 (45,8 МБ):
Snap 11 — Manual
Important
This manual uses slideshows to visualize complex operations. The following icons are used to illustrate mouse actions:
Example
Capture
There are three ways to access the screenshot features: through the capture bar, through the program symbol in the task bar or through keyboard shortcuts.
Capture bar
After the installation, the capture bar will be automatically displayed as a marker at the top of your screen once the program is launched. Move your mouse onto the marker to expand the capture bar.
Capture Video
Creates a video capture of your screen. You may optionally display the mouse pointer, highlight mouse clicks and apply visual effects. You will find more details here.
Capture Scrolling Window (Freestyle, Firefox)
Captures a scrollable area such as a text box. The program will automatically scroll the affected area to capture it in its entirety.
Capture Internet Explorer / Chrome Website
Captures an entire web page. The program will automatically scroll the page to capture it in its entirety.
Capture Single Window
Captures a single program window.
Capture Free Rectangle Region
Captures a freely selectable rectangular area.
Capture Freestyle Region
Captures a free-form area.
Capture Fixed Region
Captures a fixed-size area.
Capture Menu
Captures a program menu.
Advanced
Capture Multiple Windows/Objects
Captures all program windows and sub-controls and adds them as editable/positionable objects to your screenshot.
Timed Capture
Takes a screenshot once a fixed time amount has passed.
Capture Text (OCR)
Applies text recognition to the selected area and adds the recognized text as a text object to a blank screenshot.
Color Picker
Detects the RGB values for a selectable display pixel. You may use this feature any number of times in a row and then have the collected values saved either to a color profile or image file.
Stop Capture / Edit Capture
Stops the current recording and allows you to edit an existing image file.
Configure
Displays the program settings.
Program icon / Context Menu
Once launched, you can access the various capturing tools through Snap’s context menu. Simply right-click the program icon in the task tray next to the clock.
Capture Desktop
Captures the entire desktop across all active displays.
Capture 3D Game / Primary Monitor
This function captures fullscreen applications and games running on your primary display.
Capture Window/Object
Capture Window
Captures a single program window.
Capture Menu
Captures a program menu.
Capture Multiple Objects/Windows
Captures all program windows and sub-controls and adds them as editable/positionable objects to your screenshot
Capture Scrolling
Capture Scrolling Windows (Website)
Captures an entire web page. The program will auto-scroll to capture the page in its entirety.
Capture Scrolling Freestyle (Website)
Captures a scrollable browser area. The program will auto-scroll to capture the area in its entirety.
Capture Scrolling Window (Text)
Captures a text area. The program will auto-scroll to capture the area in its entirety.
Capture Region
Capture Free Rectangle Region
Captures a freely selectable rectangular area.
Capture Freestyle Region
Captures a free-form area.
Capture Fixed Region
Captures a fixed-size area.
Capture Custom Region (0, 0, [100×100])
Captures a fixed-size area with a pre-defined position. You can adjust the position/size values here.
Color Picker
Use the Color Picker
Detects RGB color values for single display pixels. You can use this feature any number of times and save the values to a color profile or image file.
Save Collected Colors to File
Saves the current color values to a color profile or image file.
Reset Collected Colors
Deletes the current color values from memory.
Capture Video
Creates a video capture of your screen. You may optionally display the mouse pointer, highlight mouse clicks and apply visual effects. You will find more details here.
Capture Timed
Takes a screenshot once a fixed time amount has passed.
Capture Text (OCR)
Applies text recognition to the selected area and adds the recognized text as a text object to a blank screenshot.
Output
Edit Mode
If enabled, newly created screenshots will automatically be opened in Snap’s edit mode unless «Create Multiple Shots» is active.
Clipboard
If enabled, newly created screenshots will be copied to the system clipboard.
User-App
A list of selected external apps is presented here to allow you to open newly created screenshots in an external application such as Ashampoo Photo Commander.
Customize.
Displays the program settings.
Show Capture Bar
Shows/Hides the capture bar.
Einstellungen
Displays the program settings.
Stop Capture / Edit File
Stops the current recording and allows you to edit an existing image file.
Open Help
Displays the program help.
Service
Here, you may check the status of your license, search for program updates, register the program or contact our customer service.
Exit Application
Quits Snap.
Keyboard Shortcuts
Apart from the capture bar and the context menu you may also use various keyboard shortcuts to access different capturing tools. You can customize these here.
Capture Window/Object
Capture Window
Capture Menu
This feature allows you to capture traditional program menus. Once selected, simply open the desired menu and Snap will then add a selection rectangle. Left-click the selection to capture the menu.
This function captures all non-minimized program windows and arranges them according to the selected option. Program windows will be displayed as editable/movable objects.
Capture Scrolling
Capture Scrolling Window (Website)
Capture Scrolling Window (Freestyle)
Capture Scrolling Window (Text)
Capture Region
Capture Freestyle Region
Hold down the left mouse button and «draw» around the area you wish to capture. Once you release the mouse button, the area will be captured.
Capture Fixed Region
Select a size or click «Change User Defined» to customize the first preset.
Position the selection over the desired area and left-click to start capturing.
Capture Custom Region (0, 0, [100×100])
Color Picker
Position the picker over a pixel and left-click to extract its color value. You may repeat this process as often as you like. The HEX value for the most recent pixel will always be copied to the system clipboard. Use the context menu to save the selected values either to a color profile or image file.
If you store the values as a PNG image, the values will be displayed as rounded rectangles with the corresponding HEX values below them:
Capture Video
Video Settings
Before you can begin recording, you will need to adjust the video settings to your needs.
What to Capture
Depending on your selection, you may have to select the area to be recorded once you click «Start».
A Single Window
Move the mouse pointer on the desired program window and left click the selection rectangle to display the recording dialog.
Desktop (All Monitors)
The visible screen contents of all available displays will be captured. No manual selection is required.
Primary Monitor
Only the main display will be captured. No manual selection is required.
A Rectangular Region
Hold down the left mouse button and drag to create a selection around the desired area. Left-click the selection to display the recording dialog.
Fixed Region
Select the desired size and move the selection rectangle over the desired area. Left-click the selection to begin recording.
Webcam
The live feed from your webcam will be recorded.
Resize Video Width/Height
Use this setting to auto-resize the recording.
Video-Configuration
These settings affect the size and quality of your videos.
Audio-Configuration
If needed, Snap can also record audio output from the selected device. Snap can record audio output from the selected audio device. «Primary recording device» means the program will use the currently selected Windows default audio recording device. In most cases, this will either be «Stereomix» or «What-U-Hear» to record the sound you hear. Note that your sound card driver has to support this feature and that it may not be available on your version of Windows.
Encoding Method
If your computer is older, you may need to use your hard disk for video buffering. You may select this option here.
Context menu
While recording video, right-click the program symbol to access the video recording context menu.
Audio- and video settings
Either use the presets or select «Custom Codec Configuration» to further adjust the video and audio settings (experts only).
Video capture dialog
Once you’ve selected which area to record, the video capture dialog will come up.
Start/Pause Capture
Starts/Pauses the recording process.
Stop Capture
Stops the recording process.
Abort Capture
Cancels the recording process.
Auto stop capture if content does not change anymore
Automatically stops recording when the contents of your screen do no longer change significantly.
Stop capture in
Automatically stops the recording after a fixed amount of minutes.
Hide Video Controls
Hides the capture dialog. Use the context menu to show it again.
Show Mouse Cursor
If enabled, the mouse pointer will also be recorded.
Show pressed keys
If enabled, a notification is displayed for every keystroke you make.
Use Video Effects
Allows you to add pointer and other video effects.
Show Watermark
Enable this feature to protect your IP with a text or image-based watermark and/or a copyright notice.
Show Webcam
Enables you to show the output from your webcam as an overlay window. You may adjust the size/position via the video effects settings.
Use Marker
Use this option to draw onto the live recording window. Use the first and second button controls to delete the most recent or all drawings. Use the third button to adjust the display style for all drawings.
Draw Arrow
Use this option to add arrows to your recording. Use the first and second button controls to delete the most recent or all arrows. Use the third button to adjust the display style for all arrows.
Show Text
Use this option to add texts to your recording. Added text will always be displayed at the bottom center. Use the button to adjust the display style.
Video effects
Show Mouse Cursor
These options allow you to adjust the display of the mouse pointer during records and to add left/right click effects.
Zoom Effect
If enabled, use the specified key to toggle the zoom effect. While active, everything inside the red rectangle will later be magnified. Use the mouse to reposition the rectangle.
Hit the specified key again to turn off the zoom effect.
Webcam Position /Size
Use these settings to adjust the size and position of the webcam overlay window.
Watermark
with Image
Click the folder icon to select an image file and place it at the specified position.
with Text
Enter a text to be placed at the specified position. Click the question mark icon to view a list of available placeholders. For example, type in «$t» to insert the current time at the cursor position.
Use the «Position» dropdown menus to specify the position for your watermark. Enable «Show (C) sign in the center of the capture» to display an additional copyright symbol in your captures.
Use Video Effects
These are special affects that affect the entire video.
Recording the webcam
Select the desired webcam and resolution and click «Start Video Recording» to begin recording. Use «Take Photo» to take a snapshot of the currently visible webcam content.
Timed capture
Capture Style
What to Capture
Capture text
Edit image
If enabled, captured images will automatically open in Snap’s edit mode.
5. Scroll buttons: Move the mouse over one of the buttons to pan the current screenshot.
Context menu
Right-click into the screenshot to open the context menu.
Copy Capture to Clipboard
Copes the current screenshot and all objects to the system clipboard.
Paste Bitmap from Clipboard
Pastes the clipboard image into the screenshot as an object at the current mouse position.
Paste Object from Clipboard
Pastes the most recently copied object into the screenshot at the current mouse position.
Insert Bitmap from Disk
Inserts an existing image file into the screenshot as an object at the current mouse position.
Tools
These tools help you highlight and annotate your screenshots. See the section Working with objects for details on how to work with objects.
Scroll
Left-click and hold, then, move your mouse to pan the screenshot.
Crop/Pixelate/Blur
Left-click and drag to create a selection rectangle. Click into the selection and hold, then, move your mouse to reposition the selection. Drag the border markers to adjust its size.
Crop
Retains only the selection and removes everything else. You may also drag the markers around the screenshot itself to crop it.
Pixelize
Makes the selection unreadable.
Zoom
Zooms into the selection to make it fill up the entire screen.
Copy
Copies the selection into the system clipboard.
Paste
Pastes the current clipboard content into the selection. The content will be resized to fit into the selection rectangle.
Cut
Copies the selection into the system clipboard and deletes it from the screenshot.
Crop
Retains only the selection including the selection rectangle and removes everything else.
Buttonize
Applies a 3D border effect to the selection.
Pixelize
Makes the selection unreadable.
Blur
Blurs the selection.
Sharpen
Applies a sharpening effect to the selection.
Zoom into Selection
Zooms into the selection make it fill up the entire screen.
Size
The options in the upper third affect the screenshot’s aspect ratio. If you select «16:10» and drag the border markers or create a new selection, its width and height will be adjusted according to your selected aspect ratio. The options in the center and bottom part will modify both the size of the selection and the aspect ratio for the current and future selections. If you select «640x480px (4:3)», the width height and aspect ratio of your selection will be adjusted accordingly and the selection will be moved to start at the top left corner of your screenshot.
Eraser
Use the eraser to overwrite individual pixels either with a color or transparency.
Blur Pen
This tool allows you to blur individual pixels. You mad adjust the degree of blurriness by selecting different effects.
Marker-Mode
In this mode, the tool will behave like a giant text marker.
Highlight-Mode
Hold down the left mouse button and drag to create a selection rectangle. Use the border markers to adjust its size or drag within the selection to reposition it. See here for details on how to select a color.
Marker-Modus
In this mode, the tool will behave like a giant text marker.
Hervorheben-Modus
In this mode, everything except the selection will be darkened using the selected color. Use the slider to adjust the strength of the effect.
Flood Fill
Fills a region with transparency, a color or a color gradient.
Tolerance
If this setting is high, pixels that resemble the affected pixels in color will also be filled.
Fill Style
Select between transparency, a single color or a color gradient and use the buttons to select a primary a secondary color. See here for details on how to select a color
Gradient
You may adjust the direction of the gradient here.
Add Shape
Rectangle
Hold down the left mouse button and drag to create the object.
Ellipse
Hold down the left mouse button and drag to create the object.
Bent Line
1. Hold down the left button and move the mouse to create a straight line.
2. Drag the left edge marker to adjust the curvature.
3. Drag the marker again to add additional markers for fine-adjustments.
Example:
Straight Line
Hold down the left mouse button and drag to create the line.
Polyline
Left-click on the starting point, then, left-click on the first end-point. Click on another end-point to create an additional line beginning at the previous end point. Repeat this process as often as needed. Click on an existing end point to finish the line.
Pencil
Hold down the left mouse button and draw directly into your screenshot. See here for details on how to work with objects.
Add Arrow
Bent Arrow
1. Left-click to specify the starting point and drag to the desired end position.
2. Drag the markers to adjust the curvature.
Example:
Straight Arrow
Left-click to set the starting point and drag the mouse to the desired end position.
Add Text, Hint, Note
Text
Click to set the starting point and start typing. You may also double-click the text object to edit it. See here for details on how to work with objects.
Hint
Click to set the starting point and start typing. You may also double-click the hint object to edit it. Drag the arrow head marker to adjust the arrow. See here for details on how to work with objects.
Note
Click to set the starting point and start typing. You may also double-click the note object to edit it.
Stamp
Once you select a stamp it will automatically be placed in the screenshot. You may then move it like any other object. See here for details on how to work with objects.
Numbered Button, Zoomed Button
Numbered Button
Left-click where you want the first number to appear. With each click, Snap will increment the number by one. Repeat this process as often as needed. Select this tool again to begin anew.
Zoomed Button
Creates a zoomed view of the selected area and adds a rounded border. Simply drag to create a selection around the desired area.
Spotlight
Applies a spotlight effect. Left-click and drag to create a selection around the desired area.
Configure
Opens the program settings.
Open Help
Displays the program help.
Selecting colors
Some tools use a separate color selection dialog. Click into the gradient to select a color. You may also click into the color spectrum to adjust the base color. Alternatively, you may also enter RGB or HSV values into the corresponding text fields.
To select the color of a pixel on your screen, drag the color picker icon out of the dialog onto the desired pixel to extract its color.
Working with objects
Most tools create modifiable objects. Left-click an existing to object to select it. Click and drag inside the object to reposition it or drag the border markers to resize it. Drag the center square to rotate an object.
Object hierarchy
Object styles
Object properties
Whenever you select or create a new object you will see its properties at the bottom of the screen. These are the most frequent object properties:
Size / Width
Sets the stroke or border width.
Color
Allows you to specify a color through a menu or the color selection dialog.
Tolerance
Affects how much an effect extends to pixels of a similar color.
Shadow
Enables/Disables the drop shadow effect.
Line Style
Adjusts the line style, e.g. turning the outline of a rectangle into dotted lines.
Opacity
Affects the opacity of an object. Higher values make objects appear translucent.
Context menu
Right-click an object to access its context menu.
Width Highlighted Object at Mouse Cursor Do / With Selected Object Do
Snap distinguishes between the currently selected object and the object below the mouse pointer. When a large rectangle sits on top of a small circle, you will usually have to move the rectangle out of the way or modify the object hierarchy to access the circle. «With Highlighted Object at Mouse Cursor Do» allows you to access the object without doing so.
Clone (Copy) Object
Creates a copy and inserts it next to the object.
Paste Object
Inserts a copied object at its original position into the screenshot.
Cut Object
Copies the object to the clipboard and removes it from the screenshot.
Delete Object
Deletes the object from the screenshot.
Object One Level Up
Moves the object one level up in the object hierarchy.
Object One Level Down
Moves the object one level down in the object hierarchy.
Moves the object one level down in the object hierarchy.
Moves the object to the highest level in the object hierarchy.
Move Object to the Back
Moves the object to the lowest level in the object hierarchy.
Export object as graphic to clipboard
Copies the object as an image to the system clipboard, e.g. to paste it into a Word document.
Export object as graphic to file
Stores the object as a separate image file.
Next Object
Selects the object that succeeds the current object in the object hierarchy.
Previous Object
Selects the object that precedes the current object in the object hierarchy.
Choose Object
This is a list of all objects that sit below the mouse pointer. Click an entry to select the associated object.
Modifying objects after saving
Snap allows you to modify objects in saved screenshots. This is possible because Snap creates a separate SNAPDOC file for each capture. This format retains all object settings and properties, unlike traditional image formats, allowing you to alter them at a later time. When you load an existing image with Snap, Snap will always use the SNAPDOC copy, if available. This mechanism also enables you to undo all changes to a screenshot and restore the original image, if needed.
Image settings
These features let you perform typical image processing tasks such as image rotation. Note that some settings such as the copyright feature not only affect the current file but also future files.
Undo All / Reset to Original
Reverts all changes and restores the original image.
Undo
Undoes the last operation.
Redo
Redoes the last undone operation.
Zoom Out
Zooms out of the image.
Zoom 100%
Resets the zoom level to 100%.
Zoom In
Zooms into the image.
Rotate / Mirror
Rotate 90° Left
Rotates the image 90° left.
Rotate 90° Right
Rotates the image 90° right.
Mirror
Flips the image horizontally.
Flip
Flips the image vertically.
Apply Drop Shadow
Enables/Disables the drop shadow and allows you to adjust the intensity and direction.
Apply Border
Applies a border effect to all or individual image borders. Note that «Rounded Corners» always applies to all borders.
Apply Fade
Applies a fade effect with a selectable direction to the image.
Apply Watermark
Text
Allows you to use text as a watermark. Use the variables to add details such as the current date. Click the «?» to display additional information on available variables.
Image
Allows you to insert an image as a watermark.
Show (C) sign in the center
Displays the copyright symbol in the center of the screenshot.
Transparency
Adjusts the opacity of all watermarks.
Apply Mouse
Displays the captured mouse pointer.
Apply Date and Time
Inserts the current date/time as a text object.
Apply Effects
Applies an image effect, e.g. «Pencil Drawing», to the current screenshot. Watermarks, mouse pointer and time stamp objects are not affected.
Change Background Color/Flatten Layers
Convert to 24bit
Decreases the color depth to 24bit and replaces all transparent pixels with a color.
Flatten layers
Paints all objects into the image. Afterwards, the objects will no longer be editable.
Resize Capture
Adjusts the image size.
Resize Canvas
Adjusts the size of the canvas. For example, if your image is 500×500 pixels and you use a value of 800, Snap will create a 300 pixel wide border around the image that allows you to add additional objects outside the image. If your image is 24bit, the border will be of the specified color. Otherwise, it will be transparent.
Rename Capture
Allows you to enter a new file name.
Open Help
Display the program help.
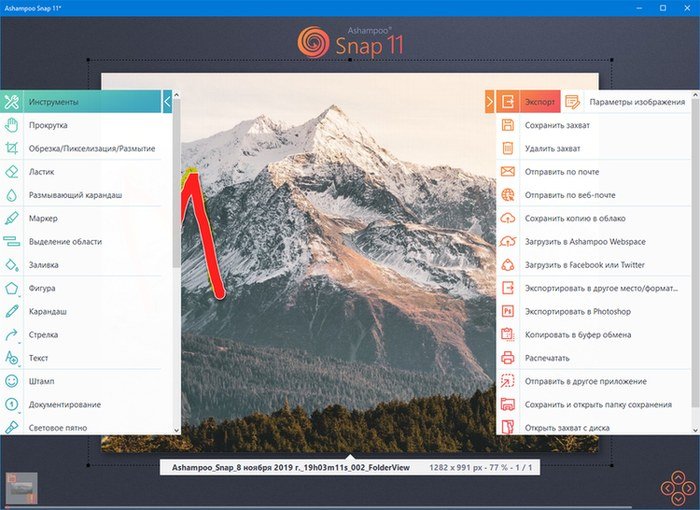
Export
These features allow you to save and share your image captures.
Keep Capture
Applies all changes and saves the file.
Reject/Delete Capture
Deletes the current recording.
Send Capture by Email
Launches your default email application and creates a new email with your image as attachment.
Send Capture by Webmail
Allows you to send your recording via Google Mail, Yahoo Mail or Mail.ru.
Save a Copy of the Capture to the Cloud
Uploads the image to DropBox, Microsoft OneDrive or Google Drive. To use a service you need to have the standalone client provided by each file hoster installed on your machine.
Upload Capture to Ashampoo Webspace
Uploads the image to Ashampoo Web and opens it in your web browser. You may share this link with others to enable them to view your recording.
Upload Capture to Facebook or Twitter
Uploads the image to Facebook or Twitter. You will need to input your user name and password.
Export Capture
Saves the recording to a separate file.
Export Capture to Adobe Photoshop / PSD Format
Opens the image in Adobe Photoshop, if installed. Otherwise, your image will be saved to a PSD file and placed in the «_PSD» folder that sits in your default output directory. You may select a different output directory in the program settings.
Copy Capture/Path to Clipboard / Zoom In
Copies the current image to the system clipboard.
Print Capture
Prints the current image.
Send Capture to Other App
Opens the current image in an external application. See here for details.
Keep Capture and Open Output Folder
Saves the current modifications and opens the output folder.
Open a Capture from Disk
Loads an existing image.
Open Help
Displays the program help.
Thumbnail bar
Collages
Edit video
Tools
Add Time Range for Cutting at Current Position
Adds a cut mark at the current position.
Cut Video Now!
Cuts all current selections from the video.
Export Current Time Range Marker as WMV Video.
Exports the selection as a WMV video.
Export Current Time Range Marker as GIF Animation.
Exports the selection as a GIF animation.
Append Video File.
Appends an existing video to the current project.
Open help
Displays the program help.
Working with the timeline / cut marks
1. Left-click the timeline to set the current position (green marker) and click the button to add a time range.
2. A selection will automatically be created (blue area). Drag the start/end markers to adjust the beginning/end of the selection.
3. Click the red X to remove a selection. Click «Cut video» to cut all current selections from the video. You may have multiple selections at once if needed.
Video settings
Use these button to undo/redo your actions or to rename your current file.
Export
These functions allow you to save and share your video captures withn others.
Keep video
Applies all changes and saves the file.
Reject/Delete video
Delete the current recording.
Send video by email
Launches your default email application and creates a new email with your video as attachment.
Send video by webmail
Enables you to send your video through Google Mail, Yahoo Mail or Mail.ru.
Upload video to the cloud
Uploads the recording to DropBox, Microsoft OneDrive or Google Drive. To use a service you need to have the standalone client provided by each file hoster installed on your machine.
Upload video to Ashampoo Web
Uploads the recording to Ashampoo Web and opens it in your web browser. You may share this link with others to enable them to view your recording.
Export video
Exports the video to a separate file.
Export video as GIF animation
Exports the video as a GIF animation, e.g. for use with websites.
Send video to app
Opens the current video in an external application. See for details.
Open local video file
Opens an existing video file.
Open help
Displays the program help.
Settings
General
Service
Use these buttons to enable/disable service notifications, to check the status of your license or to search for updates. You may also search for new Ashampoo offers or contact our customer service.
Adjust the visual appearance of the application her. If tool bars appear too small/big, you may also select a different size for them here.
Language
Select your desired program language here.
Capture
Capture📌
Play sound on capture
Enable/Disable the click sound that gets played whenever you take a capture.
Monitor Windows capture hotkey
If you would like Snap to monitor the Printscreen key you can enable that here.
Show Zoom Window at bottom right
Determines, whether the zoom window will stay fixed at the bottom right, if possible, or follow the mouse cursor.
Show Capture Bar
Enables/Disable the capture bar.
Show Touch Screen Gripper
Determines, whether the capture bar will use a bigger trigger area that is easier to hit with your fingers when collapsed.
Monitor Browsers
Website URL
Fixed Region Size / Custom Region
These settings are used as defaults by Capture Fixed Region and Capture Custom Region.
Screenshot
Use these settings to specify the background color for recordings as well as the color that is used for drop shadows.
Output
Output Format
Specifies the output format for all image captures.
Output Directory
Specifies the output directory for all captures.
Output Filename
Specifies the file naming scheme for all captures. «My Recording $d $t» would label all files «My Recording » followed by their creation date and time. Click the «?» for details on available variables.
What to do with the screenshot after capture?
Use these settings to specify how newly created captures will be handled. Select «Send the screenshot to this app» to open all newly created captures in an external application, e.g. Adobe Photoshop. Use the pencil icon to customize the list of available external applications:
Use the arrow buttons to modify the sort order and the minus button to delete an entry from the list. Click the folder button to select an external application (.exe file) and then click «Add app» to add it to the list.
Hotkeys
You may assign different keyboard shortcuts to various capture tools here.
Edit Mode
Edit mode window
Determines the position of the edit mode window.
Always on top
If enabled, the edit mode window will always appear on top of other applications.
Stay at current object
If enabled, Snap will keep the currently selected object tool instead of reverting back to scroll mode each time an object has been created.
Shadow Color
These settings affect the drop shadow effect used for objects, e.g. arrows.
Share/Email
Email
Determines, whether multiple screenshots will be bundled in a PDF file or send out as separate attachments. You may also specify a default email address that will be used with all emails.
Export
Specifies, whether images that have been sent to the clipboard or emailed should be deleted. You may furthermore specify how the program will handle exported Photoshop files.
Resize on Share
These settings enable you to auto-resize your images if their width exceeds the specified value.
Import/Export
Import
Imports all program settings from an external file.
Export
Exports all program settings to an external file.
Import from Previous Version
Imports program settings from a previous Snap version.